目录标题
一、结构体
结构体是一 群数据类型的集合。它也是一种数据类型。
(一)声明结构体
结构体的名字与类一样,首字母大写。
注意:声明结构体时必须使用struct 修饰,调用、创建结构体变量时可以省略。
- 方式一:
#include <iostream>

using namespace std;

struct Person {
    int id = 0; //在声明结构体时可以给结构体中的数据,一个初始值。
    string name = "lihua";
    int age = 18;
    char sex = 'm';
};

int main() {
    Person person1;
    Person person2;
    person1.name = "lihua";
    person2.name = "xiaoming";
    cout << person1.name << endl;
    cout << person2.name << endl;
    return 0;
}
- 方式二:
#include <iostream>

using namespace std;

//使用关键字 typedef  给结构体一个别名
typedef  struct Person {
    int id = 0;
    string name = "lihua";
    int age = 18;
    char sex = 'm';
} Student;

int main() {
    Student student1;
    Student student2;
    student1.name = "lihua";
    student2.name = "xiaoming";
    cout << student1.name << endl;
    cout << student2.name << endl;
    return 0;
}
(二)使用结构体
- 方式一:
#include <iostream>

using namespace std;

typedef struct Person {
    int id = 0;
    string name = "lihua";
    int age = 18;
    char sex = 'm';
} Student;

int main() {
    Student student;
    student.id = 123;
    student.name = "lihua";
    student.age = 18;
    student.age = 'w';
    cout << student.id << endl;
    cout << student.name << endl;
    cout << student.age << endl;
    cout << student.sex << endl;
    return 0;
}
- 方式二:
#include <iostream>

using namespace std;

typedef struct Person {
    int id = 0;
    string name = "lihua";
    int age = 18;
    char sex = 'm';
} Student;

int main() {
	//创建并初始化。
    Student student = {123,"lihua",18,'w'};
    cout << student.id << endl;
    cout << student.name << endl;
    cout << student.age << endl;
    cout << student.sex << endl;
    return 0;
}
(三)结构体数组
- 方式一:
#include <iostream>

using namespace std;

typedef struct Person {
    int id = 0;
    string name = "lihua";
    int age = 18;
    char sex = 'm';
} Student;

void printf(const Student &student) {
    cout << student.id << endl;
    cout << student.name << endl;
    cout << student.age << endl;
    cout << student.sex << endl;
}

int main() {
    Student students[3] = {
            {1, "a", 18, 'w'},
            {2, "b", 19, 'm'},
            {3, "c", 20, 'm'}
    };
    for (int i = 0; i < size(students); ++i) {
        printf(students[i]);
    }
    return 0;
}
- 方式二:
#include <iostream>

using namespace std;

typedef struct Person {
    int id = 0;
    string name = "lihua";
    int age = 18;
    char sex = 'm';
} Student;

void printf(const Student &student) {
    cout << "id = "<<student.id << " "<< "name = "<<student.name << " "<< "age = "<<student.age << " "<< "sex = "<<student.sex << endl;
}

void printf(Student *student) {
    cout << "id = "<<student->id << " "<< "name = "<<student->name << " "<< "age = "<<student->age << " "<< "sex = "<<student->sex << endl;
}

int main() {
    auto *s = new Student[3]; //等价于Student *s = new Student[3];
    for (int i = 0; i < 3; ++i) {
        printf(s);
        s++;
    }
    return 0;
}
二、内存模型
C++程序在执行时,将内存大方向划分为4个区域
- 代码区:存放函数体的二进制代码,由操作系统进行管理的。
注意:代码区的局部变量,不要返回它的指针和引用。 - 全局区:存放全局变量和静态变量以及常量。
- 栈区:由编译器自动分配释放, 存放函数的参数值,局部变量等
- 堆区:由程序员分配和释放,若程序员不释放,程序结束时由操作系统回收
C++中在程序运行前分为全局区和代码区
- 代码区特点是共享和只读
- 全局区中存放全局变量、静态变量、常量
- 常量区中存放 const修饰的全局常量 和 字符串常量
(一)new 关键字的使用
栈区:由编译器自动分配释放, 存放函数的参数值,局部变量等
由程序员分配释放,若程序员不释放,程序结束时由操作系统回收。在C++中主要利用new在堆区开辟内存
new关键字可以在堆区中开辟内存。开辟后的内存程序不会自动释放,当程序结束运行后,操作系统才会回收。
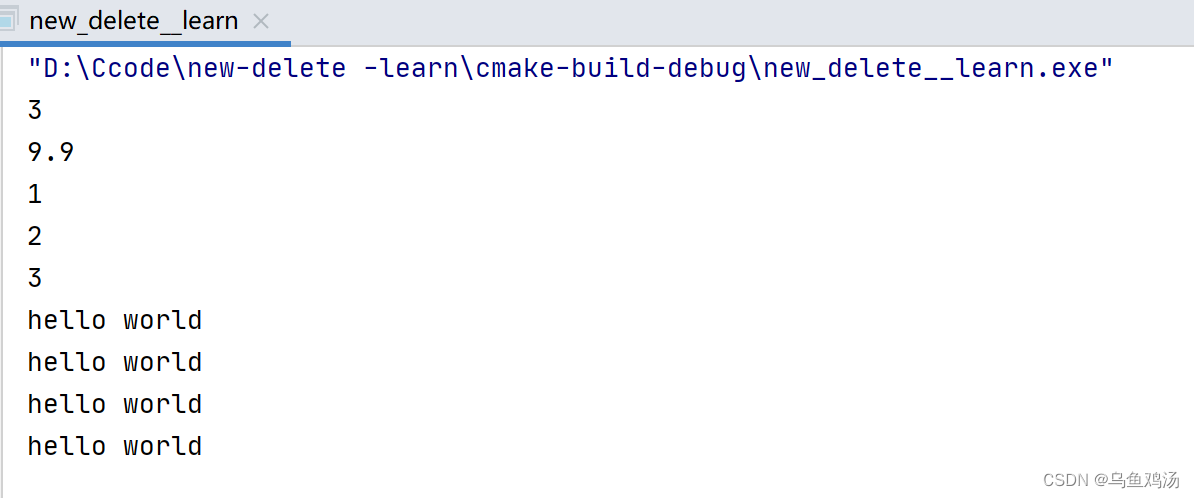
#include <iostream>
#include <windows.h>

using namespace std;


string *useNew() {
    //使用new关键字开辟数据类型为int的内存空间,并初始化值为10;
    int *ip = new int(3);
    cout << *ip << endl;

    //使用new开辟一个float类型的内存空间。
    float *fp  = new float;
    //初始化内存空间存储的值
    *fp = 9.9;
    cout << *fp << endl;

    //使用new开辟大小为3的int数组
    int *array = new int[*ip]{1, 2, 3};
    //遍历
    for (int j = 0; j < 3; ++j) {
        cout << *array << endl;
        array++;
    }
    //创建字符穿变量
    string *str = new string("hello world");
    cout << *str << endl;


    //返回使用new创建的字符的地址。
    return str;
}

int main() {
    string *strP = useNew();
    cout << *strP << endl;
    cout << *strP << endl;
    cout << *strP << endl;
    return 0;
}
(二)delete 关键字的使用
delete 关键字可以释放有new开辟的内存空间。
释放多个地址,比如:数组 。使用delete [ ] p;
#include <iostream>
#include <windows.h>
using namespace std;
string *useNew() {
//使用new关键字开辟数据类型为int的内存空间,并初始化值为10;
int *ip = new int(3);
cout << *ip << endl;
//使用new开辟一个float类型的内存空间。
float *fp = new float;
//初始化内存空间存储的值
*fp = 9.9;
cout << *fp << endl;
//使用new开辟大小为3的int数组
int *array = new int[*ip]{1, 2, 3};
//遍历
for (int j = 0; j < 3; ++j) {
cout << *array << endl;
array++;
}
//创建字符穿变量
string *str = new string("hello world");
cout << *str << endl;
//返回使用new创建的字符的地址。
return str;
}
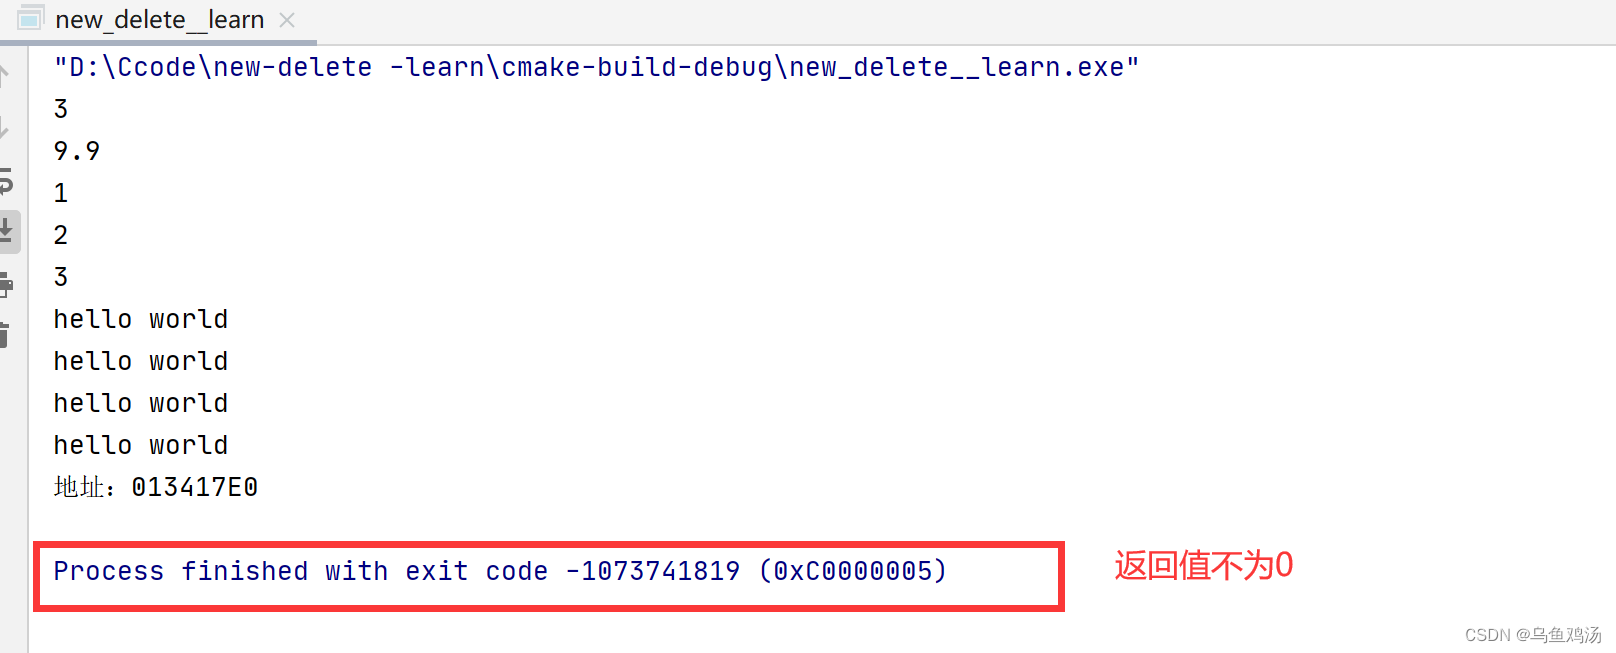
//使用delete关键字,主动释放new开辟的内存空间
void useDelete(string *strP) {
//通过指针,指定释放那个地址的内存空间
delete strP;
}
int main() {
string *strP = useNew();
cout << *strP << endl;
cout << *strP << endl;
cout << *strP << endl;
cout << "地址:" << strP << endl;
useDelete(strP);
//再次调用会报错
cout << *strP << endl;
//释放数组
int *arrayP = new int[3]{1,2,4};
delete [] arrayP;
return 0;
}
注释掉cout << *strP << endl;的情况下运行:

释放内存后继续调用该地址的指针。报错
(三)如何返回一个局部变量的地址
由C++的内存可以知道,局部变量在函数调用结束后会自动释放内存。因此,不要直接在函数中返回局部变量的地址。
#include <iostream>
#include <windows.h>

using namespace std;

int *test() {
    int a = 10;
    return &a;
}

int main() {

    int *a = test();
    cout << *a << endl;
    cout << *a << endl;
    cout << *a << endl;
    cout << *a << endl;
    return 0;
}
输出: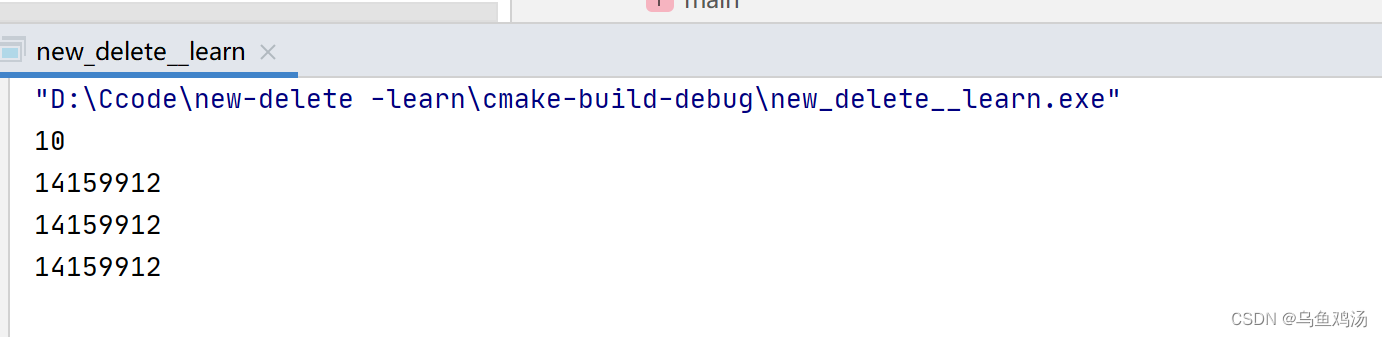
除了第一个打印的值外,其他的都是乱码。原因是,函数执行完后,会释放局部变量开辟的内存。至于第一个还能访问成功是c++为了防止用户意外调用,保留了内存的一次访问,之后就释放了内存。
想要返回一个局部变量的地址,必须使用new 关键字开辟空间,然后将这个变量返回。这样在函数调用结束后,才不会被回收内存。
int *test() {
    //错误方式
    //int a = 10;
    //return &a;

    //正确方式
    int *a = new int(10);
    return a;
}
三、引用的使用
- 引用可以简化指针的使用。
- 引用必须初始化,且初始化后,不能改变(指向的内存空间不会改变)。
- 引用的本质在c++内部实现是一个指针常量。发现是引用,转换为 int* const ref = &a; 指针常量是指针指向不可改,也说明为什么引用不可更改指向
语法: 数据类型 &别名 = 原名
//引用的使用
#include <iostream>

using namespace std;

void test() {
    //引用必须初始化,且初始化后,不能改变。
    //int &d1 ;
    int test1 = 1;
    int test2 = 2;
    int &d2 = test1;
    d2 = test2; // 注意:这是赋值操作,不是改变引用的指向
    //通过d2引用赋值操作,test1的内容已经发生改变。
    cout << test1 << endl;
    cout << d2 << endl;
}

int main() {
    int a = 10;
    //声明变量时前面用&符号表示:引用(引用直接指向a的地址,修改d,a也会变)
    int &d = a;
    //声明变量时前面用*符号表示:指针(&a表示取a的地址。)
    int *p = &a;
    cout << &a << endl;
    cout << &d << endl;
    cout << p << endl;
    //*p表示获取p指向的内存地址存放的值。
    //cout << *p << endl;
    d = 100;
    cout << a << endl;

    test();

    return 0;
}
注意:引用与指针一样,不能返回局部引用。
//引用的使用
#include <iostream>

using namespace std;

int &errorTest() {
    int a = 10;
    return a;
}

int &correctTest() {
    //静态变量,存放在全局区
    static int a = 100;
    return a;
}

int main() {
    int &test1 = errorTest();
    int &test2 = correctTest();

    //调用一次后,局部变量内存空间地址被释放
    cout << test1 << endl;
    cout << test1 << endl;
    cout << test1 << endl;

    //由于静态变量存放在全局区,所以地址在程序结束运行后才释放,不影响调用。
    cout << test2 << endl;
    cout << test2 << endl;
    cout << test2 << endl;
    return 0;
}

常量引用 const int& ref = 10; 等价于 const int* const ref = &a; 常量指针常量。它的指向和指向的内容都是不可变的。
四、类
C++面向对象的三大特性为:封装、继承、多态。
封装性与java一致,有三种:public 公共权限、protected 保护权限、private 私有权限。
(一)创建类
创建类,一般在头文件中声明类的属性(变量),方法(函数)。
在源文件中实现类。具体如下:
注意:类名首字母大写。
- 头文件:Person.h
//
// Created by wuyuj on 2022/8/26.
//
#include <iostream>
using namespace std;

#ifndef LEARN_01_PERSON_H
#define LEARN_01_PERSON_H


class Person {
private:
    int id;
    string name;
    int age;
    char sex;

public:
    //无参构造函数
    Person();
    //有参构造函数
    Person(int id, const string &name, int age, char sex);
    //析构函数
    virtual ~Person();

    //说出自己的名字
    void say();

    int getId() const;

    void setId(int id);

    const string &getName() const;

    void setName(const string &name);

    int getAge() const;

    void setAge(int age);

    char getSex() const;

    void setSex(char sex);
};


#endif //LEARN_01_PERSON_H
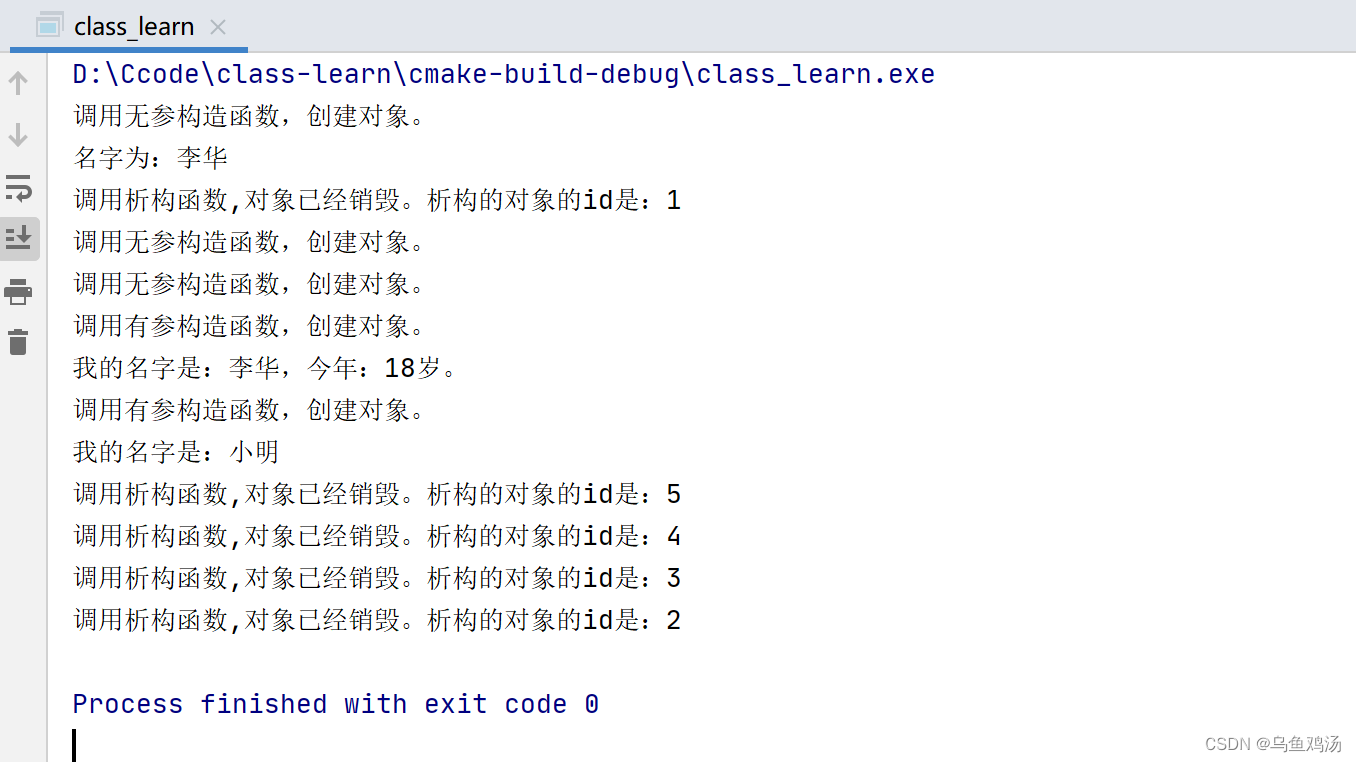
- 源文件:Person.cpp
//
// Created by wuyuj on 2022/8/26.
//
#include "Person.h"

void Person::say() {
    cout << "我的名字是:" << name << endl;
}

Person::Person() {
    cout << "调用无参构造函数,创建对象。"  << endl;
}

Person::Person(int id, const string &name, int age, char sex) : id(id), name(name), age(age), sex(sex) {
    cout << "调用有参构造函数,创建对象。"  << endl;
}

Person::~Person() {
    cout << "调用析构函数,对象已经销毁。" <<"析构的对象的id是:"<<this->id << endl;
}

int Person::getId() const {
    return id;
}

void Person::setId(int id) {
    Person::id = id;
}

const string &Person::getName() const {
    return name;
}

void Person::setName(const string &name) {
    Person::name = name;
}

int Person::getAge() const {
    return age;
}

void Person::setAge(int age) {
    Person::age = age;
}

char Person::getSex() const {
    return sex;
}

void Person::setSex(char sex) {
    Person::sex = sex;
}
(二)创建对象
- 方式一:像基本类型一样创建对象。类名 变量名; (默认调用无参构造器)
- 方式二:显示的调用构造器创建。
- 方式三:通过new关键字创建。
#include <iostream>
#include "Person.h"

using namespace std;

int main() {
    //通过new 创建。可以选择构造器。
    auto *person = new Person();
    person->setName("李华");
    person->setId(1);
    cout << "名字为:" << person->getName() << endl;
    //通过new 创建的对象,用完需要销毁,否则造成内存泄漏。如果不销毁等程序运行结束,操作系统才会回收。
    delete person;


    //下面创建的对象,在函数运行结束后,直接销毁。
    //直接创建,默认无参构造函数。
    Person person1;
    person1.setId(2);

    //指定构造函数创建。
    Person person2 = Person();
    person2.setId(3);
    Person person3 = Person(4, "李华", 18, 'm');
    cout << "我的名字是:" << person3.getName() << ",今年:" << person3.getAge() << "岁。" << endl;

    //匿名对象,没有名字的对象,只能使用一次。用完直接析构
    Person(5, "小明", 18, 'm').say();

    return 0;
}
运行结果:
(三)销毁对象
局部(函数中)创建的对象,在函数结束运行后,自动调用析构函数就行销毁。
全局中的对象需要使用关键字delete 进行 销毁。比如:使用new关键字创建的对象。
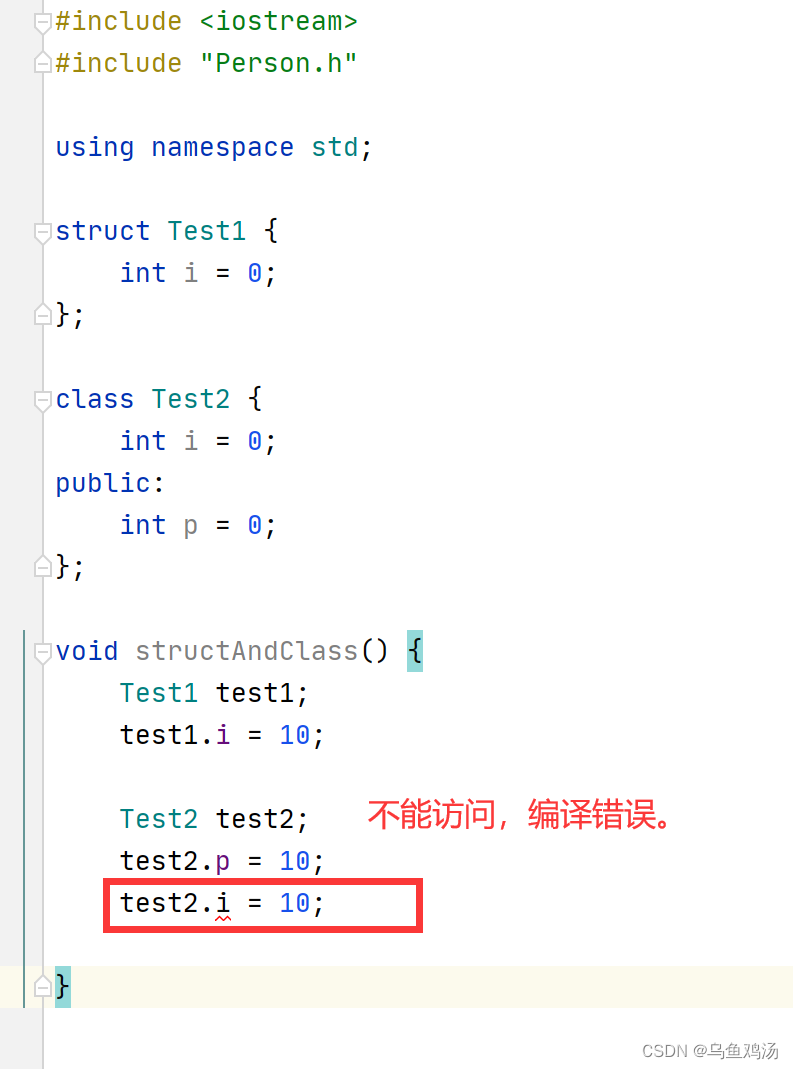
(四)class与struct的区别
在C++中 struct和class区别就在于 默认的访问权限不同
区别:
- struct 默认权限为公共
- class 默认权限为私有
还有就是class类可以有函数。
(五)构造函数
构造函数两种分类方式:
- 按参数分为: 有参构造和无参构造
2. 按类型分为: 普通构造和拷贝构造
默认情况下,c++编译器至少给一个类添加3个函数:
默认构造函数(无参,函数体为空)
默认析构函数(无参,函数体为空)
默认拷贝构造函数,对属性进行值拷贝
构造函数默认规则如下:
如果用户定义有参构造函数,c++不在提供默认无参构造,但是会提供默认拷贝构造。
如果用户定义拷贝构造函数,c++不会再提供其他构造函数。
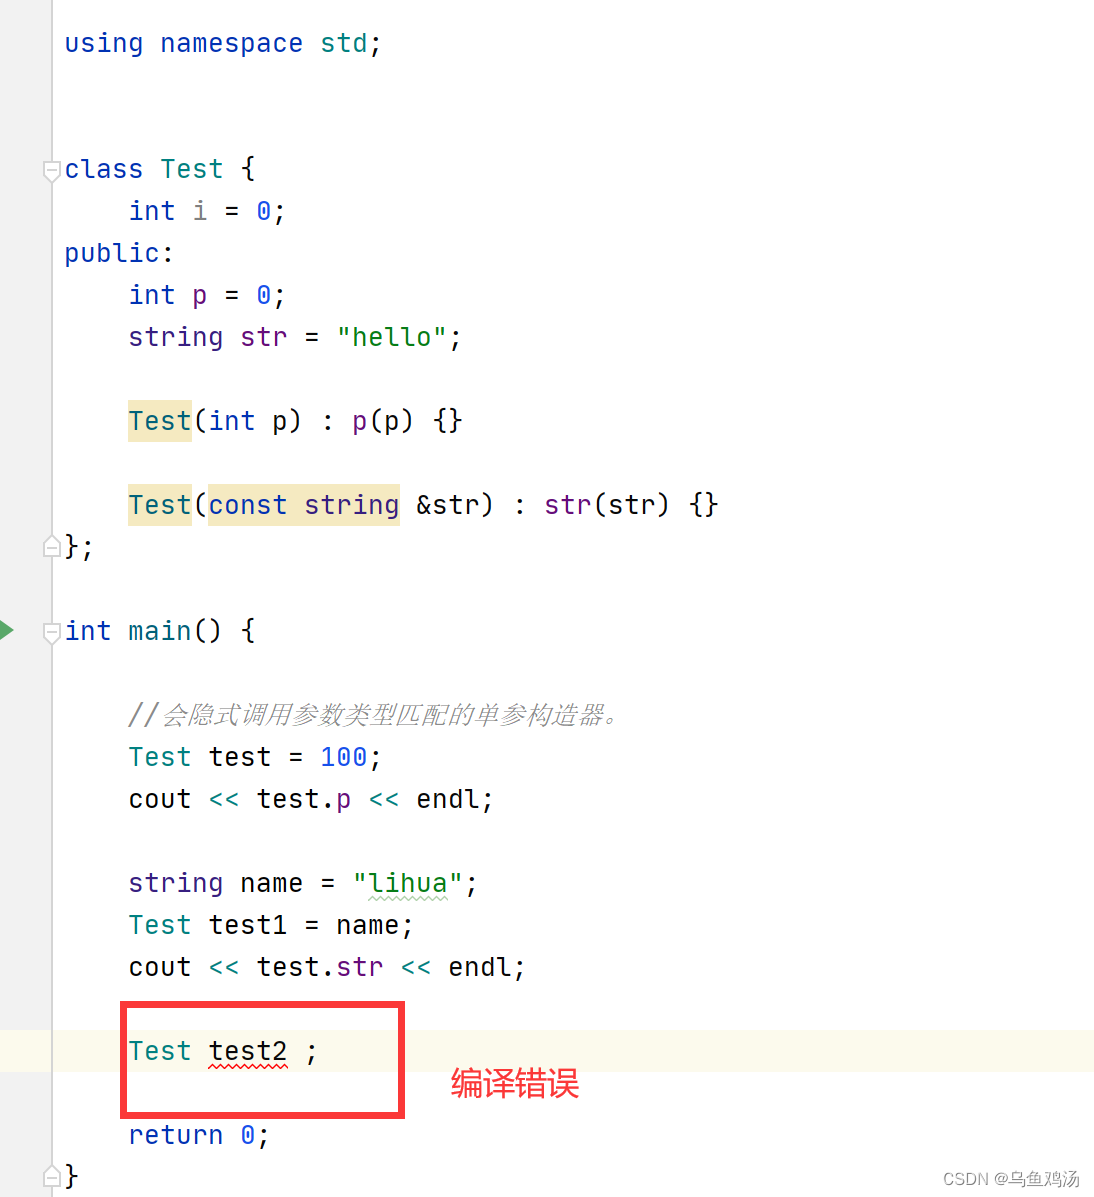
- 单参数构造函数,可以隐式调用。一般在构造函数前面 使用explicit 修饰,避免隐式调用。
下面是隐式调用的例子:
//
// Created by wuyuj on 2022/8/30.
//
#include <iostream>

using namespace std;


class Test {
    int i = 0;
public:
    int p = 0;
    string str = "hello";

    Test(int p) : p(p) {}

    Test(const string &str) : str(str) {}
};

int main() {

    //会隐式调用参数类型匹配的单参构造器。
    Test test = 100;
    cout << test.p << endl;

    string name = "lihua";
    Test test1 = name;
    cout << test.str << endl;

    return 0;
}
- 自己创建有参构造函数后,c++编辑器不再提供无参的。
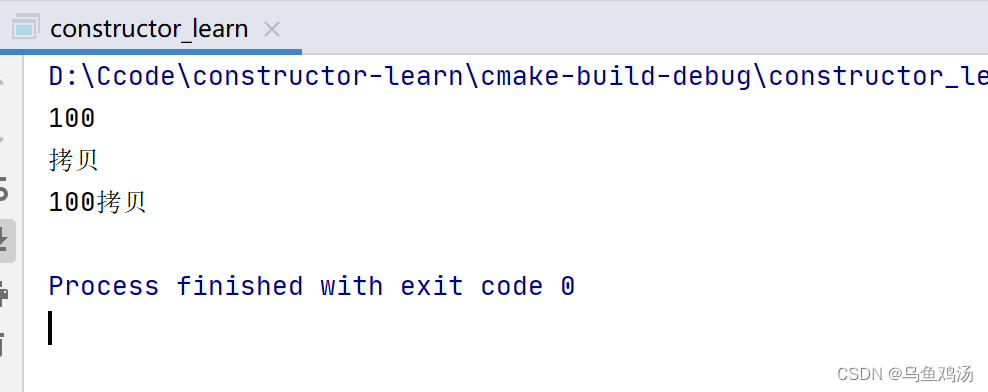
- 默认的拷贝构造函数(浅拷贝)
//
// Created by wuyuj on 2022/8/30.
//
#include <iostream>

using namespace std;


class Test {
    int i = 0;
public:
    int p = 0;
    string str = "hello";

    Test(int p) : p(p) {}

    Test(const string &str) : str(str) {}
};

int main() {

    //会隐式调用参数类型匹配的单参构造器。
    Test test = 100;
    test.str = "拷贝";
    cout << test.p << endl;

    //使用默认提供的拷贝构造函数,会将test对象的属性的值赋值给test2.
    Test test2 = Test(test);
    cout << test2.p << test2.str << endl;
    return 0;
}
- 浅拷贝和深拷贝
- 浅拷贝
demo1:
//
// Created by wuyuj on 2022/8/30.
//
#include <iostream>

using namespace std;


class Test {
    int i = 0;
public:
    int a = 0;
    string str = "hello";
    int *p = nullptr;

    Test() {}

    Test(int a) : a(a) {}

    Test(const string &str) : str(str) {}

};

void copyTest() {
    Test test1;
    test1.a = 10;
    test1.str = "test1";
    test1.p = &test1.a;

    //进行浅拷贝后,test1.p和test2.p的指向了同一块内存,也就是 test1对象的属性a 。
    // 当通过test2.p改变属性a的值后,test1对象的属性a也会受到影响。
    //也就是没有完全拷贝。
    Test test2 = Test(test1);//浅拷贝

    *test2.p = 200;

    cout << "发现对象test1的a属性也发生了改变:" << *test1.p << endl;
}

int main() {
	//浅拷贝
    copyTest();
    return 0;
}
demo2:
//
// Created by wuyuj on 2022/8/30.
//
#include <iostream>

using namespace std;

class Teacher {
public:
    int id = 0;
    string name = "xiaohong";
    int age = 18;

    Teacher() {}

    Teacher(int id, const string &name, int age) : id(id), name(name), age(age) {}
};

class Student {
public:
    int id = 0;
    string name = "lihua";
    int age = 18;
    Teacher *teacher = nullptr;
};

void copyTest() {
    Student student1;
    student1.id = 1;
    student1.name = "小明";
    student1.age = 18;
    Teacher teacher =Teacher(2, "李老师", 45);
    student1.teacher = &teacher;

    //拷贝
    Student student2 = Student(student1);
    student2.teacher->name = "黄老师";


    //同样发现student1的老师也被改变了。
    cout << student1.teacher->name << endl;
}

int main() {
    //浅拷贝
    copyTest();

    return 0;
}
- 深拷贝
想要实现深拷贝很简单,只需要我们自定义拷贝函数即可。
//
// Created by wuyuj on 2022/8/30.
//
#include <iostream>

using namespace std;

class Teacher {
public:
    int id = 0;
    string name = "xiaohong";
    int age = 18;

    Teacher() {}

    Teacher(int id, const string &name, int age) : id(id), name(name), age(age) {}

};

class Student {
public:
    int id = 0;
    string name = "lihua";
    int age = 18;
    Teacher *teacher = nullptr;

    Student() {}

    //自定义拷贝构造函数
    Student(const Student &student) {
        id = student.id;
        name = student.name;
        age = student.age;
        //对于是指针类型的属性,需要重新分配内存。让指针指向一块新的内存空间。
        teacher = new Teacher(student.teacher->id, student.teacher->name, student.teacher->age);
    }

    //注意:因为拷贝的对象的teacher属性是通过new创建的,因此需要重写析构函数,释放内存。
    ~Student() {
        //注意:这里释放内存会报错,原因,创建student1的teacher时不是new出来的,因此不能正常释放内存。暂时想不到方法解决
        //delete teacher;
    }
};

void copyTest() {
    Student student1;
    student1.id = 1;
    student1.name = "小明";
    student1.age = 18;
    Teacher teacher = Teacher(2, "李老师", 45);
    student1.teacher = &teacher;

    //拷贝
    Student student2 = Student(student1);
    student2.teacher->name = "黄老师";


    //student1的老师没有被改变。
    cout << student1.teacher->name << endl;
}

int main() {
    //深拷贝
    copyTest();

    return 0;
}
(六)关键字friend(友元)
friend 关键字与java里面的反射有点相似的地方,那就是能访问封装类型为私有的属性和方法。
在类中声明哪些类、方法能访问自己的私有属性和方法。
一共有三种方式:
- 全局函数做友元:全局函数中能调用该类的私有属性和方法。
- 类做友元:类中能调用其他类的私有属性和方法。
- 成员函数做友元:成员函数中能调用其他类的私有属性和方法。
//friend关键字的使用
#include <iostream>

using namespace std;

class Student;
class Teacher;


class Student {
    //方式一:告诉编译器 global全局函数 是 Building类的好朋友,可以访问类中的私有内容
    friend void global(Student & student);

    //方式二:通过friend修饰其他类,那么在这个类中就能调用私有变量和方法。
    friend class Teacher;


private:
    int money = 100;
    void myMoney() const {
        cout << "我有这么多钱:" << money << endl;
    }

public:
    int id;
    string name;
    int age;
};

class Teacher{
private:
    int id;
    string name;
    int age;
public:
    void getStudent(){
        Student student;
        //方式二:通过friend修饰其他类,那么在这个类中就能调用它的私有变量和方法。
        student.myMoney();
    }
};


//方式一:通过friend 修饰全局函数,调用私有变量和方法。
void global(Student & student){
    cout << student.money<< endl;
    student.myMoney();
}


class Test2{
public:
    void getTest1();
};

class Test1{
    //方式三:通过friend修饰其他类的成员方法,那么在这个方法中就能调用私有变量和方法。
    friend void Test2::getTest1();
private:
    int a = 10;
};

//方式三:通过friend修饰其他类的成员方法,那么在这个方法中就能调用私有变量和方法。
void Test2::getTest1(){
    Test1 test1;
    cout <<"方式三:"<<test1.a <<endl;
}


int main() {
    Student student;
    //方式一:通过friend 修饰全局函数,调用私有变量和方法。
    global(student);

    //方式二:在一个类中通过friend,修饰其他类,那么在这个类中就能调用私有变量和方法。
    Teacher teacher;
    teacher.getStudent();

    //方式三:通过friend修饰其他类的成员方法,那么在这个方法中就能调用私有变量和方法。
    Test2 test2;
    test2.getTest1();
    return 0;
}
(七)对象关系运算符重载 operator关键字的使用
让对象之间也能进行相加,比较等操作。
//对象关系运算符重载 operator关键字的使用
#include <iostream>
#include <utility>

using namespace std;

class Person {
private:
    int id = 0;
    int age = 18;
    int money = 100;
    string name = "lihua";
public:
    Person() = default;

    Person(int id, int age, int money, string name) : id(id), age(age), money(money), name(std::move(name)) {}

    //成员函数实现 + 号运算符重载
    Person operator+(const Person &p) const {
        Person temp;
        temp.id = id + p.id;
        temp.age = age + p.age;
        temp.money = money + p.money;
        temp.name = name +"-"+ p.name;
        return temp;
    }

    // 重写==
    bool operator==(const Person &p) const {
        return money == p.money;
    }
    //可以重写各种运算符。


    int getId() const {
        return id;
    }

    void setId(int id) {
        Person::id = id;
    }

    int getAge() const {
        return age;
    }

    void setAge(int age) {
        Person::age = age;
    }

    int getMoney() const {
        return money;
    }

    void setMoney(int money) {
        Person::money = money;
    }

    const string &getName() const {
        return name;
    }

    void setName(const string &name) {
        Person::name = name;
    }
};

void printf(Person &person){
    cout << "id="<<person.getId()<<" ;"<< "age="<<person.getAge()<<" ;"<< "name="<<person.getName()<<" ;"<< "money="<<person.getMoney()<<endl;
}

int main() {
    Person person1 = Person(1, 18, 100, "li");
    Person person2 = Person(2, 20, 100, "feng");
    Person p = person1 + person2;
    printf(p);
    if (person1 == person2) {
        cout << "两者的钱一样" << endl;
    }
    return 0;
}
(八)继承
1. 如何继承
类继承的格式 class 子类 : public 父类 ; public 表示继承父类那些封装类型的属性和方法,也就是继承类型。一共有三种继承类型:公共继承、保护继承、私有继承。
//继承学习
#include <iostream>

using namespace std;


class Father {
private:
    string hobby;
public:
    string name;
    int age;
    int money;
    void say() const {
        cout << "我的名字是" << name << endl;
    }
};

class Son : public Father {
private:
    string hobby;
    string school;
public:
    void mySchool() {
        cout << "我在" << school << "上学。" << endl;
    }

    const string &getHobby() const {
        return hobby;
    }

    void setHobby(const string &hobby) {
        Son::hobby = hobby;
    }

    const string &getSchool() const {
        return school;
    }

    void setSchool(const string &school) {
        Son::school = school;
    }
};


int main() {

    Son son;
    son.name = "小明";
    son.money = 0;
    son.age = 18;
    //可以调用父类的方法。
    son.say();
    son.setSchool("星星小学");
    son.mySchool();
    return 0;
}
2. 继承类型
三种继承方式:
- 公共继承:子类内只能访问父类封装类型为 public 的属性和方法。同时子类继承到的属性方法的封装类型变为:public。
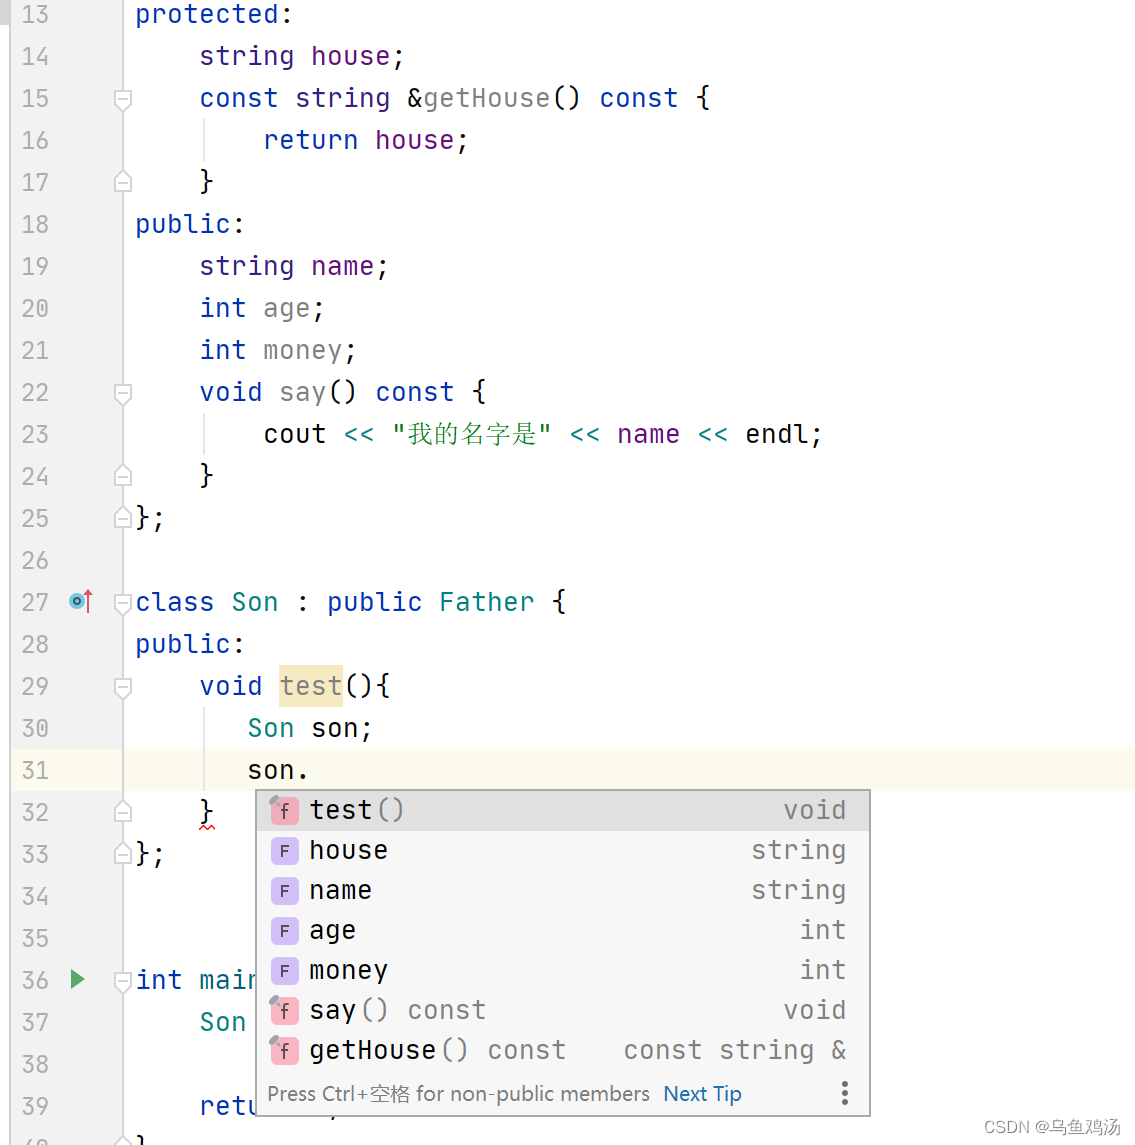
- 保护继承:子类内能访问父类封装类型为 public和protected 的属性和方法。同时子类继承到的属性方法的封装类型变为:protected。
- 私有继承:子类内能访问父类封装类型为 public和protected 的属性和方法。同时子类继承到的属性方法的封装类型变为:private。
- public
//继承学习
#include <iostream>

using namespace std;


class Father {
private:
    string hobby;
    const string &getHobby() const {
        return hobby;
    }
protected:
    string house;
    const string &getHouse() const {
        return house;
    }
public:
    string name;
    int age;
    int money;
    void say() const {
        cout << "我的名字是" << name << endl;
    }
};

class Son : public Father {
public:
    void test(){
       Son son;
       //son.
    }
};


int main() {
    Son son;

    return 0;
}
- protected
//继承学习
#include <iostream>

using namespace std;


class Father {
private:
    string hobby;
    const string &getHobby() const {
        return hobby;
    }
protected:
    string house;
    const string &getHouse() const {
        return house;
    }
public:
    string name;
    int age;
    int money;
    void say() const {
        cout << "我的名字是" << name << endl;
    }
};

class Son : protected Father {
public:
    void test(){
       Son son;
       //son.
    }
};
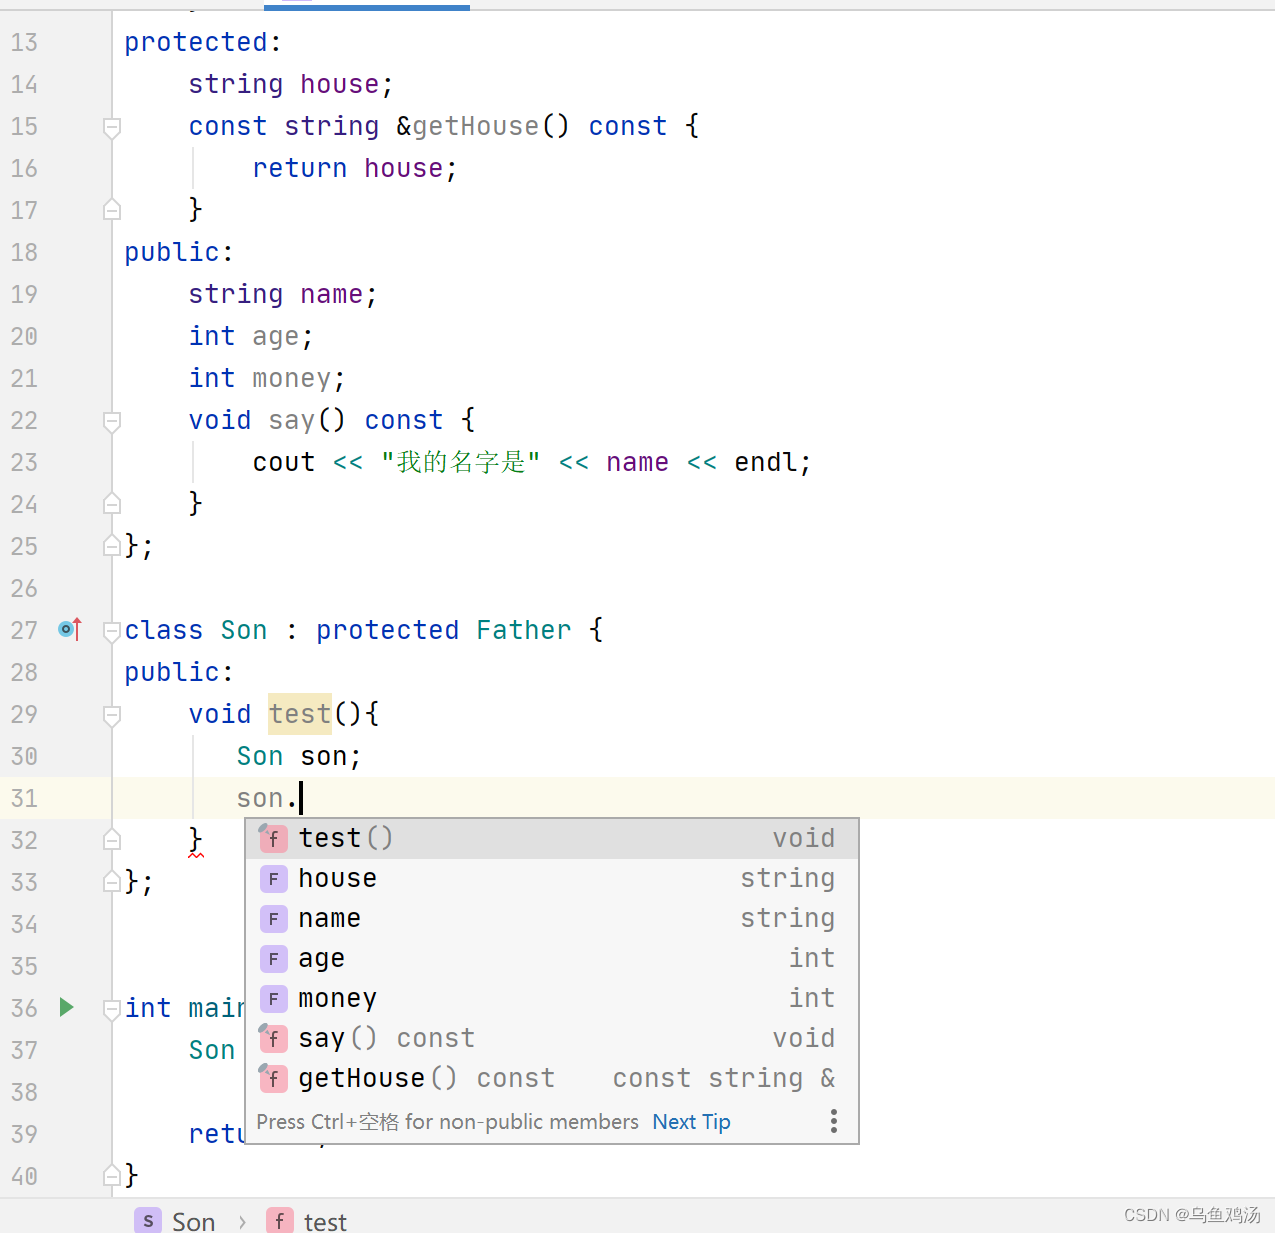
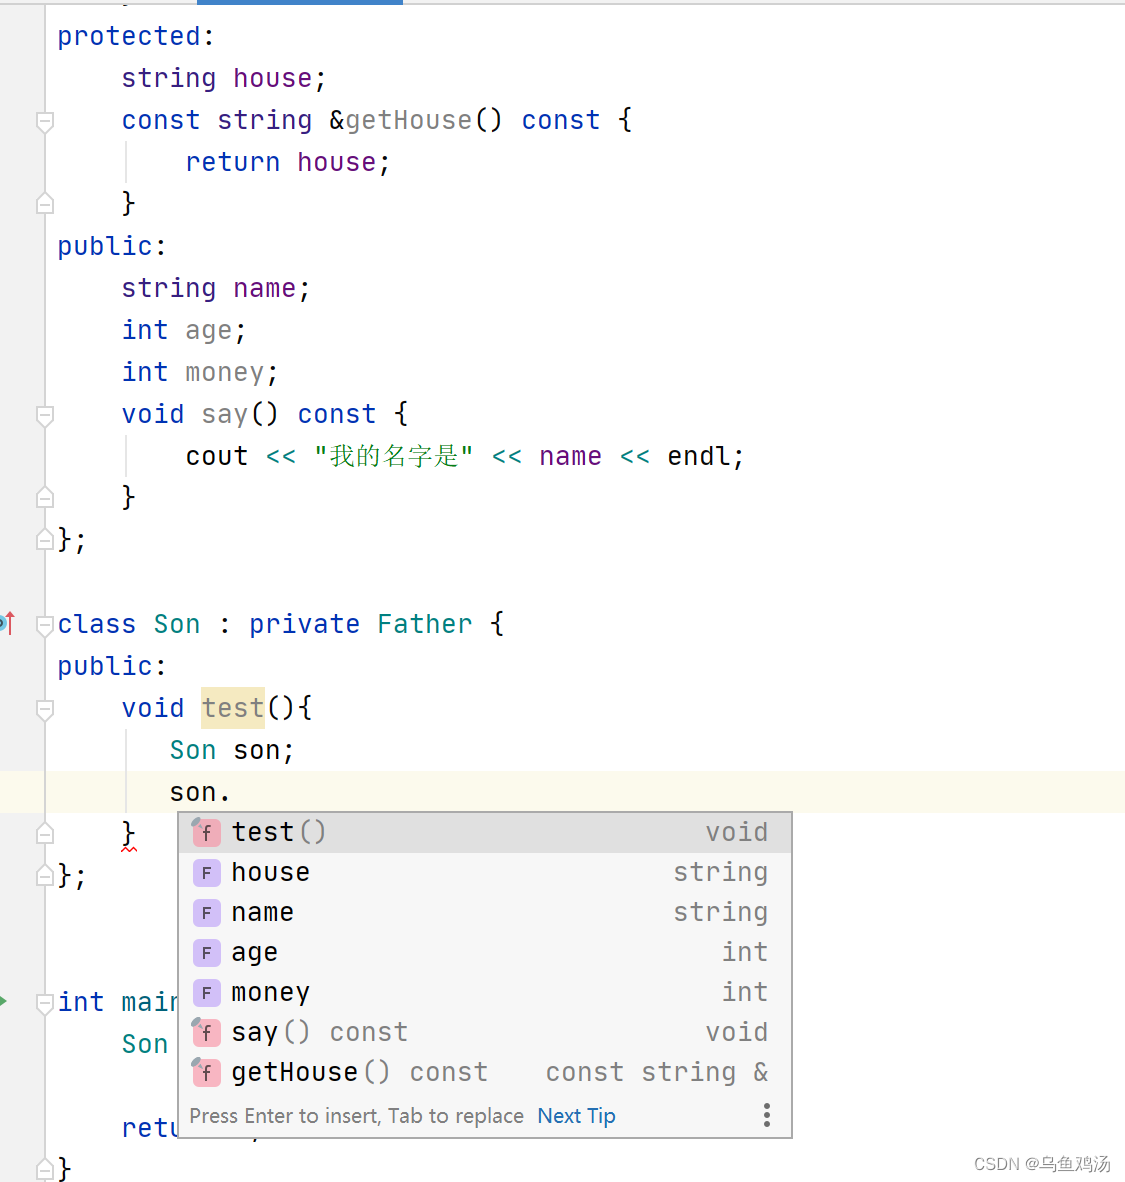
- private
//继承学习
#include <iostream>

using namespace std;


class Father {
private:
    string hobby;
    const string &getHobby() const {
        return hobby;
    }
protected:
    string house;
    const string &getHouse() const {
        return house;
    }
public:
    string name;
    int age;
    int money;
    void say() const {
        cout << "我的名字是" << name << endl;
    }
};

class Son : private Father {
public:
    void test(){
       Son son;
       son.
    }
};
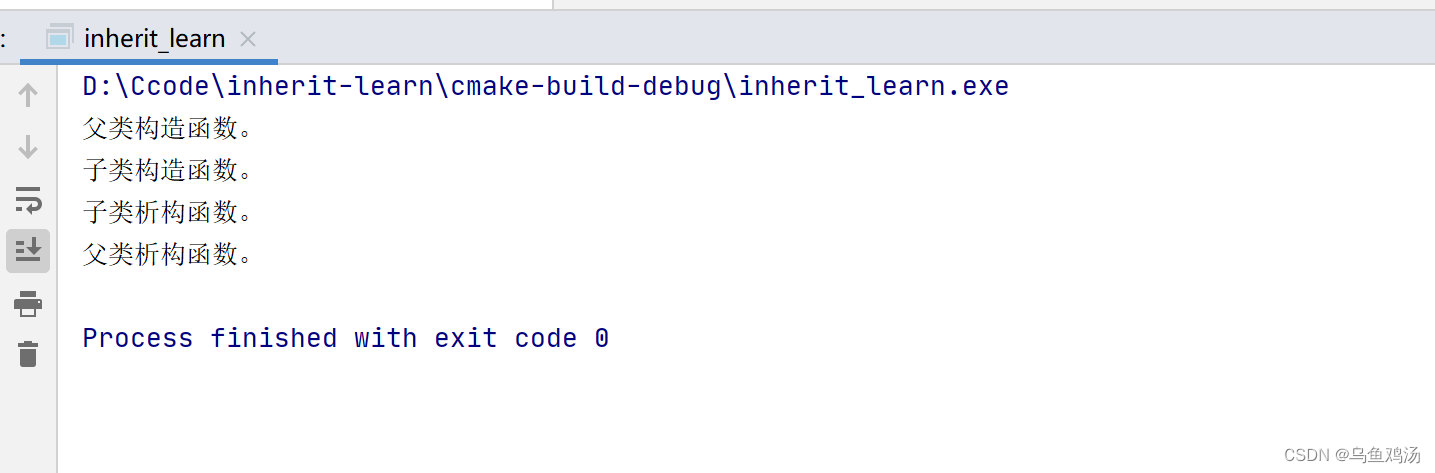
3. 继承后,子类和父类的构造函数和析构函数调用顺序
对于构造函数,先调用父类再调用子类。
//继承学习
#include <iostream>

using namespace std;


class Father {
private:
    string hobby;
    const string &getHobby() const {
        return hobby;
    }
protected:
    string house;
    const string &getHouse() const {
        return house;
    }
public:
    string name;
    int age;
    int money;

    Father() {
        cout << "父类构造函数。" << endl;
    }

    virtual ~Father() {
        cout << "父类析构函数。" << endl;
    }

    void say() const {
        cout << "我的名字是" << name << endl;
    }
};

class Son : private Father {
public:
    Son() {
        cout << "子类构造函数。" << endl;
    }

    virtual ~Son() {
        cout << "子类析构函数。" << endl;
    }
};


int main() {
    Son son;

    return 0;
}
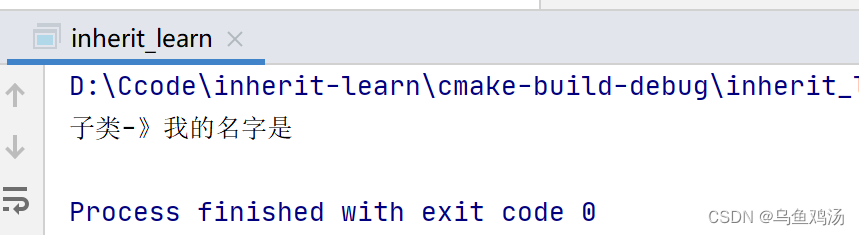
4. 重写父类的函数(函数、变量重名)
- 当子类有函数与父类一样时,子类会重写父类提供的函数。(默认用自己写的,不用父类提供的)
//继承学习
#include <iostream>

using namespace std;


class Father {
private:
    string hobby;
    const string &getHobby() const {
        return hobby;
    }
protected:
    string house;
    const string &getHouse() const {
        return house;
    }
public:
    string name;
    int age;
    int money;
    void say() const {
        cout << "我的名字是" << name << endl;
    }
};

class Son : public Father {
public:
    //重写say函数
    void say() const {
        cout << "子类-》我的名字是" << name << endl;
    }
};


int main() {
    Son son;
    son.say();
    return 0;
}
发现调用的是子类的say函数。
想要调用父类的怎么办?只需要在函数前面标明是父类的。son.Father::say();
//继承学习
#include <iostream>

using namespace std;


class Father {
private:
    string hobby;
    const string &getHobby() const {
        return hobby;
    }
protected:
    string house;
    const string &getHouse() const {
        return house;
    }
public:
    string name;
    int age;
    int money;
    void say() const {
        cout << "我的名字是" << name << endl;
    }
};

class Son : public Father {
public:
    //重写say函数
    void say() const {
        cout << "子类-》我的名字是" << name << endl;
    }
};


int main() {
    Son son;
    son.Father::say();
    return 0;
}
5. 多重继承
c++中是能多重继承的,也就是子类可以有多个父类。
格式:class 子类 :封装类型 父类1 , 封装类型 父类2 。比如:class Son : public Father1,public Father2 ;
注意:多重继承,父类中可能出现一样的方法和变量,所以要加前缀区分。
//继承学习
#include <iostream>

using namespace std;


class Father1 {
private:
    string hobby;
public:
    string name;
    int age;
    int money;
    void say() const {
        cout << "我的名字是" << name << endl;
    }
};

class Father2 {
private:
    string hobby;
public:
    string name;
    int age;
    int money;
    void say() const {
        cout << "我的名字是" << name << endl;
    }
};

class Son : public Father1,public Father2 {
public:
    void test() const {
        //当函数、变量名一样时,用前缀加以区分。
        cout << "子类-》我的名字是" << Father1::name << endl;
        Father2::say();
    }
};


int main() {
    Son son;
    son.test();
    //当函数、变量名一样时,用前缀加以区分。
    son.Father1::say();
    return 0;
}
6. 菱形继承
菱形继承概念:
两个派生类A、B继承同一个基类F
又有某个类C同时继承者两个派生类A、B。(这时候C就会间接继承两个F。有两个一样的爷爷。因此在调用时,就不知道调用哪个爷爷。)
这种继承被称为菱形继承,或者钻石继承。
可以使用 virtual 关键字解决上面产生的问题。
class Animal
{
public:
	int m_Age;
};

//继承前加virtual关键字后,变为虚继承
//此时公共的父类Animal称为虚基类
class Sheep : virtual public Animal {};
class Tuo   : virtual public Animal {};
class SheepTuo : public Sheep, public Tuo {};

void test01()
{
	SheepTuo st;
	st.Sheep::m_Age = 100;
	st.Tuo::m_Age = 200;

	cout << "st.Sheep::m_Age = " << st.Sheep::m_Age << endl;
	cout << "st.Tuo::m_Age = " <<  st.Tuo::m_Age << endl;
	cout << "st.m_Age = " << st.m_Age << endl;
}


int main() {

	test01();

	system("pause");

	return 0;
}
7. 多态
什么是多态?简单来说就是,将一个子类的对象,向上转型为父类。比如 :Father father = Son(); 。这样将Father father作为函数的参数,那么在调用函数时,可以传入各种各样的子类的对象。
多态满足条件
- 有继承关系
- 子类重写父类中的虚函数
多态使用条件
- 父类指针或引用指向子类对象
//继承学习
#include <iostream>

using namespace std;


class Father {
private:
    string hobby;
public:
    string name;
    int age;
    int money;

    virtual void beat() const {
        cout << "我的名字是" << name << endl;
    }
};


class Son1 : public Father {
public:
    void beat() const override {
        cout << "Son1-> 被打" << endl;
    }
};

class Son2 : public Father {
public:
    void beat() const override {
        cout << "Son2-> 被打" << endl;
    }
};


//父亲打儿子,可以选择打哪个儿子。
void beatSon(const Father& son){
    son.beat();
}

int main() {
    Son1 son1;
    beatSon(son1);

    Son2 son2;
    beatSon(son2);

    //当函数、变量名一样时,用前缀加以区分。
    return 0;
}
(九)virtual (抽象类,接口)
一个简单的例子。
#include <iostream>

using namespace std;
class Parent
{
public:
    void say()
    {
        cout << "Parent say" << endl;
    }
};

class Child1 : public Parent
{
public:
    void say()
    {
        cout << "Child1 say" << endl;
    }
};

class Child2 : public Parent
{
public:
    void say()
    {
        cout << "Child2 say" << endl;
    }
};

void call(Parent* p)
{
    p->say();
}

int main()
{

    Child1 c1;
    Child2 c2;
    call(&c1);
    call(&c2);

    return 0;
}
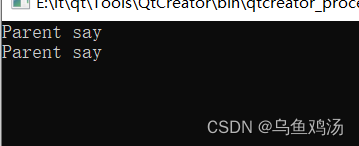
看到输出大为吃惊,跟java的多态不一样。我以为是输出:
Child1 say
Child2 say
导致错误输出的原因是,调用函数 say() 被编译器设置为基类中的版本,这就是所谓的静态多态,或静态链接 - 函数调用在程序执行前就准备好了。有时候这也被称为早绑定,因为 say() 函数在程序编译期间就已经设置好了。
修改一下父类的say函数。
class Parent
{
public:
    virtual  void say()
    {
        cout << "Parent say" << endl;
    }
};
得到正确的输出。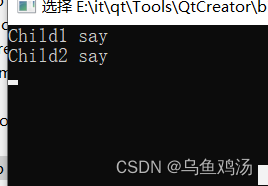
上面父类的virtual void say() 为虚函数,如果虚函数只有声明,没有实现(函数体),那么改父类,不能被实例化。
class Parent
{
public:
    virtual void say();
};
int main()
{
	//不能实例化,会报错。
    Parent p;

    return 0;
}
上面say函数,称为纯虚函数。不过一般不这么写,推荐写成 virtual void say() =0 ;有纯虚函数的类一般称为抽象类,接口。