1、什么是 Spring Boot?
Spring Boot 是 Spring 开源组织下的子项目,是 Spring 组件一站式解决方案,主要是简化了使用 Spring 的难度,简省了繁重的配置,提供了各种启动器,开发者能快速上手。
更多 Spring Boot 详细介绍请看这篇文章《什么是Spring Boot?》。
2、为什么要用 Spring Boot?
Spring Boot 优点非常多,如:
- 独立运行
- 简化配置
- 自动配置
- 无代码生成和XML配置
- 应用监控
- 上手容易
- ...
Spring Boot 集这么多优点于一身,还有理由不使用它呢?
3、Spring Boot 的核心配置文件有哪几个?它们的区别是什么?
Spring Boot 的核心配置文件是 application 和 bootstrap 配置文件。
application 配置文件这个容易理解,主要用于 Spring Boot 项目的自动化配置。
bootstrap 配置文件有以下几个应用场景。
- 使用 Spring Cloud Config 配置中心时,这时需要在 bootstrap 配置文件中添加连接到配置中心的配置属性来加载外部配置中心的配置信息;
- 一些固定的不能被覆盖的属性;
- 一些加密/解密的场景;
具体请看这篇文章《Spring Boot 核心配置文件详解》。
4、Spring Boot 的配置文件有哪几种格式?它们有什么区别?
.properties 和 .yml,它们的区别主要是书写格式不同。
1).properties
app.user.name = javastack
2).yml
app:
  user:
    name: javastack
另外,.yml 格式不支持 @PropertySource 注解导入配置。
5、Spring Boot 的核心注解是哪个?它主要由哪几个注解组成的?
启动类上面的注解是@SpringBootApplication,它也是 Spring Boot 的核心注解,主要组合包含了以下 3 个注解:
@SpringBootConfiguration:组合了 @Configuration 注解,实现配置文件的功能。
@EnableAutoConfiguration:打开自动配置的功能,也可以关闭某个自动配置的选项,如关闭数据源自动配置功能: @SpringBootApplication(exclude = { DataSourceAutoConfiguration.class })。
@ComponentScan:Spring组件扫描。
6、开启 Spring Boot 特性有哪几种方式?
1)继承spring-boot-starter-parent项目
2)导入spring-boot-dependencies项目依赖
具体请参考这篇文章《Spring Boot开启的2种方式》。
7、Spring Boot 需要独立的容器运行吗?
可以不需要,内置了 Tomcat/ Jetty 等容器。
8、运行 Spring Boot 有哪几种方式?
1)打包用命令或者放到容器中运行
2)用 Maven/ Gradle 插件运行
3)直接执行 main 方法运行
9、Spring Boot 自动配置原理是什么?
注解 @EnableAutoConfiguration,@Configuration, @ConditionalOnClass 就是自动配置的核心,首先它得是一个配置文件,其次根据类路径下是否有这个类去自动配置。
具体看这篇文章《Spring Boot自动配置原理、实战》。这里必看
10、Spring Boot 的目录结构是怎样的?
cn
 +- javastack
     +- MyApplication.java
     |
     +- customer
     |   +- Customer.java
     |   +- CustomerController.java
     |   +- CustomerService.java
     |   +- CustomerRepository.java
     |
     +- order
         +- Order.java
         +- OrderController.java
         +- OrderService.java
         +- OrderRepository.java
这个目录结构是主流及推荐的做法,而在主入口类上加上 @SpringBootApplication 注解来开启 Spring Boot 的各项能力,如自动配置、组件扫描等。具体看这篇文章《Spring Boot 主类及目录结构介绍》。
11、你如何理解 Spring Boot 中的 Starters?
Starters可以理解为启动器,它包含了一系列可以集成到应用里面的依赖包,你可以一站式集成 Spring 及其他技术,而不需要到处找示例代码和依赖包。如你想使用 Spring JPA 访问数据库,只要加入 spring-boot-starter-data-jpa 启动器依赖就能使用了。
Starters包含了许多项目中需要用到的依赖,它们能快速持续的运行,都是一系列得到支持的管理传递性依赖。具体请看这篇文章《Spring Boot Starters启动器》。
Starters是什么?
Starters可以理解为启动器,它包含了一系列可以集成到应用里面的依赖包,你可以一站式集成Spring及其他技术,而不需要到处找示例代码和依赖包。如你想使用Spring JPA访问数据库,只要加入spring-boot-starter-data-jpa启动器依赖就能使用了。
Starters包含了许多项目中需要用到的依赖,它们能快速持续的运行,都是一系列得到支持的管理传递性依赖。
Starters命名
Spring Boot官方的启动器都是以spring-boot-starter-命名的,代表了一个特定的应用类型。
第三方的启动器不能以spring-boot开头命名,它们都被Spring Boot官方保留。一般一个第三方的应该这样命名,像mybatis的mybatis-spring-boot-starter。
Starters分类
1. Spring Boot应用类启动器
| 启动器名称 | 功能描述 |
|---|---|
| spring-boot-starter | 包含自动配置、日志、YAML的支持。 |
| spring-boot-starter-web | 使用Spring MVC构建web 工程,包含restful,默认使用Tomcat容器。 |
| ... | ... |
2. Spring Boot生产启动器
| 启动器名称 | 功能描述 |
|---|---|
| spring-boot-starter-actuator | 提供生产环境特性,能监控管理应用。 |
3. Spring Boot技术类启动器
| 启动器名称 | 功能描述 |
|---|---|
| spring-boot-starter-json | 提供对JSON的读写支持。 |
| spring-boot-starter-logging | 默认的日志启动器,默认使用Logback。 |
| ... | ... |
4. 其他第三方启动器
更多可以参考下面链接。
https://github.com/spring-projects/spring-boot/blob/master/spring-boot-starters/README.adoc
12、如何在 Spring Boot 启动的时候运行一些特定的代码?
可以实现接口 ApplicationRunner 或者 CommandLineRunner,这两个接口实现方式一样,它们都只提供了一个 run 方法,具体请看这篇文章《Spring Boot Runner启动器》。
Runner启动器
如果你想在Spring Boot启动的时候运行一些特定的代码,你可以实现接口 ApplicationRunner或者 CommandLineRunner,这两个接口实现方式一样,它们都只提供了一个run方法。
CommandLineRunner:启动获取命令行参数。
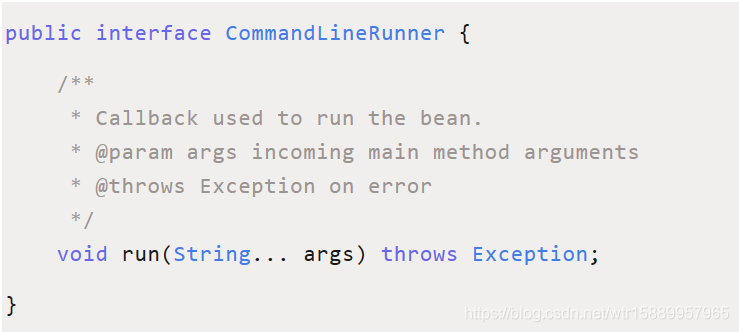
ApplicationRunner:启动获取应用启动的时候参数。
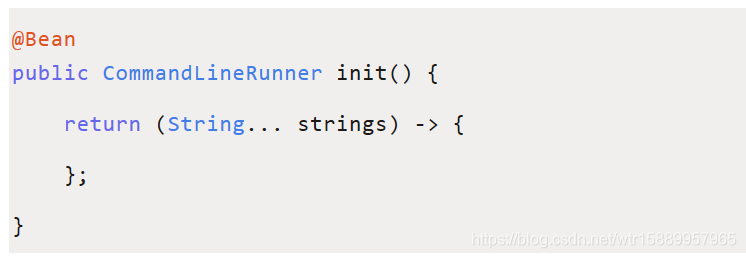
使用方式
或者这样
启动顺序
如果启动的时候有多个ApplicationRunner和CommandLineRunner,想控制它们的启动顺序,可以实现 org.springframework.core.Ordered接口或者使用 org.springframework.core.annotation.Order注解。
13、Spring Boot 有哪几种读取配置的方式?
Spring Boot 可以通过 @PropertySource,@Value,@Environment, @ConfigurationProperties 来绑定变量,具体请看这篇文章《Spring Boot读取配置的几种方式》。
14、Spring Boot 支持哪些日志框架?推荐和默认的日志框架是哪个?
Spring Boot 支持 Java Util Logging, Log4j2, Lockback 作为日志框架,如果你使用 Starters 启动器,Spring Boot 将使用 Logback 作为默认日志框架,具体请看这篇文章《Spring Boot日志集成》。
15、SpringBoot 实现热部署有哪几种方式?
主要有两种方式:
- Spring Loaded
- Spring-boot-devtools
Spring-boot-devtools 使用方式可以参考这篇文章《Spring Boot实现热部署》。
引用devtools依赖
<dependency>

   <groupId>org.springframework.boot</groupId>

   <artifactId>spring-boot-devtools</artifactId>

   <optional>true</optional>

</dependency>
这样,当修改一个java类时就会热更新。
自定义配置热部署
以下配置用于自定义配置热部署,可以不设置。
Intellij Idea修改
如果是idea,需要改以下两个地方:
1、勾上自动编译或者手动重新编译
File > Settings > Compiler-Build Project automatically
2、注册
ctrl + shift + alt + / > Registry > 勾选Compiler autoMake allow when app running
注意事项
1、生产环境devtools将被禁用,如java -jar方式或者自定义的类加载器等都会识别为生产环境。
2、打包应用默认不会包含devtools,除非你禁用SpringBoot Maven插件的 excludeDevtools属性。
3、Thymeleaf无需配置 spring.thymeleaf.cache:false,devtools默认会自动设置,参考完整属性。
16、你如何理解 Spring Boot 配置加载顺序?
在 Spring Boot 里面,可以使用以下几种方式来加载配置。
1)properties文件;
2)YAML文件;
3)系统环境变量;
4)命令行参数;
等等……
具体请看这篇文章《Spring Boot 配置加载顺序详解》。
17、Spring Boot 如何定义多套不同环境配置?
提供多套配置文件,如:
applcation.properties

application-dev.properties

application-test.properties

application-prod.properties
运行时指定具体的配置文件,具体请看这篇文章《Spring Boot Profile 不同环境配置》。
18、Spring Boot 可以兼容老 Spring 项目吗,如何做?
可以兼容,使用@ImportResource 注解导入老 Spring 项目配置文件。
19、保护 Spring Boot 应用有哪些方法?
- 在生产中使用HTTPS
- 使用Snyk检查你的依赖关系
- 升级到最新版本
- 启用CSRF保护
- 使用内容安全策略防止XSS攻击
- ...
更多请看这篇文章《10 种保护 Spring Boot 应用的绝佳方法》。
20、Spring Boot 2.X 有什么新特性?与 1.X 有什么区别?
- 配置变更
- JDK 版本升级
- 第三方类库升级
- 响应式 Spring 编程支持
- HTTP/2 支持
- 配置属性绑定
- 更多改进与加强...
1. Spring Boot简介
Spring 诞生时是 Java 企业版(Java Enterprise Edition,JEE,也称 J2EE)的
轻量级代替品。无需开发重量级的 Enterprise JavaBean(EJB),Spring 为企业级
Java 开发提供了一种相对简单的方法,通过依赖注入和面向切面编程,用简单的Java 对象(Plain Old Java Object,POJO)实现了 EJB 的功能。
虽然 Spring 的组件代码是轻量级的,但它的配置却是重量级的。
第一阶段:xml配置
在Spring 1.x时代,使用Spring开发满眼都是xml配置的Bean,随着项目的扩大,我们需要把xml配置文件放到不同的配置文件里,那时需要频繁的在开发的类和配置文件之间进行切换
第二阶段:注解配置
在Spring 2.x 时代,随着JDK1.5带来的注解支持,Spring提供了声明Bean的注解(例如@Component、@Service),大大减少了配置量。主要使用的方式是应用的基本配置(如数据库配置)用xml,业务配置用注解
第三阶段:java配置
Spring 3.0 引入了基于 Java 的配置能力,这是一种类型安全的可重构配置方式,可以代替 XML。我们目前刚好处于这个时代,Spring4.x和Spring Boot都推荐使用Java配置。
所有这些配置都代表了开发时的损耗。 因为在思考 Spring 特性配置和解决业务问题之间需要进行思维切换,所以写配置挤占了写应用程序逻辑的时间。除此之外,项目的依赖管理也是件吃力不讨好的事情。决定项目里要用哪些库就已经够让人头痛的了,你还要知道这些库的哪个版本和其他库不会有冲突,这难题实在太棘手。并且,依赖管理也是一种损耗,添加依赖不是写应用程序代码。一旦选错了依赖的版本,随之而来的不兼容问题毫无疑问会是生产力杀手。
Spring Boot 让这一切成为了过去。
Spring Boot 简化了基于Spring的应用开发,只需要“run”就能创建一个独立的、生产级别的Spring应用。
Spring Boot为Spring平台及第三方库提供开箱即用的设置(提供默认设置),这样我们就可以简单的开始。多数Spring Boot应用只需要很少的Spring配置。
我们可以使用SpringBoot创建java应用,并使用java –jar 启动它,或者采用传统的war部署方式。
Spring Boot 主要目标是:
l 为所有 Spring 的开发提供一个从根本上更快的入门体验
l 开箱即用,但通过自己设置参数,即可快速摆脱这种方式。
l 提供了一些大型项目中常见的非功能性特性,如内嵌服务器、安全、指标,健康检测、外部化配置等
l 绝对没有代码生成,也无需 XML 配置。
2. Spring Boot 入门
2.1. 环境准备
数据库:MySQL
IDE:Eclipse Mars2,idea
Spring-Boot:1.4.4
Maven: 3.3.9(官方声明1.4.4版本需要Maven 3.2+)
本地仓库:需要使用资料中的仓库
2.2. 起步依赖
2.2.1. 创建一个Maven工程
2.2.2. 添加依赖
在pom.xml中添加依赖,效果如下
<parent>

<groupId>org.springframework.boot</groupId>

<artifactId>spring-boot-starter-parent</artifactId>

<version>1.4.4.RELEASE</version>

</parent>

  <groupId>cn.cnn.springboot</groupId>

  <artifactId>cnn-springboot</artifactId>

  <version>0.0.1-SNAPSHOT</version>


<dependencies>

 <dependency>

   <groupId>org.springframework.boot</groupId>

   <artifactId>spring-boot-starter-web</artifactId>

  </dependency>

</dependencies>
我们会惊奇地发现,我们的工程自动添加了好多好多jar 包,而这些jar 包正是我们做开发时需要导入的jar 包。
因为这些jar 包被我们刚才加入的spring-boot-starter-web 所引用了,所以添加spring-boot-starter-web后会自动把依赖传递过来。
2.3. 变更JDK版本
我们发现默认情况下工程的JDK版本是1.6,但是通常使用的是1.7的版本
修改JDK为1.7,需要在pom.xml中添加以下配置:
<properties>

<java.version>1.7</java.version>

</properties>
使用Maven更新工程后,就发现版本已经变成1.8了
注意:
虽然JDK1.6或者1.7都可以使用Spring-Boot,但Spring-Boot官方建议使用JDK1.8。要使用JDK1.8,首先必须要配置JDK1.8后,才可以使用上述方法设置。
2.4. 引导类
需要创建一个引导类:
import org.springframework.boot.SpringApplication;

import org.springframework.boot.autoconfigure.SpringBootApplication;


@SpringBootApplication
public class Demo {

public static void main(String[] args) {

  SpringApplication.run(Demo.class, args);

  }

}这里多了一个@SpringBootApplication注解
@Configuration: 用于定义一个配置类
@EnableAutoConfiguration :Spring Boot 会自动根据你jar 包的依赖来自动配置
项目。
@ComponentScan: 告诉Spring 哪个packages 的用注解标识的类会被spring
自动扫描并且装入bean 容器。
Banner
直接启动,控制台出现以下标识。
. ____ _ __ _ _
/\\ / ___'_ __ _ _(_)_ __ __ _ \ \ \ \
( ( )\___ | '_ | '_| | '_ \/ _` | \ \ \ \
\\/ ___)| |_)| | | | | || (_| | ) ) ) )
' |____| .__|_| |_|_| |_\__, | / / / /
=========|_|==============|___/=/_/_/_/
:: Spring Boot :: (v1.4.4.RELEASE)
这个标识是Spring启动标识,如果不想要,可以设置取消
import org.springframework.boot.Banner.Mode;

import org.springframework.boot.SpringApplication;

import org.springframework.boot.autoconfigure.SpringBootApplication;


@SpringBootApplication
public class Application {

public static void main(String[] args) {

// SpringApplication.run(Application.class, args);

SpringApplication application = new SpringApplication(Application.class);

application.setBannerMode(Mode.OFF);

application.run(args);

}

}
参考附录二的banner设置,可以通过修改配置文件制定自己的标识。
2.5. 入门程序
需求:使用Spring MVC实现Hello World输出
2.5.1. 原来的实现
我们现在开始使用spring MVC 框架,实现json 数据的输出。如果按照我们原来的做法,需要在web.xml 中添加一个DispatcherServlet 的配置,还需要添加一个spring的配置文件,配置文件如下配置
spring加入配置

<!-- controller注解扫描 -->

<context:component-scan base-package="cn.cnn.springboot.controller" />

<!-- 注解驱动 -->

<mvc:annotation-driven />


web.xml加入配置

<!-- 配置前端控制器 -->

<servlet>

<servlet-name> cnn-springboot</servlet-name>

<servlet-class>org.springframework.web.servlet.DispatcherServlet</servlet-class>

<init-param>

<param-name>contextConfigLocation</param-name>

<param-value>classpath:spring/*.xml</param-value>

</init-param>

</servlet>

<servlet-mapping>

<servlet-name> cnn-springboot</servlet-name>

<url-pattern>/</url-pattern>

</servlet-mapping>
还要编写Controller。。。
2.5.2. Spring-Boot的实现
我们不需要配置文件,直接编写Controller类即可
import org.springframework.web.bind.annotation.RequestMapping;

import org.springframework.web.bind.annotation.RestController;


@RestController
public class HelloWorldController {

@RequestMapping("info")
 public String info() {

  return "Hello world!";

 }

}
@RestController注解:其实就是@Controller和@ResponseBody注解加在一起
启动方式一:启动之前编写的引导类即可
启动方式二:使用Maven命令spring-boot:run执行即可
选择 Maven Build
在浏览器地址栏输入http://localhost:8080/info 即可看到运行结果
2.6. 热部署
我们在开发中反复修改类、页面等资源,每次修改后都是需要重新启动才生效,这样每次启动都很麻烦,浪费了大量的时间。
能不能在我修改代码后不重启就能生效呢?可以,由于Spring Boot应用只是普通的Java应用,所以JVM热交换(hot-swapping)也能开箱即用。不过JVM热交换能替换的字节码有限制,想要更彻底的解决方案可以使用Spring Loaded项目或JRebel。
spring-boot-devtools 模块也支持应用快速重启(restart)。
我们只需要在pom.xml加入如下配置即可
<dependency>

<groupId>org.springframework.boot</groupId>

<artifactId>spring-boot-devtools</artifactId>

</dependency>
3. SpringBoot整合
3.1. 整合Spring Data JPA
3.1.1. 需求
使用Spring Boot + Spring MVC + Spring Data JPA + EasyUI 框架组合实现部门列表查询,效果如下:
DROP TABLE IF EXISTS `user`;

CREATE TABLE `user` (

  `id` bigint(20) NOT NULL AUTO_INCREMENT,

  `user_name` varchar(100) DEFAULT NULL COMMENT '用户名',

  `password` varchar(100) DEFAULT NULL COMMENT '密码',

  `name` varchar(100) DEFAULT NULL COMMENT '姓名',

  PRIMARY KEY (`id`)

) ENGINE=InnoDB AUTO_INCREMENT=7 DEFAULT CHARSET=utf8;


INSERT INTO `user` VALUES ('1', 'zhangsan', '123456', '张三');

INSERT INTO `user` VALUES ('2', 'lisi', '123456', '李四');

INSERT INTO `user` VALUES ('3', 'wangwu', '123456', '王五');

INSERT INTO `user` VALUES ('4', 'zhangwei', '123456', '张伟');

INSERT INTO `user` VALUES ('5', 'lina', '123456', '李娜');

INSERT INTO `user` VALUES ('6', 'lilei', '123456', '李磊');
3.1.2. 环境准备
3.1.2.1. 导入数据库表
在MySQL数据库执行以下语句
3.1.2.2. 创建Maven工程
cnn-info(打jar包),在pom.xml中进行如下配置
<parent>

<groupId>org.springframework.boot</groupId>

<artifactId>spring-boot-starter-parent</artifactId>

<version>1.4.4.RELEASE</version>

</parent>

<dependencies>

<dependency>

<groupId>org.springframework.boot</groupId>

<artifactId>spring-boot-starter-web</artifactId>

<version>1.4.4.RELEASE</version>

</dependency>

<dependency>

<groupId>org.springframework.boot</groupId>

<artifactId>spring-boot-devtools</artifactId>

<version>1.4.4.RELEASE</version>

</dependency>

<dependency>

<groupId>org.springframework.boot</groupId>

<artifactId>spring-boot-starter-data-jpa</artifactId>

<version>1.4.4.RELEASE</version>

</dependency>

<dependency>

<groupId>mysql</groupId>

<artifactId>mysql-connector-java</artifactId>

<version>5.1.6</version>

</dependency>

</dependencies>
3.1.2.3. 加入Spring-Boot配置文件
在src/main/resources 下添加application.properties 配置文件,内容如下:
#DB Configuration:

spring.datasource.driverClassName=com.mysql.jdbc.Driver

spring.datasource.url=jdbc:mysql://127.0.0.1:3306/taotao

spring.datasource.username=root

spring.datasource.password=root


#JPA Configuration:

spring.jpa.database=MySQL

spring.jpa.show-sql=true

spring.jpa.generate-ddl=true

spring.jpa.hibernate.ddl-auto=update

spring.jpa.hibernate.naming_strategy=org.hibernate.cfg.ImprovedNamingStrategy
此文件用于覆盖Spring Boot的默认配置,完整的配置信息参考“附录2”
3.1.3. 后端实现
3.1.3.1. 创建实体类
import javax.persistence.Entity;

import javax.persistence.Id;


@Entity

public class User {

@Id

private Long id;

private String userName;

private String password;

private String name;


//添加 get 和set 方法

}


3.1.3.2. 创建DAO接口

import org.springframework.data.jpa.repository.JpaRepository;

import cn.cnn.info.pojo.User;


public interface UserDao extends JpaRepository<User, Long> {

}


3.1.3.3. 创建业务逻辑接口

import java.util.List;

import cn.cnn.info.pojo.User;


public interface UserService {

List<User> findAll();

}


3.1.3.4. 创建业务逻辑实现类

import java.util.List;

import org.springframework.beans.factory.annotation.Autowired;

import org.springframework.stereotype.Service;

import cn.cnn.info.dao.UserDao;

import cn.cnn.info.pojo.User;

import cn.cnn.info.service.UserService;


@Service

public class UserServiceImpl implements UserService {


@Autowired

private UserDao userDao;


@Override

public List<User> findAll() {

List<User> list = this.userDao.findAll();

return list;

}

}


3.1.3.5. 创建Controller

import java.util.List;

import org.springframework.beans.factory.annotation.Autowired;

import org.springframework.web.bind.annotation.RequestMapping;

import org.springframework.web.bind.annotation.RestController;

import cn.cnn.info.pojo.User;

import cn.cnn.info.service.UserService;


@RestController

@RequestMapping("user")

public class UserControlelr {


@Autowired

private UserService userService;


@RequestMapping("list")

public List<User> queryUserAll() {

List<User> list = this.userService.findAll();

return list;

}


}


3.1.3.6. 创建引导类

import org.springframework.boot.SpringApplication;

import org.springframework.boot.autoconfigure.SpringBootApplication;


@SpringBootApplication

public class Application {

public static void main(String[] args) {

SpringApplication.run(Application.class, args);

}


}
运行引导类Application,打开浏览器输入http://127.0.0.1:8080/user/list
3.1.4. 前端实现
把资料中的static文件夹,拷贝到src/main/resources路径下
浏览器地址栏输入:http://127.0.0.1:8080/user.html,效果如下
运行引导类Application
3.2. 整合MyBatis
3.2.1. 简单整合
3.2.1.1. 加入依赖
在pom.xml中加入以下依赖
<!-- SpringBoot的Mybatis启动器 -->

<dependency>

<groupId>org.mybatis.spring.boot</groupId>

<artifactId>mybatis-spring-boot-starter</artifactId>

<version>1.1.1</version>

</dependency>
3.2.1.2. 编写Mapper
和之前的方式一样,只是多了两个注解
@Mapper:声明Mapper接口
@Select:声明这个接口所需要使用的sql,当然,有查询的注解,肯定就有增删改的注解。
import java.util.List;

import org.apache.ibatis.annotations.Mapper;

import org.apache.ibatis.annotations.Select;

import cn.cnn.info.pojo.User;


@Mapper

public interface UserMapper {


@Select("select * from user where name like '%${value}%'")

public List<User> queryUserByName(String name);


}


3.2.1.3. 编写Service和Controller

添加Service调用Mapper

@Service

public class UserServiceImpl implements UserService {


@Autowired

private UserDao userDao;


@Autowired

private UserMapper userMapper;


@Override

public List<User> findAll() {

List<User> list = this.userDao.findAll();

return list;

}


@Override

public List<User> queryUserByName(String name) {

List<User> list = this.userMapper.queryUserByName(name);

return list;

}


}


修改Controller

@RestController

@RequestMapping("user")

public class UserControlelr {


@Autowired

private UserService userService;


@RequestMapping("list")

public List<User> queryUserAll() {

List<User> list = this.userService.findAll();

return list;

}


@RequestMapping("list/{name}")

public List<User> queryUserAll(@PathVariable String name) {

List<User> list = this.userService.queryUserByName(name);

return list;

}


}
3.2.1.4. 测试
浏览器地址栏输入:http://127.0.0.1:8080/user/list/张
显示效果:
3.2.2. 整合通用Mapper和分页助手
以上所有的配置都是使用的默认配置,我们只需要专注java代码的开发即可,不需要加入配置文件了。
但并不是所有得场景都是简单的业务,有时候业务复杂,需要我们加入自定义的配置文件;有时候需要载入例如分页助手这样的插件,辅助开发,所以我们也需要了解如何加载这些配置。
3.2.2.1. 加入依赖
我们需要加入通用Mapper和分页插件,所以需要在pom.xml加入以下依赖
<!-- 通用Mapper -->
<dependency>
<groupId>com.github.abel533</groupId>
<artifactId>mapper</artifactId>
<version>2.3.4</version>
</dependency>
<!-- 分页助手 -->
<dependency>
<groupId>com.github.pagehelper</groupId>
<artifactId>pagehelper</artifactId>
<version>3.7.5</version>
</dependency>
<dependency>
<groupId>com.github.jsqlparser</groupId>
<artifactId>jsqlparser</artifactId>
<version>0.9.1</version>
</dependency>
3.2.2.2. 修改配置文件
在application.properties添加配置
#spring集成Mybatis环境
#pojo别名扫描包
mybatis.type-aliases-package=cn.cnn.info.pojo
#加载Mybatis核心配置文件
mybatis.mapper-locations=classpath:mapper/*Mapper.xml
mybatis.config-location=classpath:mybatis/SqlMapConfig.xml
#配置连接池,还需要在pom.xml中加入该连接池的依赖
#spring.datasource.type=com.jolbox.bonecp.BoneCPDataSource
在src\main\resources\mapper路径下加入UserMapper.xml配置文件
<?xml version="1.0" encoding="UTF-8" ?>
<!DOCTYPE mapper PUBLIC "-//mybatis.org//DTD Mapper 3.0//EN" "http://mybatis.org/dtd/mybatis-3-mapper.dtd" >
<mapper namespace="cn.cnn.info.dao.UserMapper">
<select id="queryAll" resultType="user">
select * from user
</select>
</mapper>
在src\main\resources\mybatis加入SqlMapConfig.xml配置文件,用以加载通用Mapper和分页助手
<?xml version="1.0" encoding="UTF-8" ?>
<!DOCTYPE configuration
PUBLIC "-//mybatis.org//DTD Config 3.0//EN"
"http://mybatis.org/dtd/mybatis-3-config.dtd">
<configuration>
<!-- 分页助手 -->
<plugins>
<plugin interceptor="com.github.pagehelper.PageHelper">
<property name="dialect" value="mysql" />
<!-- 该参数默认为false -->
<!-- 设置为true时,使用RowBounds分页会进行count查询 -->
<property name="rowBoundsWithCount" value="true" />
</plugin>
<!-- 通用Mapper -->
<plugin interceptor="com.github.abel533.mapperhelper.MapperInterceptor">
<!--主键自增回写方法,默认值MYSQL,详细说明请看文档 -->
<property name="IDENTITY" value="MYSQL" />
<!--通用Mapper接口,多个通用接口用逗号隔开 -->
<property name="mappers" value="com.github.abel533.mapper.Mapper" />
</plugin>
</plugins>
</configuration>
3.2.2.3. 编写Mapper
import java.util.List;
import org.apache.ibatis.annotations.Mapper;
import org.apache.ibatis.annotations.Select;
import cn.cnn.info.pojo.User;
//extends com.github.abel533.mapper.Mapper<User>:需要继承通用Mapper
@Mapper
public interface UserMapper extends com.github.abel533.mapper.Mapper<User> {
@Select("select * from user where name like '%${value}%'")
public List<User> queryUserByName(String name);
// 使用UserMapper.xml配置文件
public List<User> queryAll();
}
3.2.2.4. 编写Service和Controller
Service编写
import java.util.List;
import org.springframework.beans.factory.annotation.Autowired;
import org.springframework.stereotype.Service;
import com.github.pagehelper.PageHelper;
import cn.cnn.info.dao.UserDao;
import cn.cnn.info.dao.UserMapper;
import cn.cnn.info.pojo.User;
import cn.cnn.info.service.UserService;
@Service
public class UserServiceImpl implements UserService {
@Autowired
private UserDao userDao;
@Autowired
private UserMapper userMapper;
@Override
public List<User> findAll() {
List<User> list = this.userDao.findAll();
return list;
}
@Override
public List<User> queryUserByName(String name) {
List<User> list = this.userMapper.queryUserByName(name);
return list;
}
// 调用使用UserMapper.xml的Mapper
@Override
public List<User> queryAll() {
List<User> list = this.userMapper.queryAll();
return list;
}
// 使用通用Mapper和分页助手
@Override
public List<User> queryUserByPage(Integer page, Integer rows) {
// 设置分页
PageHelper.startPage(page, rows);
// 使用通用Mapper的方法进行查询所有数据
List<User> list = this.userMapper.select(null);
return list;
}
}
Controller编写
import java.util.List;
import org.springframework.beans.factory.annotation.Autowired;
import org.springframework.web.bind.annotation.PathVariable;
import org.springframework.web.bind.annotation.RequestMapping;
import org.springframework.web.bind.annotation.RestController;
import cn.cnn.info.pojo.User;
import cn.cnn.info.service.UserService;
@RestController
@RequestMapping("user")
public class UserControlelr {
@Autowired
private UserService userService;
@RequestMapping("list")
public List<User> queryUserAll() {
List<User> list = this.userService.findAll();
return list;
}
@RequestMapping("list/{name}")
public List<User> queryUserAll(@PathVariable String name) {
List<User> list = this.userService.queryUserByName(name);
return list;
}
@RequestMapping("list/query")
public List<User> queryUserAll2() {
List<User> list = this.userService.queryAll();
return list;
}
@RequestMapping("list/{page}/{rows}")
public List<User> queryUserAll(@PathVariable Integer page, @PathVariable Integer rows) {
List<User> list = this.userService.queryUserByPage(page, rows);
return list;
}
}
3.2.2.5. 测试
测试使用UserMapper.xml
浏览器地址栏输入:http://127.0.0.1:8080/user/list/query
测试使用通用Mapper和分页助手
浏览器地址栏输入:http://127.0.0.1:8080/user/list/2/2
3.3. 整合Redis
3.3.1. 注解方式实现添加缓存
需求:基于上例代码,将列表数据缓存到Redis
3.3.1.1. 加入依赖
在pom.xml加入依赖
<!-- 配置使用redis启动器 -->
<dependency>
<groupId>org.springframework.boot</groupId>
<artifactId>spring-boot-starter-redis</artifactId>
</dependency>
3.3.1.2. 修改引导类
修改开启缓存,添加注解@EnableCaching
import org.springframework.boot.SpringApplication;
import org.springframework.boot.autoconfigure.SpringBootApplication;
import org.springframework.cache.annotation.EnableCaching;
@SpringBootApplication
@EnableCaching
public class Application {
public static void main(String[] args) {
SpringApplication.run(Application.class, args);
}
}
3.3.1.3. 设置实现序列化接口
需要修改实体,让实体实现序列化接口
@Entity
public class User implements Serializable {
@Id
private Long id;
private String userName;
private String password;
private String name;
。。。。。。
}
3.3.1.4. 实现添加/删除缓存
修改UserServiceImpl,添加@Cacheable注解实现缓存添加
@Override
@Cacheable(value = "userCache", key = "'user.findAll'")
public List<User> findAll() {
System.out.println("从Mysql中查询");
List<User> list = this.userDao.findAll();
return list;
}
@Override
@CacheEvict(value = "userCache", key = "'user.findAll'")
public List<User> queryUserByName(String name) {
System.out.println("缓存清理了!");
List<User> list = this.userMapper.queryUserByName(name);
return list;
}
这样设置完成后,执行findAll()方法就会使用缓存,如果缓存没有就添加缓存,而queryUserByName(String name)方法则是删除缓存
@Cacheable:添加/使用缓存
@CacheEvict:删除缓存
参数value是缓存的名字,在执行的时候,会找叫这个名字的缓存使用/删除
参数key默认情况下是空串””,是Spring的一种表达式语言SpEL,我们这里可以随意指定,但是需要注意一定要加单引号
3.3.2. redis的深入使用
3.3.2.1. 直接操作redis
redis除了作为缓存使用,还有很多其他的作用,例如利用redis的单线程获取唯一数,例如使用redis为单点登录系统存储用户登录信息等,我们就需要直接操作redis。
官网提供了三种接口RedisConnectionFactory, StringRedisTemplate 和 RedisTemplate,我们可以直接注入或者自己实现其他的实现类,来直接操作redis。我们这里使用RedisTemplate来操作Redis。
如下所示,我们只需要直接注入RedisTemplate即可使用以下方法操作redis的五种不同的数据类型
测试:
@Autowired
private RedisTemplate<String, String> redisTemplate;
@Override
@CacheEvict(value = "userCache", key = "'user.findAll'")
public List<User> queryUserByName(String name) {
// 保存数据
this.redisTemplate.boundValueOps("redis").set("Hello redis !");
// 设置有效时间为100秒
this.redisTemplate.boundValueOps("redis").expire(100l, TimeUnit.SECONDS);
// 给value每次执行加一操作
this.redisTemplate.boundValueOps("count").increment(1l);
System.out.println("缓存清理了!");
List<User> list = this.userMapper.queryUserByName(name);
return list;
}
3.3.2.2. 设置redis连接属性
redis单机版
redis启动器默认情况下会找本地的redis服务,端口号默认是6379如果需要访问其他服务器的redis,则需要在application.properties中进行如下配置:
#Redis
spring.redis.host=192.168.37.161
spring.redis.port=6379
这表示会去找ip为192.168.37.161和端口为6379的服务
redis集群版
#Redis
#spring.redis.host=192.168.37.161
#spring.redis.port=6379
#Redis Cluster
spring.redis.cluster.nodes=192.168.37.161:7001,192.168.37.161:7002,192.168.37.161:7003,192.168.37.161:7004,192.168.37.161:7005,192.168.37.161:7006
切换到集群版只需要做以上配置,配置集群版节点信息,注释掉单机版信息
3.4. 整合ActiveMQ
3.4.1. 加入依赖
在pom.xml中加入以下配置
<!-- 配置ActiveMQ启动器 -->
<dependency>
<groupId>org.springframework.boot</groupId>
<artifactId>spring-boot-starter-activemq</artifactId>
</dependency>
3.4.2. 创建队列
在引导类中添加以下方法,设置队列
@SpringBootApplication
@EnableCaching
public class Application {
public static void main(String[] args) {
SpringApplication.run(Application.class, args);
}
@Bean
public Queue queue() {
return new ActiveMQQueue("cnn.queue");
}
}
3.4.3. 发送消息
编写Controller,发送消息
import javax.jms.Destination;
import org.springframework.beans.factory.annotation.Autowired;
import org.springframework.jms.core.JmsTemplate;
import org.springframework.web.bind.annotation.PathVariable;
import org.springframework.web.bind.annotation.RequestMapping;
import org.springframework.web.bind.annotation.RestController;
@RestController
@RequestMapping("queue")
public class QueueController {
//注入发送消息的对象
@Autowired
private JmsTemplate jmsTemplate;
//注入消息队列
@Autowired
private Destination destination;
//编写发送消息的方法
@RequestMapping("send/{message}")
public String send(@PathVariable String message) {
this.jmsTemplate.convertAndSend(destination, message);
return "消息发送成功!消息内容:" + message;
}
}
3.4.4. 接收消息
编写bean,加入@Component注解让spring管理这个bean,作为接收消息的消费者
import org.springframework.jms.annotation.JmsListener;
import org.springframework.stereotype.Component;
@Component
public class Consumer {
// 接受消息方法
@JmsListener(destination = "cnn.queue")
public void readMessage(String text) {
System.out.println("接受到的消息是:" + text);
}
}
测试:
启动服务后,在浏览器执行http://127.0.0.1:8080/queue/send/发消息了11
即可看到消息发送成功
同时可以在控制台看到打印信息
我们没有安装ActiveMQ,为什么可以使用?因为Spring Boot 内置了ActiveMQ 的服务,所以我们不用单独启动也可以实现消息的发送和接收。
3.4.5. 使用外部服务
首先确认有一台外部ActiveMQ服务可以使用
在application.properties中加入以下配置
#ActiveMQ
spring.activemq.broker-url=tcp://192.168.37.161:61616
这样就加入了ActiveMQ服务的地址
3.5. 整合junit
3.5.1. 加入依赖
在pom.xml中加入测试依赖
<!-- 配置测试启动器 -->
<dependency>
<groupId>org.springframework.boot</groupId>
<artifactId>spring-boot-starter-test</artifactId>
<scope>test</scope>
</dependency>
3.5.2. 编写测试类
import javax.jms.Destination;
import org.junit.Test;
import org.junit.runner.RunWith;
import org.springframework.beans.factory.annotation.Autowired;
import org.springframework.boot.test.context.SpringBootTest;
import org.springframework.jms.core.JmsTemplate;
import org.springframework.test.context.junit4.SpringJUnit4ClassRunner;
import cn.cnn.info.Application;
@RunWith(SpringJUnit4ClassRunner.class)
@SpringBootTest(classes = Application.class)
public class MessageTest {
@Autowired
private Destination destination;
@Autowired
private JmsTemplate jmsTemplate;
@Test
public void test() {
System.out.println("我发消息了!");
this.jmsTemplate.convertAndSend(destination, "Hello ActiveMQ!");
}
}
SpringRunner 与SpringJUnit4ClassRunner 是继承关系,但是没有不同的地方,只是看起来子类SpringRunner要短一些而已。
@SpringBootTest 注解的class 属性要指定引导类的class
3.6. 整合dubbox
3.6.1. 环境准备
3.6.1.1. dubbox
dubbo是一个分布式的服务架构,可直接用于生产环境作为SOA服务框架。官网首页:http://dubbo.io/
淘宝将这个项目开源出来以后,得到了不少同行的支持,包括:
当当网的扩展版本dubbox :https://github.com/dangdangdotcom/dubbox
京东的扩展版本jd-hydra: http://www.oschina.NET/p/jd-hydra
不过,略有遗憾的是, dubbo由于某些原因导致dubbo团队已经解散,已经很牛没有更新了,反到是当当网的扩展版本仍在持续发展。因为dubbox支持更新的spring版本,所以我们使用dubbox。
Dubbox在maven中央仓库并没有对应的依赖,所以我们需要自己动手将其发布到我们的本地仓库来使用。
使用git从码云上把dubbox的代码clone下来,
地址:https://git.oschina.net/wuyu15255872976/dubbox.git
执行Maven命令把工程安装到本地仓库
命令:clean install -Dmaven.test.skip
课程资料提供的仓库已经安装好了,可以直接使用
3.6.1.2. spring-boot-starter-dubbo
我们以前在使用dubbo的时候都是用的xml配置。而在整合Spring Boot的时候可以使用@ImportResource注解来引入的dubbo的xml配置。
但是Spring Boot本身并不推荐xml配置。怎么解决这个矛盾,我们可以自己准备一个Spring Boot Starter dubbo的项目来引导Spring Boot对Dubbo的自动化配置。已经有人开发好了这个自动化配置项目,我们直接使用就行了
使用git从码云上把spring-boot-starter-dubbo的代码clone下来,
地址:https://git.oschina.net/wuyu15255872976/spring-boot-starter-dubbo.git
执行Maven命令把工程安装到本地仓库
命令:clean install -Dmaven.test.skip
为了统一管理,把pom.xml修改为如下:
<project xmlns="http://maven.apache.org/POM/4.0.0" xmlns:xsi="http://www.w3.org/2001/XMLSchema-instance"
xsi:schemaLocation="http://maven.apache.org/POM/4.0.0 http://maven.apache.org/xsd/maven-4.0.0.xsd">
<modelVersion>4.0.0</modelVersion>
<parent>
<groupId>org.springframework.boot</groupId>
<artifactId>spring-boot-starter-parent</artifactId>
<version>1.4.4.RELEASE</version>
</parent>
<artifactId>spring-boot-starter-dubbo</artifactId>
<version>1.4.4.RELEASE</version>
<name>Spring Boot Dubbo Rpc</name>
<description>Spring Boot Dubbo Rpc</description>
<url>http://projects.spring.io/spring-boot/</url>
<organization>
<name>Pivotal Software, Inc.</name>
<url>http://www.spring.io</url>
</organization>
<properties>
<project.build.sourceEncoding>UTF-8</project.build.sourceEncoding>
<java.version>1.7</java.version>
</properties>
<dependencies>
<dependency>
<groupId>org.springframework.boot</groupId>
<artifactId>spring-boot-actuator</artifactId>
</dependency>
<dependency>
<groupId>org.springframework.boot</groupId>
<artifactId>spring-boot-configuration-processor</artifactId>
</dependency>
<dependency>
<groupId>com.alibaba</groupId>
<artifactId>dubbo</artifactId>
<version>2.8.5-SNAPSHOT</version>
<exclusions>
<exclusion>
<artifactId>spring</artifactId>
<groupId>org.springframework</groupId>
</exclusion>
</exclusions>
</dependency>
<!-- zookeeper 客户端 -->
<dependency>
<groupId>com.github.sgroschupf</groupId>
<artifactId>zkclient</artifactId>
<version>0.1</version>
</dependency>
</dependencies>
<dependencyManagement>
<dependencies>
<dependency>
<groupId>org.springframework.boot</groupId>
<artifactId>spring-boot-dependencies</artifactId>
<version>1.4.4.RELEASE</version>
<type>pom</type>
<scope>import</scope>
</dependency>
</dependencies>
</dependencyManagement>
<build>
<plugins>
<plugin>
<artifactId>maven-source-plugin</artifactId>
<configuration>
<attach>true</attach>
</configuration>
<executions>
<execution>
<phase>compile</phase>
<goals>
<goal>jar</goal>
</goals>
</execution>
</executions>
</plugin>
</plugins>
</build>
</project>
课程资料提供的仓库已经安装好了,可以直接使用
3.6.1.3. zookeeper注册中心
我们使用zookeeper作为dubbo的注册中心。
这里使用的zookeeper注册中心地址是:192.168.37.161:2181
修改hosts,配置注册中心的域名是zookeeper.taotao.com
3.6.2. 搭建项目
taotao-parent作为所有工程的父工程
taotao- interface作为提供pojo和抽取服务接口的
taotao-provider作为服务提供者
taotao-consumer作为服务消费者
3.6.2.1. 搭建taotao-parent
创建taotao-parent,并打pom包,这里配置公共使用的依赖。
修改pom.xml为如下
<project xmlns="http://maven.apache.org/POM/4.0.0" xmlns:xsi="http://www.w3.org/2001/XMLSchema-instance"
xsi:schemaLocation="http://maven.apache.org/POM/4.0.0 http://maven.apache.org/xsd/maven-4.0.0.xsd">
<modelVersion>4.0.0</modelVersion>
<parent>
<groupId>org.springframework.boot</groupId>
<artifactId>spring-boot-starter-parent</artifactId>
<version>1.4.4.RELEASE</version>
</parent>
<groupId>com.taotao</groupId>
<artifactId>taotao-parent</artifactId>
<version>0.0.1-SNAPSHOT</version>
<packaging>pom</packaging>
<properties>
<!-- 配置java版本 -->
<java.version>1.7</java.version>
</properties>
<dependencies>
<!-- 配置测试启动器 -->
<dependency>
<groupId>org.springframework.boot</groupId>
<artifactId>spring-boot-starter-test</artifactId>
<scope>test</scope>
</dependency>
<!-- 配置web启动器 -->
<dependency>
<groupId>org.springframework.boot</groupId>
<artifactId>spring-boot-starter-web</artifactId>
<optional>true</optional>
</dependency>
<!-- 配置dubbo启动器 -->
<dependency>
<groupId>org.springframework.boot</groupId>
<artifactId>spring-boot-starter-dubbo</artifactId>
<version>1.4.4.RELEASE</version>
<optional>true</optional>
</dependency>
</dependencies>
</project>
3.6.2.2. 搭建taotao-interface
创建taotao-interface,并打jar包。
修改pom.xml为如下,几乎不用配置
<project xmlns="http://maven.apache.org/POM/4.0.0" xmlns:xsi="http://www.w3.org/2001/XMLSchema-instance"
xsi:schemaLocation="http://maven.apache.org/POM/4.0.0 http://maven.apache.org/xsd/maven-4.0.0.xsd">
<modelVersion>4.0.0</modelVersion>
<parent>
<groupId>com.taotao</groupId>
<artifactId>taotao-parent</artifactId>
<version>0.0.1-SNAPSHOT</version>
</parent>
<groupId>com.taotao</groupId>
<artifactId>taotao-interface</artifactId>
<version>0.0.1-SNAPSHOT</version>
</project>
3.6.2.3. 搭建taotao-provider
创建taotao-provider,并打jar包。
修改pom.xml为如下
<project xmlns="http://maven.apache.org/POM/4.0.0" xmlns:xsi="http://www.w3.org/2001/XMLSchema-instance"
xsi:schemaLocation="http://maven.apache.org/POM/4.0.0 http://maven.apache.org/xsd/maven-4.0.0.xsd">
<modelVersion>4.0.0</modelVersion>
<parent>
<groupId>com.taotao</groupId>
<artifactId>taotao-parent</artifactId>
<version>0.0.1-SNAPSHOT</version>
</parent>
<groupId>com.taotao</groupId>
<artifactId>taotao-provider</artifactId>
<version>0.0.1-SNAPSHOT</version>
<dependencies>
<!-- 加入taotao-interface依赖 -->
<dependency>
<groupId>com.taotao</groupId>
<artifactId>taotao-interface</artifactId>
<version>0.0.1-SNAPSHOT</version>
</dependency>
<!-- 配置MyBatis启动器 -->
<dependency>
<groupId>org.mybatis.spring.boot</groupId>
<artifactId>mybatis-spring-boot-starter</artifactId>
<version>1.1.1</version>
</dependency>
<!-- MySQL连接驱动 -->
<dependency>
<groupId>mysql</groupId>
<artifactId>mysql-connector-java</artifactId>
</dependency>
</dependencies>
</project>
3.6.2.4. 搭建taotao-consumer
创建taotao-consumer,并打jar包。
修改pom.xml为如下
<project xmlns="http://maven.apache.org/POM/4.0.0" xmlns:xsi="http://www.w3.org/2001/XMLSchema-instance"
xsi:schemaLocation="http://maven.apache.org/POM/4.0.0 http://maven.apache.org/xsd/maven-4.0.0.xsd">
<modelVersion>4.0.0</modelVersion>
<parent>
<groupId>com.taotao</groupId>
<artifactId>taotao-parent</artifactId>
<version>0.0.1-SNAPSHOT</version>
</parent>
<groupId>com.taotao</groupId>
<artifactId>taotao-consumer</artifactId>
<version>0.0.1-SNAPSHOT</version>
<dependencies>
<!-- 加入taotao-interface依赖 -->
<dependency>
<groupId>com.taotao</groupId>
<artifactId>taotao-interface</artifactId>
<version>0.0.1-SNAPSHOT</version>
</dependency>
</dependencies>
</project>
3.7. 实现功能
3.7.1. 实现taotao-interface
编写pojo
import java.io.Serializable;
public class User implements Serializable {
private Long id;
private String userName;
private String password;
private String name;
get/set方法
}
编写Service接口
import com.taotao.common.pojo.User;
public interface UserService {
public User queryUserById(Long id);
}
3.7.2. 实现taotao-provider
编写UserMapper
import org.apache.ibatis.annotations.Mapper;
import org.apache.ibatis.annotations.Select;
import com.taotao.common.pojo.User;
@Mapper
public interface UserMapper {
@Select("select * from user where id=#{id}")
public User queryUserById(Long id);
}
编写UserServiceImpl实现类
import org.springframework.beans.factory.annotation.Autowired;
import com.alibaba.dubbo.config.annotation.Service;
import com.taotao.common.consumer.UserService;
import com.taotao.common.pojo.User;
import com.taotao.mapper.UserMapper;
@Service
public class UserServiceImpl implements UserService {
@Autowired
private UserMapper userMapper;
@Override
public User queryUserById(Long id) {
User user = this.userMapper.queryUserById(id);
return user;
}
}
编写引导类
import org.springframework.boot.SpringApplication;
import org.springframework.boot.autoconfigure.SpringBootApplication;
import com.alibaba.boot.dubbo.EnableDubboAutoConfiguration;
@SpringBootApplication
@EnableDubboAutoConfiguration
public class ProviderApplication {
public static void main(String[] args) {
SpringApplication.run(ProviderApplication.class, args);
}
}
在src/main/resources加入配置文件application.properties
#DB Configuration:
spring.datasource.driverClassName=com.mysql.jdbc.Driver
spring.datasource.url=jdbc:mysql://127.0.0.1:3306/taotao
spring.datasource.username=root
spring.datasource.password=root
#配置服务器访问端口号
server.port=8081
#配置dubbo信息
#配置服务名称
spring.dubbo.application.name=taotao-provider
#注册中心类型
spring.dubbo.registry.protocol=zookeeper
#注册中心连接方式
spring.dubbo.registry.address=manager.taotao.com:2181
#配置服务调用所使用的协议
spring.dubbo.protocol.name=dubbo
#配置服务端口号
spring.dubbo.protocol.port=20880
#配置服务访问地址
spring.dubbo.protocol.host=localhost
#配置dubbo扫描
spring.dubbo.scan=com.taotao.provider
3.7.3. 实现taotao-consumer
编写Controller
import org.springframework.web.bind.annotation.PathVariable;
import org.springframework.web.bind.annotation.RequestMapping;
import org.springframework.web.bind.annotation.RestController;
import com.alibaba.dubbo.config.annotation.Reference;
import com.taotao.common.consumer.UserService;
import com.taotao.common.pojo.User;
@RestController
@RequestMapping("user")
public class UserController {
@Reference
private UserService userService;
@RequestMapping("{id}")
public User queryUserById(@PathVariable Long id) {
User user = this.userService.queryUserById(id);
return user;
}
}
编写引导类
import org.springframework.boot.SpringApplication;
import org.springframework.boot.autoconfigure.SpringBootApplication;
import com.alibaba.boot.dubbo.EnableDubboAutoConfiguration;
@SpringBootApplication
@EnableDubboAutoConfiguration
public class ConsumerApplication {
public static void main(String[] args) {
SpringApplication.run(ConsumerApplication.class, args);
}
}
在src/main/resources加入配置文件application.properties
#配置服务器访问端口号
server.port=8080
#配置dubbo信息
#配置服务名称
spring.dubbo.application.name=taotao-consumer
#注册中心类型
spring.dubbo.registry.protocol=zookeeper
#注册中心连接方式
spring.dubbo.registry.address=manager.taotao.com:2181
#配置服务调用所使用的协议
spring.dubbo.protocol.name=dubbo
#配置服务端口号
spring.dubbo.protocol.port=20880
#配置服务访问地址
spring.dubbo.protocol.host=localhost
#配置dubbo扫描
spring.dubbo.scan=com.taotao.consumer
4. Spring Boot深入学习
4.1. 读取配置文件
4.1.1. .读取核心配置文件
在工程的src/main/resources 下修改核心配置文件
application.properties, 添加内容如下
name=传智播客
url=http://www.cnn.cn
在Controller中添加:
@Resource
private Environment env;
@RequestMapping("list")
public List<User> queryUserAll() {
System.out.println(env.getProperty("name"));
System.out.println(env.getProperty("url"));
List<User> list = this.userService.findAll();
return list;
}
就可以直接把配置文件信息打印出来。
注意包名是:org.springframework.core.env.Environment
4.1.2. 读取自定义文件
在工程的src/main/resources 下构建自定义配置文件mail.properties, 内容如下
mail.host=smtp.sina.com
mail.port=25
mail.username=cnn
mail.password=heima
编写JavaBean
import org.springframework.boot.context.properties.ConfigurationProperties;
import org.springframework.context.annotation.Configuration;
@Configuration
@ConfigurationProperties(locations = "classpath:mail.properties", prefix = "mail")
public class MailProperties {
private String host;
private Integer port;
private String username;
private String password;
set/get
}
改造Controller
@Autowired
private MailProperties mailProperties;
@RequestMapping("/mailInfo")
public String mailInfo() {
return mailProperties.getHost() + "<br>" + mailProperties.getPort() + "<br>" + mailProperties.getUsername()
+ "<br>" + mailProperties.getPassword();
}
打印效果
4.2. 打jar包
在工程的pom.xml中添加以下依赖
<build>
<plugins>
<plugin>
<groupId>org.springframework.boot</groupId>
<artifactId>spring-boot-maven-plugin</artifactId>
</plugin>
</plugins>
</build>
我们目前的工程采用的是jar 的打包方式,所以我们在执行package 命令后,
会产生一个jar 包。
我们进入到这个目录用压缩软件打开此jar 包,其中我们发现了一个叫lib 的文件夹,打开lib 文件夹发现此文件夹下全是工程依赖的jar包,甚至还有tomcat。这种包含有jar 包的jar包,我们称之为fatJAR( 胖jar 包)
由于fatJAR 本身就包括tomcat , 我们就不需要另外部署了,直接在命令行就可以把我们的应用启动起来,在命令行,进入到jar 包所在的目录,我们可以通过以下java –jar命令来执行此jar 包。
在控制台会出现启动信息,在浏览器访问程序
4.3. 打war包
spring-boot 默认提供内嵌的tomcat,所以打包直接生成jar 包,用java
-jar 命令就可以启动。但是,有时候我们更希望一个tomcat 来管理多个项目,
这种情况下就需要项目是war 格式的包而不是jar 格式的包。
我们按照以下步骤完成对工程的改造
(1)修改pom.xml
将打包方式修改为war
<packaging>war</packaging>
添加依赖
<dependency>
<groupId>org.springframework.boot</groupId>
<artifactId>spring-boot-starter-tomcat</artifactId>
<scope>provided</scope>
</dependency>
spring-boot-starter-tomcat 是原来被传递过来的依赖,默认会打到包里,所
以我们再次引入此依赖,并指定依赖范围为provided,这样tomcat 相关的jar
就不会打包到war 里了.
(2)添加ServletInitializer
import org.springframework.boot.builder.SpringApplicationBuilder;
import
org.springframework.boot.context.web.SpringBootServletInitializer;
public class ServletInitializer extends SpringBootServletInitializer {
@Override
protected SpringApplicationBuilder configure(SpringApplicationBuilder
application) {
return application.sources(Application.class);
}
}
由于我们采用web3.0 规范,是没有web.xml 的,而此类的作用与web.xml
相同。
(3)运行package 打包命令生成war 包
生成后将war 包放入tomcat,启动tomcat,测试完成的功能是否可以使用。
附录1. Spring-boot的启动器
(摘自Spring-boot 1.4.4官方文档)
1. Spring Boot application starters
spring-boot-starter-thymeleaf
使用Thymeleaf视图构建MVC Web应用程序
spring-boot-starter-ws
使用Spring Web服务。1.4不推荐使用,推荐使用spring-boot-starter-web-services
spring-boot-starter-data-couchbase
Starter for using Couchbase document-oriented database and Spring Data Couchbase
spring-boot-starter-artemis
使用Apache Artemis启动JMS消息传递
spring-boot-starter-web-services
使用Spring Web服务
spring-boot-starter-mail
支持使用Java Mail和Spring Framework发送电子邮件
spring-boot-starter-data-redis
使用Redis键值数据存储与Spring Data Redis和Jedis客户端
spring-boot-starter-web
启动器构建web,包括RESTful,使用Spring MVC的应用程序。使用Tomcat作为默认嵌入式容器
spring-boot-starter-data-gemfire
Starter for using GemFire distributed data store and Spring Data GemFire
spring-boot-starter-activemq
使用Apache ActiveMQ启动JMS消息传递
spring-boot-starter-data-elasticsearch
使用Elasticsearch搜索和分析引擎和Spring Data Elasticsearch
spring-boot-starter-integration
Starter for using Spring Integration
spring-boot-starter-test
Spring Boot应用程序用于测试包括JUnit,Hamcrest和Mockito
spring-boot-starter-hornetq
使用HornetQ启动JMS消息传递。1.4已弃用,推荐使用spring-boot-starter-artemis
spring-boot-starter-jdbc
使用JDBC与Tomcat JDBC连接池
spring-boot-starter-mobile
使用Spring Mobile构建Web应用程序的入门
spring-boot-starter-validation
使用Java Bean校验与Hibernate校验器
spring-boot-starter-hateoas
使用Spring MVC和Spring HATEOAS构建基于超媒体的RESTful Web应用程序的入门
spring-boot-starter-jersey
使用JAX-RS和Jersey构建RESTful Web应用程序的入门。 spring-boot-starter-web的替代品
spring-boot-starter-data-neo4j
使用Neo4j图数据库和Spring Data Neo4j
spring-boot-starter-websocket
使用Spring Framework的WebSocket支持构建WebSocket应用程序
spring-boot-starter-aop
使用Spring AOP和AspectJ进行面向方面编程
spring-boot-starter-amqp
使用Spring AMQP和Rabbit MQ的入门
spring-boot-starter-data-cassandra
使用Cassandra分布式数据库和Spring Data Cassandra
spring-boot-starter-social-facebook
使用Spring Social Facebook
spring-boot-starter-jta-atomikos
使用Atomikos进行JTA事务
spring-boot-starter-security
使用Spring Security
spring-boot-starter-mustache
使用Mustache视图构建MVC Web应用程序
spring-boot-starter-data-jpa
使用Spring Data JPA与Hibernate
spring-boot-starter
核心启动器,包括自动配置支持,日志记录和YAML
spring-boot-starter-velocity
使用Velocity视图构建MVC Web应用程序。1.4已弃用
spring-boot-starter-groovy-templates
使用Groovy模板视图构建MVC Web应用程序
spring-boot-starter-freemarker
使用FreeMarker视图构建MVC Web应用程序
spring-boot-starter-batch
使用Spring Batch
spring-boot-starter-redis
使用Redis键值数据存储与Spring Data Redis和Jedis客户端的入门。1.4已弃用,建议使用spring-boot-starter-data-redis
spring-boot-starter-social-linkedin
Stater for using Spring Social LinkedIn
spring-boot-starter-cache
支持使用Spring Framework的缓存
spring-boot-starter-data-solr
使用带有Spring Data Solr的Apache Solr搜索平台
spring-boot-starter-data-mongodb
使用MongoDB和Spring Data MongoDB
spring-boot-starter-jooq
使用jOOQ访问SQL数据库。 spring-boot-starter-data-jpa或spring-boot-starter-jdbc的替代方法
spring-boot-starter-jta-narayana
Spring Boot启动Narayana JTA
spring-boot-starter-cloud-connectors
启动者使用Spring Cloud连接器,简化了连接到云平台中的服务,如Cloud Foundry和Heroku
spring-boot-starter-jta-bitronix
使用Bitronix进行JTA事务
spring-boot-starter-social-twitter
使用Spring Social Twitter
spring-boot-starter-data-rest
使用Spring Data REST通过REST暴露Spring数据存储库
2. Spring Boot production starters
spring-boot-starter-actuator
使用Spring Boot的Actuator,提供生产就绪的功能,以帮助您监视和管理您的应用程序
spring-boot-starter-remote-shell
使用CRaSH远程shell通过SSH监视和管理您的应用程序
3. Spring Boot technical starters
spring-boot-starter-undertow
使用Undertow作为嵌入式servlet容器。 spring-boot-starter-tomcat的替代方法
spring-boot-starter-jetty
使用Jetty作为嵌入式servlet容器的。 spring-boot-starter-tomcat的替代方法
spring-boot-starter-logging
使用Logback进行日志记录。 默认日志启动器
spring-boot-starter-tomcat
使用Tomcat作为嵌入式servlet容器。 spring-boot-starter-web使用的默认servlet容器
spring-boot-starter-log4j2
使用Log4j2进行日志记录。 spring-boot-starter-logging的替代方法
SpringBoot为我们做的自动配置,确实方便快捷,但是对于新手来说,如果不大懂SpringBoot内部启动原理,以后难免会吃亏。所以这次博主就跟你们一起一步步揭开SpringBoot的神秘面纱,让它不在神秘。

正文
我们开发任何一个Spring Boot项目,都会用到如下的启动类
@SpringBootApplication
public class Application {
public static void main(String[] args) {
SpringApplication.run(Application.class, args);
}
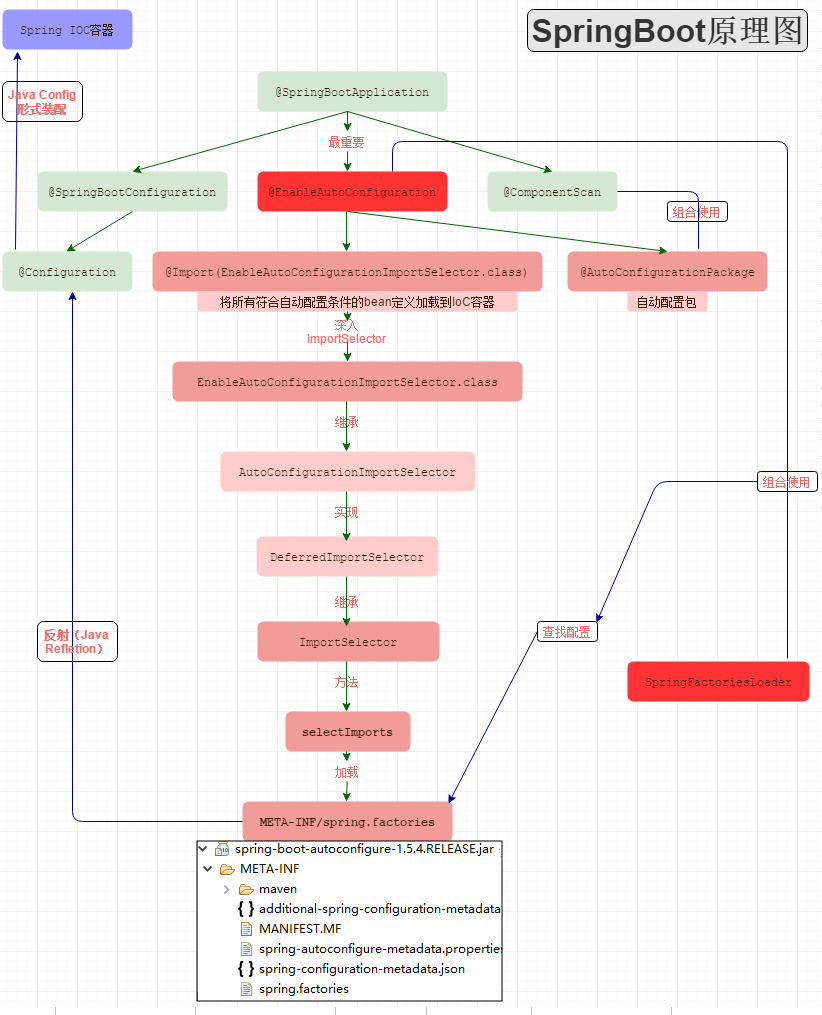
}从上面代码可以看出,Annotation定义(@SpringBootApplication)和类定义(SpringApplication.run)最为耀眼,所以要揭开SpringBoot的神秘面纱,我们要从这两位开始就可以了。
SpringBootApplication背后的秘密
@Target(ElementType.TYPE)            // 注解的适用范围,其中TYPE用于描述类、接口(包括包注解类型)或enum声明
@Retention(RetentionPolicy.RUNTIME)  // 注解的生命周期,保留到class文件中(三个生命周期)
@Documented                          // 表明这个注解应该被javadoc记录
@Inherited                           // 子类可以继承该注解
@SpringBootConfiguration             // 继承了Configuration,表示当前是注解类
@EnableAutoConfiguration             // 开启springboot的注解功能,springboot的四大神器之一,其借助@import的帮助
@ComponentScan(excludeFilters = {    // 扫描路径设置(具体使用待确认)
        @Filter(type = FilterType.CUSTOM, classes = TypeExcludeFilter.class),
        @Filter(type = FilterType.CUSTOM, classes = AutoConfigurationExcludeFilter.class) })
public @interface SpringBootApplication {
...
}
虽然定义使用了多个Annotation进行了原信息标注,但实际上重要的只有三个Annotation:
- @Configuration(@SpringBootConfiguration点开查看发现里面还是应用了@Configuration)
- @EnableAutoConfiguration
- @ComponentScan
所以,如果我们使用如下的SpringBoot启动类,整个SpringBoot应用依然可以与之前的启动类功能对等:
@Configuration
@EnableAutoConfiguration
@ComponentScan
public class Application {
    public static void main(String[] args) {
        SpringApplication.run(Application.class, args);
    }
}
每次写这3个比较累,所以写一个@SpringBootApplication方便点。接下来分别介绍这3个Annotation。
@Configuration
这里的@Configuration对我们来说不陌生,它就是JavaConfig形式的Spring Ioc容器的配置类使用的那个@Configuration,SpringBoot社区推荐使用基于JavaConfig的配置形式,所以,这里的启动类标注了@Configuration之后,本身其实也是一个IoC容器的配置类。
举几个简单例子回顾下,XML跟config配置方式的区别:
- 表达形式层面
基于XML配置的方式是这样:
- 表达形式层面
<?xml version="1.0" encoding="UTF-8"?>
<beans xmlns="http://www.springframework.org/schema/beans"
       xmlns:xsi="http://www.w3.org/2001/XMLSchema-instance"
       xsi:schemaLocation="http://www.springframework.org/schema/beans http://www.springframework.org/schema/beans/spring-beans-3.0.xsd"
       default-lazy-init="true">
    <!--bean定义-->
</beans>
而基于JavaConfig的配置方式是这样:
@Configuration
public class MockConfiguration{
    //bean定义
}
任何一个标注了@Configuration的Java类定义都是一个JavaConfig配置类。
- 注册bean定义层面
基于XML的配置形式是这样:
- 注册bean定义层面
<bean id="mockService" class="..MockServiceImpl">
    ...
</bean>
而基于JavaConfig的配置形式是这样的:
@Configuration
public class MockConfiguration{
    @Bean
    public MockService mockService(){
        return new MockServiceImpl();
    }
}
任何一个标注了@Bean的方法,其返回值将作为一个bean定义注册到Spring的IoC容器,方法名将默认成该bean定义的id。
- 表达依赖注入关系层面
为了表达bean与bean之间的依赖关系,在XML形式中一般是这样:
- 表达依赖注入关系层面
<bean id="mockService" class="..MockServiceImpl">
    <propery name ="dependencyService" ref="dependencyService" />
</bean>

<bean id="dependencyService" class="DependencyServiceImpl"></bean>
而基于JavaConfig的配置形式是这样的:
@Configuration
public class MockConfiguration{
    @Bean
    public MockService mockService(){
        return new MockServiceImpl(dependencyService());
    }

    @Bean
    public DependencyService dependencyService(){
        return new DependencyServiceImpl();
    }
}
如果一个bean的定义依赖其他bean,则直接调用对应的JavaConfig类中依赖bean的创建方法就可以了。
@ComponentScan
@ComponentScan这个注解在Spring中很重要,它对应XML配置中的元素,@ComponentScan的功能其实就是自动扫描并加载符合条件的组件(比如@Component和@Repository等)或者bean定义,最终将这些bean定义加载到IoC容器中。
我们可以通过basePackages等属性来细粒度的定制@ComponentScan自动扫描的范围,如果不指定,则默认Spring框架实现会从声明@ComponentScan所在类的package进行扫描。
注:所以SpringBoot的启动类最好是放在root package下,因为默认不指定basePackages。
@EnableAutoConfiguration
个人感觉@EnableAutoConfiguration这个Annotation最为重要,所以放在最后来解读,大家是否还记得Spring框架提供的各种名字为@Enable开头的Annotation定义?比如@EnableScheduling、@EnableCaching、@EnableMBeanExport等,@EnableAutoConfiguration的理念和做事方式其实一脉相承,简单概括一下就是,借助@Import的支持,收集和注册特定场景相关的bean定义。
- @EnableScheduling是通过@Import将Spring调度框架相关的bean定义都加载到IoC容器。
- @EnableMBeanExport是通过@Import将JMX相关的bean定义加载到IoC容器。
而@EnableAutoConfiguration也是借助@Import的帮助,将所有符合自动配置条件的bean定义加载到IoC容器,仅此而已!
@EnableAutoConfiguration作为一个复合Annotation,其自身定义关键信息如下:
@SuppressWarnings("deprecation")
@Target(ElementType.TYPE)
@Retention(RetentionPolicy.RUNTIME)
@Documented
@Inherited
@AutoConfigurationPackage
@Import(EnableAutoConfigurationImportSelector.class)
public @interface EnableAutoConfiguration {
    ...
}
两个比较重要的注解:
@AutoConfigurationPackage:自动配置包
@Import: 导入自动配置的组件
AutoConfigurationPackage注解:

1     static class Registrar implements ImportBeanDefinitionRegistrar, DeterminableImports {
2
3         @Override
4         public void registerBeanDefinitions(AnnotationMetadata metadata,
5                 BeanDefinitionRegistry registry) {
6             register(registry, new PackageImport(metadata).getPackageName());
7         }
它其实是注册了一个Bean的定义。
new PackageImport(metadata).getPackageName(),它其实返回了当前主程序类的 同级以及子级 的包组件。

以上图为例,DemoApplication是和demo包同级,但是demo2这个类是DemoApplication的父级,和example包同级
也就是说,DemoApplication启动加载的Bean中,并不会加载demo2,这也就是为什么,我们要把DemoApplication放在项目的最高级中。
Import(AutoConfigurationImportSelector.class)注解:
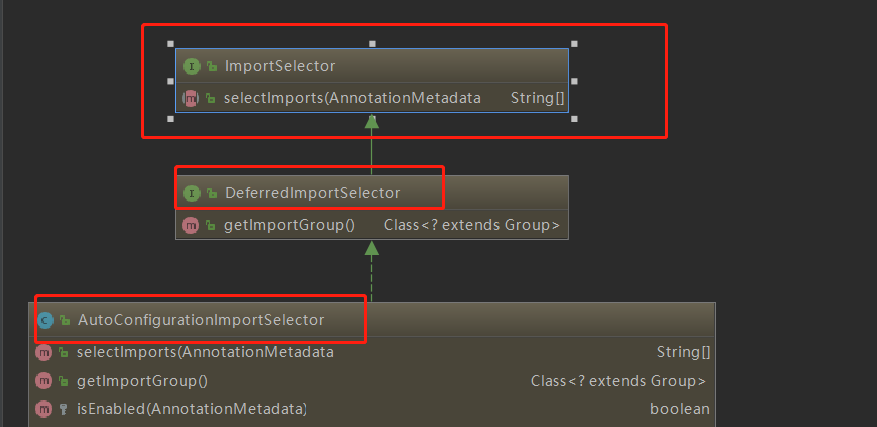
可以从图中看出 AutoConfigurationImportSelector 继承了 DeferredImportSelector 继承了 ImportSelector
ImportSelector有一个方法为:selectImports。
@Override
    public String[] selectImports(AnnotationMetadata annotationMetadata) {
        if (!isEnabled(annotationMetadata)) {
            return NO_IMPORTS;
        }
        AutoConfigurationMetadata autoConfigurationMetadata = AutoConfigurationMetadataLoader
                .loadMetadata(this.beanClassLoader);
        AnnotationAttributes attributes = getAttributes(annotationMetadata);
        List<String> configurations = getCandidateConfigurations(annotationMetadata,
                attributes);
        configurations = removeDuplicates(configurations);
        Set<String> exclusions = getExclusions(annotationMetadata, attributes);
        checkExcludedClasses(configurations, exclusions);
        configurations.removeAll(exclusions);
        configurations = filter(configurations, autoConfigurationMetadata);
        fireAutoConfigurationImportEvents(configurations, exclusions);
        return StringUtils.toStringArray(configurations);
    }
可以看到第九行,它其实是去加载 public static final String FACTORIES_RESOURCE_LOCATION = "META-INF/spring.factories";外部文件。这个外部文件,有很多自动配置的类。如下:

其中,最关键的要属@Import(EnableAutoConfigurationImportSelector.class),借助EnableAutoConfigurationImportSelector,@EnableAutoConfiguration可以帮助SpringBoot应用将所有符合条件的@Configuration配置都加载到当前SpringBoot创建并使用的IoC容器。就像一只“八爪鱼”一样。
自动配置幕后英雄:SpringFactoriesLoader详解
借助于Spring框架原有的一个工具类:SpringFactoriesLoader的支持,@EnableAutoConfiguration可以智能的自动配置功效才得以大功告成!
SpringFactoriesLoader属于Spring框架私有的一种扩展方案,其主要功能就是从指定的配置文件META-INF/spring.factories加载配置。
public abstract class SpringFactoriesLoader {
    //...
    public static <T> List<T> loadFactories(Class<T> factoryClass, ClassLoader classLoader) {
        ...
    }


    public static List<String> loadFactoryNames(Class<?> factoryClass, ClassLoader classLoader) {
        ....
    }
}
配合@EnableAutoConfiguration使用的话,它更多是提供一种配置查找的功能支持,即根据@EnableAutoConfiguration的完整类名org.springframework.boot.autoconfigure.EnableAutoConfiguration作为查找的Key,获取对应的一组@Configuration类

上图就是从SpringBoot的autoconfigure依赖包中的META-INF/spring.factories配置文件中摘录的一段内容,可以很好地说明问题。
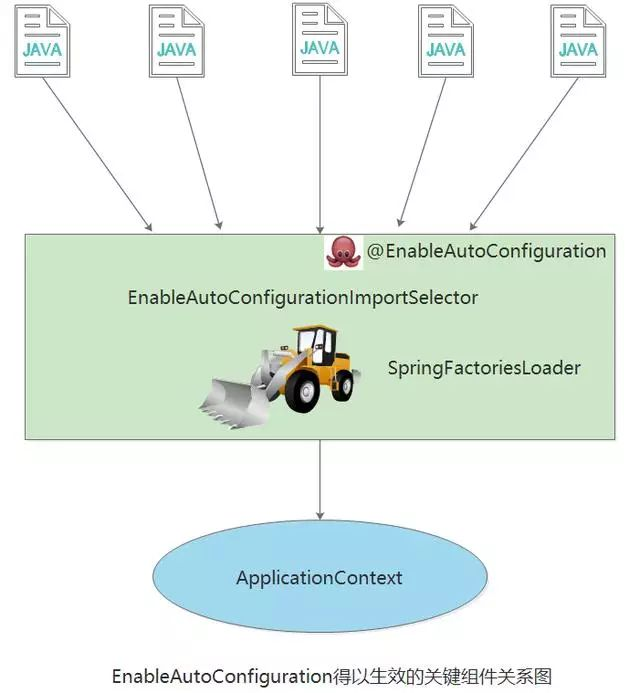
所以,@EnableAutoConfiguration自动配置的魔法骑士就变成了:从classpath中搜寻所有的META-INF/spring.factories配置文件,并将其中org.springframework.boot.autoconfigure.EnableutoConfiguration对应的配置项通过反射(Java Refletion)实例化为对应的标注了@Configuration的JavaConfig形式的IoC容器配置类,然后汇总为一个并加载到IoC容器。
SpringBoot的启动原理基本算是讲完了,为了方便记忆,我根据上面的分析画了张图
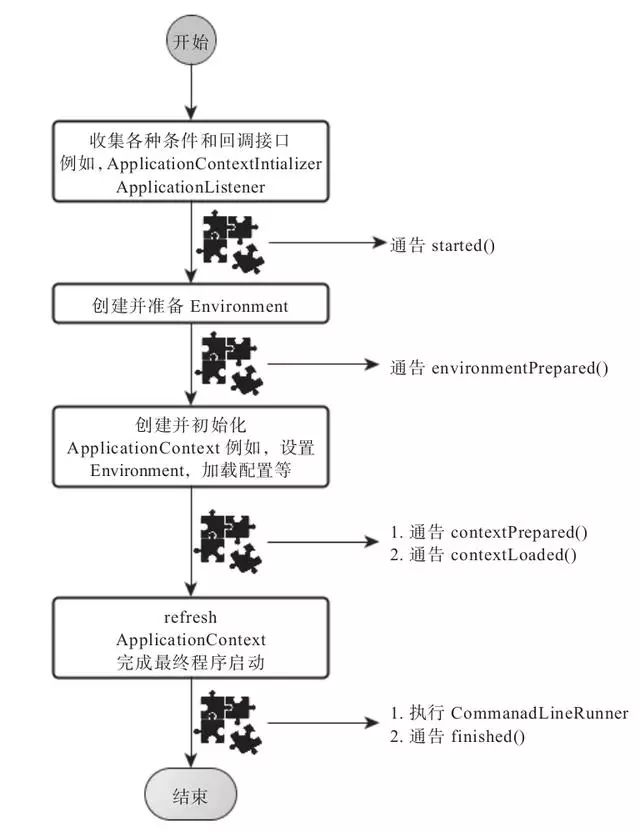
深入探索SpringApplication执行流程
SpringApplication的run方法的实现是我们本次旅程的主要线路,该方法的主要流程大体可以归纳如下:
1) 如果我们使用的是SpringApplication的静态run方法,那么,这个方法里面首先要创建一个SpringApplication对象实例,然后调用这个创建好的SpringApplication的实例方法。在SpringApplication实例初始化的时候,它会提前做几件事情:
public static ConfigurableApplicationContext run(Object[] sources, String[] args) {
        return new SpringApplication(sources).run(args);
}- 根据classpath里面是否存在某个特征类(org.springframework.web.context.ConfigurableWebApplicationContext)来决定是否应该创建一个为Web应用使用的ApplicationContext类型。
- 使用SpringFactoriesLoader在应用的classpath中查找并加载所有可用的ApplicationContextInitializer。
- 使用SpringFactoriesLoader在应用的classpath中查找并加载所有可用的ApplicationListener。
- 推断并设置main方法的定义类。
@SuppressWarnings({ "unchecked", "rawtypes" })
    private void initialize(Object[] sources) {
        if (sources != null && sources.length > 0) {
            this.sources.addAll(Arrays.asList(sources));
        }
        this.webEnvironment = deduceWebEnvironment();
        setInitializers((Collection) getSpringFactoriesInstances(
                ApplicationContextInitializer.class));
        setListeners((Collection) getSpringFactoriesInstances(ApplicationListener.class));
        this.mainApplicationClass = deduceMainApplicationClass();
    }
2) SpringApplication实例初始化完成并且完成设置后,就开始执行run方法的逻辑了,方法执行伊始,首先遍历执行所有通过SpringFactoriesLoader可以查找到并加载的SpringApplicationRunListener。调用它们的started()方法,告诉这些SpringApplicationRunListener,“嘿,SpringBoot应用要开始执行咯!”。
public ConfigurableApplicationContext run(String... args) {
        StopWatch stopWatch = new StopWatch();
        stopWatch.start();
        ConfigurableApplicationContext context = null;
        FailureAnalyzers analyzers = null;
        configureHeadlessProperty();
        SpringApplicationRunListeners listeners = getRunListeners(args);
        listeners.starting();
        try {
            ApplicationArguments applicationArguments = new DefaultApplicationArguments(
                    args);
            ConfigurableEnvironment environment = prepareEnvironment(listeners,
                    applicationArguments);
            Banner printedBanner = printBanner(environment);
            context = createApplicationContext();
            analyzers = new FailureAnalyzers(context);
            prepareContext(context, environment, listeners, applicationArguments,
                    printedBanner);
       // 核心点:会打印springboot的启动标志,直到server.port端口启动
            refreshContext(context);
            afterRefresh(context, applicationArguments);
            listeners.finished(context, null);
            stopWatch.stop();
            if (this.logStartupInfo) {
                new StartupInfoLogger(this.mainApplicationClass)
                        .logStarted(getApplicationLog(), stopWatch);
            }
            return context;
        }
        catch (Throwable ex) {
            handleRunFailure(context, listeners, analyzers, ex);
            throw new IllegalStateException(ex);
        }
    }
3) 创建并配置当前Spring Boot应用将要使用的Environment(包括配置要使用的PropertySource以及Profile)。
private ConfigurableEnvironment prepareEnvironment(
            SpringApplicationRunListeners listeners,
            ApplicationArguments applicationArguments) {
        // Create and configure the environment
        ConfigurableEnvironment environment = getOrCreateEnvironment();
        configureEnvironment(environment, applicationArguments.getSourceArgs());
        listeners.environmentPrepared(environment);
        if (!this.webEnvironment) {
            environment = new EnvironmentConverter(getClassLoader())
                    .convertToStandardEnvironmentIfNecessary(environment);
        }
        return environment;
    }
4) 遍历调用所有SpringApplicationRunListener的environmentPrepared()的方法,告诉他们:“当前SpringBoot应用使用的Environment准备好了咯!”。
public void environmentPrepared(ConfigurableEnvironment environment) {
        for (SpringApplicationRunListener listener : this.listeners) {
            listener.environmentPrepared(environment);
        }
    }
5) 如果SpringApplication的showBanner属性被设置为true,则打印banner。
private Banner printBanner(ConfigurableEnvironment environment) {
        if (this.bannerMode == Banner.Mode.OFF) {
            return null;
        }
        ResourceLoader resourceLoader = this.resourceLoader != null ? this.resourceLoader
                : new DefaultResourceLoader(getClassLoader());
        SpringApplicationBannerPrinter bannerPrinter = new SpringApplicationBannerPrinter(
                resourceLoader, this.banner);
        if (this.bannerMode == Mode.LOG) {
            return bannerPrinter.print(environment, this.mainApplicationClass, logger);
        }
        return bannerPrinter.print(environment, this.mainApplicationClass, System.out);
    }
6) 根据用户是否明确设置了applicationContextClass类型以及初始化阶段的推断结果,决定该为当前SpringBoot应用创建什么类型的ApplicationContext并创建完成,然后根据条件决定是否添加ShutdownHook,决定是否使用自定义的BeanNameGenerator,决定是否使用自定义的ResourceLoader,当然,最重要的,将之前准备好的Environment设置给创建好的ApplicationContext使用。
7) ApplicationContext创建好之后,SpringApplication会再次借助Spring-FactoriesLoader,查找并加载classpath中所有可用的ApplicationContext-Initializer,然后遍历调用这些ApplicationContextInitializer的initialize(applicationContext)方法来对已经创建好的ApplicationContext进行进一步的处理。
@SuppressWarnings({ "rawtypes", "unchecked" })
    protected void applyInitializers(ConfigurableApplicationContext context) {
        for (ApplicationContextInitializer initializer : getInitializers()) {
            Class<?> requiredType = GenericTypeResolver.resolveTypeArgument(
                    initializer.getClass(), ApplicationContextInitializer.class);
            Assert.isInstanceOf(requiredType, context, "Unable to call initializer.");
            initializer.initialize(context);
        }
    }
8) 遍历调用所有SpringApplicationRunListener的contextPrepared()方法。
private void prepareContext(ConfigurableApplicationContext context,
            ConfigurableEnvironment environment, SpringApplicationRunListeners listeners,
            ApplicationArguments applicationArguments, Banner printedBanner) {
        context.setEnvironment(environment);
        postProcessApplicationContext(context);
        applyInitializers(context);
        listeners.contextPrepared(context);
        if (this.logStartupInfo) {
            logStartupInfo(context.getParent() == null);
            logStartupProfileInfo(context);
        }

        // Add boot specific singleton beans
        context.getBeanFactory().registerSingleton("springApplicationArguments",
                applicationArguments);
        if (printedBanner != null) {
            context.getBeanFactory().registerSingleton("springBootBanner", printedBanner);
        }

        // Load the sources
        Set<Object> sources = getSources();
        Assert.notEmpty(sources, "Sources must not be empty");
        load(context, sources.toArray(new Object[sources.size()]));
        listeners.contextLoaded(context);
    }
9) 最核心的一步,将之前通过@EnableAutoConfiguration获取的所有配置以及其他形式的IoC容器配置加载到已经准备完毕的ApplicationContext。
private void prepareAnalyzer(ConfigurableApplicationContext context,
            FailureAnalyzer analyzer) {
        if (analyzer instanceof BeanFactoryAware) {
            ((BeanFactoryAware) analyzer).setBeanFactory(context.getBeanFactory());
        }
    }
10) 遍历调用所有SpringApplicationRunListener的contextLoaded()方法。
public void contextLoaded(ConfigurableApplicationContext context) {
        for (SpringApplicationRunListener listener : this.listeners) {
            listener.contextLoaded(context);
        }
    }
11) 调用ApplicationContext的refresh()方法,完成IoC容器可用的最后一道工序。
private void refreshContext(ConfigurableApplicationContext context) {
        refresh(context);
        if (this.registerShutdownHook) {
            try {
                context.registerShutdownHook();
            }
            catch (AccessControlException ex) {
                // Not allowed in some environments.
            }
        }
    }
12) 查找当前ApplicationContext中是否注册有CommandLineRunner,如果有,则遍历执行它们。
private void callRunners(ApplicationContext context, ApplicationArguments args) {
        List<Object> runners = new ArrayList<Object>();
        runners.addAll(context.getBeansOfType(ApplicationRunner.class).values());
        runners.addAll(context.getBeansOfType(CommandLineRunner.class).values());
        AnnotationAwareOrderComparator.sort(runners);
        for (Object runner : new LinkedHashSet<Object>(runners)) {
            if (runner instanceof ApplicationRunner) {
                callRunner((ApplicationRunner) runner, args);
            }
            if (runner instanceof CommandLineRunner) {
                callRunner((CommandLineRunner) runner, args);
            }
        }
    }
13) 正常情况下,遍历执行SpringApplicationRunListener的finished()方法、(如果整个过程出现异常,则依然调用所有SpringApplicationRunListener的finished()方法,只不过这种情况下会将异常信息一并传入处理)
去除事件通知点后,整个流程如下:
public void finished(ConfigurableApplicationContext context, Throwable exception) {
        for (SpringApplicationRunListener listener : this.listeners) {
            callFinishedListener(listener, context, exception);
        }
    }
总结
到此,SpringBoot的核心组件完成了基本的解析,综合来看,大部分都是Spring框架背后的一些概念和实践方式,SpringBoot只是在这些概念和实践上对特定的场景事先进行了固化和升华,而也恰恰是这些固化让我们开发基于Sping框架的应用更加方便高效。