首先,简单介绍一下spring boot的配置和连接数据库获取数据(在Log in with Atlassian account 案例基础上进行修改)。
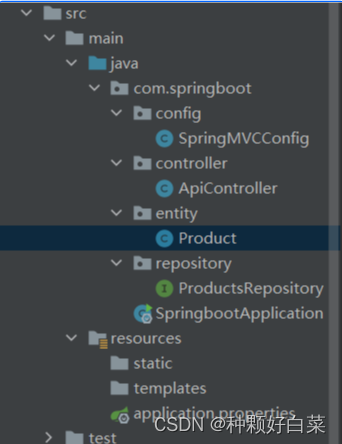
spingboot目录结构:
SpingMVCConfig.java:
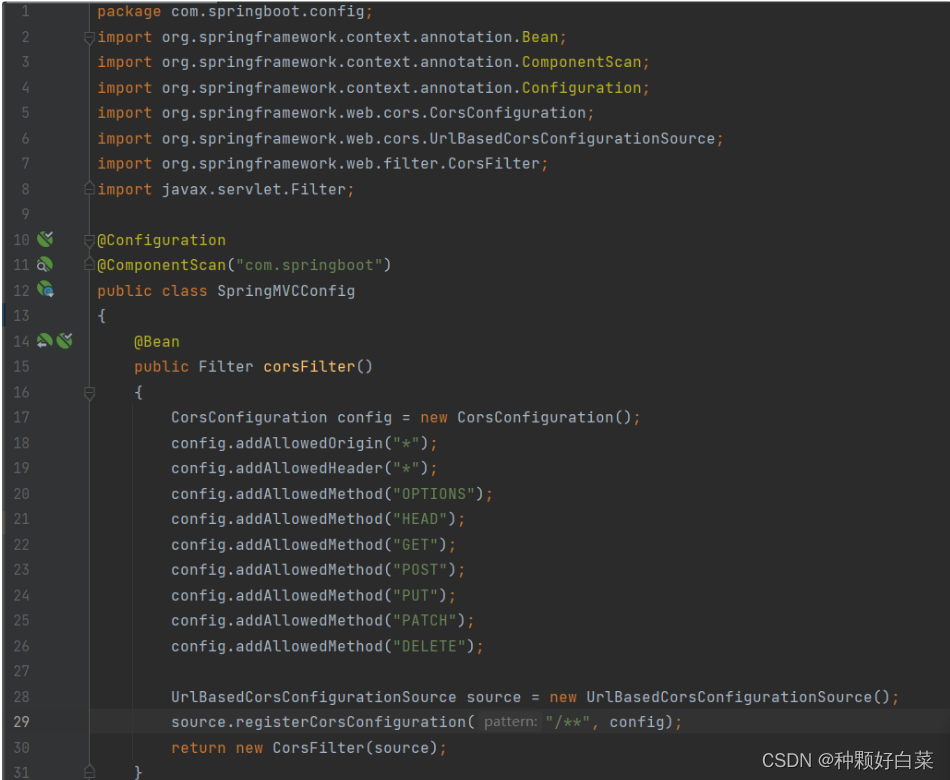
(由于从Intellij IDEA中复制的代码在这里粘贴,结构会乱,所以这里用代码截图)
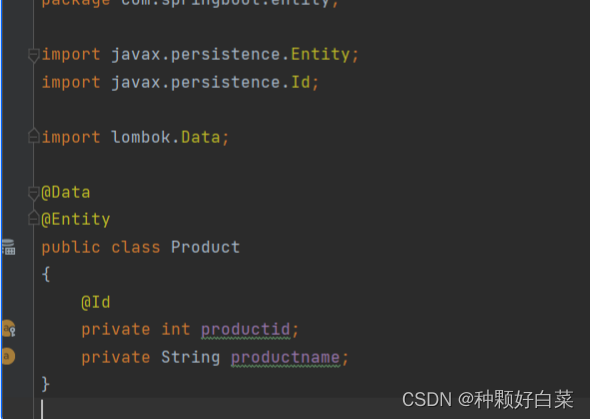
Product.java:
ApiController.java:
package com.example.odata.controller;
import com.example.odata.dao.HeroesDao;
import com.example.odata.entity.Hero;
import com.example.odata.entity.Product;
import com.example.odata.repository.ProductsRepository;
import org.springframework.beans.BeanUtils;
import org.springframework.beans.BeanWrapper;
import org.springframework.beans.BeanWrapperImpl;
import org.springframework.beans.factory.annotation.Autowired;
import org.springframework.web.bind.annotation.*;
import java.beans.PropertyDescriptor;
import java.util.*;
@RestController
@RequestMapping("/api")
public class ApiController
{
@Autowired
private ProductsRepository prodectsRepository;
@GetMapping(value = "/Products",
produces = "application/json; charset=UTF-8")
public List<Product> queryAllFromDB()
{
return prodectsRepository.findAll();
}
@GetMapping(value = "/Products/{id}",
produces = "application/json; charset=UTF-8")
public Optional<Product> queryOneFromDB(@PathVariable("id") Integer id)
{
return prodectsRepository.findById(id);
}
@PostMapping("/Products")
public boolean insertToDB(@RequestBody Product data)
{
prodectsRepository.save(data);
return true;
}
@PutMapping("/Products")
public boolean updateToDB(@RequestBody Product data)
{
prodectsRepository.save(data);
return true;
}
@PatchMapping("/Products/{id}")
public boolean updatePartToDB(@PathVariable("id") Integer id,
@RequestBody Product data)
{
if (prodectsRepository.existsById(id))
{
Product oldData = prodectsRepository.getById(id);
data.setProductid(id);
BeanUtils.copyProperties(data, oldData, getNullPropertyNames(data));
prodectsRepository.save(oldData);
return true;
}
return false;
}
@DeleteMapping("/Products/{id}")
public boolean deleteToDB(@PathVariable("id") Integer id)
{
prodectsRepository.deleteById(id);
return true;
}
@Autowired
private HeroesDao heroesDao;
@GetMapping(value = "/heroes",
produces = "application/json; charset=UTF-8")
public List<Hero> queryAllByDao()
{
return heroesDao.findAll();
}
@GetMapping(value = "/heroes/{id}",
produces = "application/json; charset=UTF-8")
public Hero queryOneByDao(@PathVariable("id") int id)
{
return heroesDao.findById(id);
}
@PostMapping("/heroes")
public Hero insertByDao(@RequestBody Hero data)
{
heroesDao.insert(data);
return data;
}
@PutMapping("/heroes")
public boolean updateByDao(@RequestBody Hero data)
{
heroesDao.update(data);
return true;
}
@DeleteMapping("/heroes/{id}")
public boolean deleteByDao(@PathVariable("id") int id)
{
heroesDao.deleteById(id);
return true;
}
private List<Map<String, Object>> dataList;
public ApiController()
{
dataList = new ArrayList<Map<String, Object>>();
Map<String, Object> data;
data = new HashMap<String, Object>();
data.put("id", 1);
data.put("title", "测试数据aaa");
data.put("subtitle", "aaa");
dataList.add(data);
data = new HashMap<String, Object>();
data.put("id", 2);
data.put("title", "测试数据bbb");
data.put("subtitle", "bbb");
dataList.add(data);
data = new HashMap<String, Object>();
data.put("id", 3);
data.put("title", "测试数据ccc");
data.put("subtitle", "ccc");
dataList.add(data);
data = new HashMap<String, Object>();
data.put("id", 4);
data.put("title", "测试数据ddd");
data.put("subtitle", "ddd");
dataList.add(data);
}
@GetMapping(value = "/test",
produces = "application/json; charset=UTF-8")
public List<Map<String, Object>> queryAllFromMock()
{
return dataList;
}
@GetMapping(value = "/test/{id}",
produces = "application/json; charset=UTF-8")
public Map<String, Object> queryOneFromMock(@PathVariable("id") Integer id)
{
for (Map<String, Object> data : dataList)
{
if (data.get("id") == id)
{
return data;
}
}
return new HashMap<String, Object>();
}
@PostMapping("/test")
public boolean insertToMock(@RequestBody Map<String, Object> data)
{
dataList.add(data);
return true;
}
@PutMapping("/test")
public boolean updateToMock(@RequestBody Map<String, Object> data)
{
for (int i = 0; i < dataList.size(); i++)
{
if (dataList.get(i).get("id") == data.get("id"))
{
dataList.set(i, data);
return true;
}
}
return false;
}
@PatchMapping("/test/{id}")
public boolean updatePartToMock(@PathVariable("id") Integer id,
@RequestBody Map<String, Object> data)
{
for (int i = 0; i < dataList.size(); i++)
{
if (dataList.get(i).get("id") == id)
{
Set<String> keys = data.keySet();
for (String key : keys)
{
dataList.get(i).put(key, data.get(key));
}
return true;
}
}
return false;
}
@DeleteMapping("/test/{id}")
public boolean deleteToMock(@PathVariable("id") Integer id)
{
for (Map<String, Object> data : dataList)
{
if (data.get("id") == id)
{
dataList.remove(data);
return true;
}
}
return false;
}
public static String[] getNullPropertyNames (Object source)
{
final BeanWrapper src = new BeanWrapperImpl(source);
PropertyDescriptor[] pds = src.getPropertyDescriptors();
Set<String> emptyNames = new HashSet<>();
for(PropertyDescriptor pd : pds)
{
Object srcValue = src.getPropertyValue(pd.getName());
if (srcValue == null)
{
emptyNames.add(pd.getName());
}
}
String[] result = new String[emptyNames.size()];
return emptyNames.toArray(result);
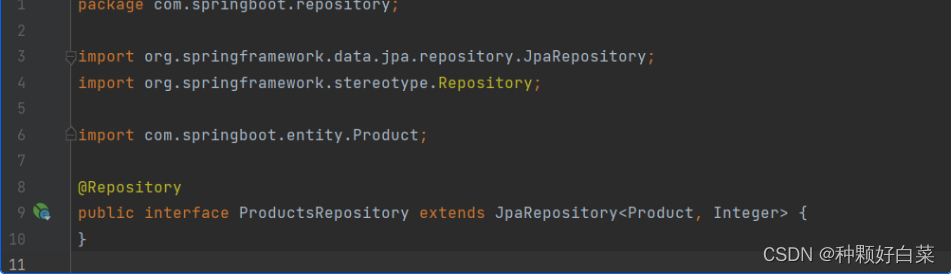
}ProductsRepository.java:
Spring Boot项目的pom.xml里需要加上下面这两个依赖:
<dependency>
 <groupId>org.springframework.boot</groupId>
 <artifactId>spring-boot-starter-data-jpa</artifactId>
</dependency>
然后在application.properties里配上数据库的连接信息:
spring.jpa.hibernate.ddl-auto=update
spring.datasource.url = jdbc:mysql://localhost:3306/test?serverTimezone=Asia/Shanghai
spring.datasource.username = root
spring.datasource.password = ******
spring.datasource.driver-class-name = com.mysql.cj.jdbc.Driver

spring.jpa.show-sql=true
因为我这边数据库用的是mySQL,需要在pom.xml里加上下面这两个依赖:
 <dependency>
            <groupId>org.springframework.boot</groupId>
            <artifactId>spring-boot-starter-jdbc</artifactId>
        </dependency>
        <dependency>
            <groupId>mysql</groupId>
            <artifactId>mysql-connector-java</artifactId>
            <scope>runtime</scope>
        </dependency>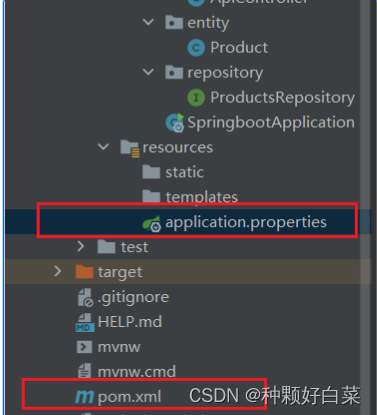
如果觉得在Entity里给所有属性写getter和setter函数麻烦的话,可以在Entity类上加@Data注解,然后在pom.xml里加上下面这个依赖:
<dependency>
 <groupId>org.projectlombok</groupId>
 <artifactId>lombok</artifactId>
 <optional>true</optional>
</dependency>
想要@Data注解起效还需要在Spring Tool Suite目录下放一个lombok.jar包,并在SpringToolSuite4.ini里加上下面这句话:
-javaagent:D:\Tools\SpringToolSuite\sts\lombok.jar
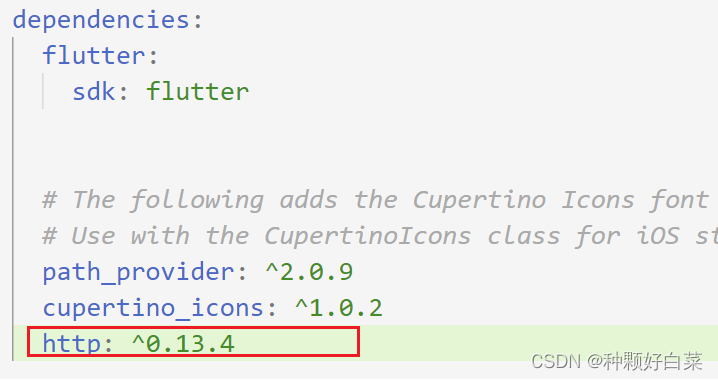
现在我们要将flutter项目通过spring boot服务器获取数据库数据并渲染到页面。
http请求
http:是Dart.dev提供的第三方类库,地址:https://pub.dev/packages/http
需要先在pubspec.yaml里添加类库应用:
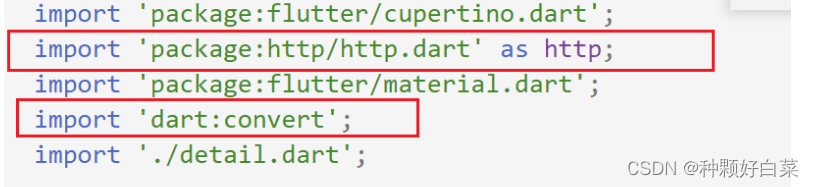
导入:
获取数据:
 _getData() async {
    var apiUrl = Uri.parse('http://192.168.1.7:8081/api/Products');
    var response = await http.get(apiUrl);
    if (response.statusCode == 200) {
      setState(() {
        _list = json.decode(response.body);
            print(_list);
      });
    }
  }
同时要在全局定义_list接受数据List _list = [];
在页面初始化时调用_getData()方法:
 @override
  void initState() {
    super.initState();
    _getData();
  }
此时如果请求成功控制台会打印数据:

通过ListView渲染到页面:
 @override
  Widget build(BuildContext context) {
    String inputValue = '';
    return Scaffold(
      appBar: AppBar(
        title: Text(widget.title),
      ),
      body: _list.isNotEmpty
          ? ListView.builder(
              itemCount: _list.length,
              itemBuilder: (BuildContext context, int index) {
                return ListTile(
                  title: Text(_list[index]["productid"].toString(),
                      style: const TextStyle(fontSize: 18.0)),
                  subtitle: Text(_list[index]["productname"]),
                  leading: const Icon(Icons.people, color: Colors.blue),
                  trailing: InkWell(
                    child: const Icon(Icons.delete_outline, color: Colors.red),
                    onTap: () {
                    },
                  ),
                  },
                );
              },
            )
          : const Text(""),
      floatingActionButton: FloatingActionButton(
        onPressed: () {
        },
        tooltip: 'Increment',
        child: const Icon(Icons.add),
      ),
    );
  }
}
post请求:
给页面右下角按钮FloatingActionButton的点击事件里添加一个对话框,当点击按钮是打开对话框:
showDialog<String>(
            context: context,
            barrierDismissible: false,
            builder: (BuildContext context) {
              return AlertDialog(
                title: const Text('请输入昵称'),
                content: SingleChildScrollView(
                  child: ListBody(
                    children: <Widget>[
                      CupertinoTextField(
                        placeholder: '请输入昵称',
                        onChanged: (value) {
                          inputValue = value;
                        },
                      )
                    ],
                  ),
                ),
                actions: <Widget>[
                  CupertinoDialogAction(
                    child: const Text('取消'),
                    onPressed: () {
                      Navigator.pop(context);
                    },
                  ),
                  CupertinoDialogAction(
                    child: const Text('确定'),
                    onPressed: () {
                      print(inputValue);
                      add(inputValue, () => {Navigator.pop(context)});
                    },
                  )
                ],
              );
            },
          ).then((val) {
            print(val);
          });
}
通过onChanged方法获取输入框的值,并在点确定按钮时将值作为参数传给add()方法:
add(e, callBack) async {
    var apiUrl = Uri.parse('http://192.168.1.7:8081/api/Products');
    var data = jsonEncode({"productname": e});
    var response = await http.post(apiUrl,
        headers: {"Content-Type": "application/json"}, body: data);
    print(response.body);
    if (response.body == "true") {
      _getData();
      callBack();
    }else {
      print("请求失败");
    }
  }
add()方法会调用post请求并将参数传给后端,如果请求成功就会重新获取数据渲染页面并退回到上一个页面。