原文链接:
Using Materials in Unreal UIs
How to apply shader effects to your UIs.
7th June 2017
For 90% of the time when creating UIs, using static textures inside Image widgets is good enough. Some of the time static textures are not enough and you need to display a material.
Luckily the standard Image widget accepts both static textures (UTexture2D) and materials.
Creating a User Interface Material
First we need to create a material that we can use within our UI.Create > New Material
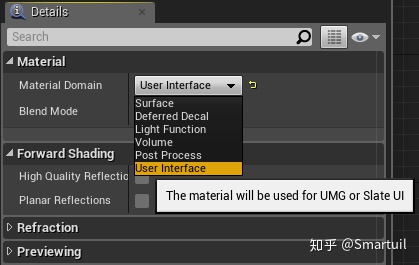
We want to use our material in our UI so the first thing we do is mark it as a User Interface material. We want to be able to make our widget semitransparent so we will set the Blend Mode to Transparent.
The material editor gives us a visual graph-based method for creating new materials. This tutorial won't delve into the details of material creation but we will create a simple material that will let us desaturate the colour of the texture that we want to display.
The Image widget has its own Colour property that we use to easily change the colour of static textures. We can use this property as an input to our material by using the VertexColor node.

Creating a Dynamic Material Instance
With our material created it's time to see how to use it in-game and how we can dynamically change our custom saturationparameter.
We will cover two different ways of achieving the same results, one from Blueprints and the other from pure C++.
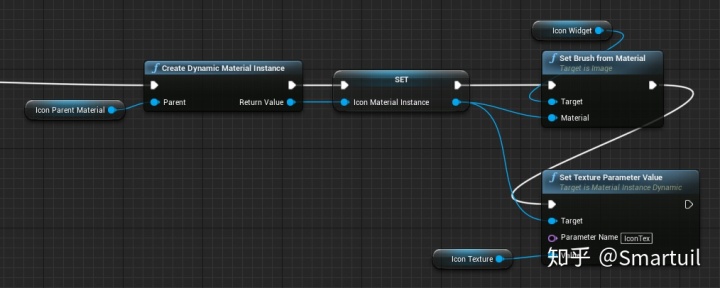
We can't set our material on the Image widget and try to change that. Instead we need to create a new Dynamic Material Instance at run-time, set that to the Image widget, and keep a reference to it in order to change its values.
In Blueprints
In C++
Assuming we have used the Bindwidget meta property to make our Image widget accessible from C++, we can create a new Dynamic Material Instance in C++ and assign it to the widget:
MaterialExample.h
#pragma once

#include "MaterialExample.generated.h"

UCLASS(Abstract)
class UMaterialExample : public UUserWidget
{
public:
	GENERATED_BODY()

	virtual void NativeConstruct() override;

	// We need an Image widget in our Blueprint class named "IconImage"
	UPROPERTY(BlueprintReadOnly, meta = (BindWidget))
	UImage* IconImage = nullptr;

	// Our base material that will be the template for our material instance
	UPROPERTY(EditDefaultsOnly)
	UMaterialInterface* IconMaterial = nullptr;

	// Our actual material instance
	UMaterialInstanceDynamic* IconMaterialInstance = nullptr;

	// A texture we'll set as a parameter to our dynamic material instance
	UPROPERTY(EditDefaultsOnly)
	UTexture2D* IconTexture = nullptr;
};
MaterialExample.cpp
#include "MaterialExample.h"

void UMaterialExample::NativeConstruct()
{
	Super::NativeConstruct();

	// Create dynamic material instance, based on parent
	IconMaterialInstance = UMaterialInstanceDyanmic::Create(IconMaterial, this);

	IconMaterialInstance->SetScalarParameterValue("Strength", 0.8f);
	IconMaterialInstance->SetVectorParameterValue("Color", FLinearColor::Red);
	IconMaterialInstance->SetTextureParameterValue("IconTex", IconTexture);
}
UMG Animations and Materials
UMG animations are a little fiddly and under-documented but you can produce some amazing things with them. One of their best-kept secrets is that it's possible to control material properties from UMG animations.
Using our previous desaturation example, it's possible to control the saturation scalar parameter from a UMG animation.