1.SpringMVC基于注解开发
1.1 创建maven webapp项目,修改项目结构,pom文件导入依赖
 <!-- https://mvnrepository.com/artifact/org.springframework/spring-webmvc -->
    <dependency>
      <groupId>org.springframework</groupId>
      <artifactId>spring-webmvc</artifactId>
      <version>5.1.5.RELEASE</version>
    </dependency>
    <!-- 配置ServletAPI依赖 -->
    <!-- https://mvnrepository.com/artifact/javax.servlet/javax.servlet-api -->
    <dependency>
      <groupId>javax.servlet</groupId>
      <artifactId>javax.servlet-api</artifactId>
      <version>3.0.1</version>
      <scope>provided</scope>
    </dependency>
    <!--配置JSP依赖包-->
    <!-- https://mvnrepository.com/artifact/javax.servlet.jsp/javax.servlet.jsp-api -->
    <dependency>
      <groupId>javax.servlet.jsp</groupId>
      <artifactId>javax.servlet.jsp-api</artifactId>
      <version>2.2.1</version>
      <scope>provided</scope>
    </dependency>
1.2 编写控制器类StudentController 类名上加@Controller
package qing;
import org.springframework.stereotype.Controller;
import org.springframework.web.bind.annotation.RequestMapping;
import org.springframework.web.servlet.ModelAndView;
@Controller
public class StudentController {
    @RequestMapping("qing")
    public ModelAndView testRequest() {
        ModelAndView mav = new ModelAndView();
        mav.addObject("info", "早上好,小李同学");
        mav.setViewName("qing.jsp");
        return mav;
    }
}
1.3 编写SpringMVC.xml 配置文件
<?xml version="1.0" encoding="UTF-8"?>
<beans xmlns="http://www.springframework.org/schema/beans"
       xmlns:xsi="http://www.w3.org/2001/XMLSchema-instance"
       xmlns:mvc="http://www.springframework.org/schema/mvc"
       xmlns:context="http://www.springframework.org/schema/context"
       xsi:schemaLocation="http://www.springframework.org/schema/beans
       http://www.springframework.org/schema/beans/spring-beans.xsd
       http://www.springframework.org/schema/mvc
       http://www.springframework.org/schema/mvc/spring-mvc.xsd
       http://www.springframework.org/schema/context
       http://www.springframework.org/schema/context/spring-context.xsd">
    <!-- 开启注解 -->
    <mvc:annotation-driven></mvc:annotation-driven>
    <!-- 配置自动扫描包 -->
    <context:component-scan base-package="qing"></context:component-scan>
    <!-- 配置视图解析器 -->
    <bean class="org.springframework.web.servlet.view.InternalResourceViewResolver">
        <property name="prefix" value="/"></property>
        <property name="suffix" value=""></property>
    </bean>
</beans>
1.4 配置web.xml 文件
<!DOCTYPE web-app PUBLIC
 "-//Sun Microsystems, Inc.//DTD Web Application 2.3//EN"
 "http://java.sun.com/dtd/web-app_2_3.dtd" >
<web-app>
  <display-name>Archetype Created Web Application</display-name>
  <!-- 配置中央处理器 -->
  <servlet>
    <servlet-name>DispatcherServlet</servlet-name>
    <servlet-class>org.springframework.web.servlet.DispatcherServlet</servlet-class>
    <!-- 加载SpringMVC配置文件 -->
    <init-param>
      <param-name>contextConfigLocation</param-name>
      <param-value>classpath:SpringMVC.xml</param-value>
    </init-param>
  </servlet>
  <servlet-mapping>
    <servlet-name>DispatcherServlet</servlet-name>
    <url-pattern>/</url-pattern>
  </servlet-mapping>
</web-app>
1.5 创建qing.jsp 文件
<%@ page contentType="text/html;charset=UTF-8" language="java" isELIgnored="false" %>
<html>
<head>
    <title>hello,SpringMVC</title>
</head>
<body>
<center>
    <h1>${info}</h1>
</center>
</body>
</html>
1.6 配置本地服务器,测试
http://localhost:8080/qing
2.解析 @Controller注解和@RequestMapping注解
2.1 @Controller—表示我们所编写的java类是一个处理请求的控制器类。只能作用在java类,在JavaWeb程序中是分层出来的为了表明Java类是一个控制器,我们才使用@Controller注解,@Controller注解中包含@Component注解。
@Controller与Spring中的@Service和@Repository将应用程序标记为不同的层。
数据访问层:@Repository、业务访问层:@Service、Web层 (控制层):@Controller、webapp:静态资源
2.2 @RequestMapping可以作用在java类上,表示配置这个java类的访问路径;
package qing;
import org.springframework.stereotype.Controller;
import org.springframework.web.bind.annotation.RequestMapping;
import org.springframework.web.servlet.ModelAndView;
@Controller
@RequestMapping("/qing")
public class StudentController {
    @RequestMapping("/.do")
    public ModelAndView testRequest() {
        ModelAndView mav = new ModelAndView();
        mav.addObject("info", "早上好,小李同学");
        mav.setViewName("qing.jsp");
        return mav;
    }
}
http://localhost:8080/qing/.do
如果控制器类上没有@RequestMapping注解,直接使用方法上的@RequestMapping访问路径
package qing;
import org.springframework.stereotype.Controller;
import org.springframework.web.bind.annotation.RequestMapping;
import org.springframework.web.servlet.ModelAndView;
@Controller
public class StudentController {
    @RequestMapping("/.do")
    public ModelAndView testRequest() {
        ModelAndView mav = new ModelAndView();
        mav.addObject("info", "早上好,小李同学");
        mav.setViewName("qing.jsp");
        return mav;
    }
}
2.3 @RequestMapping的常用属性
value表示设置访问路径 (可以省略)
@RequestMapping(value = “/qing”)
@RequestMapping("/qing")
设置访问路径的时候可以设置通配符
? : 匹配任何单字符
例如:@RequestMapping("/?qing")
http://localhost:8080/qqing
http://localhost:8080/qqqing //错误
- : 匹配任意数量的字符
例如:@RequestMapping("/*qing")
http://localhost:8080/qqqqing
例如:@RequestMapping("/*/qing")
http://localhost:8080/qq/qing
** : 匹配多个路径
例如:@RequestMapping("/**/qing")
http://localhost:8080/qing
http://localhost:8080/qq/qing
2.3 method–限制请求的访问方式 (GET、POST)
表现形式:@RequestMapping(value = “/login.do”,method = RequestMethod.POST )
控制器类:
package qing;
import org.springframework.stereotype.Controller;
import org.springframework.web.bind.annotation.RequestMapping;
import org.springframework.web.bind.annotation.RequestMethod;
import org.springframework.web.servlet.ModelAndView;
@Controller
public class StudentController {
    @RequestMapping(value = "/qing" ,method = RequestMethod.POST)
    public ModelAndView testRequest() {
        ModelAndView mav = new ModelAndView();
        mav.addObject("info", "早上好,小李同学");
        mav.setViewName("qing.jsp");
        return mav;
    }
}
index.jsp
<%@page language="java" pageEncoding="UTF-8" isELIgnored="false" %>
<html>
<body>
<form action="/qing" method="post">
    <input type="submit" value="测试Method=GET">
</form>
</body>
</html>
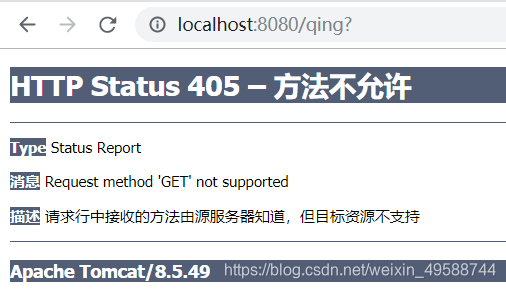
将index.jsp页面中的表单提交方式修改成method="post"即可。
3.请求处理方法接收请求参数值
3.1 @PathVariable 定义在方法上获取请求url路径上的参数数据
请求处理方法:
@RequestMapping(value = "/get1/{name}/{age}", method = RequestMethod.GET)
    public ModelAndView getReqParam(@PathVariable("name") String name, @PathVariable("age") int age) {
        ModelAndView mav = new ModelAndView();
        mav.addObject("name", name);
        mav.addObject("age", age);
        mav.setViewName("test.jsp");
        return mav;
    }
http://localhost:8080/get1/zhangsan/22
3.2 @RequestParam 定义在方法上,获取请求中通过key=value方式传递的参数数据
处理请求方法:
 @RequestMapping(value = "/get2",method = RequestMethod.GET)
    public ModelAndView getReqParam2(@RequestParam("name")String name,@RequestParam("address")String address){
        ModelAndView modelAndView=new ModelAndView();
        modelAndView.addObject("name",name);
        modelAndView.addObject("address",address);
        modelAndView.setViewName("test.jsp");
        return modelAndView;
    }
http://localhost:8080/get2?name=lisi&address=beijing
3.3 HttpServletRequest对象的getParameter()方法接收数据
请求处理方法:
 @RequestMapping(value = "/get3",method = RequestMethod.GET)
    public ModelAndView getReqParam(HttpServletRequest request){
        String name=request.getParameter("name");
        String pass=request.getParameter("password");
        ModelAndView model=new ModelAndView();
        model.addObject("name",name);
        model.addObject("password",pass);
        model.setViewName("test.jsp");
        return model;
    }
http://localhost:8080/get3?name=wangwu&password=123456
3.4 在请求处理方法中定义对应参数变量,参数变量的名称与页面元素的name属性值相同
请求处理方法:
@RequestMapping(value = "/get4",method = RequestMethod.POST)
    public ModelAndView getReqParam4(String name,String password){
        ModelAndView model=new ModelAndView();
        model.addObject("name",name);
        model.addObject("password",password);
        model.setViewName("test.jsp");
        return model;
    }
登录页面 login.jsp
<%@ page contentType="text/html;charset=UTF-8" language="java" isELIgnored="false" %>
<html>
<head>
    <title>Title</title>
</head>
<body>
<form action="/get4" method="post">
    用户名:<input type="text" name="name"/><br>
    密码:<input type="password" name="password"/><br>
    <input type="submit" value="提交"/>
</form>
</body>
</html>
http://localhost:8080/login.jsp
输入用户名和密码
3.5 将需要提交的请求参数值封装到java对象中 (java对象的成员变量的名称一定要与页面元素的name属性值相同)
请求处理方法:
    @RequestMapping(value = "/get5",method = RequestMethod.POST)
    public ModelAndView getReqParam5(StudentBean studentBean){
        ModelAndView MAV=new ModelAndView();
        MAV.addObject("studentBean",studentBean);
        MAV.setViewName("test.jsp");
        return MAV;
    }
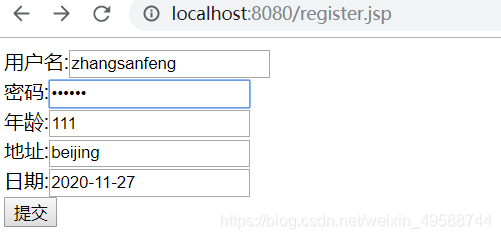
登录 register.jsp
<%@ page contentType="text/html;charset=UTF-8" language="java" isELIgnored="false" %>
<html>
<head>
    <title>登录页面</title>
</head>
<body>
    <form action="/get5" method="post">
        用户名:<input type="text" name="name"/><br>
        密码:<input type="password" name="password"/><br>
        年龄:<input type="text" name="age"/><br>
        地址:<input type="text" name="address"/><br>
        日期:<input type="text" name="day"/><br>
        <input type="submit" value="提交"/>
    </form>
</body>
</html>
test.jsp 页面
<%@ page contentType="text/html;charset=UTF-8" language="java" isELIgnored="false" %>
<html>
<head>
    <title>Title</title>
</head>
<body>
<h4>name==${studentBean.name}</h4>
<h4>password==${studentBean.password}</h4>
<h4>age==${studentBean.age}</h4>
<h4>address==${studentBean.address}</h4>
<h4>day==${studentBean.day}</h4>
</body>
</html>
http://localhost:8080/register.jsp