文章目录
前言
提示:这里可以添加本文要记录的大概内容:
终于放暑假了,不用在为那些头大的课程烦恼了。不过你的考试好像不及格,啊哈哈哈哈哈。现在要闭关学习一些有趣的知识。顺便把一些觉得有意思的文档分享给大家,大家可以随意修改。
一、前戏准备
你要下载好并且配置好相关环境。
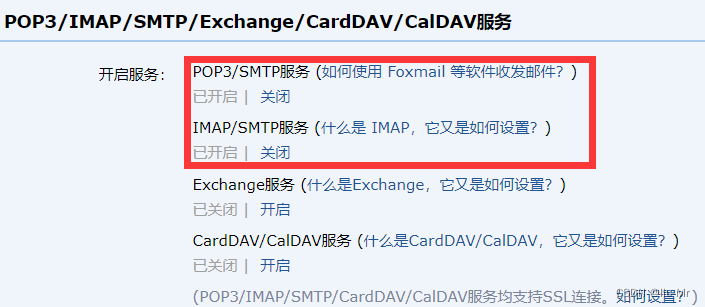
1.先开通邮箱SMTP服务
1、进入设置(以QQ邮箱为例)

2、点击账户

3、下滑,开启方框内的功能(注意:需要发送信息申请,要收取短信费用)

2.安装 face_recognition 人脸识别库
这里我就直接用别人的链接:作者:1941s
二、使用步骤
1.引入库
time库 、smtplib库、email库都是内置库需要安装
import time
import cv2
import face_recognition
import smtplib
from email.mime.text import MIMEText
from email.mime.image import MIMEImage
from email.mime.multipart import MIMEMultipart

"""  实现流程
1、通过opencv调用摄像头拍照保存图像到本地
2、使用email库构建邮件内容,保存的图像以附件插入邮件内容
3、使用smtplib库发送到指定邮件
"""
2.人脸识别并保存图像
def GetPicture():
    # 获取摄像头
    cap = cv2.VideoCapture(0)
    while True:
        # 读取摄像头数据
        success, img = cap.read()
        # 转换格式
        cv2.cvtColor(img, cv2.COLOR_BGR2RGB)
        # 获取人脸位置
        face_locations = face_recognition.face_locations(img)
        # 输出人脸位置
        print(face_locations)
        # 判断人数
        if len(face_locations) > 0:
            # 提取人脸位置
            top, rigth, bottom, left = face_locations[0]
            # 通过opencv画人脸框
            cv2.rectangle(img, (left, top), (rigth, bottom), (0, 255, 0), 2)
            # 保存人脸到本地
            cv2.imwrite("./output/img.jpg", img)
            # 退出
            break
    # 释放数据
    cap.release()
    cv2.destroyAllWindows()
3.配置邮箱
def SetEmail():
    # 设置总的邮件体对象,对象类型为mixed
    msg = MIMEMultipart("mixed")
    # 邮件的标题
    msg['Subject'] = "测试 emil test"
    # 邮件的发件人及收件人信息
    msg['From'] = from_email
    msg['To'] = To_email

    # 构造文本内容
    text_info = "他动我电脑了,一不小心被我抓住了。"
    # 正文转码
    text_sub = MIMEText(text_info, 'plain', 'utf-8')
    msg.attach(text_sub)

    # 构造图片附件
    image_file = open(r'./output/img.jpg', 'rb').read()
    image = MIMEImage(image_file)

    # 设置图像附件可直接预览
    image.add_header('Content-ID', '<image1>')
    # 如果不加下边这行代码的话,会在收件方方面显示乱码的bin文件,下载之后也不能正常打开,这个地方也可以对文件重命名
    image["Content-Disposition"] = 'attachment; filename="people.png"'
    msg.attach(image)

    # 返回对象
    return msg.as_string()
3.发送邮箱
def SendEmail(msg):
    try:
        # 声明SMTP对象
        server = smtplib.SMTP()
        # 设置smtp服务器地址
        server.connect('smtp.qq.com')
        # 根据自己的账号登录目标服务器(自己的邮箱地址和邮箱授权码)
        server.login(from_email, from_email_password)
        # 调用对象中的方法,发送邮件到目标地址
        server.sendmail(from_email, To_email, msg)
        # 延时
        time.sleep(2)
        # 退出
        server.quit()
        print('发送邮件成功!!!')

    except Exception as e:
        print('发送邮件失败!!!')
        print(e)
完整代码
import time
import cv2
import face_recognition
import smtplib
from email.mime.text import MIMEText
from email.mime.image import MIMEImage
from email.mime.multipart import MIMEMultipart


# 配置邮箱及密码
from_email = "你的@qq.com"  # 发送端账号
from_email_password = "你的授权码"  # 发送端账号密码
To_email = "接收对方的邮箱"  # 接收端账号


# ############## 人脸识别并保存图像 ############################
def GetPicture():
    # 获取摄像头
    cap = cv2.VideoCapture(0)
    while True:
        # 读取摄像头数据
        success, img = cap.read()
        # 转换格式
        cv2.cvtColor(img, cv2.COLOR_BGR2RGB)
        # 获取人脸位置
        face_locations = face_recognition.face_locations(img)
        # 输出人脸位置
        print(face_locations)
        # 判断人数
        if len(face_locations) > 0:
            # 提取人脸位置
            top, rigth, bottom, left = face_locations[0]
            # 通过opencv画人脸框
            cv2.rectangle(img, (left, top), (rigth, bottom), (0, 255, 0), 2)
            # 保存人脸到本地
            cv2.imwrite("./output/img.jpg", img)
            # 退出
            break
    # 释放数据
    cap.release()
    cv2.destroyAllWindows()


# ############ 配置邮箱 #################################
def SetEmail():
    # 设置总的邮件体对象,对象类型为mixed
    msg = MIMEMultipart("mixed")
    # 邮件的标题(随意改动)
    msg['Subject'] = "测试 emil test"
    # 邮件的发件人及收件人信息
    msg['From'] = from_email
    msg['To'] = To_email

    # 构造文本内容
    text_info = "他动我电脑了,一不小心被我抓住了。"
    # 正文转码
    text_sub = MIMEText(text_info, 'plain', 'utf-8')
    msg.attach(text_sub)

    # 构造图片附件
    image_file = open(r'./output/img.jpg', 'rb').read()
    image = MIMEImage(image_file)

    # 设置图像附件可直接预览
    image.add_header('Content-ID', '<image1>')
    # 如果不加下边这行代码的话,会在收件方方面显示乱码的bin文件,下载之后也不能正常打开,这个地方也可以对文件重命名
    image["Content-Disposition"] = 'attachment; filename="people.png"'
    msg.attach(image)

    # 返回对象
    return msg.as_string()


# ############ 发送邮箱 #################################
def SendEmail(msg):
    try:
        # 声明SMTP对象
        server = smtplib.SMTP()
        # 设置smtp服务器地址
        server.connect('smtp.qq.com')
        # 根据自己的账号登录目标服务器(自己的邮箱地址和邮箱授权码)
        server.login(from_email, from_email_password)
        # 调用对象中的方法,发送邮件到目标地址
        server.sendmail(from_email, To_email, msg)
        # 延时
        time.sleep(2)
        # 退出
        server.quit()
        print('发送邮件成功!!!')

    except Exception as e:
        print('发送邮件失败!!!')
        print(e)


if __name__ == '__main__':
    GetPicture()
    msg = SetEmail()
    SendEmail(msg)
总结
结果来了:

例如:以上就是今天要讲的内容,本文仅仅简单介绍了pandas的使用,而pandas提供了大量能使我们快速便捷地处理数据的函数和方法。
版权声明:本文为weixin_43422072原创文章,遵循 CC 4.0 BY-SA 版权协议,转载请附上原文出处链接和本声明。