fail2ban
With fail2ban, your Linux computer automatically blocks IP addresses that have too many connection failures. It’s self-regulating security! We’ll show you how to use it.
使用fail2ban ,您Linux计算机会自动阻止连接失败过多的IP地址。 这是自我调节的安全性! 我们将向您展示如何使用它。
安全安全安全 (Security Security Security)
Duchess of Windsor, Wallis Simpson, once famously said, “You can never be too rich or too thin.” We’ve updated this for our modern, interconnected world: You can never be too careful or too secure.
温莎公爵夫人 沃利斯·辛普森 ( Wallis Simpson)曾说过一句著名的话:“永远不能太富或太瘦。” 我们已经为现代互联世界更新了此内容:您永远不能太小心或太安全。
If your computer accepts incoming connection requests, such as Secure Shell (SSH) connections, or acts as a web or email server, you need to protect it from brute-force attacks and password-guessers.
如果您的计算机接受传入的连接请求,例如Secure Shell ( SSH )连接,或者充当Web或电子邮件服务器,则需要保护它免受暴力攻击和密码猜测者的攻击。
To do so, you’ll need to monitor connection requests that fail to get into an account. If they repeatedly fail to authenticate within a short period, they should be banned from making further attempts.
为此,您需要监视无法进入帐户的连接请求。 如果他们在短时间内反复未能通过身份验证,则应禁止他们进行进一步尝试。
The only way this can be achieved practically is to automate the entire process. With a little bit of simple configuration, fail2ban will manage the monitoring, banning, and unbanning for you.
实际上可以实现的唯一方法是使整个过程自动化。 借助一些简单的配置, fail2ban将为您管理监视,禁止和取消禁止 。
fail2ban integrates with the Linux firewall iptables. It enforces the bans on the suspect IP addresses by adding rules to the firewall. To keep this explanation uncluttered, we’re using iptables with an empty ruleset.
fail2ban与Linux防火墙 iptables集成。 它通过向防火墙添加规则来实施对可疑IP地址的禁止。 为了使这一说明更加整洁,我们使用带有空规则集的iptables 。
Of course, if you’re concerned about security, you probably have a firewall configured with a well-populated ruleset. fail2ban only adds and removes its own rules—your regular firewall functions will remain untouched.
当然,如果您担心安全性,则可能已为防火墙配置了填充良好的规则集。 fail2ban仅添加和删除其自己的规则-您的常规防火墙功能将保持不变。
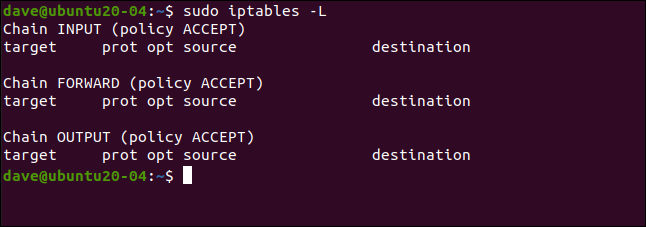
We can see our empty ruleset using this command:
我们可以使用以下命令查看空规则集:
sudo iptables -L
安装fail2ban (Installing fail2ban)
Installing fail2ban is simple on all the distributions we used to research this article. On Ubuntu 20.04, the command is as follows:
在我们用来研究本文的所有发行版中,安装fail2ban很简单。 在Ubuntu 20.04上,命令如下:
sudo apt-get install fail2ban

On Fedora 32, type:
在Fedora 32上,键入:
sudo dnf install fail2ban

On Manjaro 20.0.1, we used pacman:
在Manjaro 20.0.1上,我们使用pacman :
sudo pacman -Sy fail2ban

配置fail2ban (Configuring fail2ban)
The fail2ban installation contains a default configuration file called jail.conf. This file is overwritten when fail2ban is upgraded, so we’ll lose our changes if we make customizations to this file.
fail2ban安装包含一个名为jail.conf的默认配置文件。 升级fail2ban时,该文件将被覆盖,因此,如果对此文件进行自定义,我们将丢失所做的更改。
Instead, we’ll copy the jail.conf file to one called jail.local. By putting our configuration changes in jail.local, they’ll persist across upgrades. Both files are automatically read by fail2ban.
相反,我们将jail.conf文件复制到一个名为jail.local的文件中。 通过将我们的配置更改放入jail.local,它们将在升级过程中保持不变。 两个文件都由fail2ban自动读取。
This is how to copy the file:
这是复制文件的方法:
sudo cp /etc/fail2ban/jail.conf /etc/fail2ban/jail.local

Now open the file in your favorite editor. We’re going to use gedit:
现在,在您喜欢的编辑器中打开文件。 我们将使用gedit :
sudo gedit /etc/fail2ban/jail.local
We’ll look for two sections in the file: [DEFAULT] and [sshd]. Take care to find the actual sections, though. Those labels also appear near the top in a section that describes them, but that’s not what we want.
我们将在文件中查找两个部分:[DEFAULT]和[sshd]。 但是请小心找到实际的部分。 这些标签也出现在描述它们的部分的顶部附近,但这不是我们想要的。
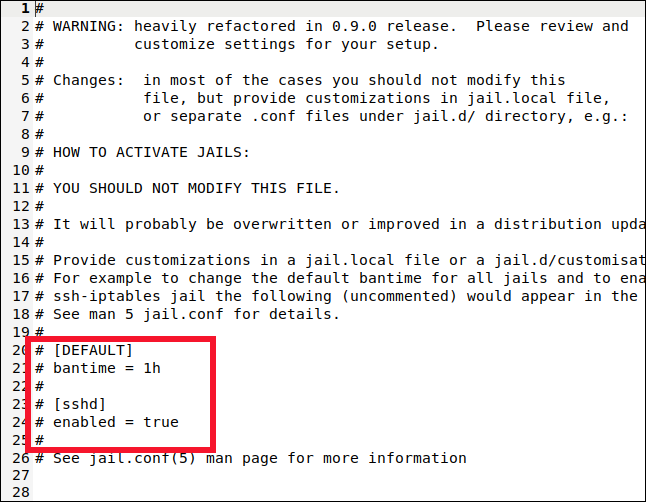
You’ll find the [DEFAULT] section somewhere around line 40. It’s a long section with a lot of comments and explanations.
您会在第40行附近找到[DEFAULT]部分。这是一个很长的部分,其中包含许多评论和解释。
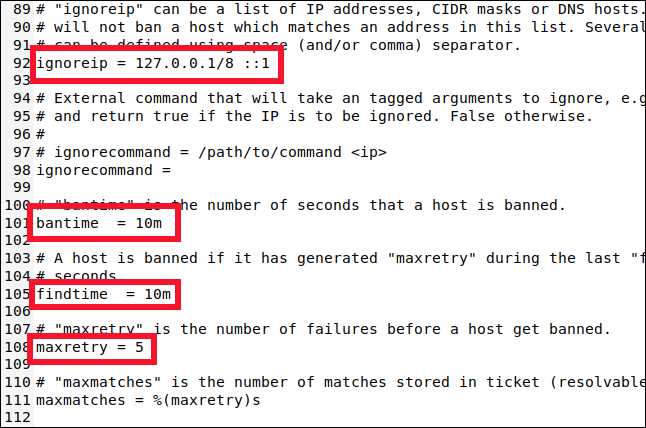
Scroll down to around line 90, and you’ll find the following four settings you need to know about:
向下滚动到第90行,您将发现以下四个需要了解的设置:
ignoreip: A whitelist of IP addresses that will never be banned. They have a permanent Get Out of Jail Free card. The localhost IP address (
127.0.0.1) is in the list by default, along with its IPv6 equivalent (::1). If there are other IP addresses you know should never be banned, add them to this list and leave a space between each one.ignoreip:永远不会被禁止的IP地址白名单。 他们拥有永久的“摆脱监狱”卡。 默认情况下,列表中包含localhost IP地址 (
127.0.0.1)及其等效的IPv6(::1)。 如果您知道永远不应禁止其他IP地址,请将它们添加到此列表中,并在每个IP地址之间留一个空格。bantime: The duration for which an IP address is banned (the “m” stands for minutes). If you type a value without an “m” or “h” (for hours) it will be treated as seconds. A value of -1 will permanently ban an IP address. Be very careful not to permanently lock yourself out.
bantime:禁止IP地址的持续时间(“ m”代表分钟)。 如果键入的值不带“ m”或“ h”(代表小时),则将被视为秒。 值-1将永久禁止IP地址。 要非常小心,不要将自己永久锁定在自己身旁。
findtime: The amount of time within which too many failed connection attempts will result in an IP address being banned.
findtime:尝试失败的连接次数过多会导致IP地址被禁止的时间。
maxretry: The value for “too many failed attempts.”
maxretry: “尝试失败次数过多”的值。
If a connection from the same IP address makes maxretry failed connection attempts within the findtime period, they’re banned for the duration of the bantime. The only exceptions are the IP addresses in the ignoreip list.
如果来自同一IP地址进行连接maxretry的内连接尝试失败findtime期间,他们被禁止在持续时间bantime 。 唯一的例外是ignoreip列表中的IP地址。
fail2ban puts the IP addresses in jail for a set period of time. fail2ban supports many different jails, and each one represents holds the settings apply to a single connection type. This allows you to have different settings for various connection types. Or you can have fail2ban monitor only a chosen set of connection types.
fail2ban会将IP地址放入监狱一段时间。 fail2ban支持许多不同的监狱,每个监狱代表适用于单个连接类型的设置。 这使您可以对各种连接类型进行不同的设置。 或者,您可以让fail2ban仅监视一组选定的连接类型。
You might have guessed it from the [DEFAULT] section name, but the settings we’ve looked at are the defaults. Now, let’s look at the settings for the SSH jail.
您可能已经从[DEFAULT]部分的名称中猜到了,但是我们看到的设置是默认设置。 现在,让我们看一下SSH监狱的设置。
配置监狱 (Configuring a Jail)
Jails let you move connection types in and out of fail2ban's monitoring. If the default settings don’t match those you want applied to the jail, you can set specific values for bantime, findtime, and maxretry.
Jails使您可以将连接类型移入和移出fail2ban's监视。 如果默认设置与您想要应用于监狱的设置不匹配,则可以为bantime , findtime和maxretry设置特定的值。
Scroll down to about line 280, and you’ll see the [sshd] section.
向下滚动到第280行,您将看到[sshd]部分。

This is where you can set values for the SSH connection jail. To include this jail in the monitoring and banning, we have to type the following line:
您可以在此处设置SSH连接监狱的值。 要将这个监狱包括在监视和禁止中,我们必须输入以下行:
enabled = true
We also type this line:
我们也输入以下行:
maxretry = 3
The default setting was five, but we want to be more cautious with SSH connections. We dropped it to three, and then saved and closed the file.
默认设置为5,但是我们希望在使用SSH连接时更加谨慎。 我们将其降为三,然后保存并关闭文件。
We added this jail to fail2ban's monitoring, and overrode one of the default settings. A jail can use a combination of default and jail-specific settings.
我们将此监狱添加到了fail2ban's监视中,并覆盖了默认设置之一。 监狱可以结合使用默认设置和特定于监狱的设置。
启用fail2ban (Enabling fail2ban)
So far, we’ve installed fail2ban and configured it. Now, we have to enable it to run as an auto-start service. Then, we need to test it to make sure it works as expected.
到目前为止,我们已经安装了fail2ban并对其进行了配置。 现在,我们必须使它能够作为自动启动服务运行。 然后,我们需要对其进行测试以确保其可以正常工作。
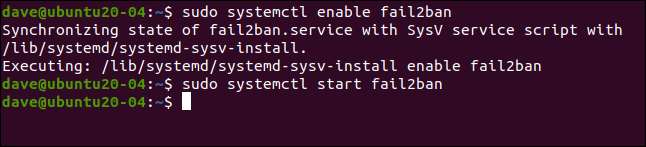
To enable fail2ban as a service, we use the systemctl command:
为了启用fail2ban服务,我们使用systemctl命令 :
sudo systemctl enable fail2ban
We also use it to start the service:
我们还使用它来启动服务:
sudo systemctl start fail2ban
We can check the status of the service using systemctl, too:
我们也可以使用systemctl服务的状态:
sudo systemctl status fail2ban.service
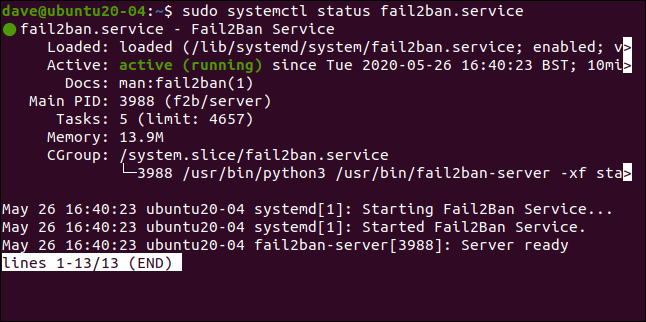
Everything looks good—we’ve got the green light, so all is well.
一切看起来都很好-我们已经开绿灯,所以一切都很好。
Let’s see if fail2ban agrees:
让我们看看fail2ban同意:
sudo fail2ban-client status
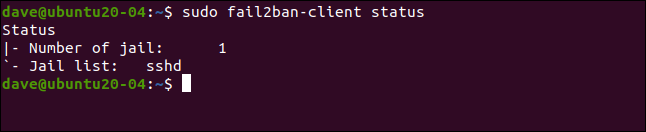
This reflects what we set up. We’ve enabled a single jail, named [sshd]. If we include the name of the jail with our previous command, we can take a deeper look at it:
这反映了我们的设置。 我们启用了一个名为[sshd]的监狱。 如果在前面的命令中包含监狱的名称,我们可以对其进行更深入的研究:
sudo fail2ban-client status sshd
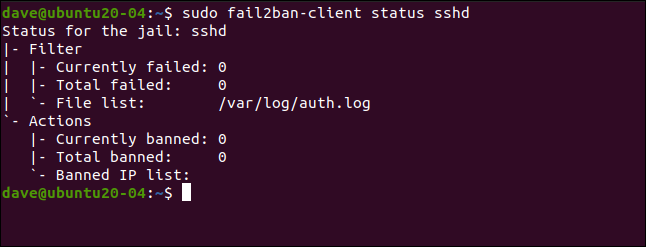
This lists the number of failures and banned IP addresses. Of course, all the statistics are zero at the moment.
这列出了失败的数量和被禁止的IP地址。 当然,目前所有统计信息均为零。
测试我们的监狱 (Testing Our Jail)
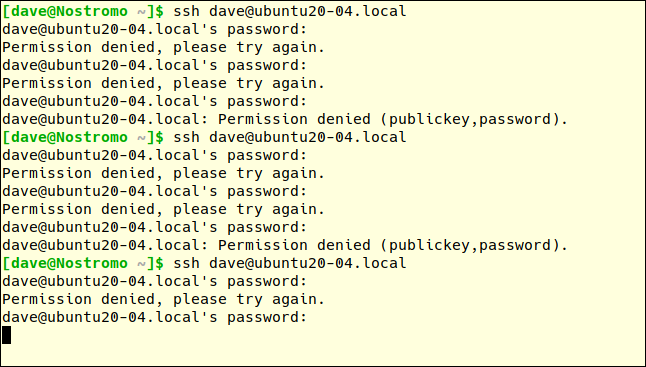
On another computer, we’ll make an SSH connection request to our test machine and purposefully mistype the password. You get three attempts to get the password right on each connection attempt.
在另一台计算机上,我们将向测试计算机发出SSH连接请求,并故意输入密码。 您将进行三次尝试以在每次连接尝试中正确获取密码。
The maxretry value will trigger after three failed connection attempts, not three failed password attempts. So, we have to type an incorrect password three times to fail connection attempt one.
maxretry值将在连接尝试失败三次,而不是密码尝试失败三次后触发。 因此,我们必须键入3次错误的密码才能使连接尝试一次失败。
We’ll then make another connection attempt and type the password incorrectly another three times. The first incorrect password attempt of the third connection request should trigger fail2ban.
然后,我们将尝试进行另一次连接,并再三次错误输入密码。 第三个连接请求的第一次错误密码尝试将触发fail2ban.
After the first incorrect password on the third connection request, we don’t get a response from the remote machine. We don’t get any explanation; we just get the cold shoulder.
在第三个连接请求上输入了第一个不正确的密码后,我们没有收到远程计算机的响应。 我们没有任何解释。 我们只是冷漠的肩膀。
You must press Ctrl+C to return to the command prompt. If we try once more, we’ll get a different response:
您必须按Ctrl + C返回到命令提示符。 如果再试一次,我们将得到不同的响应:
ssh dave@ubuntu20-04.local

Previously, the error message was “Permission denied.” This time, the connection is outright refused. We’re persona non grata. We’ve been banned.
以前,错误消息是“权限被拒绝”。 这次,连接被完全拒绝。 我们是不受欢迎的角色。 我们被禁止了。
Let’s look at the details of the [sshd] jail again:
让我们再次查看[sshd]监狱的详细信息:
sudo fail2ban-client status sshd
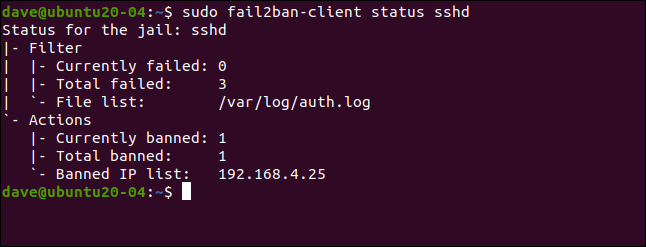
There were three failures, and one IP address (192.168.4.25) was banned.
有3个失败,并且一个IP地址(192.168.4.25)被禁止。
As we mentioned previously, fail2ban enforces bans by adding rules to the firewall ruleset. Let’s take another look at the ruleset (it was empty before):
如前所述, fail2ban通过向防火墙规则fail2ban添加规则来强制执行禁止。 让我们再来看一下规则集(以前是空的):
sudo iptables -L
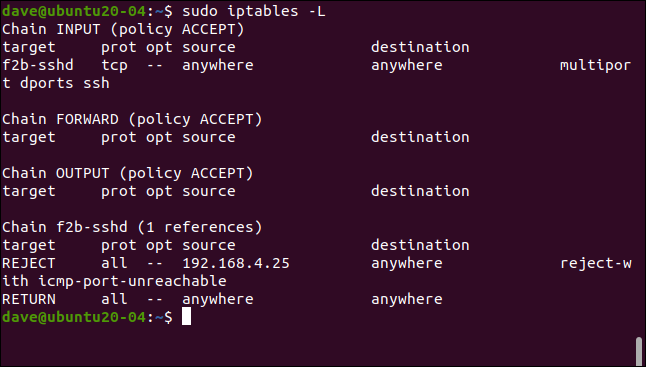
A rule has been added to the INPUT policy, sending SSH traffic to the f2b-sshd chain. The rule in the f2b-sshd chain rejects SSH connections from 192.168.4.25. We didn’t alter the default setting for bantime, so, in 10 minutes, that IP address will be unbanned and can make fresh connection requests.
一条规则已添加到INPUT策略,将SSH流量发送到f2b-sshd链。 f2b-sshd链中的规则拒绝来自192.168.4.25的SSH连接。 我们没有更改bantime的默认设置,因此,在10分钟内,该IP地址将被禁止并且可以发出新的连接请求。
If you set a longer ban duration (like several hours), but want to allow an IP address to make another connection request sooner, you can parole it early.
如果您设置了更长的禁令持续时间(例如数小时),但是希望允许IP地址更快地提出另一个连接请求,则可以提早假释。
We type the following to do this:
我们输入以下内容来做到这一点:
sudo fail2ban-client set sshd unbanip 192.168.5.25

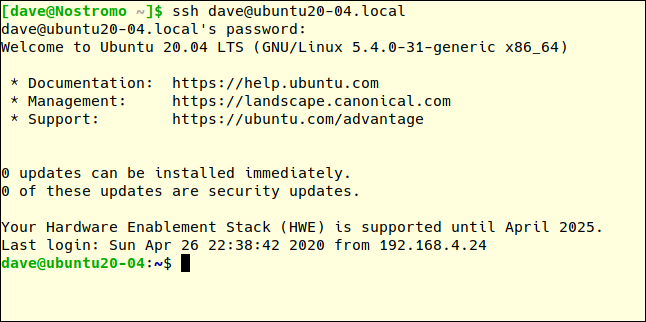
On our remote computer, if we make another SSH connection request and type the correct password, we’ll be allowed to connect:
在我们的远程计算机上,如果我们发出另一个SSH连接请求并输入正确的密码,则可以连接:
ssh dave@ubuntu20-04.local
简单有效 (Simple and Effective)
Simpler is usually better, and fail2ban is an elegant solution to a tricky problem. It takes very little configuration and imposes hardly any operational overhead—to you or your computer.
通常fail2ban简单越好,而fail2ban是解决棘手问题的fail2ban解决方案。 它只需很少的配置,几乎不会给您或您的计算机带来任何操作开销。
翻译自: https://www.howtogeek.com/675010/how-to-secure-your-linux-computer-with-fail2ban/
fail2ban