移植深度学习训练好的模型,第一步是可以使用安卓手机的相机进行拍照或者访问相册进行图片选择。第二步,调用模型,进行结果显示。现在记录第一步的代码实现。
我的界面有三个,第一个是MainActivity,第二个是Camera拍照的显示,第三个是Albums的显示。
结构介绍
1.activity_main.xml和MainActivity.java介绍
1.1.activity_main.xml代码
首先是activity_main.xml,主要有3个控件,但是第三个ImageView控件这里没有使用,界面图下图所示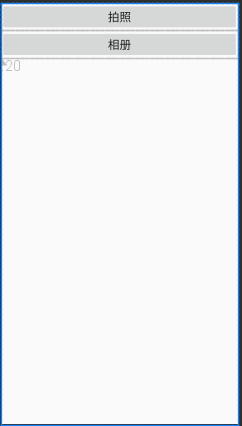
详细代码如下
<?xml version="1.0" encoding="utf-8"?>
<RelativeLayout xmlns:android="http://schemas.android.com/apk/res/android"
    xmlns:app="http://schemas.android.com/apk/res-auto"
    xmlns:tools="http://schemas.android.com/tools"
    android:layout_width="match_parent"
    android:layout_height="match_parent"
    tools:context=".MainActivity">
    <Button
        android:id="@+id/take_photo"
        android:layout_width="match_parent"
        android:layout_height="wrap_content"
        android:text="拍照"
        android:textSize="20dp" />
    <Button
        android:id="@+id/choose_from_album"
        android:layout_width="match_parent"
        android:layout_height="wrap_content"
        android:text="相册"
        android:layout_below="@+id/take_photo"
        android:textSize="20dp"
        />
    <ImageView
        android:id="@+id/picture"
        android:layout_width="wrap_content"
        android:layout_height="wrap_content"
        android:layout_gravity="center_horizontal"
        android:layout_below="@+id/choose_from_album"
        android:layout_marginTop="20dp" />
</RelativeLayout>
1.2.MainActivity.java代码及介绍
MainActivity.java代码如下所示:我的主界面主要功能比较简单,就是在拍照和相册按钮中添加响应,然后跳转到相应的显示界面
package com.example.mycamera;

import androidx.appcompat.app.AppCompatActivity;
import androidx.core.app.ActivityCompat;
import androidx.core.content.ContextCompat;
import android.Manifest;
import android.content.Intent;
import android.content.pm.PackageManager;
import android.os.Bundle;
import android.view.View;
import android.widget.Button;
import android.widget.ImageView;


public class MainActivity extends AppCompatActivity {
    public static final int TAKE_PHOTO = 1;
    public static final int CHOOSE_PHOTO = 2;
    private ImageView picture;
    private Intent intent1,intent2;

    @Override
    protected void onCreate(Bundle savedInstanceState) {
        super.onCreate(savedInstanceState);
        setContentView(R.layout.activity_main);

        Button chooseFromAlbum = findViewById(R.id.choose_from_album);
        chooseFromAlbum.setOnClickListener(new View.OnClickListener() {
            @Override
            public void onClick(View v) {
                if (ContextCompat.checkSelfPermission(MainActivity.this, Manifest.permission.WRITE_EXTERNAL_STORAGE) != PackageManager.PERMISSION_GRANTED) {
                    ActivityCompat.requestPermissions(MainActivity.this, new String[]{Manifest.permission.WRITE_EXTERNAL_STORAGE}, CHOOSE_PHOTO);
                } else {
                    openAlbum();//打开album的界面
                }
            }
        });
        Button takePhoto = findViewById(R.id.take_photo);
        picture = findViewById(R.id.picture);

        takePhoto.setOnClickListener(new View.OnClickListener() {
            @Override
            public void onClick(View v) {
                // 动态申请权限
                if (ContextCompat.checkSelfPermission(MainActivity.this, Manifest.permission.CAMERA) != PackageManager.PERMISSION_GRANTED) {
                    ActivityCompat.requestPermissions(MainActivity.this, new String[]{Manifest.permission.CAMERA}, TAKE_PHOTO);
                } else {
                    // 启动相机程序
                    startCamera();
                }
            }
        });
        intent1=new Intent(this,Albums.class);//创建跳转到Albums显示的窗口的Intent
        intent2=new Intent(this,Camera.class);//创建跳转到Camera显示的窗口的Intent
    }

    private void openAlbum() {
        startActivity(intent1);//进入album的窗口界面
    }
    private void startCamera() {
        startActivity(intent2);//进入camera的窗口界面
        //Intent intent = new Intent("android.media.action.IMAGE_CAPTURE");
        // 指定图片的输出地址为imageUri
        //mPhotoPath = getSDPath()+"/"+ getPhotoFileName();//设置图片文件路径,getSDPath()和getPhotoFileName()具体实现在下面
        //intent.putExtra(MediaStore.EXTRA_OUTPUT, imageUri);
        //startActivityForResult(intent, TAKE_PHOTO);
    }
}
2.albums.xml和Albums.java介绍以及添加方法介绍
albums界面的功能就是在MainActivity点击相册按钮时,查找本地的相册,然后显示选择的picture到ImageView控件,图片检测功能未添加,因为还没有载入模型,图片保存就是将ImageView控件中的图片保存到本地中。
2.1.albums.xml代码介绍和添加方法
添加方法如下图所示

albums.xml代码如下:主要有三个控件,图片检测和保存图像按钮,以及一个图片显示的ImageView
<?xml version="1.0" encoding="utf-8"?>
<RelativeLayout xmlns:android="http://schemas.android.com/apk/res/android"
    android:layout_width="match_parent"
    android:layout_height="match_parent">
    <Button
        android:id="@+id/pestDetection"
        android:layout_width="wrap_content"
        android:layout_height="wrap_content"
        android:layout_marginLeft="50dp"
        android:layout_marginTop="20dp"
        android:text="图像检测"
        android:textSize="20dp" />

    <Button
        android:id="@+id/pictureSave"
        android:layout_width="wrap_content"
        android:layout_height="wrap_content"
        android:layout_marginTop="20dp"
        android:text="保存图像"
        android:layout_toRightOf="@+id/pestDetection"
        android:layout_marginLeft="80dp"
        android:textSize="20dp" />

    <ImageView
        android:id="@+id/picture"
        android:layout_width="wrap_content"
        android:layout_height="wrap_content"
        android:layout_below="@+id/pictureSave"
        android:layout_centerHorizontal="true"
        android:layout_marginTop="20dp" />

</RelativeLayout>

2.2.Albums.java代码介绍和添加方法
添加方法如下所示,步骤1,2,3,然后修改名称为Albums即可
Albums.java代码如下:
package com.example.mycamera;

import android.Manifest;
import android.annotation.TargetApi;
import android.app.Activity;
import android.content.ContentUris;
import android.content.Intent;
import android.content.pm.PackageManager;
import android.database.Cursor;
import android.graphics.Bitmap;
import android.graphics.BitmapFactory;
import android.graphics.drawable.BitmapDrawable;
import android.net.Uri;
import android.os.Build;
import android.os.Bundle;
import android.os.Environment;
import android.provider.DocumentsContract;
import android.provider.MediaStore;
import android.view.View;
import android.widget.Button;
import android.widget.ImageView;
import android.widget.Toast;

import androidx.annotation.Nullable;
import androidx.core.app.ActivityCompat;
import androidx.core.content.ContextCompat;

import java.io.File;
import java.io.FileNotFoundException;
import java.io.FileOutputStream;
import java.io.IOException;

public class Albums extends Activity {
    private  ImageView albumsPicture;
    public static final int CHOOSE_PHOTO = 2;
    private Button pestDection=null;
    private Button pictureSave=null;
    private Intent intent2;


    protected void onCreate(Bundle savedInstanceState) {
        super.onCreate(savedInstanceState);
        setContentView(R.layout.albums);
        pestDection=super.findViewById(R.id.pestDetection);
        pictureSave=super.findViewById(R.id.pictureSave);
        albumsPicture = super.findViewById(R.id.picture);

        if (ContextCompat.checkSelfPermission(this, Manifest.permission.WRITE_EXTERNAL_STORAGE) != PackageManager.PERMISSION_GRANTED) {
            ActivityCompat.requestPermissions(this, new String[]{Manifest.permission.WRITE_EXTERNAL_STORAGE}, CHOOSE_PHOTO);
        } else {
            openAlbum();
        }

        intent2 = new Intent(getApplicationContext(),MainActivity.class);
        //receivePicturefromMainActivaty();
        pestDection.setOnClickListener(new pestDectionFuntion());
        pictureSave.setOnClickListener(new pictureSaveFunction());

    }

    private void openAlbum() {
        Intent intent = new Intent("android.intent.action.GET_CONTENT");
        intent.setType("image/*");
        startActivityForResult(intent, CHOOSE_PHOTO);//打开相册
    }
    private class pestDectionFuntion implements View.OnClickListener {
        public void onClick(View view){
            Toast.makeText(getApplicationContext(),"粮虫检测",Toast.LENGTH_SHORT).show();
        }
    }
    private class pictureSaveFunction implements View.OnClickListener {
        public void onClick(View view){
            //Toast.makeText(getApplicationContext(),"图片保存成功!",Toast.LENGTH_SHORT).show();
            //Intent intent2 = new Intent(getApplicationContext(),MainActivity.class);//创建窗口切换的Intent,MainActivity.class指切换到主界面
            //Bitmap savepicture=loadBitmapFromView(albumsPicture);
            //String name=String.valueOf(System.currentTimeMillis());
            BitmapDrawable bmpDrawable = (BitmapDrawable) albumsPicture.getDrawable();
            Bitmap bitmap = bmpDrawable.getBitmap();
            saveToSystemGallery(bitmap);//将图片保存到本地
            Toast.makeText(getApplicationContext(),"图片保存成功!",Toast.LENGTH_SHORT).show();
            startActivity(intent2);//窗口切换
        }
    }
    public void saveToSystemGallery(Bitmap bmp) {
        // 首先保存图片
        File appDir = new File(Environment.getExternalStorageDirectory(), "MyAlbums");
        if (!appDir.exists()) {
            appDir.mkdir();
        }
        String fileName = System.currentTimeMillis() + ".jpg";
        File file = new File(appDir, fileName);
        try {
            FileOutputStream fos = new FileOutputStream(file);
            bmp.compress(Bitmap.CompressFormat.JPEG, 100, fos);
            fos.flush();
            fos.close();
        } catch (FileNotFoundException e) {
            e.printStackTrace();
        } catch (IOException e) {
            e.printStackTrace();
        }

        // 其次把文件插入到系统图库
        try {
            MediaStore.Images.Media.insertImage(getContentResolver(),
                    file.getAbsolutePath(), fileName, null);
        } catch (FileNotFoundException e) {
            e.printStackTrace();
        }

        //sendBroadcast(new Intent(Intent.ACTION_MEDIA_SCANNER_SCAN_FILE, Uri.parse(file.getAbsolutePath())));
        Intent intent = new Intent(Intent.ACTION_MEDIA_SCANNER_SCAN_FILE);
        Uri uri = Uri.fromFile(file);
        intent.setData(uri);
        sendBroadcast(intent); // 发送广播,通知图库更新
    }
    // 使用startActivityForResult()方法开启Intent的回调
    @Override
    protected void onActivityResult(int requestCode, int resultCode, @Nullable Intent data) {
        switch (requestCode) {
            case CHOOSE_PHOTO:
                //相册照片
                if (requestCode == CHOOSE_PHOTO && resultCode == RESULT_OK && null != data) {
                    if (Build.VERSION.SDK_INT >= 19) {
                        handleImageOnKitkat(data);
                    } else {
                        handleImageBeforeKitKat(data);
                    }
                }
            default:
                break;
        }
    }
    @TargetApi(19)
    private void handleImageOnKitkat(Intent data) {
        String imagePath = null;
        Uri uri = data.getData();
        if (DocumentsContract.isDocumentUri(this, uri)) {
            //如果是document类型的uri,则通过document id处理
            String docId = DocumentsContract.getDocumentId(uri);
            if ("com.android.providers.media.documents".equals(uri.getAuthority())) {
                String id = docId.split(":")[1];
                String selection = MediaStore.Images.Media._ID + "=" + id;
                imagePath = getImagePath( MediaStore.Images.Media.EXTERNAL_CONTENT_URI, selection);
            } else if ("com.android.providers.downloads.documents".equals(uri.getAuthority())) {
                Uri contentUri = ContentUris.withAppendedId(Uri.parse("content:" +
                        "//downloads/public_downloads"), Long.valueOf(docId));
                imagePath = getImagePath(contentUri, null);
            }
        } else if ("content".equalsIgnoreCase(uri.getScheme())) {
            //如果是content类型的uri,则使用普通方式处理
            imagePath = getImagePath(uri, null);
        } else if ("file".equalsIgnoreCase(uri.getScheme())) {
            //如果是File类型的uri,直接获取图片路径即可
            imagePath = uri.getPath();
        }
        //根据图片路径显示图片
        displayImage(imagePath);
    }

    private void handleImageBeforeKitKat(Intent data){
        Uri uri=data.getData();
        String imagePath=getImagePath(uri,null);
        displayImage(imagePath);
    }
    private String getImagePath(Uri uri,String selection){
        String path=null;
        Cursor cursor=getContentResolver().query(uri,null,selection,null,null);
        if(cursor!=null){
            if(cursor.moveToFirst()){
                path=cursor.getString(cursor.getColumnIndex(MediaStore.Images.Media.DATA));
            }
            cursor.close();
        }
        return path;
    }
    private void displayImage(String imagePath){
        if(imagePath!=null){
            Bitmap bitmap=BitmapFactory.decodeFile(imagePath);
            albumsPicture.setImageBitmap(bitmap);//将图片放置在控件上
        }else {
            Toast.makeText(this,"得到图片失败",Toast.LENGTH_SHORT).show();
        }
    }
}
3.camera.xml和Camera.java代码介绍及添加方法
3.1.camera.xml的添加方法和代码
camera界面的功能就是在MainActivity点击拍照按钮时,调用本地摄像机,将拍的照片显示到ImageView控件,图片检测功能未添加,因为还没有载入模型,图片保存就是将ImageView控件中的图片保存到本地中。
camera.xml的添加方法和界面和2.1中的album.xml一样
camera.xml代码如下:
<?xml version="1.0" encoding="utf-8"?>
<RelativeLayout xmlns:android="http://schemas.android.com/apk/res/android"
    android:layout_width="match_parent"
    android:layout_height="match_parent">
    <Button
        android:id="@+id/pestDetection"
        android:layout_width="wrap_content"
        android:layout_height="wrap_content"
        android:layout_marginLeft="50dp"
        android:layout_marginTop="20dp"
        android:text="图像检测"
        android:textSize="20dp" />

    <Button
        android:id="@+id/pictureSave"
        android:layout_width="wrap_content"
        android:layout_height="wrap_content"
        android:layout_marginTop="20dp"
        android:text="保存图像"
        android:layout_toRightOf="@+id/pestDetection"
        android:layout_marginLeft="80dp"
        android:textSize="20dp" />

    <ImageView
        android:id="@+id/picture"
        android:layout_width="wrap_content"
        android:layout_height="wrap_content"
        android:layout_below="@+id/pictureSave"
        android:layout_centerHorizontal="true"
        android:layout_marginTop="20dp" />

</RelativeLayout>
3.2.Camera.java的添加方法和代码
Camera.java的添加方法和界面和 2.2中的Album.java一样
Camera.java代码如下:
package com.example.mycamera;

import android.Manifest;
import android.app.Activity;
import android.content.Intent;
import android.content.pm.PackageManager;
import android.graphics.Bitmap;
import android.graphics.BitmapFactory;
import android.graphics.drawable.BitmapDrawable;
import android.net.Uri;
import android.os.Build;
import android.os.Bundle;
import android.os.Environment;
import android.provider.MediaStore;
import android.util.Log;
import android.view.View;
import android.widget.Button;
import android.widget.ImageView;
import android.widget.Toast;

import androidx.annotation.NonNull;
import androidx.annotation.Nullable;
import androidx.core.app.ActivityCompat;
import androidx.core.content.ContextCompat;
import androidx.core.content.FileProvider;

import java.io.File;
import java.io.FileNotFoundException;
import java.io.FileOutputStream;
import java.io.IOException;

public class Camera extends Activity {
    private ImageView cameraPicture;
    public static final int TAKE_PHOTO = 1;
    private Button pestDection=null;
    private Button pictureSave=null;
    private Intent intent3;
    private Uri imageUri;


    protected void onCreate(Bundle savedInstanceState) {
        super.onCreate(savedInstanceState);
        setContentView(R.layout.albums);
        pestDection=super.findViewById(R.id.pestDetection);
        pictureSave=super.findViewById(R.id.pictureSave);
        cameraPicture = super.findViewById(R.id.picture);

        // 创建一个File对象,用于保存摄像头拍下的图片,这里把图片命名为output_image.jpg
        // 并将它存放在手机SD卡的应用关联缓存目录下
        File outputImage = new File(getExternalCacheDir(), "output_image.jpg");
        // 对照片的更换设置
        try {
            // 如果上一次的照片存在,就删除
            if (outputImage.exists()) {
                outputImage.delete();
            }
            // 创建一个新的文件
            outputImage.createNewFile();
        } catch (IOException e) {
            e.printStackTrace();
        }
        // 如果Android版本大于等于7.0
        if (Build.VERSION.SDK_INT >= 24) {
            // 将File对象转换成一个封装过的Uri对象
            imageUri = FileProvider.getUriForFile(this, "com.example.lenovo.cameraalbumtest.fileprovider", outputImage);
            Log.d("MainActivity", outputImage.toString() + "手机系统版本高于Android7.0");
        } else {
            // 将File对象转换为Uri对象,这个Uri标识着output_image.jpg这张图片的本地真实路径
            Log.d("MainActivity", outputImage.toString() + "手机系统版本低于Android7.0");
            imageUri = Uri.fromFile(outputImage);
        }
        // 动态申请权限
        if (ContextCompat.checkSelfPermission(this, Manifest.permission.CAMERA) != PackageManager.PERMISSION_GRANTED) {
            ActivityCompat.requestPermissions( this, new String[]{Manifest.permission.CAMERA}, TAKE_PHOTO);
        } else {
            // 启动相机程序
            startCamera();
        }

        intent3 = new Intent(getApplicationContext(),MainActivity.class);
        pestDection.setOnClickListener(new Camera.pestDectionFuntion());
        pictureSave.setOnClickListener(new Camera.pictureSaveFunction());

    }
    private void startCamera() {
        Intent intent4 = new Intent("android.media.action.IMAGE_CAPTURE");
        // 指定图片的输出地址为imageUri
        intent4.putExtra(MediaStore.EXTRA_OUTPUT, imageUri);
        startActivityForResult(intent4, TAKE_PHOTO);
    }

    private class pestDectionFuntion implements View.OnClickListener {
        public void onClick(View view){
            Toast.makeText(getApplicationContext(),"粮虫检测",Toast.LENGTH_SHORT).show();
        }
    }
    private class pictureSaveFunction implements View.OnClickListener {
        public void onClick(View view){
            BitmapDrawable bmpDrawable = (BitmapDrawable) cameraPicture.getDrawable();
            Bitmap bitmap = bmpDrawable.getBitmap();
            saveToSystemGallery(bitmap);//将图片保存到本地
            Toast.makeText(getApplicationContext(),"图片保存成功!",Toast.LENGTH_SHORT).show();
            startActivity(intent3);//窗口切换
        }
    }
    @Override
    protected void onActivityResult(int requestCode, int resultCode, @Nullable Intent data) {
        switch (requestCode) {
            case TAKE_PHOTO:
                if (requestCode == TAKE_PHOTO && resultCode == RESULT_OK ) {
                    try {
                        // 将图片解析成Bitmap对象
                        Bitmap bitmap = BitmapFactory.decodeStream(getContentResolver().openInputStream(imageUri));
                        cameraPicture.setImageBitmap(bitmap);
                    } catch (FileNotFoundException e) {
                        e.printStackTrace();
                    }
                }
                break;
            default:
                break;
        }
    }
    public void saveToSystemGallery(Bitmap bmp) {
        // 首先保存图片
        File appDir = new File(Environment.getExternalStorageDirectory(), "Mycamera");
        if (!appDir.exists()) {
            appDir.mkdir();
        }
        String fileName = System.currentTimeMillis() + ".jpg";
        File file = new File(appDir, fileName);
        try {
            FileOutputStream fos = new FileOutputStream(file);
            bmp.compress(Bitmap.CompressFormat.JPEG, 100, fos);
            fos.flush();
            fos.close();
        } catch (FileNotFoundException e) {
            e.printStackTrace();
        } catch (IOException e) {
            e.printStackTrace();
        }

        // 其次把文件插入到系统图库
        try {
            MediaStore.Images.Media.insertImage(getContentResolver(),
                    file.getAbsolutePath(), fileName, null);
        } catch (FileNotFoundException e) {
            e.printStackTrace();
        }

        //sendBroadcast(new Intent(Intent.ACTION_MEDIA_SCANNER_SCAN_FILE, Uri.parse(file.getAbsolutePath())));
        Intent intent = new Intent(Intent.ACTION_MEDIA_SCANNER_SCAN_FILE);
        Uri uri = Uri.fromFile(file);
        intent.setData(uri);
        sendBroadcast(intent);// 发送广播,通知图库更新
    }
}
4.在AndroidManifest.xml中添加注册
4.1.注册除了MainActivity的其他两个界面,添加provider
内容如下:
<activity android:name="Albums"></activity>
        <activity android:name="Camera"></activity>
        <provider
            android:name="androidx.core.content.FileProvider"
            android:authorities="com.example.lenovo.cameraalbumtest.fileprovider"
            android:exported="false"
            android:grantUriPermissions="true">
            <meta-data
                android:name="android.support.FILE_PROVIDER_PATHS"
                android:resource="@xml/file_paths" />
        </provider>
4.2.申请使用相机的权限,读写

代码如下:
<uses-permission android:name="android.permission.WRITE_EXTERNAL_STORAGE" />
<uses-permission android:name="android.permission.CAMERA"/>
5.添加图片保存的xml路径,添加方法和内容
新建xml目录,方法如下:
名字命名为xml,点击?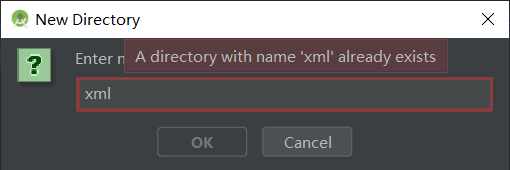
新建file_path.xml文件,方法如下:
file_path.xml文件内容如下:
<?xml version="1.0" encoding="utf-8"?>
<paths xmlns:android="http://schemas.android.com/apk/res/android">
    <external-path
        name="my_images"
        path="." />
</paths>
点击运行,可以在虚拟设备上运行了
运行或安装的问题总结
- 如果在手机上运行,可能在安装到手机上时出现错误,这时需要修改gradle.properties,如下所示:Session ‘app’: Installation did not succeed.
The application could not be installed: INSTALL_FAILED_TEST_ONLY
Retry
默认只能测试,不能安装到手机,在gradle.properties里面添加一句话,如下所示:
android.injected.testOnly=false
然后就可以开心的运行了!
续上次的程序
实际运行中,发现点击图像保存按钮时,图库中会出现两种一模一样的图片,将以下代码屏蔽,即可解决这个问题。
        // 其次把文件插入到系统图库
/*        try {
            MediaStore.Images.Media.insertImage(getContentResolver(),
                    file.getAbsolutePath(), fileName, null);
        } catch (FileNotFoundException e) {
            e.printStackTrace();
        }*/
总结
深度检测模型的移动端移植,第一步访问本地相册,或者使用相机进行拍照的功能已经完成,离成功又近了一步,加油自己!