上篇介绍了项目的开发环境的搭建,这篇开始记录我的springboot项目开发全过程。
应用到的主要的组件与框架:
1.框架:springboot2.0.1
2.数据库:mysql5.7
3.持久化:hibernate5
4.模板框架:freemarker
5.页面装饰器:sitemesh3
6.缓存:ehcache
7.日志:logback
8.服务器容器:tomcat8
一、构建项目
1.pom,里面好多前期不需要,但是后期都会用到的慢慢来
<?xml version="1.0" encoding="UTF-8"?>
<project xmlns="http://maven.apache.org/POM/4.0.0"
xmlns:xsi="http://www.w3.org/2001/XMLSchema-instance"
xsi:schemaLocation="http://maven.apache.org/POM/4.0.0 http://maven.apache.org/xsd/maven-4.0.0.xsd">
<modelVersion>4.0.0</modelVersion>
<groupId>com.example</groupId>
<artifactId>springboot-e</artifactId>
<version>0.0.1</version>
<packaging>war</packaging>
<name>springboot-e</name>
<description>springboot-e project for Spring Boot</description>
<parent>
<groupId>org.springframework.boot</groupId>
<artifactId>spring-boot-starter-parent</artifactId>
<version>2.0.1.RELEASE</version>
<relativePath />
</parent>
<properties>
<project.build.sourceEncoding>UTF-8</project.build.sourceEncoding>
<project.reporting.outputEncoding>UTF-8</project.reporting.outputEncoding>
<java.version>1.8</java.version>
</properties>
<dependencies>
<dependency>
<groupId>org.springframework.boot</groupId>
<artifactId>spring-boot-starter-web</artifactId>
</dependency>
<dependency>
<groupId>org.springframework.boot</groupId>
<artifactId>spring-boot-starter-test</artifactId>
<scope>test</scope>
</dependency>
<dependency>
<groupId>org.springframework.boot</groupId>
<artifactId>spring-boot-devtools</artifactId>
<optional>true</optional>
<scope>true</scope>
</dependency>
<dependency>
<groupId>org.springframework.boot</groupId>
<artifactId>spring-boot-starter-freemarker</artifactId>
</dependency>
<dependency>
<groupId>org.springframework.boot</groupId>
<artifactId>spring-boot-starter-aop</artifactId>
</dependency>
<dependency>
<groupId>org.hibernate</groupId>
<artifactId>hibernate-entitymanager</artifactId>
<version>5.2.17.Final</version>
</dependency>
<dependency>
<groupId>org.springframework</groupId>
<artifactId>spring-tx</artifactId>
<version>5.0.5.RELEASE</version>
</dependency>
<dependency>
<groupId>commons-dbcp</groupId>
<artifactId>commons-dbcp</artifactId>
<version>1.4</version>
</dependency>
<dependency>
<groupId>org.springframework</groupId>
<artifactId>spring-orm</artifactId>
<version>5.0.5.RELEASE</version>
</dependency>
<dependency>
<groupId>mysql</groupId>
<artifactId>mysql-connector-java</artifactId>
<version>5.1.46</version>
</dependency>
<dependency>
<groupId>com.alibaba</groupId>
<artifactId>fastjson</artifactId>
<version>1.2.47</version>
</dependency>
<dependency>
<groupId>org.springframework.boot</groupId>
<artifactId>spring-boot-starter-tomcat</artifactId>
<scope>provided</scope>
</dependency>
<dependency>
<groupId>org.webjars</groupId>
<artifactId>bootstrap</artifactId>
<version>3.3.5</version>
</dependency>
<dependency>
<groupId>org.webjars</groupId>
<artifactId>jquery</artifactId>
<version>3.1.1</version>
</dependency>
<dependency>
<groupId>org.sitemesh</groupId>
<artifactId>sitemesh</artifactId>
<version>3.0.1</version>
</dependency>
<dependency>
<groupId>org.springframework.boot</groupId>
<artifactId>spring-boot-starter-cache</artifactId>
</dependency>
<dependency>
<groupId>net.sf.ehcache</groupId>
<artifactId>ehcache</artifactId>
</dependency>
<dependency>
<groupId>org.springframework.boot</groupId>
<artifactId>spring-boot-starter-security</artifactId>
</dependency>
<!— 验证码 —>
<dependency>
<groupId>com.github.penggle</groupId>
<artifactId>kaptcha</artifactId>
<version>2.3.2</version>
</dependency>
<dependency>
<groupId>net.sourceforge.nekohtml</groupId>
<artifactId>nekohtml</artifactId>
<version>1.9.22</version>
</dependency>
<!— email —>
<dependency>
<groupId>org.springframework.boot</groupId>
<artifactId>spring-boot-starter-mail</artifactId>
</dependency>
<!— http —>
<dependency>
<groupId>org.apache.httpcomponents</groupId>
<artifactId>httpclient</artifactId>
<version>4.5.6</version>
</dependency>
<!—java版本的jquery, html 解析—>
<dependency>
<groupId>org.jsoup</groupId>
<artifactId>jsoup</artifactId>
<version>1.11.3</version>
</dependency>
<!— 分词组件 —>
<dependency>
<groupId>com.huaban</groupId>
<artifactId>jieba-analysis</artifactId>
<version>1.0.2</version>
</dependency>
<!—这个可以不要,这个是二维码,我引入的本地的jar包—>
<dependency>
<groupId>com.google.zxing</groupId>
<artifactId>qrcode</artifactId>
<version>1.0.1</version>
<scope>system</scope>
<systemPath>${project.basedir}/src/main/lib/core.jar</systemPath>
</dependency>
</dependencies>
<build>
<plugins>
<plugin>
<groupId>org.springframework.boot</groupId>
<artifactId>spring-boot-maven-plugin</artifactId>
<configuration>
<includeSystemScope>true</includeSystemScope>
</configuration>
</plugin>
</plugins>
</build>
</project>
2.工程结构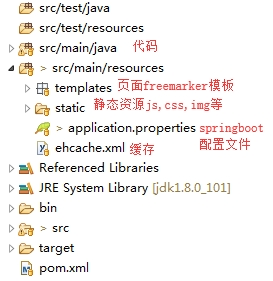
3.maven构建项目
进入项目根目录如,打开CMD
#进入项目根目录
cd d:\workspace\project
#执行maven构建命令
mvn eclipse:eclipse
4.创建启动类Application.java
@Configuration
//@EnableAutoConfiguration(exclude=HibernateJpaAutoConfiguration.class) //hibernate配置,现在先不用以后加入hibernate的时候再用
@ComponentScan
@SpringBootApplication
//@EnableCaching //缓存后面用
public class Application extends SpringBootServletInitializer {
    /*
    配置这个以后发布的时候,可以把容器换成tomcat
    */
    @Override
    protected SpringApplicationBuilder configure(SpringApplicationBuilder builder){
        return builder.sources(Application.class);
    }

    public static void main(String[] args){
        SpringApplication.run(Application.class, args);
    }

}
二、启动
右键Application.java-run as - spring boot app,启动项目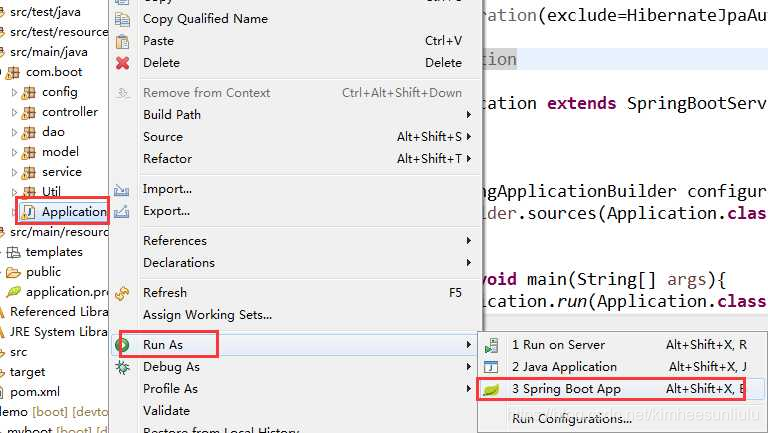
默认好像是8080端口,如果要修改端口需要修改application.properties这个配置,加入如下内容:
#修改端口号
server.port=80
至此一个简单的springboot项目构建起来了,后面就是开发功能了,来丰富我的springboot项目的功能。
版权声明:本文为kimheesunliulu原创文章,遵循CC 4.0 BY-SA版权协议,转载请附上原文出处链接和本声明。