先安装13.10.2版本的GitLab,然后跨版本迁移到目前最新的15.0.0版本的GitLab。
GitLab有严格的版本规范,根据官方文档,升级版本需要先升级到当前版本的最大版本,然后再进行升级下一个版本的最大版本,如有特别说明需要单独再升级某个中间版本。
因此,要从13.10.2升级到15.0.0版本,要经过四次升级:
13.10.2 —> 13.12.15 —> 14.0.12 —> 14.10.4—> 15.0.0
Gitlab环境部署
环境要求:内存不低于2G
第一步,查看Linux版本信息。
查看Linux系统的版本信息命令:cat /proc/version
查看Linux系统发行版信息命令:cat /etc/redhat-release
第二步,安装依赖包。
命令:yum install policycoreutils openssh-server openssh-clients postfix
systemctl enable sshd
systemctl start sshd
systemctl enable postfix
systemctl start postfix
第三步,下载并安装rpm包。
不同版本的Linux对应不同的rpm包。
若Linux版本为Centos 7,则需要下载el7版本的GitLab;
若Linux版本为Centos 8,则需要下载el8版本的GitLab;
若Linux版本为Alibaba Cloud Linux release 3,则需要下载el8版本的GitLab。
下载el7版本的GitLab,登录网址:
Index of /gitlab-ce/yum/el7/ | 清华大学开源软件镜像站 | Tsinghua Open Source Mirror
gitlab/gitlab-ce - Results for el/7 in gitlab/gitlab-ce (Page 17)
下载el8版本的GitLab,登录网址:
gitlab/gitlab-ce - Results for el/8 in gitlab/gitlab-ce (Page 13)
下载el7版本rpm命令:
cd /usr/local/rpm
wget https://mirrors.tuna.tsinghua.edu.cn/gitlab-ce/yum/el7/gitlab-ce-13.10.2-ce.0.el7.x86_64.rpm
chown -R git:git /usr/local/rpm
rpm -ivh gitlab-ce-13.10.2-ce.0.el7.x86_64.rpm
若结果显示“policycoreutils-python is needed by gitlab-ce”,则说明运行出现错误。又因为Linux版本为Centos 7,GitLab版本为el7,所以可以使用命令“yum install policycoreutils-python”来解决这个问题。若使用上述命令无效,则说明Linux版本一定不是centos 7。然后重新安装GitLab。
下载el8版本rpm命令:
cd /usr/local/rpm
chown -R git:git /usr/local/rpm
rpm -ivh download.rpm
若结果显示“policycoreutils-python-utils is needed by gitlab-ce”,则说明运行出现错误。又因为Linux版本为Centos 8或Alibaba Cloud Linux release 3,GitLab版本为el8,所以可以使用命令“yum install policycoreutils-python-utils”来解决这个问题。若使用上述命令无效,则说明Linux版本一定不是centos 8或Alibaba Cloud Linux release 3。然后重新安装GitLab。
第四步,修改配置文件。
1)修改配置文件/etc/gitlab/gitlab.rb,在文件中做如下修改:
# 把网址改为服务器公网IP(默认IP为80,若80已经使用,自定义其它端口),这个IP一定要在阿里云上进行授权配置。
external_url 'http://x.x.x.x'# 备份数据的路径
gitlab_rails['backup_path'] = "/var/opt/gitlab/backups"2)确保防火墙启动成功
命令:systemctl status firewalld
若结果显示“Active: inactive (dead)”,则需要启动防火墙。
systemctl start firewalld
若结果显示“Active: active (running)”,则可以运行下面的命令:
sudo firewall-cmd --permanent --add-service=http
sudo firewall-cmd --permanent --add-service=https
sudo systemctl reload firewalld
若结果都显示“success”,则说明防火墙启动成功。
3)把GitLab的端口号放开
firewall-cmd --zone=public --add-port=80/tcp --permanent若结果显示“success”,则说明GitLab的端口号成功放开。
4)重新加载并启动
命令:gitlab-ctl reconfigure
若结果显示“ruby_block[supervise_redis_sleep] action run”,则会一直卡无法往下进行,这时需要按住“CTRL+C”强制结束,然后运行命令“sudo systemctl restart gitlab-runsvdir”,最后再次执行命令“sudo gitlab-ctl reconfigure”。
gitlab-ctl restart
若结果显示“ok: run”,则说明配置文件修改完成。
GitLab常用命令
gitlab-ctl start # 启动所有GitLab组件
gitlab-ctl stop # 停止所有GitLab组件
gitlab-ctl restart # 重启所有GitLab组件
gitlab-ctl status # 查看服务状态
gitlab-ctl reconfigure # 启动服务
gitlab-rake gitlab:check SANITIZE=true --trace # 检查GitLab
gitlab-ctl tail # 查看日志
1)GitLab的守护进程关闭和重启
# 备注:GitLab的守护进程会默认开启nginx
命令:gitlab-ctl stop nginx
gitlab-ctl restart nginx
释放资源,关闭GitLab命令:gitlab-ctl stop
2)服务器重启或者GitLab意外停止,执行命令“gitlab-ctl start”。
若结果显示“fail: sidekiq: runsv not running”等,则说明GitLab不能启动。可以使用下面命令来解决这个问题:
systemctl start gitlab-runsvdir
gitlab-ctl restart
GitLab使用
在浏览器的地址栏中输入ECS服务器的公网IP(GitLab的ip和端口号),无法访问。
第一步,linux系统开放GitLab的端口号。
命令:cd /etc/sysconfig
ls -l
结果显示“ip6tables-config”和“iptables-config”,但是没有查看到iptables文件。
第二步,安装iptables-services。
命令:yum install iptables-services
第三步,启动iptables。
命令:systemctl enable iptables
systemctl start iptables
第四步,在iptables中配置开放GitLab的端口号。
命令:vim /etc/sysconfig/iptables
在文件中添加下面的代码:
-A INPUT -m state --state NEW -m tcp -p tcp --dport 80 -j ACCEPT第五步,重启防火墙。
命令:service iptables restart
第六步,重新登录GitLab。
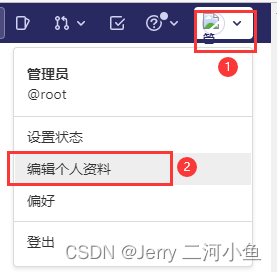
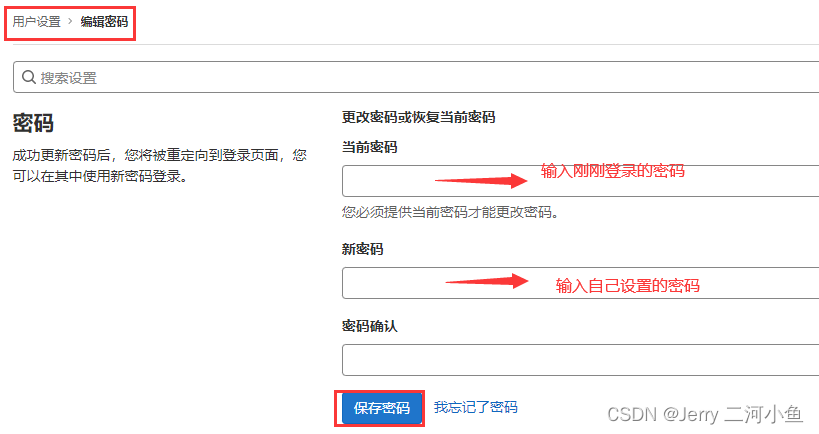
在浏览器的地址栏中输入ECS服务器的公网IP(GitLab的ip和端口号),登录GitLab的界面,第一次登录使用的用户名为 root,而密码在文件/etc/gitlab/initial_root_password中(密码不会含空格),且会在 24 小时后自动被删除。然后修改密码即可。
第七步,登录GitLab时界面显示“502”。
这个一般是权限问题,可以给予GitLab权限。
命令:chmod -R 755 /var/log/gitlab
创建Project
第一步,安装Git工具。
在linux中安装Git,使用自带的源安装。
命令:yum install git
第二步,生成密钥文件。
使用ssh-keygen生成密钥文件.ssh/id_rsa.pub。
命令:ssh-keygen #连续回车四下
cat .ssh/id_rsa.pub #结果显示生成的秘钥
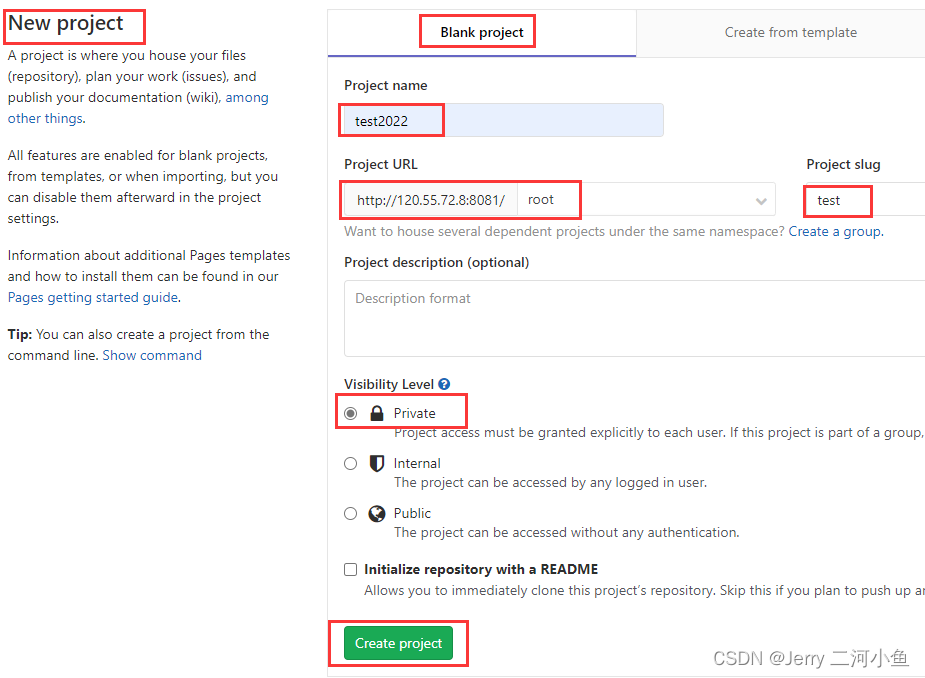
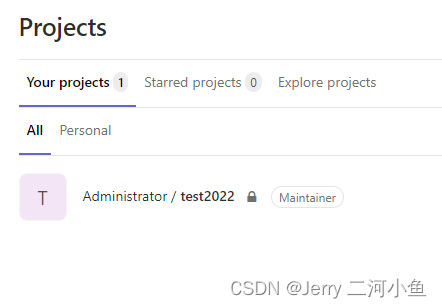
第三步,在GitLab的主页中新建一个Project。
点击“新建Project”,在“Blank Project”栏目中,填写“Project name”,其他默认,最后点击“创建Project”。
第四步,添加ssh key导入第二步中生成的密钥文件内容。
点击“添加ssh key”,然后在“key”中复制粘贴刚刚生成的秘钥,最后点击“添加key”。
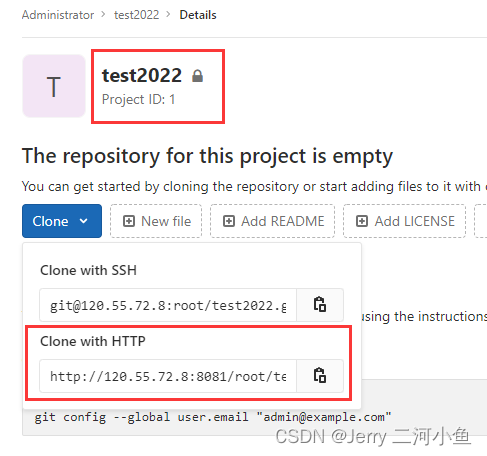
项目地址在进行clone操作时需要用到。
跨服务器进行Gitlab同版本迁移
公网IP为x.x.x.x和y.y.y.y的服务器上按照上述的步骤安装并使用Gitlab。然后在公网IP为x.x.x.x的服务器上创建Project,再向公网IP为y.y.y.y的服务器上的Gitlab迁移数据。
第一步,对公网IP为X.X.X.X的服务器上的数据进行备份。
进入Gitlab数据备份目录命令:
cd /var/opt/gitlab/backups
Gitlab数据备份命令:
gitlab-rake gitlab:backup:create
若结果显示“Errno::EACCES: Permission denied @ dir_s_mkdir - /var/opt/gitlab/backups/db”,则说明当前路径的权限不足以及拥有者错误,需要授予当前路径对应的权限并把拥有者改为“git”。
命令:chmod -R 755 /var/opt/gitlab/backups
chown -R git:git /var/opt/gitlab/backups
若结果不显示内容,则会生成.tar形式的备份文件。
第二步,把备份文件传输到公网IP为y.y.y.y的服务器上。
使用WinSCP将导出的.tar文件传送到内网IP为y1.y1.y1.y1的新服务器对应的路径中,并且路径的权限以及拥有者与旧服务器中的一致。
命令:scp/var/opt/gitlab/backups/1654133514_2022_06_02_13.10.2_gitlab_backup.tar root@y1.y1.y1.y1:/var/opt/gitlab/backups/
输入连接root@y1.y1.y1.y1的密码“xxxxx@123456”。
若结果显示“WARNING: REMOTE HOST IDENTIFICATION HAS CHANGED”,则说明出现错误。可以使用命令“ssh-keygen -R y1.y1.y1.y1”,然后重新尝试连接,输入“yes”,按下回车,成功连接。
若结果显示“1654133514_2022_06_02_13.10.2_gitlab_backup.t 100% 270KB 13.0MB/s 00:00”,则说明数据传送成功。
第三步,导入备份数据。
停止公网IP为y.y.y.y的服务器上相关数据链接服务。
命令:gitlab-ctl stop unicorn
gitlab-ctl stop sidekiq
修改备份文件权限为777,若是是从本服务器恢复能够不修改。
命令:chmod 777 /var/opt/gitlab/backups/1654133514_2022_06_02_13.10.2_gitlab_backup.tar
导入备份数据,若被导入数据的服务器上之前有数据,则之前的数据会被覆盖掉。从1654133514_2022_06_02_13.10.2编号备份中恢复。
命令:cd /var/opt/gitlab/backups
gitlab-rake gitlab:backup:restore BACKUP=1654133514_2022_06_02_13.10.2
按照提示输入两次“yes”并回车。
同服务器进行Gitlab跨版本迁移
在公网IP为y.y.y.y的服务器上操作
第一步,备份数据。
查看当前的版本
命令:cat /opt/gitlab/embedded/service/gitlab-rails/VERSION
进入Gitlab数据备份目录
命令:cd /var/opt/gitlab/backups
Gitlab数据备份
命令:gitlab-rake gitlab:backup:create
chmod -R 755 /var/opt/gitlab/backups
chown -R git:git /var/opt/gitlab/backups
执行命令后会生成.tar形式的备份文件。
第二步,升级安装。
停止Gitlab相关数据链接服务
命令:gitlab-ctl stop sidekiq
gitlab-ctl stop unicorn
下载四个升级的Gitlab版本
命令:cd /usr/local/rpm
wget https://mirrors.tuna.tsinghua.edu.cn/gitlab-ce/yum/el7/gitlab-ce-13.12.15-ce.0.el7.x86_64.rpm
wget https://mirrors.tuna.tsinghua.edu.cn/gitlab-ce/yum/el7/gitlab-ce-14.0.12-ce.0.el7.x86_64.rpm
wget https://mirrors.tuna.tsinghua.edu.cn/gitlab-ce/yum/el7/gitlab-ce-14.10.4-ce.0.el7.x86_64.rpm
wget https://mirrors.tuna.tsinghua.edu.cn/gitlab-ce/yum/el7/gitlab-ce-15.0.0-ce.0.el7.x86_64.rpm
yum安装Gitlab,安装完成后会提示备份/etc/gitlab/gitlab.rb和/etc/gitlab/gitlab-secrets.json文件。
命令:yum install gitlab-ce-13.12.15-ce.0.el7.x86_64.rpm
(yum install gitlab-ce-14.0.12-ce.0.el7.x86_64.rpm
yum install gitlab-ce-14.10.4-ce.0.el7.x86_64.rpm
yum install gitlab-ce-15.0.0-ce.0.el7.x86_64.rpm)
cp /etc/gitlab/gitlab.rb /etc/gitlab/gitlab.rb.bk
cp /etc/gitlab/gitlab-secrets.json /etc/gitlab/gitlab-secrets.json.bk
chmod -R 755 /usr/local/rpm
chown -R git:git /usr/local/rpm
重新加载并启动
命令:gitlab-ctl reconfigure
若结果显示“Error executing action `run` 'ruby_block[resource: /var/opt/gitlab/git-data/repositor”,则说明重新加载出现问题,需要执行“chmod 2770 /var/opt/gitlab/git-data/repositories”来解决这个问题。
gitlab-ctl restart
然后重新登录验证下是否正常。
第三步,检查后台迁移任务。
命令:sudo gitlab-rails console
若结果显示“GitLab:13.12.15”,则说明升级安装成功。
(若结果显示“GitLab:14.0.12”,则说明升级安装成功。
若结果显示“GitLab:14.10.4”,则说明升级安装成功。
若结果显示“GitLab:15.0.0”,则说明升级安装成功。)
> puts Sidekiq::Queue.new("background_migration").size
> Sidekiq::ScheduledSet.new.select { |r| r.klass == 'BackgroundMigrationWorker' }.size
若两者结果都显示为“0”,则说明迁移任务完成;若两者结果不显示为“0”,则可以通过一直重新加载并启动,直到两者结果都显示为“0”。也可以通过看板查看。登录看板网址:
http://120.55.73.145/admin/sidekiq/,把迁移任务添加到“执行中”即可。
每次版本升级完成后,都要检查迁移状态,只有迁移状态结果都为“0”,才能进行下一个版本升级。
第四步,依次升级14.0.12、14.10.4和15.0.0版本的GitLab。
每次升级都重复按照流程:第一步 --> 第二步 --> 第三步。等15.0.0版本升级完成后,登录http://x.x.x.x/admin可以在这个页面找到“GitLab 15.0.0”,说明升级成功了。
第五步,修改配置文件/etc/gitlab/gitlab.rb,把puma设置为default web server。
第六步,若CentOS系统中有CI功能,则需要升级一下gitlab-runner。
命令:rpm -i gitlab-runner_.rpm
Register the Runner
卸载
如果gitlab升级后,发现有解决不了的问题,那就卸载gitlab并重装。注意:gitlab一定要卸载干净,否则会有不少麻烦。
第一步,停服务。
命令:sudo gitlab-ctl stop
第二步,卸载gitlab。(需确认gitlab是ce版本还是ee版本)
命令:sudo rpm -e gitlab-ce
第三步,杀掉gitlab守护进程。(带有opt/gitlab/service log)
命令:ps -ef|grep gitlab
sudo kill -9 [PID]
第四步,删除磁盘文件。
命令:sudo find / -name gitlab |xargs rm -rf
若结果提示“permission deny”,则手动逐层删除即可。
第五步,下载的gitlab软件包也删除。