参考:
官方:
Beego GitHub地址:https://github.com/beego/beego
Beego 官网地址:https://beego.me/
Gorm 官网:https://gorm.io/zh_CN/docs/connecting_to_the_database.html
第三方包:https://pkg.go.dev/
非官方:
Golang Beego中没法下载第三方包解决办法
目录
一、介绍
Beego 是一个开源基于Golang的MVC框架,主要用于Web开发、API接口开发等。项目比较小,只写一些接口的话可以选Gin框架。开发较为复杂的项目,并且注重代码质量的话建议使用Beego。
二、开发准备
1、安装bee脚手架
go get github.com/beego/bee
安装完后,使用bee命令查看
2、创建项目
bee new 项目名称
复制一个beego项目,要生成一个go.mod的依赖文件
go mod init 项目名称
3、项目运行
bee run // 运行项目
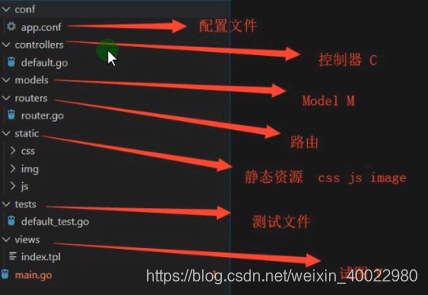
4、目录结构
5、项目升级
1)推荐使用升级方式
go get -u github.com/astaxie/beego
2)源码下载升级
https://github.com/astaxie/beego 下载源码,覆盖到 $GOPATH/src/github.com/astaxie/beego 目录,然后通过本地执行安装:
go install github.com/astaxie/beego
三、框架语法
1、常用方法总结
| 介绍 | 用法 | 案例 |
|---|---|---|
| 获取参数: | ||
| 获取GET传值 | c.GetString("名称") | id := c.GetString("id") |
| 获取多个GET传值,类型是切片 | c.GetStrings("名称") | id := c.GetStrings("id") |
| 接受Int类型的传值 | c.GetInt("名称") | c.GetInt("id") |
| 接受Bool类型的传值 | c.GetBool("名称") | c.GetBool("id") |
| 接受Float类型的传值 | c.GetFloat("名称") | c.GetFloat("id") |
| ParseForm获取表单传过来的数据 | 见:1) ParseForm获取表单传过来的数据 | |
| 获取post提交的xml格式数据 | 见:3) 获取post提交的xml格式数据 | |
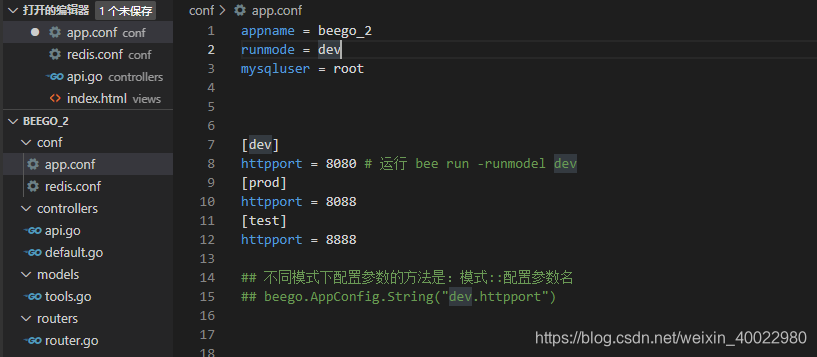
| 获取app.cof信息 | beego.AppConfig.String("名称") | beego.AppConfig.String("mysqluser") |
| 视图中获取配置文件信息 | {{config "类型" "要获取的参数名称" "默认值"}} | {{config "String" "mysqluser" ""}} |
| 不同级别的配置 | 见:11) 配置文件不同级别的配置 | |
| 配置文件中常用的配置 | 见:13) 配置文件中常用的配置 | |
| 打印: | ||
| 直接打印到页面上 | c.Ctx.WriteString(内容 ") | c.Ctx.WriteString("ID 为: " + id") |
| 控制台打印 | beego.Info(名称) | beego.Info(id) |
| 路由: | ||
| Get请求 | beego.Router("/goods", &controllers.GoodsController{}) | http://localhost:8080/goods, 默认Get方法 |
| Get请求 | beego.Router("/goods/add", &controllers.GoodsController{}, "get:AddGoods") | 请求方式(get、post、put、delete):方法名称(首字母大写), http://localhost:8080/goods/add |
| 动态路由 | beego.Router("/api/:id", &controllers.ApiController{}) | 访问:http://localhost:8080/api/567 |
| 获取动态路由中的值 | id := c.Ctx.Input.Param(":id") | |
| 正则路由(伪静态) | beego.Router("/api_:id([0-9]+).html", &controllers.ApiController{}) | id([0-9]+).html 看成是一个整体 访问:http://localhost:8080/api_567.html |
| 视图: | ||
| 视图展示 | c.TplName = "以html或tpl结尾的文件" | c.TplName = "user.html" |
| 页面跳转 | c.Redirect("/", 301) // 301/302 永久/临时重定向 | |
| 页面跳转 | c.Ctx.Redirect(301, "/") // 301/302 永久/临时重定向 | |
| 模板中的数据绑定 | 见:视图展示变量的标识修改、模板中的数据绑定 | |
| 模板中的if判断语句 | 见:模板中的if判断语句 | |
| define 自定义模板 | 见:define 自定义模板 | |
| 自定义模板,模板继承 | 见:自定义模板,模板继承 | |
| beego 内置的模板函数 | 见:beego 内置的模板函数、自定义模板函数 | |
| 静态资源配置,下载文件 | 见:静态资源配置,下载文件 | |
1) ParseForm获取表单传过来的数据
※ &接收参数
type User struct {
	Username string   `form:"username"` // 反射
	Password string   `form:"password"`
	Hobby    []string `form:"hobby"`
}

func (c *UserController) DOEditUser() {
	u := User{}
	if err := c.ParseForm(&u); err != nil {
		c.Ctx.WriteString("post 提交失败")
	}
	fmt.Printf("%#v", u)
	c.Ctx.WriteString("解析Post数据成功")
}
2)在Beego中,返回Json数据
※ 结构体添加tag直接标签
type User struct {
	Username string   `form:"username"`
	Password string   `form:"password"`
	Hobby    []string `form:"hobby"`
}

// 在beego  中,想要返回 Json 数据的话,需要把数据放在结构体中
func (c *UserController) GetUser() {
	u := User{
		Username: "张三",
		Password: "123456",
		Hobby:    []string{"2", "3"},
	}

	// 返回一个Json数据
	c.Data["json"] = u
	c.ServeJSON()
}
3)获取post提交的xml格式数据
支付的时候常用
1、配置文件里设置 copyrequestbody = true
2、准备XML数据
3、使用 ParseForm获取表单传过来的数据 的方式获取,c.ParseForm(&u) 改成 xml.Unmarshal(c.Cxt.input.RequestBody, &u)
4、结构体中添加反射
Demo:
type Product struct {
	Title   string `form:"title" xml:"title"`
	Content string `form:"content" xml:"content"`
}
4)视图展示变量的标识修改
第一种修改方式:配置文件修改
	TemplateLeft="<<"
	TemplateRight=">>"

第二种修改方式:也可在入口文件main.go 文件修改
func main() {
	beego.BConfig.WebConfig.TemplateLeft = "<<"
	beego.BConfig.WebConfig.TemplateRight = ">>"
	beego.Run()
}
5)模板中的数据绑定
type Article struct {
	Title   string
	Content string
}

func (c *ApiController) Get() {
	// 1、模板中绑定基本数据 字符串 数值 布尔值
	c.Data["website"] = "beego"
	c.Data["title"] = "你好 beego"
	c.Data["num"] = 12
	c.Data["falg"] = true // 页面输出:{{.falg}}

	// 2、模板中绑定结构体数据
	aticle := Article{
		Title:   "我是Title",
		Content: "内容",
	}
	c.Data["article"] = aticle // 页面输出:{{.article.Title}}  {{.article.Content}}

	// 3、模板中的循环遍历 range 模板中循环切片
	c.Data["sliceList"] = []string{"php", "java", "golang"}
	// html中:
	// {{range $key,$val := .sliceList}}
	//   <li>{{$key}}----------{{$val}}</li>
	// {{end}}

	// 4、模板中的循环遍历 range 模板中循环Map
	userinfo := make(map[string]interface{})
	userinfo["username"] = "张三"
	userinfo["age"] = 18
	userinfo["sex"] = "男"
	c.Data["userinfo"] = userinfo
	// html中:
	// {{range $key,$val := .userinfo}}
	//   <li>{{$key}}----------{{$val}}</li>
	// {{end}}

	// 5、模板中的循环遍历,结构体类型的切片
	c.Data["articleList"] = []Article{
		{
			Title:   "标题1",
			Content: "内容1",
		},
		{
			Title:   "标题2",
			Content: "内容2",
		},
		{
			Title:   "标题3",
			Content: "内容3",
		},
	}
	// html中:
	// {{range $key,$val := .articleList}}
	//   <li>{{$key}}----{{$val.Title}}-----{{$val.content}}</li>
	// {{end}}

	// 6、结构体类型的另一种定义方法
	/*
		匿名结构体,他就是一个类型
		struct {
			Title string
		}
	*/
	c.Data["cmsList"] = []struct {
		Title string
	}{
		{
			Title: "标题1",
		},
		{
			Title: "标题2",
		},
	}
	// html中:
	// {{range $key,$val := .cmsList}}
	//   <li>{{$key}}----{{$val.Title}}-----{{$val.content}}</li>
	// {{end}}

	// 7、模板中的自定义变量
	// {{$title:=.title}} 自定义变量$title
	// {{title}}
	c.TplName = "index.html"
}
6)模板中的if判断语句
<!-- 不能写>这种符号,只能写:eq==、ne!=、lt<、le<=、gt>、ge>= -->
  {{if .变量1}}
  <p>true</p>
  {{else if .变量2}}
  <p>false1</p>
  {{else}}
    {{if .变量3}}
    <P>false3</P>
    {{end}}
  <p>false2</p>
  {{end}}

  {{if lt .n1 .n2}}
  <p>n1小于n2</p>
  {{else}}
  <p>n1不小于n2</p>
  {{end}}
7)define 自定义模板
<!-- define 自定义模板 -->
{{define "aaa"}}
  <h5>自定义</h5>
{{end}}

<!-- 引用 -->
{{template "aaa" .}}
8)自定义模板,模板继承
{{template "/***.html"}}

// 子模版中渲染变量
{{template "/***.html" .}}
9)beego 内置的模板函数、自定义模板函数
1、date 格式化时间
{{date .变量 "Y-m-d H:i:s"}}
2、substr 字符串的截取
{{substr .变量 起始位置 结束位置}}
3、html2str 把html转化成字符串
第一种写法:
{{html2str .变量}}
第二种写法:
{{.变量 | html2str}}
4、str2html 把对应字符当作html来输出
第一种写法:
{{str2html .变量}}
第二种写法:
{{.变量 | str2html}}
5、htmlquote html字符串转义,</h2> 转化成 <h2>
{{htmlquote .变量}}
6、config 获取config中的配置文件
{{config “String类型首字母大写” “配置文件中的key” “默认值”}}
7、map_get 获取map的值
{{map_get .名称 “key”}}
10)静态资源配置,下载文件
1、在main.go文件中,run方法之前
	/ 配置静态资源目录
	beego.SetStaticPath("/down", "download")
2、访问下载地址,就会下载download目录下的指定文件
	http://localhost:8080/down/11.docx
11) 配置文件不同级别的配置
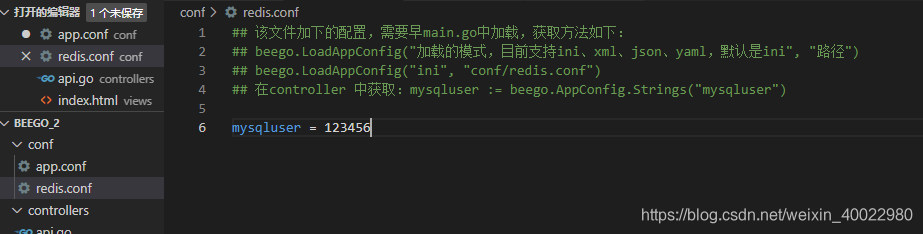
12) 多个配置文件,分开配置(不建议使用)
13) 配置文件中常用的配置
隐藏网站错误信息: EnableErrorsRender = false
2、cookie设置
	// 1、设置cookie
	// 获取:this.Ctx.GetCookie("username")
	this.Ctx.SetCookie("username", "lisi")

	// 2、设置coolie的过期时间 秒
	this.Ctx.SetCookie("sex", "1", 10000)
	// setcookie的第三个参数是时间,单位是秒
	// 不设置时间的换默认3600秒,浏览器关闭会话消失

	// 3、设置cookie的访问路径
	this.Ctx.SetCookie("length", "100", 10, "/article")

	// 4、设置cookie在二级域名下也可以访问
	this.Ctx.SetCookie("size", "99", 10, "/", ".baidu.com")

	// 5、第6个参数secure,true 时需要用https访问,默认是false

	// 6、第七个参数 httponly,true 时 js脚本无法获取到cookie,只允许服务端获取,防止XSS攻击,默认false

	// 7、设置中文cookie,cookie加密传输
	// this.SetSecureCookie("密钥", 其他参数同setcookie)
	// 获取: name, _ := this.Ctx.GetSecureCookie("123456", "name")
	this.SetSecureCookie("123456", "name", "张三")

	// 8、删除cookie
	// 设置cookie的时间为0
3、session设置
常用的session设置:
sessionon = true # 开启session
sessiongcmaxlifetime = 10 # session过期时间
sessionName = "baidu"
SessionHashkey = "mybeego"
4、日志处理、错误处理
1)记录错误日志
在main.go,文件中设置:
beego.SetLogger("file", `{"filename":"log/test.log"}`)
2)错误信息的打印
    beego.Info("打印信息")
	beego.Error("我是一个错误信息")
	beego.Warning("我是一个警告信息")
	beego.Notice("我是一个通知信息")
	beego.Debug("我是一个调试信息")
3)页面处理、抛出异常
this.Redirect("/", 302)
可以自定义异常跳转页面:
1、新建一个ErrorController 控制器

	func (c *ArticleController) Error404() {
		c.TplName = "errors/404.html"
	}

	func (c *ArticleController) Error500() {
		c.TplName = "errors/500.html"
	}

	func (c *ArticleController) ErrorDb() {
		c.Data["content"] = "database is now down"
		c.TplName = "errors/dberror.html"
	}

2、在view下创建 errors/404.html 页面

3、在main.go文件中声明

	// 配置错误处理的控制器
	beego.ErrorController(&controllers.ErrorController{})

4、异常抛出时调用指定页面
	c.Abort("404")
5、文件上传
注:form 表 单 中 必 须 加 入 enctype="multipart/form-data"这个属性

Demo:

func (c *ArticleController) DoUpload() {
	f, h, err := c.GetFile("pic")
	if err != nil {
		beego.Info("getfile err ", err)
	}
	defer f.Close() // 关闭文件资源

	extName := path.Ext(h.Filename) // 获取文件后缀名
	allowExtMap := map[string]bool{".jpg": true, ".jpeg": true, ".png": true, ".gif": true}
	if _, ok := allowExtMap[extName]; !ok {
		c.Ctx.WriteString("后缀名不符合上传要求")
		return
	}

	// 创建图片保存目录 static/upload/20200623
	day := models.GetDay() // 20200623
	dir := "static/upload/" + day
	if err := os.MkdirAll(dir, 0666); err != nil { // os.MkdirAll() 创建目录
		beego.Error(err)
		return
	}

	// 生成文件名称 144325235235.png
	fileUnixName := strconv.FormatInt(models.GetUnix(), 10)
	uploadDir := path.Join(dir, fileUnixName+extName) // 文件路径拼接 path.Join()

	// 保存图片
	c.SaveToFile("pic", uploadDir) // 保存位置在 static/upload, 没有文件夹要先创建
	c.Ctx.WriteString("上传成功")
}
6、GORM查询
1)介绍
GORM是一个当都的ORM框架。比自带的orm框架语法友好,gin框架也可以引用。
gorm 小记
四、打包发布
打包
bee pack
bee pack -be GOOS=window
bee pack -be GOOS=linux
运行
增加可执行权限: chmod -R 777 目录/
运行:nohup ./beepkg &
nginx 配置
server {
    listen       80;
    server_name  域名;

    location / {
      proxy_set_header Host $host;
      proxy_set_header X-Real-IP $remote_addr;
      proxy_set_header X-Forwarded-For $proxy_add_x_forwarded_for;
      proxy_buffering off;
      proxy_pass http://127.0.0.1:8081;
    }

    error_page   500 502 503 504  /50x.html;
    location = /50x.html {
        root   /usr/share/nginx/html;
    }

    access_log  /data0/logs/域名.log;
		error_log  /data0/logs/域名_error.log;
}
五、Api接口开发
六、Api接口文档 swagger
开发总结:
	1、路由文件必须是 router.go,不然的话识别不了
	2、文档中的方法都用了还是,进不去的话,可以用 beego.NSRouter 再定义一遍路由
	3、需要添加 swagger 的路由,要不然不能访问
	4、用 bee generate docs 创建文档可以看到生成文档时报的错,bee run -gendoc=true -downdoc=true 自动生成报错不明确
版权声明:本文为weixin_40022980原创文章,遵循CC 4.0 BY-SA版权协议,转载请附上原文出处链接和本声明。