自定义用户认证逻辑
这篇文章只要是实现web页面登录认证!就是用户通过账号密码登录系统,获得授权!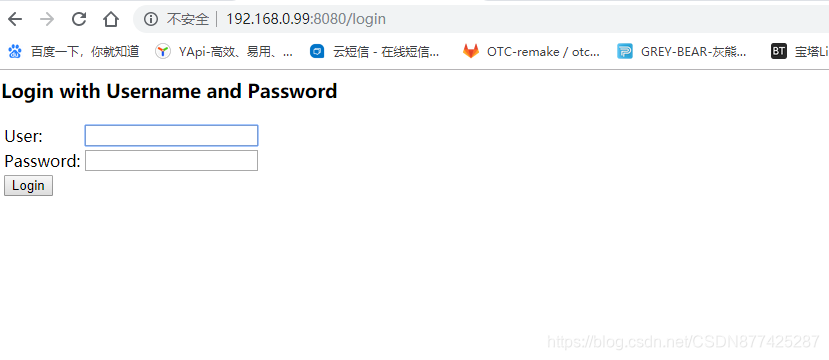
也就是这中样子的登录!实现起来比较简单,别说网页丑,这是SpringSecurity自己默认的登录界面
简单实现
1.一个登录后访问的请求
@RestController
public class TestController {
    @RequestMapping("/user")
    public String user(){
        return "HelloWorld";
    }
}
2.编写SpringSecurity核心配置
@Configuration
public class SecurityConfig extends WebSecurityConfigurerAdapter {

    @Override
    protected void configure(HttpSecurity http) throws Exception {
        http.formLogin()
                .and()
                .authorizeRequests()
                .anyRequest()
                .authenticated();
    }
}
然后启动就可以了,但是这种默认的实现方式只能使用控制台提供的SpringSecurity的默认账号密码
那么肯定是无法满足我们日常的开发需求的,
所以我们需要自己编写相关处理逻辑,这种表单登录核心也就是三个步骤
1.处理用户信息获取逻辑
2.处理用户校验逻辑
3.处理密码加密解密
自定义实现
创建我们自己的UserDetailsService实现类,上面的代码无需更改
@Component
public class MyUserDetailsService implements UserDetailsService {
@Bean
public PasswordEncoder passwordEncoder(){//密码加密
return new BCryptPasswordEncoder();//这里也可以自定义加密方式
}
@Override
public UserDetails loadUserByUsername(String userName) throws UsernameNotFoundException {
//1.处理用户信息获取逻辑
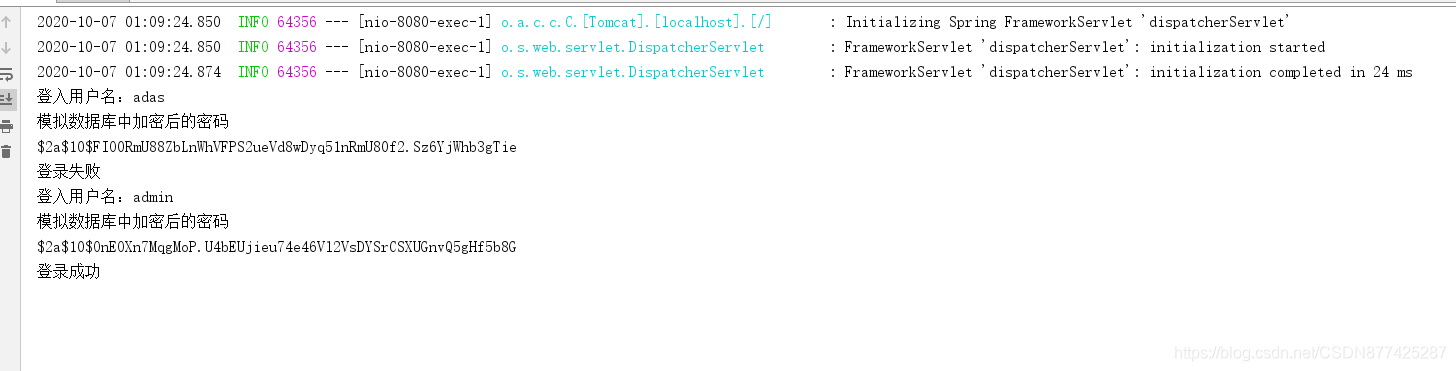
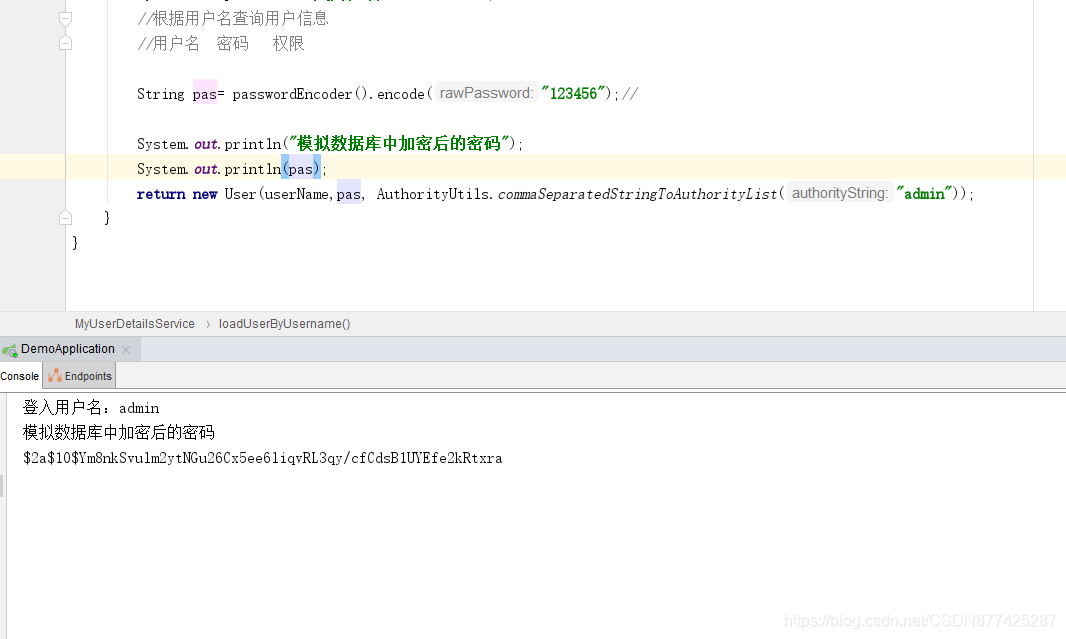
System.out.println("获取登录用户的用户名:"+userName);
//根据用户名查询用户信息得到用户的密码,权限,用户状态
//3.处理密码加密解密
String pas= passwordEncoder().encode("123456");
//2.处理用户校验逻辑
return new User(userName,pas, AuthorityUtils.commaSeparatedStringToAuthorityList("admin"));
//在日常开发中,用户状态是会有多种状态的,SpringSecurity也为我们考虑到了这种情况,也就是提供能校验用户状态的构造器
//User(String username, String password, boolean enabled,boolean accountNonExpired, boolean credentialsNonExpired,boolean accountNonLocked, Collection<? extends GrantedAuthority> authorities)
//accountNonExpired-代表用户是否过期 true没有过期 false过期(具体的判断逻辑需要自己实现,SpringSecurity只人这个状态值,如果业务中没有这个状态需求那么固定写为true即可)
//credentialsNonExpired-这个是判断密码是否过期,(在一些安全性较高的网站上会有这个需求,如果实际业务中没有这个需求设置为true即可)
//accountNonLocked-这个判断账号是否被锁定(实际业务中这个代表账号是否被冻结,没冻结就是true,冻结了就是false)
//enabled-这个判断账户是否可用(这个代表账号是否被删除,这个不是真正意义上的删除,而是逻辑上的删除,设置删除标志位)
}
}
关于加密
这里登陆的密码在同样的字符串先得到的数据是不一样的,这是SpringSecurity默认提供的passwordEncoder的强大的地方,同样的密码加密后的数据是不一样的,因为每次加密都会随机生成一个盐,在生成的密串后会将随机生成的盐混在这个密串中,然后每次数据对比的时候就会根据混在密串中的随机盐解码,这样做的好处就是防止密码在一样的情况下爆破其他的账户
注意
这里关于密码加密的实现会根据SpringBoot的版本不同实现的效果也是不同的,低版本的SpringBoot是需要手动实现加密的,而高版本的SpringBoot是默认自动实现的!
报错提示如下:
java.lang.IllegalArgumentException: There is no PasswordEncoder mapped for the id "null
自定义登录界面
使用SpringSecurity自带的登录页显然是不行的,那么我们需要编写我们自己的登录页面!
1.创建我们自己的登录页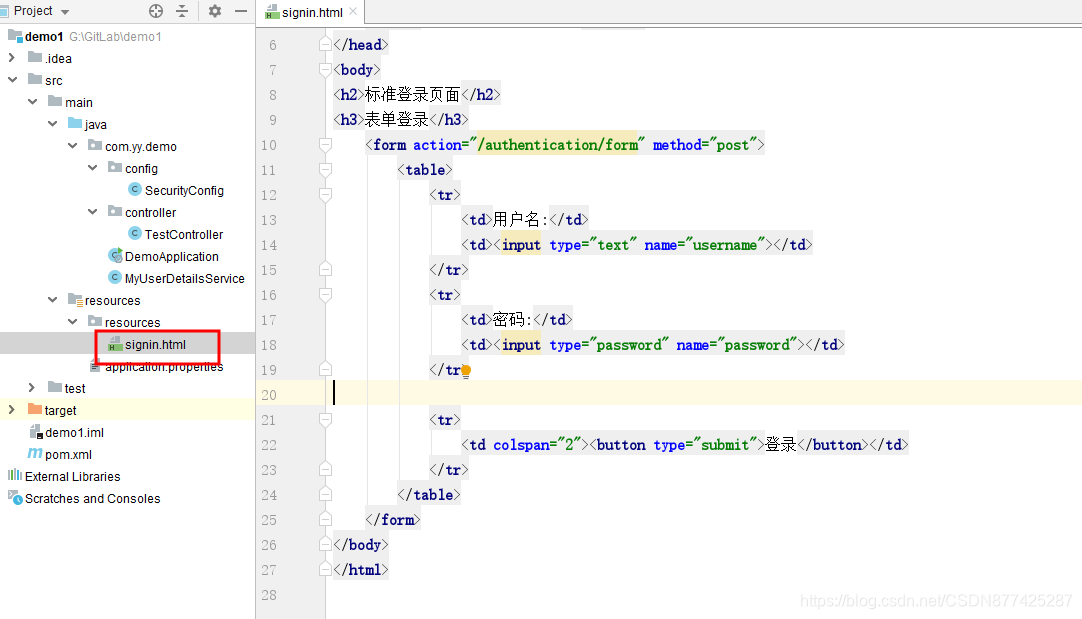
2.配置我们自己的登录页
@Override
    protected void configure(HttpSecurity http) throws Exception {
        http.formLogin()
                .loginPage("/signin.html")//配置我们自己的登录页面
                .and()
                .authorizeRequests()
                .anyRequest()
                .authenticated();
    }
访问测试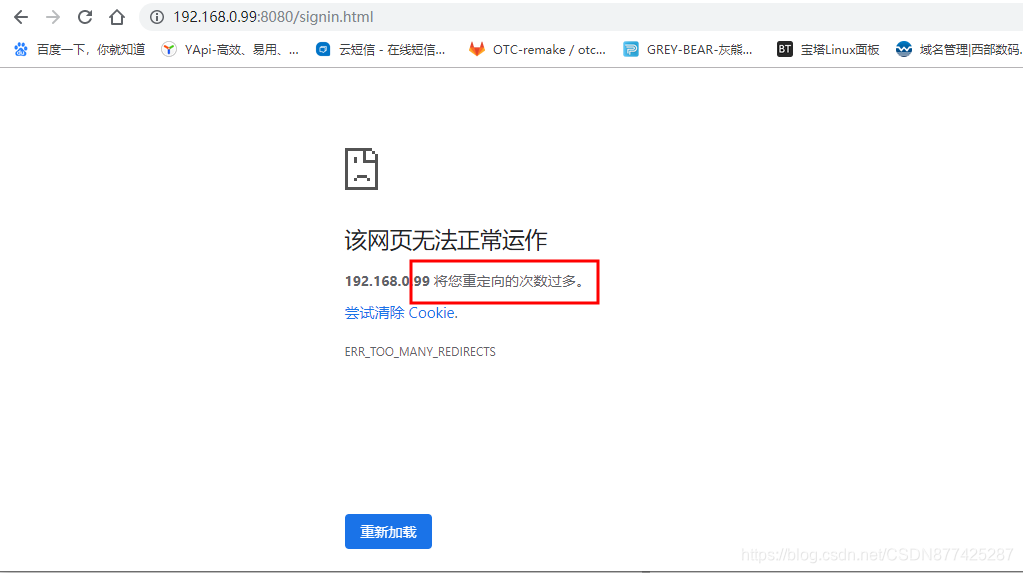
这里是因为我们配置的所有请求都需要认证,所以/signin.html也不例外!这里需要单独放开一些不需要认证的请求
3.放开无需认证请求
 @Override
    protected void configure(HttpSecurity http) throws Exception {
        http.formLogin()
                .loginPage("/signin.html")
                .and()
                .authorizeRequests()
                .antMatchers("/signin.html").permitAll()//这段代码就是放开一些请求的
                .anyRequest()
                .authenticated();
    }
再次访问测试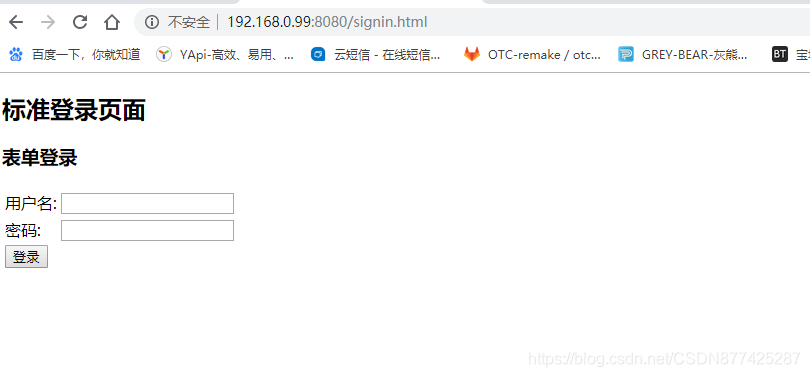
这里在SpringBoot企业级整合SpringSecurity(WEB+APP+授权)这篇文章中有讲到表单登录使用的是UsernamePasswordAuthenticationFilter这个过滤器,而这个过滤器是过滤掉login请求的,而我们在实际开发中可能实际的登录接口不叫login,就如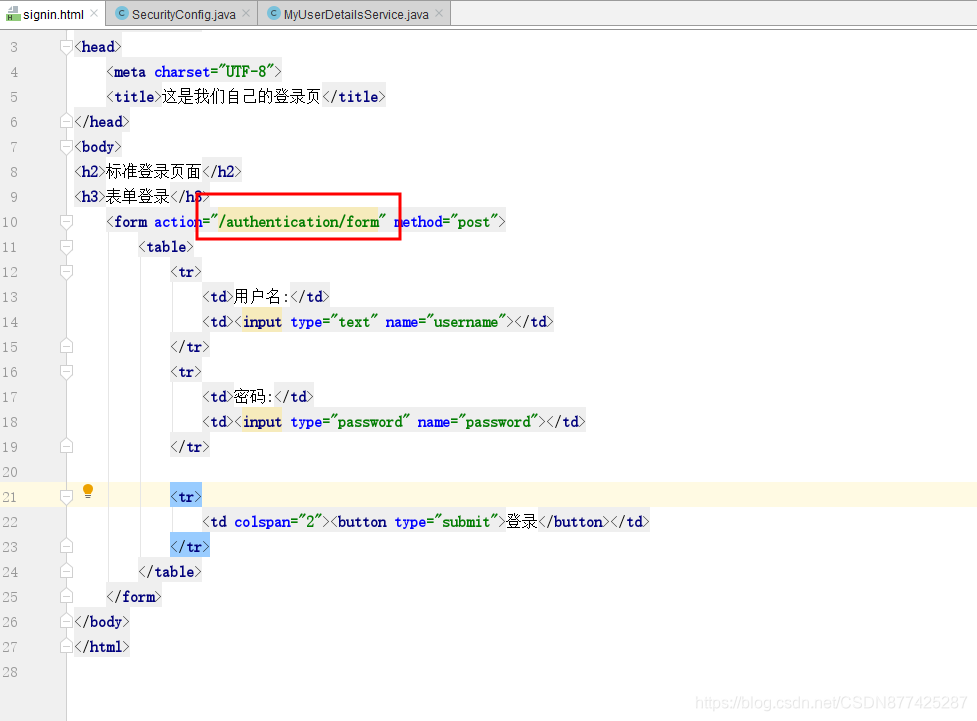
那么这里只需要而外添加匹配规则即可
4.修改默认login登录请求
@Override
    protected void configure(HttpSecurity http) throws Exception {
        http.formLogin()
                .loginPage("/signin.html")//设置我们自己的登录也
                .loginProcessingUrl("/authentication/form")//替换默认的login登录路径校验,
                // 设置这个后SpringSecurity就知道访问这个/authentication/form就会使用UsernamePasswordAuthenticationFilter来处理
                .and()
                .authorizeRequests()
                .antMatchers("/signin.html").permitAll()
                .anyRequest()
                .authenticated();
    }
访问测试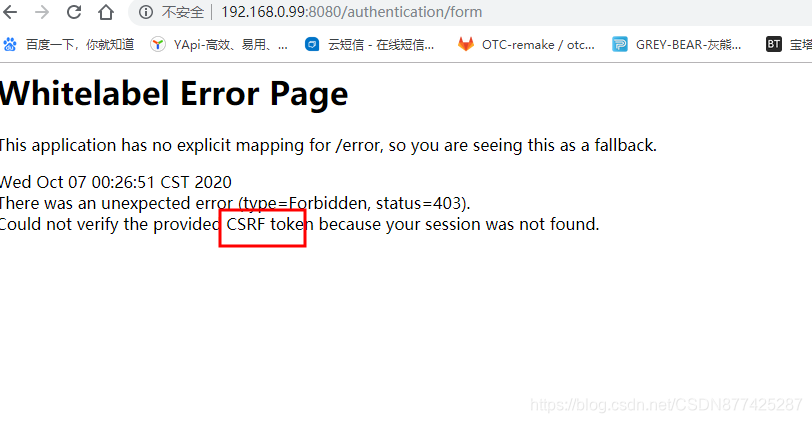
这里提示Could not verify the provided CSRF token because your session was not found.,这是因为SpringSecurity默认提供的跨站请求伪造的防护
5.关闭默认跨站请求伪造防护
@Override
    protected void configure(HttpSecurity http) throws Exception {
        http.formLogin()
                .loginPage("/signin.html")//设置我们自己的登录也
                .loginProcessingUrl("/authentication/form")//替换默认的login登录路径校验,
                // 设置这个后SpringSecurity就知道访问这个/authentication/form就会使用UsernamePasswordAuthenticationFilter来处理
                .and()
                .authorizeRequests()
                .antMatchers("/signin.html").permitAll()
                .anyRequest()
                .authenticated()
                .and()
                .csrf().disable();//关闭SpringSecurity默认的跨站请求伪造防护
    }
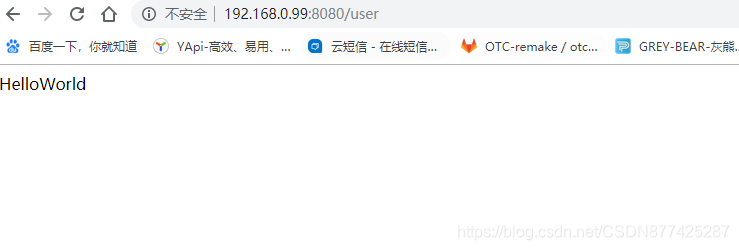
那么此时就可以通过我们自定义的登录界面,登录请求来处理了
自定义登录成功、失败处理逻辑
1.编写登录成功、失败处理类
@Component("myAuthenticationSuccessHandler")
public class MyAuthenticationSuccessHandler extends SavedRequestAwareAuthenticationSuccessHandler {
    /**
     * AuthenticationSuccessHandler-->SavedRequestAwareAuthenticationSuccessHandler
     * 原因是调用SavedRequestAwareAuthenticationSuccessHandler的 super.onAuthenticationSuccess(request, response, authentication);方法
     */


    //这里调用在BrowserSecurtyConfig类中触发,这是AuthenticationSuccessHandler类的onAuthenticationSuccess方法的实现
    @Override
    public void onAuthenticationSuccess(HttpServletRequest request, HttpServletResponse response, Authentication authentication) throws IOException, ServletException {
        System.out.println("登录成功");
        super.onAuthenticationSuccess(request, response, authentication);//使用默认登录成功逻辑

    }
}

@Component("myAuthenticationFailureHandler")
public class MyAuthenticationFailureHandler extends SimpleUrlAuthenticationFailureHandler {

	 /**
     * AuthenticationFailureHandler-->SimpleUrlAuthenticationFailureHandler
     */
    /*
     * 登录失败处理
     */
    @Override
    public void onAuthenticationFailure(HttpServletRequest request, HttpServletResponse response,AuthenticationException exception) throws IOException, ServletException {
        System.out.println("登录失败");
        super.onAuthenticationFailure(request, response, exception);//使用默认登录失败逻辑
    }
}
这里即可以直接继承SavedRequestAwareAuthenticationSuccessHandler和SimpleUrlAuthenticationFailureHandler,也可以实现
AuthenticationSuccessHandler和AuthenticationFailureHandler
2.添加请求成功失败配置
	@Autowired//身份验证成功处理器
    private AuthenticationSuccessHandler myAuthenticationSuccessHandler;
    //他的具体实现是交给MyAuthenticationSuccessHandler来重写实现的

    @Autowired//身份验证失败处理器
    private AuthenticationFailureHandler myAuthenticationFailureHandler;
    //他的具体实现是交给MyAuthenticationFailureHandler来重写实现的

    @Override
    protected void configure(HttpSecurity http) throws Exception {
        http.formLogin()
                .loginPage("/signin.html")//设置我们自己的登录也
                .loginProcessingUrl("/authentication/form")//替换默认的login登录路径校验,
                // 设置这个后SpringSecurity就知道访问这个/authentication/form就会使用UsernamePasswordAuthenticationFilter来处理
                .successHandler(myAuthenticationSuccessHandler)//身份验证成功后调用实现类
                .failureHandler(myAuthenticationFailureHandler)//身份验证失败后调用实现类
                .and()
                .authorizeRequests()
                .antMatchers("/signin.html").permitAll()
                .anyRequest()
                .authenticated()
                .and()
                .csrf().disable();//关闭SpringSecurity默认的跨站请求伪造防护
    }
如果步骤1使用的直接实现AuthenticationSuccessHandler、AuthenticationFailureHandler那么这里就直接放实现类即可,如果步骤1使用个是继承SavedRequestAwareAuthenticationSuccessHandler、SimpleUrlAuthenticationFailureHandler的话那么这里就是如上配置!
3.访问测试