七、juc工具类的使用
1.线程池

2.构造方法
public ThreadPoolExecutor(int corePoolSize,
                          int maximumPoolSize,
                          long keepAliveTime,
                          TimeUnit unit,
                          BlockingQueue<Runnable> workQueue,
                          ThreadFactory threadFactory,
                          RejectedExecutionHandler handler)
- corePoolSize:核心线程数
- maximumPoolSize:最大线程数
- maximumPoolSize - corePoolSize = 救急线程数
- keepAliveTime:救急线程空闲时的最大生存时间
- unit:时间单位
- workQueue:阻塞队列(存放任务)
- 有界阻塞队列 ArrayBlockingQueue
- 无界阻塞队列 LinkedBlockingQueue
- 最多只有一个同步元素的 SynchronousQueue
- 优先队列 PriorityBlockingQueue
- threadFactory:线程工厂(给线程取名字)
- handler:拒绝策略
当一个任务传给线程池以后,可能有以下几种可能
- 将任务分配给一个核心线程来执行
- 核心线程都在执行任务,将任务放到阻塞队列workQueue中等待被执行
- 阻塞队列满了,使用救急线程来执行任务
- 救急线程用完以后,超过生存时间(keepAliveTime)后会被释放
- 任务总数大于了 最大线程数(maximumPoolSize)与阻塞队列容量的最大值(workQueue.capacity),使用拒接策略
3.拒绝策略

4. ThreadPoolExecutor


public class Demo1 {
   static AtomicInteger threadId = new AtomicInteger(0);

   public static void main(String[] args) {
      // 手动创建线程池
      // 创建有界阻塞队列
      ArrayBlockingQueue<Runnable> runnable = new ArrayBlockingQueue<Runnable>(10);
      // 创建线程工厂
      ThreadFactory threadFactory = new ThreadFactory() {
         @Override
         public Thread newThread(Runnable r) {
            Thread thread = new Thread(r, "working_thread_"+threadId.getAndIncrement());
            return thread;
         }
      };

      // 手动创建线程池
      // 拒绝策略采用默认策略
      ThreadPoolExecutor executor = new ThreadPoolExecutor(5, 7, 10, TimeUnit.SECONDS, runnable, threadFactory);

      for (int i = 0; i < 20; i++) {
         executor.execute(new Runnable() {
            @Override
            public void run() {
               System.out.println(Thread.currentThread());
               try {
                  Thread.sleep(100000);
               } catch (InterruptedException e) {
                  e.printStackTrace();
               }
            }
         });
      }
   }
}
5.FixedThreadPool
使用

6. newCachedThreadPool

特点
核心线程数是 0,
最大线程数是 Integer.MAX_VALUE,救急线程的空闲生存时间是 60s,意味着
全部都是救急线程(60s 后可以回收)
救急线程可以无限创建
队列采用了 SynchronousQueue 实现特点是,它没有容量,没有线程来取是放不进去的(一手交钱、一手交货)
SynchronousQueue<Integer> integers = new SynchronousQueue<>();

new Thread(() -> {
 try {
 log.debug("putting {} ", 1);
 integers.put(1);
 log.debug("{} putted...", 1);
 log.debug("putting...{} ", 2);
 integers.put(2);
 log.debug("{} putted...", 2);
 } catch (InterruptedException e) {
 e.printStackTrace();
 }
},"t1").start();

sleep(1);

new Thread(() -> {
 try {
 log.debug("taking {}", 1);
 integers.take();
 } catch (InterruptedException e) {
 e.printStackTrace();
 }
},"t2").start();

sleep(1);

new Thread(() -> {
 try {
 log.debug("taking {}", 2);
 integers.take();
 } catch (InterruptedException e) {
 e.printStackTrace();
 }
},"t3").start();
7.newSingleThreadExecutor

SingleThread和自己创建一个线程来运行多个任务的区别
- 当线程正在执行的任务发生错误时,如果是自己创建的线程,该任务和剩余的任务就无法再继续运行下去。而SingleThread会创建一个新线程,继续执行任务队列中剩余的任务。
SingleThread和newFixedThreadPool(1)的区别
- newFixedThreadPool(1)传值为1,可以将FixedThreadPool强转为ThreadPoolExecutor,然后通过setCorePoolSize改变核心线程数
// 强转为ThreadPoolExecutor ThreadPoolExecutor threadPool = (ThreadPoolExecutor) Executors.newFixedThreadPool(1); // 改变核心线程数 threadPool.setCorePoolSize(2);Copy- 而SingleThread无法修改核心线程数
8.提交任务
// 执行任务
void execute(Runnable command);

// 提交任务 task,用返回值 Future 获得任务执行结果
<T> Future<T> submit(Callable<T> task);

// 提交 tasks 中所有任务
<T> List<Future<T>> invokeAll(Collection<? extends Callable<T>> tasks)
 throws InterruptedException;

// 提交 tasks 中所有任务,带超时时间

<T> List<Future<T>> invokeAll(Collection<? extends Callable<T>> tasks,

                              long timeout, TimeUnit unit)

    throws InterruptedException;

// 提交 tasks 中所有任务,哪个任务先成功执行完毕,返回此任务执行结果,其它任务取消
<T> T invokeAny(Collection<? extends Callable<T>> tasks)

    throws InterruptedException, ExecutionException;

// 提交 tasks 中所有任务,哪个任务先成功执行完毕,返回此任务执行结果,其它任务取消,带超时时间

<T> T invokeAny(Collection<? extends Callable<T>> tasks,

                long timeout, TimeUnit unit)

    throws InterruptedException, ExecutionException, TimeoutException;
submit()方法
Future<T> submit(Callable<T> task)
传入一个Callable对象,用Future来捕获返回值
// 通过submit执行Callable中的call方法
// 通过Future来捕获返回值
Future<String> future = threadPool.submit(new Callable<String>() {
   @Override
   public String call() throws Exception {
      return "hello submit";
   }
});

// 查看捕获的返回值
System.out.println(future.get());
9.停止
shutdown()
/**
* 将线程池的状态改为 SHUTDOWN
* 不再接受新任务,但是会将阻塞队列中的任务执行完
*/
public void shutdown() {
    final ReentrantLock mainLock = this.mainLock;
    mainLock.lock();
    try {
        checkShutdownAccess();

        // 修改线程池状态为 SHUTDOWN
        advanceRunState(SHUTDOWN);

  		// 中断空闲线程(没有执行任务的线程)
        // Idle:空闲的
        interruptIdleWorkers();
        onShutdown(); // hook for ScheduledThreadPoolExecutor
    } finally {
        mainLock.unlock();
    }
    // 尝试终结,不一定成功
    //
    tryTerminate();
}
final void tryTerminate() {
    for (;;) {
        int c = ctl.get();
        // 终结失败的条件
        // 线程池状态为RUNNING
        // 线程池状态为 RUNNING SHUTDOWN STOP (状态值大于TIDYING)
        // 线程池状态为SHUTDOWN,但阻塞队列中还有任务等待执行
        if (isRunning(c) ||
            runStateAtLeast(c, TIDYING) ||
            (runStateOf(c) == SHUTDOWN && ! workQueue.isEmpty()))
            return;

        // 如果活跃线程数不为0
        if (workerCountOf(c) != 0) { // Eligible to terminate
            // 中断空闲线程
            interruptIdleWorkers(ONLY_ONE);
            return;
        }

        final ReentrantLock mainLock = this.mainLock;
        mainLock.lock();
        try {
            // 处于可以终结的状态
            // 通过CAS将线程池状态改为TIDYING
            if (ctl.compareAndSet(c, ctlOf(TIDYING, 0))) {
                try {
                    terminated();
                } finally {
                    // 通过CAS将线程池状态改为TERMINATED
                    ctl.set(ctlOf(TERMINATED, 0));
                    termination.signalAll();
                }
                return;
            }
        } finally {
            mainLock.unlock();
        }
        // else retry on failed CAS
    }
}
shutdownNow()
/**
* 将线程池的状态改为 STOP
* 不再接受新任务,也不会在执行阻塞队列中的任务
* 会将阻塞队列中未执行的任务返回给调用者
*/
public List<Runnable> shutdownNow() {
    List<Runnable> tasks;
    final ReentrantLock mainLock = this.mainLock;
    mainLock.lock();
    try {
        checkShutdownAccess();

        // 修改状态为STOP,不执行任何任务
        advanceRunState(STOP);

        // 中断所有线程
        interruptWorkers();

        // 将未执行的任务从队列中移除,然后返回给调用者
        tasks = drainQueue();
    } finally {
        mainLock.unlock();
    }
    // 尝试终结,一定会成功,因为阻塞队列为空了
    tryTerminate();
    return tasks;
}
异步模式之工作线程
让有限的工作线程(Worker Thread)来轮流异步处理无限多的任务。也可以将其归类为分工模式,它的典型实现就是线程池,也体现了经典设计模式中的享元模式。
就是用不同的线程池产出的线程做不同的事。
比如,饭店里有点菜有厨师,我们把它们放在一起就有可能出现,多线程下全都去点菜了,而没人做饭,而任务只有点菜-做饭才能完成,此时就发生了死锁,不仅浪费而且很难脱出。
解决方法就是使用这个分类思想,一个线程池产生厨子,一个线程池产生点菜的。


10.任务调度线程池
在『任务调度线程池』功能加入之前,可以使用 java.util.Timer 来实现定时功能,Timer 的优点在于简单易用,但由于所有任务都是由同一个线程来调度,因此所有任务都是串行执行的,同一时间只能有一个任务在执行,前一个任务的延迟或异常都将会影响到之后的任务。


11.处理异常

定时发布任务的应用

12.Fork/Join
Fork/Join 是 JDK 1.7 加入的新的线程池实现,它体现的是一种分治思想,适用于能够进行任务拆分的 cpu 密集型运算
所谓的任务拆分,是将一个大任务拆分为算法上相同的小任务,直至不能拆分可以直接求解。跟递归相关的一些计算,如归并排序、斐波那契数列、都可以用分治思想进行求解
Fork/Join 在分治的基础上加入了多线程,可以把每个任务的分解和合并交给不同的线程来完成,进一步提升了运算效率
Fork/Join 默认会创建与 cpu 核心数大小相同的线程池
1.使用
@Slf4j(topic = "c.AddTask")
class AddTask1 extends RecursiveTask<Integer> {

    int n;
 public AddTask1(int n) {

     this.n = n;
 }
 @Override
 public String toString() {

     return "{" + n + '}';
 }
 @Override
 protected Integer compute() {
 // 如果 n 已经为 1,可以求得结果了
 if (n == 1) {

     log.debug("join() {}", n);

     return n;
 }

 // 将任务进行拆分(fork)

     AddTask1 t1 = new AddTask1(n - 1);

     t1.fork();

     log.debug("fork() {} + {}", n, t1);

 // 合并(join)结果

     int result = n + t1.join();

     log.debug("join() {} + {} = {}", n, t1, result);

     return result;
 }
}
public static void main(String[] args) {

    ForkJoinPool pool = new ForkJoinPool(4);

    System.out.println(pool.invoke(new AddTask1(5)));
}
结果
[ForkJoinPool-1-worker-0] - fork() 2 + {1}
[ForkJoinPool-1-worker-1] - fork() 5 + {4}
[ForkJoinPool-1-worker-0] - join() 1
[ForkJoinPool-1-worker-0] - join() 2 + {1} = 3
[ForkJoinPool-1-worker-2] - fork() 4 + {3}
[ForkJoinPool-1-worker-3] - fork() 3 + {2}
[ForkJoinPool-1-worker-3] - join() 3 + {2} = 6
[ForkJoinPool-1-worker-2] - join() 4 + {3} = 10
[ForkJoinPool-1-worker-1] - join() 5 + {4} = 15
15

但这个例子属于单向线性的分治,效率不高,我们来多线改进下他。
2.改进
class AddTask3 extends RecursiveTask<Integer> {


int begin;

int end;

 public AddTask3(int begin, int end) {

     this.begin = begin;

     this.end = end;
 }
 @Override
 public String toString() {

     return "{" + begin + "," + end + '}';
 }
 @Override
 protected Integer compute() {
 // 5, 5
 if (begin == end) {

     log.debug("join() {}", begin);

     return begin;
 }
 // 4, 5
 if (end - begin == 1) {
 log.debug("join() {} + {} = {}", begin, end, end + begin);
 return end + begin;
 }

 // 1 5
 int mid = (end + begin) / 2; // 3

     AddTask3 t1 = new AddTask3(begin, mid); // 1,3

     t1.fork();

     AddTask3 t2 = new AddTask3(mid + 1, end); // 4,5

     t2.fork();

     log.debug("fork() {} + {} = ?", t1, t2);

     int result = t1.join() + t2.join();

     log.debug("join() {} + {} = {}", t1, t2, result);

     	return result;
 }
}
执行:
public static void main(String[] args) {
 ForkJoinPool pool = new ForkJoinPool(4);
 System.out.println(pool.invoke(new AddTask3(1, 10)));
}
[ForkJoinPool-1-worker-0] - join() 1 + 2 = 3
[ForkJoinPool-1-worker-3] - join() 4 + 5 = 9
[ForkJoinPool-1-worker-0] - join() 3
[ForkJoinPool-1-worker-1] - fork() {1,3} + {4,5} = ?
[ForkJoinPool-1-worker-2] - fork() {1,2} + {3,3} = ?
[ForkJoinPool-1-worker-2] - join() {1,2} + {3,3} = 6
[ForkJoinPool-1-worker-1] - join() {1,3} + {4,5} = 15
15

13.AQS 原理
[外链图片转存失败,源站可能有防盗链机制,建议将图片保存下来直接上传(img-jUbhN961-1646556103978)(https://cdn.jsdelivr.net/gh/EngageRing/images01@master/codeImages/QQ截图20220303200915.77pdbyg26uk0.webp)]


14.ReentrantLock 原理
lock类的继承实现关系:

1.非公平锁实现原理
加锁


释放锁
[外链图片转存失败,源站可能有防盗链机制,建议将图片保存下来直接上传(img-W70W1NPj-1646556103984)(https://cdn.jsdelivr.net/gh/EngageRing/images01@master/codeImages/QQ截图20220304150424.2bi0uu6w6j8k.webp)]

线程一成为owner的具体实现过程:


非公平竞争(中途有线程进来抢owner)

2.锁重入原理

重入锁释放:

3.非公平锁和公平锁的抢锁区别
- 非公平锁

- 公平锁

hasQueuedPredecessors的具体实现:

4.不可打断模式和可打断模式代码层面的区别
- 不可打断模式

- 可打断模式

5.await和signal的实现原理
- await


signal


15. ReentrantReadWriteLock–读写锁
使用
当读操作远远高于写操作时,这时候使用 读写锁 让 读-读 可以并发,提高性能。 类似于数据库中的 select … from … lock in share mode
读写锁操作的时候:
- 允许读读操作
- 不允许读写操作
- 不允许写写操作
使用:
class DataContainer {

    private Object data;

    private ReentrantReadWriteLock rw = new ReentrantReadWriteLock();

    private ReentrantReadWriteLock.ReadLock r = rw.readLock();

    private ReentrantReadWriteLock.WriteLock w = rw.writeLock();

public Object read() {

        log.debug("获取读锁...");

        r.lock();
 try {

     log.debug("读取");

     sleep(1);

     return data;
 } finally {

     log.debug("释放读锁...");

     r.unlock();
 }
 }

public void write() {

    log.debug("获取写锁...");

    w.lock();
 try {

     log.debug("写入");

     sleep(1);
 } finally {

     log.debug("释放写锁...");

     w.unlock();
 }
 }
}
升级和降级
注意事项
读锁不支持条件变量
重入时升级不支持:即持有读锁的情况下去获取写锁,会导致获取写锁永久等待
r.lock();
try {
 // ...
 w.lock();
 try {
 // ...
 } finally{
 w.unlock();
 }
} finally{
 r.unlock();
}
- 重入时降级支持:即持有写锁的情况下去获取读锁
class CachedData {

    Object data;

  // 是否有效,如果失效,需要重新计算 data
 volatile boolean cacheValid;

    final ReentrantReadWriteLock rwl = new ReentrantReadWriteLock();

void processCachedData() {

    rwl.readLock().lock();

 if (!cacheValid) {
 // 获取写锁前必须释放读锁

     rwl.readLock().unlock();

     rwl.writeLock().lock();
 try {

 // 判断是否有其它线程已经获取了写锁、更新了缓存, 避免重复更新
 if (!cacheValid) {

     data = ...

     cacheValid = true;
 }
 // 降级为读锁, 释放写锁, 这样能够让其它线程读取缓存

     rwl.readLock().lock();
 } finally {

     rwl.writeLock().unlock();
 }
 }
 // 自己用完数据, 释放读锁
 try {

     use(data);
 } finally {

     rwl.readLock().unlock();

 }
 }
}
原理
读写锁上锁原理


写锁解除,读锁的连续唤醒


至此,解除结束
16.StampedLock–拥有乐观读的锁

主要还是对读锁的进一步升级,用戳(有点像版本)代替锁,使得读操作暂时无锁,而假如中途被人修改,则将乐观读修改为读锁。
使用
class DataContainerStamped {

    private int data;

    private final StampedLock lock = new StampedLock();

 public DataContainerStamped(int data) {

     this.data = data;
 }
 public int read(int readTime) {
    //使用乐观读
     long stamp = lock.tryOptimisticRead();

     log.debug("optimistic read locking...{}", stamp);

     sleep(readTime);
     //检验戳是否发生变化
 if (lock.validate(stamp)) {

     log.debug("read finish...{}, data:{}", stamp, data);

     return data;
 }

  // 锁升级 - 读锁
 log.debug("updating to read lock... {}", stamp);

 try {

     stamp = lock.readLock();

     log.debug("read lock {}", stamp);

     sleep(readTime);

     log.debug("read finish...{}, data:{}", stamp, data);

     return data;
 } finally {

     log.debug("read unlock {}", stamp);

     lock.unlockRead(stamp);
 }
 }
 public void write(int newData) {

     long stamp = lock.writeLock();

     log.debug("write lock {}", stamp);
 try {

     sleep(2);

     this.data = newData;
 } finally {

     log.debug("write unlock {}", stamp);

     lock.unlockWrite(stamp);
 }
 }
}
- StampedLock 不支持条件变量
- StampedLock 不支持可重入
17.Semaphore
信号量,用来限制能同时访问共享资源的线程上限。
信号量就像停车厂的停车位一样,有一个数量的上限,无论来多少车,停车位一定,能停的车也一定。
public static void main(String[] args) {

    // 1. 创建 semaphore 对象
    Semaphore semaphore = new Semaphore(3);

    // 2. 10个线程同时运行
 for (int i = 0; i < 10; i++) {
 new Thread(() -> {
 // 3. 获取许可
 try {

     semaphore.acquire();
 } catch (InterruptedException e) {

     e.printStackTrace();
 }
 try {

     log.debug("running...");

     sleep(1);

     log.debug("end...");
 } finally {
 // 4. 释放许可

     semaphore.release();
 }
 }).start();
 }
 }
Semaphore 原理
1. 加锁解锁流程
Semaphore 有点像一个停车场,permits 就好像停车位数量,当线程获得了 permits 就像是获得了停车位,然后
停车场显示空余车位减一
刚开始,permits(state)为 3,这时 5 个线程来获取资源


18.CountdownLatch—倒计时锁
用来进行线程同步协作,等待所有线程完成倒计时。
其中构造参数用来初始化等待计数值,await() 用来等待计数归零,countDown() 用来让计数减一

19.线程安全类的使用
线程安全类大体分为三种:

遗留的线程安全集合如 Hashtable , Vector
使用 Collections 装饰的线程安全集合,如:
- Collections.synchronizedCollection
- Collections.synchronizedList
- Collections.synchronizedMap
- Collections.synchronizedSet
- Collections.synchronizedNavigableMap
- Collections.synchronizedNavigableSet
- Collections.synchronizedSortedMap
- Collections.synchronizedSortedSet
java.util.concurrent.*
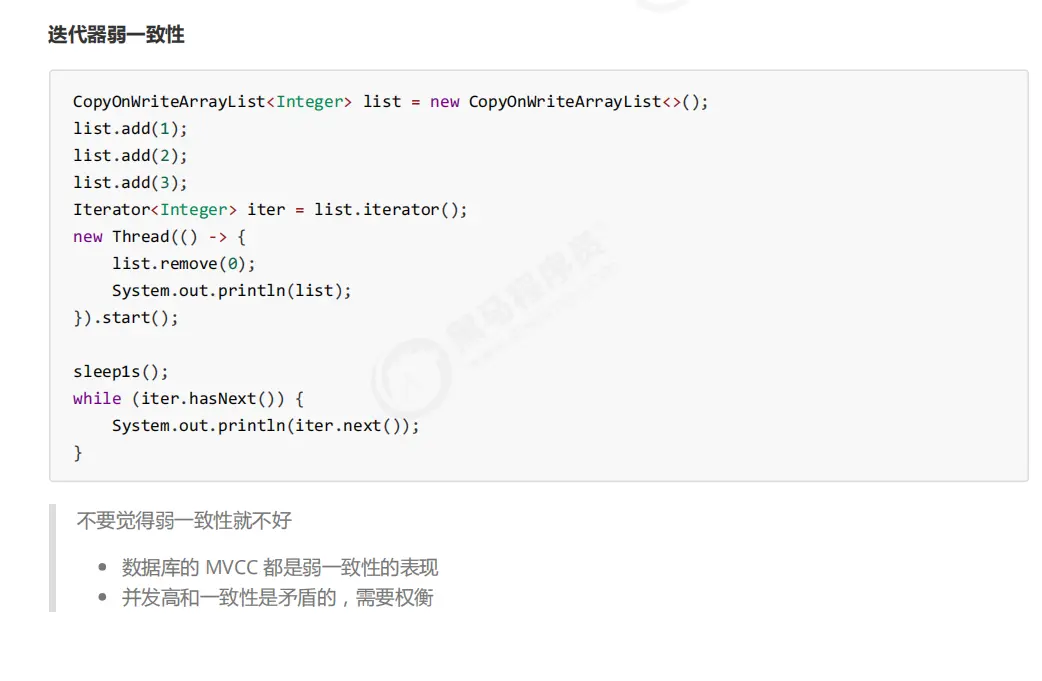
我们来看看java.util.concurrent.* 下的线程安全集合类,可以发现它们有规律,里面包含三类关键词: Blocking、CopyOnWrite、Concurrent
Blocking 大部分实现基于锁,并提供用来阻塞的方法
CopyOnWrite 之类容器修改开销相对较重,同时也有弱一致性
Concurrent 类型的容器
- 内部很多操作使用 cas 优化,一般可以提供较高吞吐量
- 弱一致性
- 遍历时弱一致性,例如,当利用迭代器遍历时,如果容器发生修改,迭代器仍然可以继续进行遍历,这时内容是旧的
- 求大小弱一致性,size 操作未必是 100% 准确
- 读取弱一致性
遍历时如果发生了修改,对于非安全容器来讲,使用 fail-fast 机制也就是让遍历立刻失败,抛出ConcurrentModifificationException,不再继续遍历
1.ConcurrentHashMap
一段小插曲:单词统计问题
设想你要为一个包含26个字母各200个(统计前未知)的文件做单词计数。
有如下实现: 它是线程安全的吗?
demo(
 // 创建 map 集合
 // 创建 ConcurrentHashMap 对不对?
 () -> new HashMap<String, Integer>(),
 // 进行计数
 (map, words) -> {
 for (String word : words) {

     Integer counter = map.get(word);

     int newValue = counter == null ? 1 : counter + 1;

     map.put(word, newValue);
 }
 }
);
显然,它是线程不安全的。
因为 get() 和 put()同时使用就没办法保证线程安全。
依照我们之前的方法进行改进:
- 上锁
[外链图片转存失败,源站可能有防盗链机制,建议将图片保存下来直接上传(img-4QP4S2XW-1646556104001)(https://cdn.jsdelivr.net/gh/EngageRing/images01@master/codeImages/QQ截图20220306104026.6gzo7fzchao0.webp)]
使用ConcurrentHashMap的方法加累加器

原理解析
图解
- 添加

- 扩容

- forwardingNode的作用

JDK 8 ConcurrentHashMap
- 重要的属性和内部类

- 重要方法

- 构造器解析
[外链图片转存失败,源站可能有防盗链机制,建议将图片保存下来直接上传(img-ypNE9leF-1646556104006)(https://cdn.jsdelivr.net/gh/EngageRing/images01@master/codeImages/QQ截图20220306112702.vdzlwlwk04w.webp)]
- get()方法

- put()方法
public V put(K key, V value) {
return putVal(key, value, false);
}
final V putVal(K key, V value, boolean onlyIfAbsent) {
 if (key == null || value == null) throw new NullPointerException();
 // 其中 spread 方法会综合高位低位, 具有更好的 hash 性
 int hash = spread(key.hashCode());
 int binCount = 0;
 for (Node<K,V>[] tab = table;;) {
 // f 是链表头节点
 // fh 是链表头结点的 hash
 // i 是链表在 table 中的下标
 Node<K,V> f; int n, i, fh;
 // 要创建 table
 if (tab == null || (n = tab.length) == 0)
 // 初始化 table 使用了 cas, 无需 synchronized 创建成功, 进入下一轮循环
 tab = initTable();
 // 要创建链表头节点
 else if ((f = tabAt(tab, i = (n - 1) & hash)) == null) {
 // 添加链表头使用了 cas, 无需 synchronized
 if (casTabAt(tab, i, null,
 new Node<K,V>(hash, key, value, null)))
 break;
 }
 // 帮忙扩容
 else if ((fh = f.hash) == MOVED)
 // 帮忙之后, 进入下一轮循环
 tab = helpTransfer(tab, f);
 else {
 V oldVal = null;
 // 锁住链表头节点
 synchronized (f) {
 // 再次确认链表头节点没有被移动
 if (tabAt(tab, i) == f) {
 // 链表
 if (fh >= 0) {
 binCount = 1;
 // 遍历链表
 for (Node<K,V> e = f;; ++binCount) {
 K ek;
 // 找到相同的 key
 if (e.hash == hash &&
 ((ek = e.key) == key ||
 (ek != null && key.equals(ek)))) {
 oldVal = e.val;
 // 更新
 if (!onlyIfAbsent)
 e.val = value;
 break;
 }
 Node<K,V> pred = e;
 // 已经是最后的节点了, 新增 Node, 追加至链表尾
 if ((e = e.next) == null) {
 pred.next = new Node<K,V>(hash, key,
 value, null);
 break;
 }
 }
 }
 // 红黑树
 else if (f instanceof TreeBin) {
 Node<K,V> p;
 binCount = 2;
 // putTreeVal 会看 key 是否已经在树中, 是, 则返回对应的 TreeNode
 if ((p = ((TreeBin<K,V>)f).putTreeVal(hash, key,
 value)) != null) {
 oldVal = p.val;
 if (!onlyIfAbsent)
 p.val = value;
 }
 }
 }
 // 释放链表头节点的锁
 }

 if (binCount != 0) {
 if (binCount >= TREEIFY_THRESHOLD)
 // 如果链表长度 >= 树化阈值(8), 进行链表转为红黑树
 treeifyBin(tab, i);
 if (oldVal != null)
 return oldVal;
 break;
 }
 }
 }
 // 增加 size 计数
 addCount(1L, binCount);
 return null; }
private final Node<K,V>[] initTable() {
 Node<K,V>[] tab; int sc;
 while ((tab = table) == null || tab.length == 0) {
 if ((sc = sizeCtl) < 0)
 Thread.yield();
 // 尝试将 sizeCtl 设置为 -1(表示初始化 table)
 else if (U.compareAndSwapInt(this, SIZECTL, sc, -1)) {
 // 获得锁, 创建 table, 这时其它线程会在 while() 循环中 yield 直至 table 创建
 try {
 if ((tab = table) == null || tab.length == 0) {
 int n = (sc > 0) ? sc : DEFAULT_CAPACITY;
 Node<K,V>[] nt = (Node<K,V>[])new Node<?,?>[n];
 table = tab = nt;
 sc = n - (n >>> 2);
 }
 } finally {
  sizeCtl = sc;
 }
 break;
 }
 }
 return tab; }
// check 是之前 binCount 的个数
private final void addCount(long x, int check) {
 CounterCell[] as; long b, s;
 if (
 // 已经有了 counterCells, 向 cell 累加
 (as = counterCells) != null ||
 // 还没有, 向 baseCount 累加
 !U.compareAndSwapLong(this, BASECOUNT, b = baseCount, s = b + x)
 ) {
 CounterCell a; long v; int m;
 boolean uncontended = true;
 if (
 // 还没有 counterCells
 as == null || (m = as.length - 1) < 0 ||
 // 还没有 cell
 (a = as[ThreadLocalRandom.getProbe() & m]) == null ||
 // cell cas 增加计数失败
 !(uncontended = U.compareAndSwapLong(a, CELLVALUE, v = a.value, v + x))
 ) {
 // 创建累加单元数组和cell, 累加重试
 fullAddCount(x, uncontended);
 return;
 }
 if (check <= 1)
 return;
 // 获取元素个数
 s = sumCount();
 }
 if (check >= 0) {
 Node<K,V>[] tab, nt; int n, sc;
 while (s >= (long)(sc = sizeCtl) && (tab = table) != null &&
 (n = tab.length) < MAXIMUM_CAPACITY) {
 int rs = resizeStamp(n);
 if (sc < 0) {
 if ((sc >>> RESIZE_STAMP_SHIFT) != rs || sc == rs + 1 ||
 sc == rs + MAX_RESIZERS || (nt = nextTable) == null ||
 transferIndex <= 0)
 break;
 // newtable 已经创建了,帮忙扩容
 if (U.compareAndSwapInt(this, SIZECTL, sc, sc + 1))
 transfer(tab, nt);
 }
 // 需要扩容,这时 newtable 未创建
 else if (U.compareAndSwapInt(this, SIZECTL, sc,
 (rs << RESIZE_STAMP_SHIFT) + 2))
  transfer(tab, null);
 s = sumCount();
 }
 }
}
- initTable()方法

- transfer()方法


JDK 7 ConcurrentHashMap
它维护了一个 segment 数组,每个 segment 对应一把锁
优点:如果多个线程访问不同的 segment,实际是没有冲突的,这与 jdk8 中是类似的(对segment元素上锁)
缺点:Segments 数组默认大小为16,这个容量初始化指定后就不能改变了,并且不是懒惰初始化(桶元素还是懒惰的)
源码分析
- 构造器分析
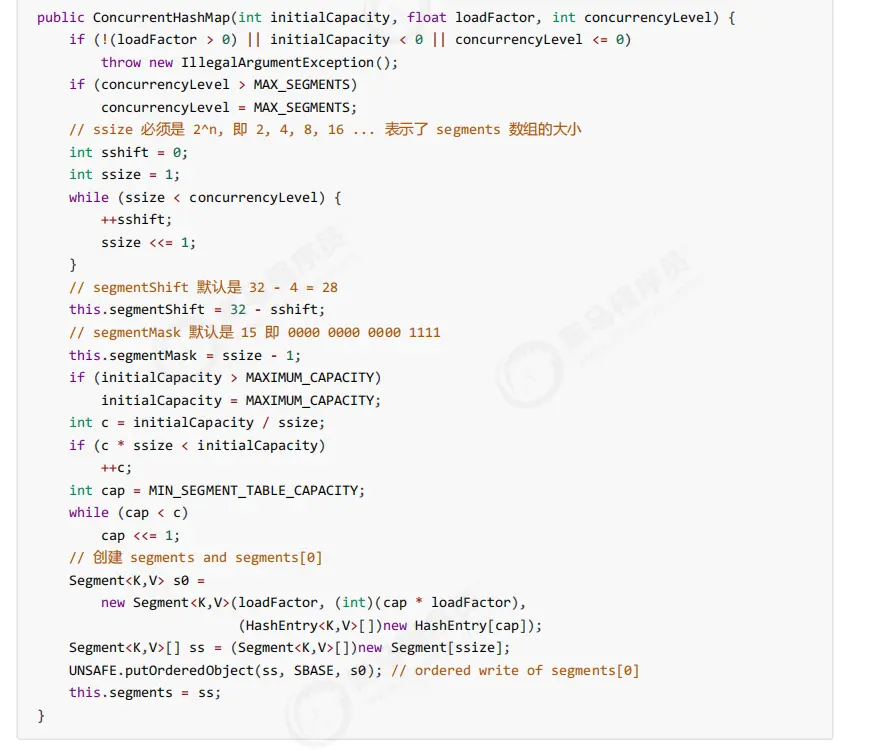
图解:

- put()方法


- rehash(扩容方法)


- get()

- size()

LinkedBlockingQueue
- 基本的入队出队
public class LinkedBlockingQueue<E> extends AbstractQueue<E>
 implements BlockingQueue<E>, java.io.Serializable {
 static class Node<E> {
  E item;
 /**
 * 下列三种情况之一
 * - 真正的后继节点
 * - 自己, 发生在出队时
 * - null, 表示是没有后继节点, 是最后了
 */
 Node<E> next;
 Node(E x) { item = x; }
 }
}
- 原理图示


- 基本操作


ConcurrentLinkedQueue
ConcurrentLinkedQueue 的设计与 LinkedBlockingQueue 非常像,也是
- 两把【锁】,同一时刻,可以允许两个线程同时(一个生产者与一个消费者)执行
- dummy 节点的引入让两把【锁】将来锁住的是不同对象,避免竞争
- 只是这【锁】使用了 cas 来实现
事实上,ConcurrentLinkedQueue 应用还是非常广泛的
例如之前讲的 Tomcat 的 Connector 结构时,Acceptor 作为生产者向 Poller 消费者传递事件信息时,正是采用了
ConcurrentLinkedQueue 将 SocketChannel 给 Poller 使用
CopyOnWriteArrayList