目录
Shell概述
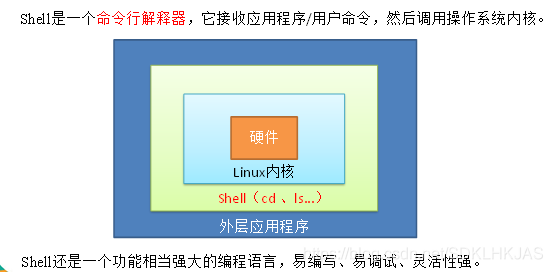
linux系统的核心是内核。内核控制着计算机系统上的所有硬件和软件,在必要时为应用程序分配硬件, 并根据需要执行程序中的代码。
内核主要负责以下四种功能:
- 系统内存管理
- 软件程序管理
- 硬件设备管理
- 文件系统管理
简单来说Shell是一种特殊的交互式工具,核心是命令提示符,允许输入文本命令,解释命令,并在内核中执行命令。
Shell解析器
(1)Linux提供的Shell解析器有:
[atguigu@hadoop101 ~]$ cat /etc/shells
/bin/sh
/bin/bash
/sbin/nologin
/bin/dash
/bin/tcsh
/bin/csh
不同的shell解析器,功能不同,比如csh,符合c语言风格的shell解析器。Centos默认使用的是/bin/sh 和 /bin/bash作为shell解析器
(2)bash和sh的关系
[atguigu@hadoop101 bin]$ ll | grep bash
-rwxr-xr-x. 1 root root 941880 5月 11 2016 bash
lrwxrwxrwx. 1 root root 4 5月 27 2017 sh -> bash
(3)Centos默认的解析器是bash
[atguigu@hadoop102 bin]$ echo $SHELL
/bin/bash
Shell脚本入门
1.脚本格式
脚本以#!/bin/bash开头(指定解析器)
2.第一个Shell脚本:helloworld
(1)需求:创建一个Shell脚本,输出helloworld
(2)案例实操:
[atguigu@hadoop101 datas]$ touch helloworld.sh
[atguigu@hadoop101 datas]$ vi helloworld.sh
在helloworld.sh中输入如下内容
#!/bin/bash
echo "helloworld"
(3)脚本的常用执行方式
第一种:采用bash或sh+脚本的相对路径或绝对路径(不用赋予脚本+x权限)
sh+脚本的相对路径
[atguigu@hadoop101 datas]$ sh helloworld.sh
Helloworld
sh+脚本的绝对路径
[atguigu@hadoop101 datas]$ sh /home/atguigu/datas/helloworld.sh
helloworld
bash+脚本的相对路径
[atguigu@hadoop101 datas]$ bash helloworld.sh
Helloworld
bash+脚本的绝对路径
[atguigu@hadoop101 datas]$ bash /home/atguigu/datas/helloworld.sh
Helloworld
第二种:采用输入脚本的绝对路径或相对路径执行脚本(必须具有可执行权限+x)
a)首先要赋予helloworld.sh 脚本的+x权限
[atguigu@hadoop101 datas]$ chmod 777 helloworld.sh
(b)执行脚本
相对路径
[atguigu@hadoop101 datas]$ ./helloworld.sh
Helloworld
绝对路径
[atguigu@hadoop101 datas]$ /home/atguigu/datas/helloworld.sh
Helloworld
注意:第一种执行方法,本质是bash解析器帮你执行脚本,所以脚本本身不需要执行权限。第二种执行方法,本质是脚本需要自己执行,所以需要执行权限。
第三种:在脚本的路径前加上“.”
(a)有以下脚本
[root@0725pc shells]# cat test1.sh
#! /bin/bash
A="hello"
(b) 分别使用sh,bash,./ 和 . 的方式来执行,结果如下:
[
root@0725pc shells]# bash test1.sh

[root@0725pc shells]# echo $A


[root@0725pc shells]# sh test1.sh

[root@0725pc shells]# echo $A


[root@0725pc shells]# ./test1.sh

[root@0725pc shells]# echo $A


[root@0725pc shells]# . test1.sh

[root@0725pc shells]# echo $A

hello
原因:
前三种方式都是在当前shell中打开一个子shell来执行脚本内容,当脚本内容结束,则子shell关闭,回到父shell中。
第四种,也就是使用在脚本路径前加.的方式,可以使脚本内容在当前shell里执行,而无需打开子shell!
开子shell与不开子shell的区别就在于,环境变量的继承关系,如在子shell中设置的当前变量,不做特殊通道处理的话,父shell是不可见的。
3.第二个Shell脚本:多命令处理
(1)需求:
在用户家目录下创建一个banzhang.txt,在banzhang.txt文件中增加“I love cls”。
(2)案例实操:
[atguigu@hadoop101 datas]$ touch batch.sh
[atguigu@hadoop101 datas]$ vi batch.sh

在helloworld.sh中输入如下内容
#!/bin/bash

cd /home/atguigu
touch cls.txt
echo "I love cls" >>cls.txt
Shell中的变量
11.4.1系统变量
1. 常用系统变量
$HOME、$PWD、$SHELL、$USER等
2.案例实操

(1)查看系统变量的值

[atguigu@hadoop101 datas]$ echo $HOME

/home/atguigu

(2)显示当前Shell中所有变量:set

[atguigu@hadoop101 datas]$ set

BASH=/bin/bash

BASH_ALIASES=()

BASH_ARGC=()

BASH_ARGV=()
自定义变量
1.基本语法
(1)定义变量:变量=值
(2)撤销变量:unset 变量
(3)声明静态变量:readonly变量,注意:不能unset
2.变量定义规则
(1)变量名称可以由字母、数字和下划线组成,但是不能以数字开头,环境变量名建议大写。
(2)等号两侧不能有空格
(3)在bash中,变量默认类型都是字符串类型,无法直接进行数值运算。
(4)变量的值如果有空格,需要使用双引号或单引号括起来。
(5)使用双引号,可以识别空格之外的其他变量,使用单引号则会只会忽略空格!
(6)使用反引号,可以将语句运行的结果作为值赋值给变量!
3.案例实操
(1)定义变量A
[atguigu@hadoop101 datas]$ A=5
[atguigu@hadoop101 datas]$ echo $A
5
	(2)给变量A重新赋值
[atguigu@hadoop101 datas]$ A=8
[atguigu@hadoop101 datas]$ echo $A
8
	(3)撤销变量A
[atguigu@hadoop101 datas]$ unset A
[atguigu@hadoop101 datas]$ echo $A
	(4)声明静态的变量B=2,不能unset
[atguigu@hadoop101 datas]$ readonly B=2
[atguigu@hadoop101 datas]$ echo $B
2
[atguigu@hadoop101 datas]$ B=9
-bash: B: readonly variable
	(5)在bash中,变量默认类型都是字符串类型,无法直接进行数值运算
[atguigu@hadoop102 ~]$ C=1+2
[atguigu@hadoop102 ~]$ echo $C
1+2
(6)变量的值如果有空格,需要使用双引号或单引号括起来,无需注意数据的类型
[atguigu@hadoop102 ~]$ D=I love banzhang
-bash: world: command not found
[atguigu@hadoop102 ~]$ D="I love banzhang"
[atguigu@hadoop102 ~]$ echo $A
I love banzhang
	(7)使用双引号可以识别变量
[root@0725pc shells]# echo $A
hello
[root@0725pc shells]# B="hello $A"
[root@0725pc shells]# echo $B
hello hello
[root@0725pc shells]# C='hello $A'
[root@0725pc shells]# echo $C
hello $A
(8)使用反引号,将命令运行的结果赋值给参数,即A=`ll` 等同于 A=$(ll)
[root@0725pc shells]# D=`ll`
[root@0725pc shells]# echo $D
总用量 4 -rwxr--r--. 1 root root 23 10月 8 21:36 test1.sh
[root@0725pc shells]# E=$(ll)
[root@0725pc shells]# echo $E
总用量 4 -rwxr--r--. 1 root root 23 10月 8 21:36 test1.sh
(9)可把变量提升为全局环境变量,可供其他Shell程序使用
export 变量名
[atguigu@hadoop101 datas]$ vim helloworld.sh

在helloworld.sh文件中增加echo $B
#!/bin/bash

echo "helloworld"
echo $B

[atguigu@hadoop101 datas]$ ./helloworld.sh
Helloworld
发现并没有打印输出变量B的值。
[atguigu@hadoop101 datas]$ export B
[atguigu@hadoop101 datas]$ ./helloworld.sh
helloworld
每次修改 /etc/profile时,我们会执行source /etc/profile,source的作用就是执行文件中所有的export命令!特殊变量:$n
1.基本语法
$n (功能描述:n为数字,$0代表该脚本名称,$1-$9代表第一到第九个参数,十以上的参数,十以上的参数需要用大括号包含,如${10})
2.案例实操
(1)输出该脚本文件名称、输入参数1和输入参数2 的值
[atguigu@hadoop101 datas]$ touch parameter.sh
[atguigu@hadoop101 datas]$ vim parameter.sh

#!/bin/bash
echo "$0  $1   $2"

[atguigu@hadoop101 datas]$ chmod 777 parameter.sh

[atguigu@hadoop101 datas]$ ./parameter.sh cls  xz
./parameter.sh cls xz特殊变量:$#
1.基本语法
$# (功能描述:获取所有输入参数个数,常用于循环)。
2.案例实操
(1)获取输入参数的个数
[atguigu@hadoop101 datas]$ vim parameter.sh

#!/bin/bash
echo "$0  $1   $2"
echo $#

[atguigu@hadoop101 datas]$ chmod 777 parameter.sh

[atguigu@hadoop101 datas]$ ./parameter.sh cls  xz
parameter.sh cls xz
2特殊变量:$*、$@
1.基本语法
$* (功能描述:这个变量代表命令行中所有的参数,$*把所有的参数看成一个整体)
$@ (功能描述:这个变量也代表命令行中所有的参数,不过$@把每个参数区分对待)
2.案例实操
(1)打印输入的所有参数
[atguigu@hadoop101 datas]$ vim parameter.sh

#!/bin/bash
echo "$0  $1   $2"
echo $#
echo $*
echo $@

[atguigu@hadoop101 datas]$ bash parameter.sh 1 2 3
parameter.sh  1   2
3
1 2 3
1 2 3特殊变量:$?
1.基本语法
$? (功能描述:最后一次执行的命令的返回状态。如果这个变量的值为0,证明上一个命令正确执行;如果这个变量的值为非0(具体是哪个数,由命令自己来决定),则证明上一个命令执行不正确了。)
2.案例实操
(1)判断helloworld.sh脚本是否正确执行
[atguigu@hadoop101 datas]$ ./helloworld.sh
hello world
[atguigu@hadoop101 datas]$ echo $?
0
运算符
1.基本语法
(1)“$((运算式))”或“$[运算式]”
(2)expr + , - , \*, /, % 加,减,乘,除,取余
注意:expr运算符间要有空格;
*号需要转义为\*,否则会被视为通配符;
运算指的都是整数的运算,浮点运算需要借助其他的命令!
2.案例实操:
(1)计算3+2的值
[atguigu@hadoop101 datas]$ expr 2 + 3
5
(2)计算3-2的值
[atguigu@hadoop101 datas]$ expr 3 - 2
1
(3)计算(2+3)X4的值
	(a)expr一步完成计算
[atguigu@hadoop101 datas]$ expr `expr 2 + 3` \* 4
20
(b)采用$[运算式]方式
[atguigu@hadoop101 datas]# S=$[(2+3)*4]
[atguigu@hadoop101 datas]# echo $S
条件判断
1.基本语法
[ condition ](注意condition前后要有空格)
注意:条件非空即为true,[ atguigu ]返回true,[] 返回false。
2. 常用判断条件
(1)两个整数之间比较
= 字符串比较
-lt 小于(less than) -le 小于等于(less equal)
-eq 等于(equal) -gt 大于(greater than)
-ge 大于等于(greater equal) -ne 不等于(Not equal)
(2)按照文件权限进行判断
-r 有读的权限(read) -w 有写的权限(write)
-x 有执行的权限(execute)
(3)按照文件类型进行判断
-f 文件存在并且是一个常规的文件(file)
-e 文件存在(existence) -d 文件存在并是一个目录(directory)
-s 文件存在且不为空 -L 文件存在且是一个链接(link)
3.案例实操
1)23是否大于等于22
[atguigu@hadoop101 datas]$ [ 23 -ge 22 ]
[atguigu@hadoop101 datas]$ echo $?
0
	(2)helloworld.sh是否具有写权限
[atguigu@hadoop101 datas]$ [ -w helloworld.sh ]
[atguigu@hadoop101 datas]$ echo $?
0
	(3)/home/atguigu/cls.txt目录中的文件是否存在
[atguigu@hadoop101 datas]$ [ -e /home/atguigu/cls.txt ]
[atguigu@hadoop101 datas]$ echo $?
1
(4)多条件判断(&& 表示前一条命令执行成功时,才执行后一条命令,|| 表示上一条命令执行失败后,才执行下一条命令)
[atguigu@hadoop101 ~]$ [ condition ] && echo OK || echo notok
OK
[atguigu@hadoop101 datas]$ [ condition ] && [ ] || echo notok
notok
流程控制
if 判断
1.基本语法
if [ 条件判断式 ]
  then
程序
elif 条件判断式
	then 程序..
else 程序..
fi
或
if [ 条件判断式 ] ; then
程序..
elif [条件判断式] ; then
程序..
else 程序
fi

	注意事项:
(1)[ 条件判断式 ],中括号和条件判断式之间必须有空格
(2)if后要有空格
2.案例实操
(1)如果输入的数字是1,2,3则输出你输入的数字是xx,否则输出,你输入的数字不是1,2,3
[root@0725pc shells]# cat test3.sh
#! /bin/bash
if [ $1 -eq 1 ]
then
    echo "你输入的是1啊!"
elif [ $1 -eq 2 ]
then
	 echo "你输入的是2啊!"
elif [ $1 -eq 3 ]
then
         echo "你输入的是3啊!"
else  echo "你输入的不是1,2,3啊!"
fi

[root@0725pc shells]# bash test3.sh 3
你输入的是3啊!
[root@0725pc shells]# bash test3.sh 2
你输入的是2啊!
[root@0725pc shells]# bash test3.sh 1
你输入的是1啊!
[root@0725pc shells]# bash test3.sh 4
你输入的不是1,2,3啊!
ase 语句
1.基本语法
case $变量名 in
"值1")
如果变量的值等于值1,则执行程序1
;;
"值2")
如果变量的值等于值2,则执行程序2
;;
…省略其他分支…
*)
如果变量的值都不是以上的值,则执行此程序
;;
esac
注意事项:
- case行尾必须为单词“in”,每一个模式匹配必须以右括号“)”结束。
- 双分号“;;”表示命令序列结束,相当于java中的break。
- 最后的“*)”表示默认模式,相当于java中的default。
2.案例实操
(1)输入一个数字,如果是1,则输出banzhang,如果是2,则输出cls,如果是其它,输出renyao。
[atguigu@hadoop101 datas]$ touch case.sh
[atguigu@hadoop101 datas]$ vim case.sh

!/bin/bash

case $1 in
"1")
        echo "banzhang"
;;

"2")
        echo "cls"
;;
*)
        echo "renyao"
;;
esac

[atguigu@hadoop101 datas]$ chmod 777 case.sh
[atguigu@hadoop101 datas]$ ./case.sh 1
1
for 循环
1.基本语法1
for (( 初始值;循环控制条件;变量变化 ))
do
程序
done
或
for (( 初始值;循环控制条件;变量变化 )); do 程序; done
2.案例实操
(1)从1加到100
[atguigu@hadoop101 datas]$ touch for1.sh
[atguigu@hadoop101 datas]$ vim for1.sh

#!/bin/bash

s=0
for((i=0;i<=100;i++))
do
        s=$[$s+$i]
done
echo $s

[atguigu@hadoop101 datas]$ chmod 777 for1.sh
[atguigu@hadoop101 datas]$ ./for1.sh
“5050”

[root@0725pc shells]# tail -n 4 test1.sh
SUM2=0
for((i=0;i<=10;i++));do SUM2=$(($SUM2+$i)); done
echo "从1加到100的值是:$SUM2"
[root@0725pc shells]# ./test1.sh
从1加到100的值是:55
3.基本语法2
for 变量 in 值1 值2 值3…
do
程序
done
或
for 变量 in 1 2 3; do 程序; done
或
for 变量 in {1..3}; do 程序; done
4.案例实操
1)打印所有输入参数
[atguigu@hadoop101 datas]$ touch for2.sh
[atguigu@hadoop101 datas]$ vim for2.sh

#!/bin/bash
#打印数字

for i in $*
    do
      echo "ban zhang love $i "
    done

[atguigu@hadoop101 datas]$ chmod 777 for2.sh
[atguigu@hadoop101 datas]$ bash for2.sh cls xz bd
ban zhang love cls
ban zhang love xz
ban zhang love bd
(2)多种写法
[root@0725pc shells]# cat test2.sh
#! /bin/bash
for i in 1 2 3
do
	echo $i
done
echo "--------------------"
for i in 1 2 3 ;do echo $i;done
echo "--------------------"
for i in {1..3};do echo $i;done
[root@0725pc shells]# ./test2.sh
1
2
3
--------------------
1
2
3
--------------------
1
2
3
(3)比较$*和$@区别
(a)$*和$@都表示传递给函数或脚本的所有参数,不被双引号“”包含时,都以$1 $2 …$n的形式输出所有参数。
[atguigu@hadoop101 datas]$ touch for.sh
[atguigu@hadoop101 datas]$ vim for.sh

#!/bin/bash

for i in $*
do
      echo "ban zhang love $i "
done

for j in $@
do
        echo "ban zhang love $j"
done

[atguigu@hadoop101 datas]$ bash for.sh cls xz bd
ban zhang love cls
ban zhang love xz
ban zhang love bd
ban zhang love cls
ban zhang love xz
ban zhang love bd
(b)当它们被双引号“”包含时,“$*”会将所有的参数作为一个整体,以“$1 $2 …$n”的形式输出所有参数;“$@”会将各个参数分开,以“$1” “$2”…”$n”的形式输出所有参数。
[atguigu@hadoop101 datas]$ vim for.sh

#!/bin/bash

for i in "$*"
#$*中的所有参数看成是一个整体,所以这个for循环只会循环一次
        do
                echo "ban zhang love $i"
        done

for j in "$@"
#$@中的每个参数都看成是独立的,所以“$@”中有几个参数,就会循环几次
        do
                echo "ban zhang love $j"
done

[atguigu@hadoop101 datas]$ chmod 777 for.sh
[atguigu@hadoop101 datas]$ bash for.sh cls xz bd
ban zhang love cls xz bd
ban zhang love cls
ban zhang love xz
ban zhang love bd
while 循环
1.基本语法
while [ 条件判断式 ]
do
程序
done
或
while((表达式))
do
程序
done
2.案例实操
(1)从1加到100
[atguigu@hadoop101 datas]$ touch while.sh
[atguigu@hadoop101 datas]$ vim while.sh

#!/bin/bash
s=0
i=1
while [ $i -le 100 ]
do
        s=$[$s+$i]
        i=$[$i+1]
done

echo $s

[atguigu@hadoop101 datas]$ chmod 777 while.sh
[atguigu@hadoop101 datas]$ ./while.sh
5050
	(2)从0开始,累加加11次
[root@0725pc shells]# bash test3.sh
11
[root@0725pc shells]# cat test3.sh
#! /bin/bash

NUM=0
while((NUM<=10));do let NUM++; done
echo $NUM
read读取控制台输入
1.基本语法
read(选项)(参数)
选项:
-p:指定读取值时的提示符;
-t:指定读取值时等待的时间(秒)。
参数
变量:指定读取值的变量名
2.案例实操
1)提示7秒内,读取控制台输入的名称
[atguigu@hadoop101 datas]$ touch read.sh
[atguigu@hadoop101 datas]$ vim read.sh

#!/bin/bash

read -t 7 -p "Enter your name in 7 seconds " NAME
echo $NAME

[atguigu@hadoop101 datas]$ ./read.sh
Enter your name in 7 seconds xiaoze
xiaoze
函数
11.9.1 系统函数
1.basename基本语法
basename [string / pathname] [suffix] (功能描述:basename命令会删掉所有的前缀包括最后一个(‘/’)字符,然后将字符串显示出来。
选项:
suffix为后缀,如果suffix被指定了,basename会将pathname或string中的suffix去掉。
2.案例实操
(1)截取该/home/atguigu/banzhang.txt路径的文件名称
[atguigu@hadoop101 datas]$ basename /home/atguigu/banzhang.txt
banzhang.txt
[atguigu@hadoop101 datas]$ basename /home/atguigu/banzhang.txt .txt
banzhang
3. dirname基本语法
dirname 文件绝对路径 (功能描述:从给定的包含绝对路径的文件名中去除文件名(非目录的部分),然后返回剩下的路径(目录的部分))
4.案例实操
(1)获取banzhang.txt文件的路径
[atguigu@hadoop101 ~]$ dirname /home/atguigu/banzhang.txt
/home/atguigu
自定义函数
1.基本语法
function funname[()]
{
Action;
[return int;]
}
funname
2.经验技巧
(1)必须在调用函数地方之前,先声明函数,shell脚本是逐行运行。不会像其它语言一样先编译。
(2)函数返回值,只能通过$?系统变量获得,可以显示加:return返回,如果不加,将以最后一条命令运行结果,作为返回值。return后跟数值n(0-255)
3.案例实操
(1)计算两个输入参数的和
[atguigu@hadoop101 datas]$ touch fun.sh
[atguigu@hadoop101 datas]$ vim fun.sh

#!/bin/bash
function sum()
{
    s=0
    s=$[ $1 + $2 ]
    echo "$s"
}

read -p "Please input the number1: " n1;
read -p "Please input the number2: " n2;
sum $n1 $n2;

[atguigu@hadoop101 datas]$ chmod 777 fun.sh
[atguigu@hadoop101 datas]$ ./fun.sh
Please input the number1: 2
Please input the number2: 5
7
Shell工具(重点)
wc
wc命令用来计算数字。利用wc指令我们可以计算文件的Byte数、字数或是列数,若不指定文件名称,或是所给予的文件名为“-”,则wc指令会从标准输入设备读取数据。
1. 基本用法
wc [选项参数] filename
2. 参数说明
选项参数 | 功能 |
-l | 统计文件行数 |
-w | 统计文件的单词数 |
-m | 统计文件的字符数 |
-c | 统计文件的字节数 |
3. 案例实操
统计redis_6379.conf文件的行数、单词数、字节数!
[root@0725pc myredis]# ll | grep redis_6379.conf
-rw-r--r--. 1 root root      188 10月  9 15:33 redis_6379.conf
[root@0725pc myredis]# cat -n redis_6379.conf
     1	include /root/myredis/redis.conf
     2	pidfile "/var/run/redis_6379.pid"
     3	port 6379
     4	dbfilename "dump_6379.rdb"
     5	cluster-enabled yes
     6	cluster-config-file nodes-6379.conf
     7	cluster-node-timeout 15000
     8
[root@0725pc myredis]# wc -w redis_6379.conf
14 redis_6379.conf
[root@0725pc myredis]# wc -l redis_6379.conf
8 redis_6379.conf
[root@0725pc myredis]# wc -m redis_6379.conf
188 redis_6379.conf
cut
cut的工作就是“剪”,具体的说就是在文件中负责剪切数据用的。cut 命令从文件的每一行剪切字节、字符和字段并将这些字节、字符和字段输出。
1.基本用法
cut [选项参数] filename
说明:默认分隔符是制表符
2.选项参数说明
表1-55
选项参数 | 功能 |
-f | f为fileds,列号,提取第几列 |
-d | d为Descriptor分隔符,按照指定分隔符分割列 |
3.案例实操
(0)以:为间隔,切割PATH环境变量的第一列
[root@0725pc ~]# echo $PATH
/usr/lib64/qt-3.3/bin:/usr/local/sbin:/usr/local/bin:/sbin:/bin:/usr/sbin:/usr/bin:/opt/jdk1.8.0_121/bin:/root/bin
[root@0725pc ~]# echo $PATH | cut -d ':' -f 1
/usr/lib64/qt-3.3/bin
(2)以:为间隔,切割PATH环境变量的第二、三列
[root@0725pc ~]# echo $PATH
/usr/lib64/qt-3.3/bin:/usr/local/sbin:/usr/local/bin:/sbin:/bin:/usr/sbin:/usr/bin:/opt/jdk1.8.0_121/bin:/root/bin
[root@0725pc ~]# echo $PATH | cut -d ':' -f 2,3
/usr/local/sbin:/usr/local/bin
(3)选取系统PATH变量值,第2个“:”开始后的所有路径:
[atguigu@hadoop101 datas]$ echo $PATH
/usr/lib64/qt-3.3/bin:/usr/local/bin:/bin:/usr/bin:/usr/local/sbin:/usr/sbin:/sbin:/home/atguigu/bin

[atguigu@hadoop102 datas]$ echo $PATH | cut -d: -f 3-
/usr/local/bin:/bin:/usr/bin:/usr/local/sbin:/usr/sbin:/sbin:/home/atguigu/bin
 (4)以:为间隔,切割PATH环境变量的第一到三列,和第五列
[root@0725pc ~]# echo $PATH
/usr/lib64/qt-3.3/bin:/usr/local/sbin:/usr/local/bin:/sbin:/bin:/usr/sbin:/usr/bin:/opt/jdk1.8.0_121/bin:/root/bin
[root@0725pc ~]# echo $PATH | cut -d ':' -f 1-3,5
/usr/lib64/qt-3.3/bin:/usr/local/sbin:/usr/local/bin:/bin
(5)切割ifconfig 后打印的IP地址
[atguigu@hadoop101 datas]$ ifconfig eth0 | grep "inet addr" | cut -d: -f 2 | cut -d" " -f1
192.168.1.102
sed
sed是一种流编辑器,它一次处理一行内容。处理时,把当前处理的行存储在临时缓冲区中,称为“模式空间”,接着用sed命令处理缓冲区中的内容,处理完成后,把缓冲区的内容送往屏幕。接着处理下一行,这样不断重复,直到文件末尾。文件内容并没有改变,除非你使用重定向存储输出。
- 基本用法
sed [选项参数] ‘command’ filename
- 选项参数说明
表1-56
选项参数 | 功能 |
-e | 直接在指令列模式上进行sed的动作编辑。 |
- 命令功能描述
表1-57
命令 | 功能描述 |
a | 新增,a的后面可以接字串,在下一行出现 |
d | 删除 |
s | 查找并替换 |
- 案例实操
(0)数据准备
[atguigu@hadoop102 datas]$ touch sed.txt
[atguigu@hadoop102 datas]$ vim sed.txt
dong shen
guan zhen
wo  wo
lai  lai

le  le
(1)将“mei nv”这个单词插入到sed.txt第二行下,打印。
[atguigu@hadoop102 datas]$ sed '2a mei nv' sed.txt
dong shen
guan zhen
mei nv
wo  wo
lai  lai

le  le
[atguigu@hadoop102 datas]$ cat sed.txt
dong shen
guan zhen
wo  wo
lai  lai

le  le
注意:文件并没有改变
(2)删除sed.txt文件所有包含wo的行
[atguigu@hadoop102 datas]$ sed '/wo/d' sed.txt
dong shen
guan zhen
lai  lai

le  le
(3)删除sed.txt文件第二行
[root@0725pc ~]# cat sed.txt
dong shen
guan zhen
wo  wo
lai  lai

le  le

[root@0725pc ~]# sed '2d' sed.txt
dong shen
wo  wo
lai  lai

le  le

(4)删除sed.txt文件最后一行
[root@0725pc ~]# sed '$d' sed.txt
dong shen
guan zhen
wo  wo
lai  lai

le  le
(5)删除sed.txt文件第二行至最后一行
[root@0725pc ~]# sed '2,$d' sed.txt
dong shen
(6)将sed.txt文件中wo替换为ni
[atguigu@hadoop102 datas]$ sed 's/wo/ni/g' sed.txt
dong shen
guan zhen
ni  ni
lai  lai

le  le
注意:‘g’表示global,全部替换,不加g只会替换第一个匹配到的字符。
(4)将sed.txt文件中的第二行删除并将wo替换为ni,
[atguigu@hadoop102 datas]$ sed -e '2d' -e 's/wo/ni/g' sed.txt
dong shen
ni  ni
lai  lai

le  le
awk
一个强大的文本分析工具,把文件逐行的读入,以空格为默认分隔符将每行切片,切开的部分再进行分析处理。
- 基本用法
awk [选项参数] ‘pattern1{action1} pattern2{action2}...’ filename
pattern:表示AWK在数据中查找的内容,就是匹配模式
action:在找到匹配内容时所执行的一系列命令
- 选项参数说明
表1-55
选项参数 | 功能 |
-F | 指定输入文件折分隔符 |
-v | 赋值一个用户定义变量 |
- 案例实操
(0)数据准备
[atguigu@hadoop102 datas]$ sudo cp /etc/passwd ./
(1)搜索passwd文件以root关键字开头的所有行,并输出该行的第7列。
[atguigu@hadoop102 datas]$ awk -F: '/^root/{print $7}' passwd
/bin/bash
(2)搜索passwd文件以root关键字开头的所有行,并输出该行的第1列和第7列,中间以“,”号分割。
[atguigu@hadoop102 datas]$ awk -F: '/^root/{print $1","$7}' passwd
root,/bin/bash
注意:只有匹配了patter的行才会执行action
(3)只显示/etc/passwd的第一列和第七列,以逗号分割,且在所有行前面添加列名user,shell在最后一行添加"dahaige,/bin/zuishuai"。
[atguigu@hadoop102 datas]$ awk -F : 'BEGIN{print "user, shell"} {print $1","$7} END{print "dahaige,/bin/zuishuai"}' passwd
user, shell
root,/bin/bash
bin,/sbin/nologin
。。。
atguigu,/bin/bash
dahaige,/bin/zuishuai
注意:BEGIN 在所有数据读取行之前执行;END 在所有数据执行之后执行。
(4)将passwd文件中的用户id增加数值1并输出
[atguigu@hadoop102 datas]$ awk -v i=1 -F: '{print $3+i}' passwd
1
2
3- awk的内置变量
表1-56
变量 | 说明 |
FILENAME | 文件名 |
NR | 已读的记录数(行号) |
NF | 浏览记录的域的个数(切割后列的个数) |
- 案例实操
(1)统计passwd文件名,每行的行号,每行的列数
[atguigu@hadoop102 datas]$ awk -F: '{print "filename:"  FILENAME ", linenumber:" NR  ",columns:" NF}' passwd
filename:passwd, linenumber:1,columns:7
filename:passwd, linenumber:2,columns:7
filename:passwd, linenumber:3,columns:7
	  (2)切割IP
[atguigu@hadoop102 datas]$ ifconfig eth0 | grep "inet addr" | awk -F: '{print $2}' | awk -F " " '{print $1}'
192.168.1.102
	  (3)查询sed.txt中空行所在的行号
[atguigu@hadoop102 datas]$ awk '/^$/{print NR}' sed.txt
5
sort
sort命令是在Linux里非常有用,它将文件进行排序,并将排序结果标准输出。默认情况以第一个字符串的字典顺序来排序!
- 基本语法
sort(选项)(参数)
表1-57
选项 | 说明 |
-n | 依照数值的大小排序 |
-r | 以相反的顺序来排序 |
-t | 设置排序时所用的分隔字符,默认使用TAB |
-k | 指定需要排序的列 |
-u | u为unique的缩写,即如果出现相同的数据,只出现一行 |
参数:指定待排序的文件列表
2. 案例实操
(0)数据准备
[atguigu@hadoop102 datas]$ touch sort.sh
[atguigu@hadoop102 datas]$ vim sort.sh
bb:40:5.4
bd:20:4.2
xz:50:2.3
cls:10:3.5
ss:30:1.6
(1)按照“:”分割后的第三列倒序排序。
[atguigu@hadoop102 datas]$ sort -t : -nrk 3  sort.sh
bb:40:5.4
bd:20:4.2
cls:10:3.5
xz:50:2.3
ss:30:1.6
企业真实面试题
1 百度&考满分
问题:Linux常用命令
参考答案:find、df、tar、ps、top、netstat等。(尽量说一些高级命令)
2 瓜子二手车
问题:Linux查看内存、磁盘存储、io 读写、端口占用、进程等命令
答案:
1、查看内存:top
2、查看磁盘存储情况:df -h
3、查看磁盘IO读写情况:iotop(需要安装一下:yum install iotop)、iotop -o(直接查看输出比较高的磁盘读写程序)
4、查看端口占用情况:netstat -tunlp | grep 端口号
5、查看进程:ps aux
3京东
问题1:使用Linux命令查询file1中空行所在的行号
答案:
[atguigu@hadoop102 datas]$ awk '/^$/{print NR}' sed.txt
5
问题2:有文件chengji.txt内容如下:
张三 40
李四 50
王五 60
使用Linux命令计算第二列的和并输出
[atguigu@hadoop102 datas]$ cat chengji.txt | awk -F " " '{sum+=$2} END{print sum}'
150
4 搜狐&和讯网
问题1:Shell脚本里如何检查一个文件是否存在?如果不存在该如何处理?
#!/bin/bash
if [ -f file.txt ]; then
echo "文件存在!"
else
echo "文件不存在!"
fi
5 新浪
问题1:用shell写一个脚本,对文本中无序的一列数字排序
[root@CentOS6-2 ~]# cat test.txt
9
8
7
6
5
4
3
2
10
1
[root@CentOS6-2 ~]# sort -n test.txt|awk '{a+=$0;print $0}END{print "SUM="a}'
1
2
3
4
5
6
7
8
9
10
SUM=55
6 金和网络
问题1:请用shell脚本写出查找当前文件夹(/home)下所有的文本文件内容中包含有字符”shen”的文件名称
[atguigu@hadoop102 datas]$ grep -r "shen" /home | cut -d ":" -f 1
/home/atguigu/datas/sed.txt
/home/atguigu/datas/cut.txt