目录
三 scrapy框架应用--以创建BaiduSpider项目为例,介绍使用scrapy框架的使用过程
一 Scrapy框架简介
- 什么是框架?
- 就是一个集成了很多功能并且具有很强通用性的一个项目模板。
- 如何学习框架?
- 专门学习框架封装的各种功能的详细用法。
- 什么是scrapy?
- 爬虫中封装好的一个明星框架。功能:高性能的持久化存储,异步的数据下载,高性能的数据解析,分布式
Scrapy是一个为了爬取网站数据,提取结构性数据而编写的应用框架。 可以应用在包括数据挖掘,信息处理 或存储历史数据等一系列的程序中。
二 scrapy框架的基本使用
1) 环境的安装
- mac or linux:pip install scrapy
- windows:
- pip install wheel
- 下载twisted,下载地址为http://www.lfd.uci.edu/~gohlke/pythonlibs/#twisted
- 安装twisted:pip install Twisted‑17.1.0‑cp36‑cp36m‑win_amd64.whl
- pip install pywin32
- pip install scrapy
测试:在终端里录入scrapy指令,没有报错即表示安装成功!
2)基础命令
- 创建一个工程:scrapy startproject xxx
- cd xxx
- 在spiders子目录中创建一个爬虫文件
- scrapy genspider spiderName www.xxx.com
- 执行工程:
- scrapy crawl spiderName
注意:应在spiders文件夹内执行
3)项目组成:
spiders
__init__.py
自定义的爬虫文件.py ‐‐‐》由我们自己创建,是实现爬虫核心功能的文件
__init__.py
items.py ‐‐‐》定义数据结构的地方,是一个继承自scrapy.Item的类
middlewares.py ‐‐‐》中间件 代理
pipelines.py ‐‐‐》管道文件,里面只有一个类,用于处理下载数据的后续处理
默认是300优先级,值越小优先级越高(1‐1000)
settings.py ‐‐‐》配置文件 比如:是否遵守robots协议,User‐Agent定义等
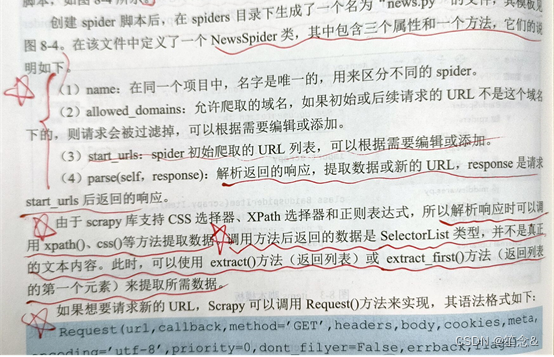
4)创建爬虫文件:
(1)跳转到spiders文件夹 cd 目录名字/目录名字/spiders
(2)scrapy genspider 爬虫名字 网页的域名
爬虫文件的基本组成:
继承scrapy.Spider类
name = 'baidu' ‐‐‐》 运行爬虫文件时使用的名字
allowed_domains ‐‐‐》 爬虫允许的域名,在爬取的时候,如果不是此域名之下的
url,会被过滤掉
start_urls ‐‐‐》 声明了爬虫的起始地址,可以写多个url,一般是一个
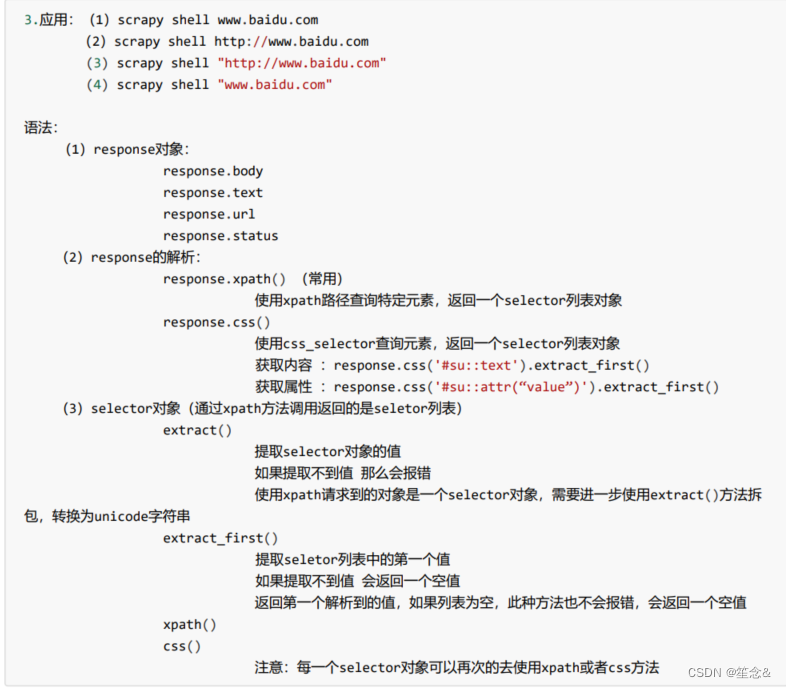
parse(self, response) ‐‐‐》解析数据的回调函数
response.text ‐‐‐》响应的是字符串
response.body ‐‐‐》响应的是二进制文件
response.xpath()‐》xpath方法的返回值类型是selector列表
extract() ‐‐‐》提取的是selector对象的是data
extract_first() ‐‐‐》提取的是selector列表中的第一个数据
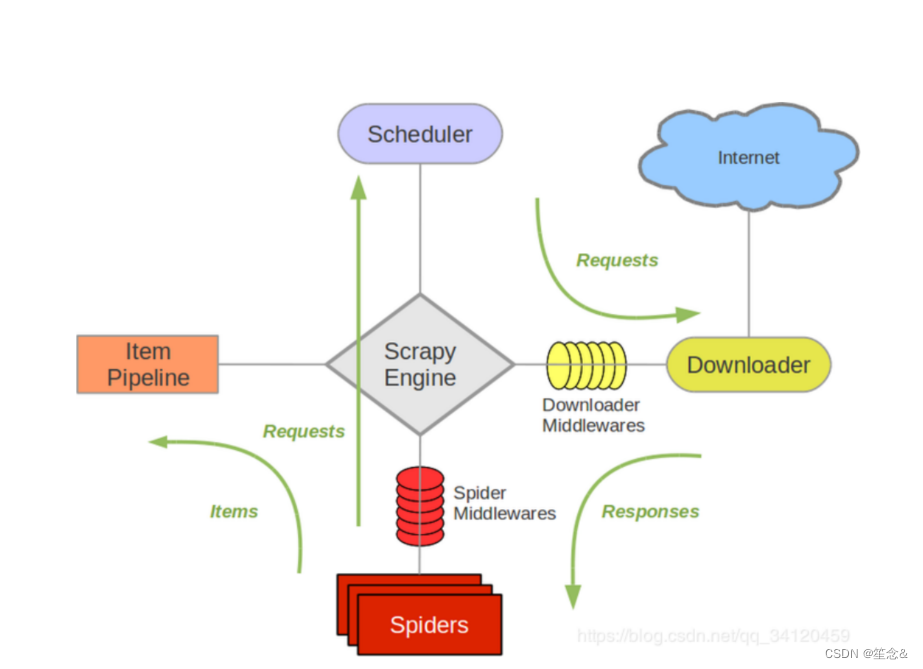
5)scrapy架构组成
(1)引擎 ‐‐‐》自动运行,无需关注,会自动组织所有的请求对象,分发给下载器
(2)下载器 ‐‐‐》从引擎处获取到请求对象后,请求数据
(3)spiders ‐‐‐》Spider类定义了如何爬取某个(或某些)网站。包括了爬取的动作(例 如:是否跟进链接)以及如何从网页的内容中提取结构化数据(爬取item)。 换句话说,Spider就是您定义爬取的动作及 分析某个网页(或者是有些网页)的地方。
(4)调度器 ‐‐‐》有自己的调度规则,无需关注
(5)管道(Item pipeline) ‐‐‐》最终处理数据的管道,会预留接口供我们处理数据 当Item在Spider中被收集之后,它将会被传递到Item Pipeline,一些组件会按照一定的顺序执行对Item的处理。 每个item pipeline组件(有时称之为“Item Pipeline”)是实现了简单方法的Python类。他们接收到Item并通过它执行 一些行为,同时也决定此Item是否继续通过pipeline,或是被丢弃而不再进行处理。
以下是item pipeline的一些典型应用:
1. 清理HTML数据
2. 验证爬取的数据(检查item包含某些字段)
3. 查重(并丢弃)
4. 将爬取结果保存到数据库中
6) 五大核心组件
引擎(Scrapy)
用来处理整个系统的数据流处理, 触发事务(框架核心)
调度器(Scheduler)
用来接受引擎发过来的请求, 压入队列中, 并在引擎再次请求的时候返回. 可以想像成一个URL(抓取网页的网址或者说是链接)的优先队列, 由它来决定下一个要抓取的网址是什么, 同时去除重复的网址
下载器(Downloader)
用于下载网页内容, 并将网页内容返回给蜘蛛(Scrapy下载器是建立在twisted这个高效的异步模型上的)
爬虫(Spiders)
爬虫是主要干活的, 用于从特定的网页中提取自己需要的信息, 即所谓的实体(Item)。用户也可以从中提取出链接,让Scrapy继续抓取下一个页面
项目管道(Pipeline)
负责处理爬虫从网页中抽取的实体,主要的功能是持久化实体、验证实体的有效性、清除不需要的信息。当页面被爬虫解析后,将被发送到项目管道,并经过几个特定的次序
7)srapy工作原理

8)yield
1. 带有 yield 的函数不再是一个普通函数,而是一个生成器generator,可用于迭代
2. yield 是一个类似 return 的关键字,迭代一次遇到yield时就返回yield后面(右边)的值。重点是:下一次迭代 时,从上一次迭代遇到的yield后面的代码(下一行)开始执行
3. 简要理解:yield就是 return 返回一个值,并且记住这个返回的位置,下次迭代就从这个位置后(下一行)开始
9)scrapy shell
10)pymysql的使用步骤
1.pip install pymysql
2.pymysql.connect(host,port,user,password,db,charset)
3.conn.cursor()
4.cursor.execute()
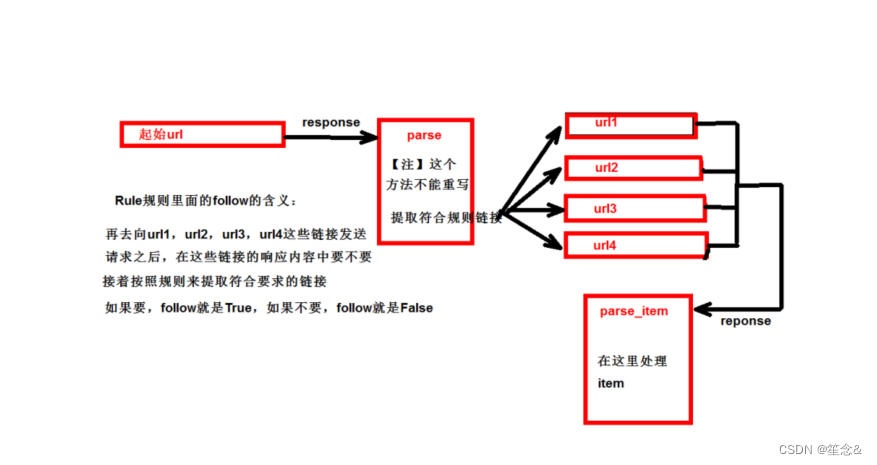
11)CrawlSpider
- CrawlSpider:类,Spider的一个子类
- 全站数据爬取的方式
- 基于Spider:手动请求
- 基于CrawlSpider
- CrawlSpider的使用:
- 创建一个工程
- cd XXX
- 创建爬虫文件(CrawlSpider):
- scrapy genspider -t crawl xxx www.xxxx.com
- 链接提取器:
- 作用:根据指定的规则(allow)进行指定链接的提取
- 规则解析器:
- 作用:将链接提取器提取到的链接进行指定规则(callback)的解析
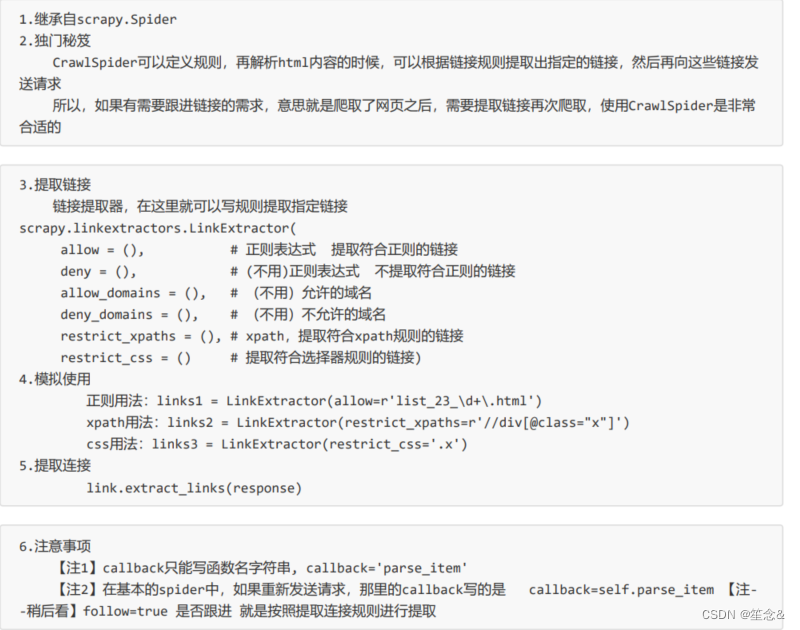
运行原理
12)日志信息和日志等级
(1)日志级别:
CRITICAL:严重错误
ERROR: 一般错误
WARNING: 警告
INFO: 一般信息
DEBUG: 调试信息
默认的日志等级是DEBUG
只要出现了DEBUG或者DEBUG以上等级的日志
那么这些日志将会打印 (2)settings.py文件设置:
默认的级别为DEBUG,会显示上面所有的信息
在配置文件中 settings.py
LOG_FILE : 将屏幕显示的信息全部记录到文件中,屏幕不再显示,注意文件后缀一定是.log
LOG_LEVEL : 设置日志显示的等级,就是显示哪些,不显示哪些
例如,想要只显示出错误的日志信息
可在setting中加入
#显示指定类型的日志信息
LOG_LEVEL = 'ERROR'
13) 乱码
在settings中加入
FEED_EXPORT_ENCODING='utf-8'
14)scrapy持久化存储
- 基于终端指令:
- 要求:只可以将parse方法的返回值存储到本地的文本文件中
- 注意:持久化存储对应的文本文件的类型只可以为:'json', 'jsonlines', 'jl', 'csv', 'xml', 'marshal', 'pickle
- 指令:scrapy crawl xxx -o filePath
- 好处:简介高效便捷
- 缺点:局限性比较强(数据只可以存储到指定后缀的文本文件中)
- 基于管道:
- 编码流程:
- 数据解析
- 在item类中定义相关的属性
- 将解析的数据封装存储到item类型的对象
- 将item类型的对象提交给管道进行持久化存储的操作(在items中 )
- 在管道类的process_item中要将其接受到的item对象中存储的数据进行持久化存储操作
- 在配置文件中开启管道
- 好处:
- 通用性强。
15)图片数据爬取之ImagesPipeline
- 基于scrapy爬取字符串类型的数据和爬取图片类型的数据区别?
- 字符串:只需要基于xpath进行解析且提交管道进行持久化存储
- 图片:xpath解析出图片src的属性值。单独的对图片地址发起请求获取图片二进制类型的数据
- ImagesPipeline:
- 只需要将img的src的属性值进行解析,提交到管道,管道就会对图片的src进行请求发送获取图片的二进制类型的数据,且还会帮我们进行持久化存储。
- 需求:爬取站长素材中的高清图片
- 使用流程:
- 数据解析(图片的地址)
- 将存储图片地址的item提交到制定的管道类
- 在管道文件中自定制一个基于ImagesPipeLine的一个管道类
- get_media_request
- file_path
- item_completed
- 在配置文件中:
- 指定图片存储的目录:IMAGES_STORE = './imgs_bobo'
- 指定开启的管道:自定制的管道类
案例:scrapy图片爬取:
img.py:
# -*- coding: utf-8 -*-
import scrapy
from imgsPro.items import ImgsproItem

class ImgSpider(scrapy.Spider):
    name = 'img'
    # allowed_domains = ['www.xxx.com']
    start_urls = ['http://sc.chinaz.com/tupian/']

    def parse(self, response):
        div_list = response.xpath('//div[@id="container"]/div')
        for div in div_list:
            #注意:使用伪属性
            src = div.xpath('./div/a/img/@src2').extract_first()

            item = ImgsproItem()
            item['src'] = src

            yield item
itiems:
# -*- coding: utf-8 -*-

# Define here the models for your scraped items
#
# See documentation in:
# https://doc.scrapy.org/en/latest/topics/items.html

import scrapy


class ImgsproItem(scrapy.Item):
    # define the fields for your item here like:
    src = scrapy.Field()
    # pass
pipelines:
# -*- coding: utf-8 -*-

# Define your item pipelines here
#
# Don't forget to add your pipeline to the ITEM_PIPELINES setting
# See: https://doc.scrapy.org/en/latest/topics/item-pipeline.html


# class ImgsproPipeline(object):
#     def process_item(self, item, spider):
#         return item
from scrapy.pipelines.images import ImagesPipeline
import scrapy
class imgsPileLine(ImagesPipeline):

    #就是可以根据图片地址进行图片数据的请求
    def get_media_requests(self, item, info):

        yield scrapy.Request(item['src'])

    #指定图片存储的路径
    def file_path(self, request, response=None, info=None):
        imgName = request.url.split('/')[-1]
        return imgName

    def item_completed(self, results, item, info):
        return item #返回给下一个即将被执行的管道类
# -*- coding: utf-8 -*-

# Define here the models for your spider middleware
#
# See documentation in:
# https://doc.scrapy.org/en/latest/topics/spider-middleware.html

from scrapy import signals


class ImgsproSpiderMiddleware(object):
    # Not all methods need to be defined. If a method is not defined,
    # scrapy acts as if the spider middleware does not modify the
    # passed objects.

    @classmethod
    def from_crawler(cls, crawler):
        # This method is used by Scrapy to create your spiders.
        s = cls()
        crawler.signals.connect(s.spider_opened, signal=signals.spider_opened)
        return s

    def process_spider_input(self, response, spider):
        # Called for each response that goes through the spider
        # middleware and into the spider.

        # Should return None or raise an exception.
        return None

    def process_spider_output(self, response, result, spider):
        # Called with the results returned from the Spider, after
        # it has processed the response.

        # Must return an iterable of Request, dict or Item objects.
        for i in result:
            yield i

    def process_spider_exception(self, response, exception, spider):
        # Called when a spider or process_spider_input() method
        # (from other spider middleware) raises an exception.

        # Should return either None or an iterable of Response, dict
        # or Item objects.
        pass

    def process_start_requests(self, start_requests, spider):
        # Called with the start requests of the spider, and works
        # similarly to the process_spider_output() method, except
        # that it doesn’t have a response associated.

        # Must return only requests (not items).
        for r in start_requests:
            yield r

    def spider_opened(self, spider):
        spider.logger.info('Spider opened: %s' % spider.name)


class ImgsproDownloaderMiddleware(object):
    # Not all methods need to be defined. If a method is not defined,
    # scrapy acts as if the downloader middleware does not modify the
    # passed objects.

    @classmethod
    def from_crawler(cls, crawler):
        # This method is used by Scrapy to create your spiders.
        s = cls()
        crawler.signals.connect(s.spider_opened, signal=signals.spider_opened)
        return s

    def process_request(self, request, spider):
        # Called for each request that goes through the downloader
        # middleware.

        # Must either:
        # - return None: continue processing this request
        # - or return a Response object
        # - or return a Request object
        # - or raise IgnoreRequest: process_exception() methods of
        #   installed downloader middleware will be called
        return None

    def process_response(self, request, response, spider):
        # Called with the response returned from the downloader.

        # Must either;
        # - return a Response object
        # - return a Request object
        # - or raise IgnoreRequest
        return response

    def process_exception(self, request, exception, spider):
        # Called when a download handler or a process_request()
        # (from other downloader middleware) raises an exception.

        # Must either:
        # - return None: continue processing this exception
        # - return a Response object: stops process_exception() chain
        # - return a Request object: stops process_exception() chain
        pass

    def spider_opened(self, spider):
        spider.logger.info('Spider opened: %s' % spider.name)
settins:
# -*- coding: utf-8 -*-

# Scrapy settings for imgsPro project
#
# For simplicity, this file contains only settings considered important or
# commonly used. You can find more settings consulting the documentation:
#
#     https://doc.scrapy.org/en/latest/topics/settings.html
#     https://doc.scrapy.org/en/latest/topics/downloader-middleware.html
#     https://doc.scrapy.org/en/latest/topics/spider-middleware.html

BOT_NAME = 'imgsPro'

SPIDER_MODULES = ['imgsPro.spiders']
NEWSPIDER_MODULE = 'imgsPro.spiders'

LOG_LEVEL = 'ERROR'
# Crawl responsibly by identifying yourself (and your website) on the user-agent
USER_AGENT = 'Mozilla/5.0 (Macintosh; Intel Mac OS X 10_12_0) AppleWebKit/537.36 (KHTML, like Gecko) Chrome/75.0.3770.100 Safari/537.36'

# Obey robots.txt rules
ROBOTSTXT_OBEY = False

# Configure maximum concurrent requests performed by Scrapy (default: 16)
#CONCURRENT_REQUESTS = 32

# Configure a delay for requests for the same website (default: 0)
# See https://doc.scrapy.org/en/latest/topics/settings.html#download-delay
# See also autothrottle settings and docs
#DOWNLOAD_DELAY = 3
# The download delay setting will honor only one of:
#CONCURRENT_REQUESTS_PER_DOMAIN = 16
#CONCURRENT_REQUESTS_PER_IP = 16

# Disable cookies (enabled by default)
#COOKIES_ENABLED = False

# Disable Telnet Console (enabled by default)
#TELNETCONSOLE_ENABLED = False

# Override the default request headers:
#DEFAULT_REQUEST_HEADERS = {
#   'Accept': 'text/html,application/xhtml+xml,application/xml;q=0.9,*/*;q=0.8',
#   'Accept-Language': 'en',
#}

# Enable or disable spider middlewares
# See https://doc.scrapy.org/en/latest/topics/spider-middleware.html
#SPIDER_MIDDLEWARES = {
#    'imgsPro.middlewares.ImgsproSpiderMiddleware': 543,
#}

# Enable or disable downloader middlewares
# See https://doc.scrapy.org/en/latest/topics/downloader-middleware.html
#DOWNLOADER_MIDDLEWARES = {
#    'imgsPro.middlewares.ImgsproDownloaderMiddleware': 543,
#}

# Enable or disable extensions
# See https://doc.scrapy.org/en/latest/topics/extensions.html
#EXTENSIONS = {
#    'scrapy.extensions.telnet.TelnetConsole': None,
#}

# Configure item pipelines
# See https://doc.scrapy.org/en/latest/topics/item-pipeline.html
ITEM_PIPELINES = {
   'imgsPro.pipelines.imgsPileLine': 300,
}

# Enable and configure the AutoThrottle extension (disabled by default)
# See https://doc.scrapy.org/en/latest/topics/autothrottle.html
#AUTOTHROTTLE_ENABLED = True
# The initial download delay
#AUTOTHROTTLE_START_DELAY = 5
# The maximum download delay to be set in case of high latencies
#AUTOTHROTTLE_MAX_DELAY = 60
# The average number of requests Scrapy should be sending in parallel to
# each remote server
#AUTOTHROTTLE_TARGET_CONCURRENCY = 1.0
# Enable showing throttling stats for every response received:
#AUTOTHROTTLE_DEBUG = False

# Enable and configure HTTP caching (disabled by default)
# See https://doc.scrapy.org/en/latest/topics/downloader-middleware.html#httpcache-middleware-settings
#HTTPCACHE_ENABLED = True
#HTTPCACHE_EXPIRATION_SECS = 0
#HTTPCACHE_DIR = 'httpcache'
#HTTPCACHE_IGNORE_HTTP_CODES = []
#HTTPCACHE_STORAGE = 'scrapy.extensions.httpcache.FilesystemCacheStorage'

#指定图片存储的目录
IMAGES_STORE = './imgs_bobo'
16)中间件(处理动态加载数据)
- 中间件
- 下载中间件
- 位置:引擎和下载器之间
- 作用:批量拦截到整个工程中所有的请求和响应
- 拦截请求:
- UA伪装:process_request
- 代理IP:process_exception:return request
- 拦截响应:
- 篡改响应数据,响应对象
案例:网易新闻爬取
items;
# -*- coding: utf-8 -*-

# Define here the models for your scraped items
#
# See documentation in:
# https://doc.scrapy.org/en/latest/topics/items.html

import scrapy


class WangyiproItem(scrapy.Item):
    # define the fields for your item here like:
    title = scrapy.Field()
    content = scrapy.Field()
wangyi.py
# -*- coding: utf-8 -*-
import scrapy
from selenium import webdriver
from wangyiPro.items import WangyiproItem
class WangyiSpider(scrapy.Spider):
    name = 'wangyi'
    # allowed_domains = ['www.cccom']
    start_urls = ['https://news.163.com/']
    models_urls = []  #存储五个板块对应详情页的url
    #解析五大板块对应详情页的url

    #实例化一个浏览器对象
    def __init__(self):
        self.bro = webdriver.Chrome(executable_path='/Users/bobo/Desktop/小猿圈爬虫课程/chromedriver')

    def parse(self, response):
        li_list = response.xpath('//*[@id="index2016_wrap"]/div[1]/div[2]/div[2]/div[2]/div[2]/div/ul/li')
        alist = [3,4,6,7,8]
        for index in alist:
            model_url = li_list[index].xpath('./a/@href').extract_first()
            self.models_urls.append(model_url)

        #依次对每一个板块对应的页面进行请求
        for url in self.models_urls:#对每一个板块的url进行请求发送
            yield scrapy.Request(url,callback=self.parse_model)

    #每一个板块对应的新闻标题相关的内容都是动态加载
    def parse_model(self,response): #解析每一个板块页面中对应新闻的标题和新闻详情页的url
        # response.xpath()
        div_list = response.xpath('/html/body/div/div[3]/div[4]/div[1]/div/div/ul/li/div/div')
        for div in div_list:
            title = div.xpath('./div/div[1]/h3/a/text()').extract_first()
            new_detail_url = div.xpath('./div/div[1]/h3/a/@href').extract_first()


            item = WangyiproItem()
            item['title'] = title

            #对新闻详情页的url发起请求
            yield scrapy.Request(url=new_detail_url,callback=self.parse_detail,meta={'item':item})
    def parse_detail(self,response):#解析新闻内容
        content = response.xpath('//*[@id="endText"]//text()').extract()
        content = ''.join(content)
        item = response.meta['item']
        item['content'] = content

        yield item


    def closed(self,spider):
        self.bro.quit()
settings:
# -*- coding: utf-8 -*-

# Scrapy settings for wangyiPro project
#
# For simplicity, this file contains only settings considered important or
# commonly used. You can find more settings consulting the documentation:
#
#     https://doc.scrapy.org/en/latest/topics/settings.html
#     https://doc.scrapy.org/en/latest/topics/downloader-middleware.html
#     https://doc.scrapy.org/en/latest/topics/spider-middleware.html

BOT_NAME = 'wangyiPro'

SPIDER_MODULES = ['wangyiPro.spiders']
NEWSPIDER_MODULE = 'wangyiPro.spiders'


# Crawl responsibly by identifying yourself (and your website) on the user-agent
#USER_AGENT = 'wangyiPro (+http://www.yourdomain.com)'
USER_AGENT = 'Mozilla/5.0 (Macintosh; Intel Mac OS X 10_12_0) AppleWebKit/537.36 (KHTML, like Gecko) Chrome/74.0.3729.169 Safari/537.36'

# Obey robots.txt rules
ROBOTSTXT_OBEY = False

# Configure maximum concurrent requests performed by Scrapy (default: 16)
#CONCURRENT_REQUESTS = 32

# Configure a delay for requests for the same website (default: 0)
# See https://doc.scrapy.org/en/latest/topics/settings.html#download-delay
# See also autothrottle settings and docs
#DOWNLOAD_DELAY = 3
# The download delay setting will honor only one of:
#CONCURRENT_REQUESTS_PER_DOMAIN = 16
#CONCURRENT_REQUESTS_PER_IP = 16

# Disable cookies (enabled by default)
#COOKIES_ENABLED = False

# Disable Telnet Console (enabled by default)
#TELNETCONSOLE_ENABLED = False

# Override the default request headers:
#DEFAULT_REQUEST_HEADERS = {
#   'Accept': 'text/html,application/xhtml+xml,application/xml;q=0.9,*/*;q=0.8',
#   'Accept-Language': 'en',
#}

# Enable or disable spider middlewares
# See https://doc.scrapy.org/en/latest/topics/spider-middleware.html
#SPIDER_MIDDLEWARES = {
#    'wangyiPro.middlewares.WangyiproSpiderMiddleware': 543,
#}

# Enable or disable downloader middlewares
# See https://doc.scrapy.org/en/latest/topics/downloader-middleware.html
DOWNLOADER_MIDDLEWARES = {
   'wangyiPro.middlewares.WangyiproDownloaderMiddleware': 543,
}

# Enable or disable extensions
# See https://doc.scrapy.org/en/latest/topics/extensions.html
#EXTENSIONS = {
#    'scrapy.extensions.telnet.TelnetConsole': None,
#}

# Configure item pipelines
# See https://doc.scrapy.org/en/latest/topics/item-pipeline.html
ITEM_PIPELINES = {
   'wangyiPro.pipelines.WangyiproPipeline': 300,
}
LOG_LEVEL = 'ERROR'
# Enable and configure the AutoThrottle extension (disabled by default)
# See https://doc.scrapy.org/en/latest/topics/autothrottle.html
#AUTOTHROTTLE_ENABLED = True
# The initial download delay
#AUTOTHROTTLE_START_DELAY = 5
# The maximum download delay to be set in case of high latencies
#AUTOTHROTTLE_MAX_DELAY = 60
# The average number of requests Scrapy should be sending in parallel to
# each remote server
#AUTOTHROTTLE_TARGET_CONCURRENCY = 1.0
# Enable showing throttling stats for every response received:
#AUTOTHROTTLE_DEBUG = False

# Enable and configure HTTP caching (disabled by default)
# See https://doc.scrapy.org/en/latest/topics/downloader-middleware.html#httpcache-middleware-settings
#HTTPCACHE_ENABLED = True
#HTTPCACHE_EXPIRATION_SECS = 0
#HTTPCACHE_DIR = 'httpcache'
#HTTPCACHE_IGNORE_HTTP_CODES = []
#HTTPCACHE_STORAGE = 'scrapy.extensions.httpcache.FilesystemCacheStorage'
pipeline:
# -*- coding: utf-8 -*-

# Define your item pipelines here
#
# Don't forget to add your pipeline to the ITEM_PIPELINES setting
# See: https://doc.scrapy.org/en/latest/topics/item-pipeline.html


class WangyiproPipeline(object):
    def process_item(self, item, spider):
        print(item)
        return item
middleware:
# -*- coding: utf-8 -*-

# Define here the models for your spider middleware
#
# See documentation in:
# https://doc.scrapy.org/en/latest/topics/spider-middleware.html

from scrapy import signals


from scrapy.http import HtmlResponse
from time import sleep
class WangyiproDownloaderMiddleware(object):
    # Not all methods need to be defined. If a method is not defined,
    # scrapy acts as if the downloader middleware does not modify the
    # passed objects.


    def process_request(self, request, spider):
        # Called for each request that goes through the downloader
        # middleware.

        # Must either:
        # - return None: continue processing this request
        # - or return a Response object
        # - or return a Request object
        # - or raise IgnoreRequest: process_exception() methods of
        #   installed downloader middleware will be called
        return None
    #该方法拦截五大板块对应的响应对象,进行篡改
    def process_response(self, request, response, spider):#spider爬虫对象
        bro = spider.bro#获取了在爬虫类中定义的浏览器对象

        #挑选出指定的响应对象进行篡改
        #通过url指定request
        #通过request指定response
        if request.url in spider.models_urls:
            bro.get(request.url) #五个板块对应的url进行请求
            sleep(3)
            page_text = bro.page_source  #包含了动态加载的新闻数据

            #response #五大板块对应的响应对象
            #针对定位到的这些response进行篡改
            #实例化一个新的响应对象(符合需求:包含动态加载出的新闻数据),替代原来旧的响应对象
            #如何获取动态加载出的新闻数据?
                #基于selenium便捷的获取动态加载数据
            new_response = HtmlResponse(url=request.url,body=page_text,encoding='utf-8',request=request)

            return new_response
        else:
            #response #其他请求对应的响应对象
            return response


    def process_exception(self, request, exception, spider):
        # Called when a download handler or a process_request()
        # (from other downloader middleware) raises an exception.

        # Must either:
        # - return None: continue processing this exception
        # - return a Response object: stops process_exception() chain
        # - return a Request object: stops process_exception() chain
        pass
17)scrapy的post请求
(1)重写start_requests方法:
def start_requests(self) (2) start_requests的返回值:
scrapy.FormRequest(url=url, headers=headers, callback=self.parse_item, formdata=data) url: 要发送的post地址
headers:可以定制头信息
callback: 回调函数 formdata: post所携带的数据,这是一个字典
18)代理
(1)到settings.py中,打开一个选项
DOWNLOADER_MIDDLEWARES = {
'postproject.middlewares.Proxy': 543,
}
(2)到middlewares.py中写代码
def process_request(self, request, spider):
request.meta['proxy'] = 'https://113.68.202.10:9999'
return None
三 scrapy框架应用--以创建BaiduSpider项目为例,介绍使用scrapy框架的使用过程
1)创建项目
语法:scrapy startproject 项目名称 【存放爬虫项目的路径】
若不指定项目路径,则在命令执行路径下生成
例如在pycharm中创建

则会在该文件目录下生成

2)修改items脚本
scrapy库提供Item对象来实现将爬取到的数据转换成结构化数据的功能,实现方法是定义Item类(继承scrapy.Item类),并定义类中的数据类型为scrapy.Filed字段
# Define here the models for your scraped items
#
# See documentation in:
# https://docs.scrapy.org/en/latest/topics/items.html

import scrapy


class BaiduspiderItem(scrapy.Item):
    # define the fields for your item here like:
    # name = scrapy.Field()
    pass

class NewsItem(scrapy.Item):
    index=scrapy.Field()  #定义排名,标题,链接,搜素结果个数
    title=scrapy.Field()
    link=scrapy.Field()
    newsNum=scrapy.Field()
3)创建spider脚本
语法:scrapy genspider [template] <name> <domain>
template:表示创建模板的类型,缺省则使用默认模板
name:表示创建的spider脚本名称,擦混关键后会在spider目录下生成一个以namme命名的py文件
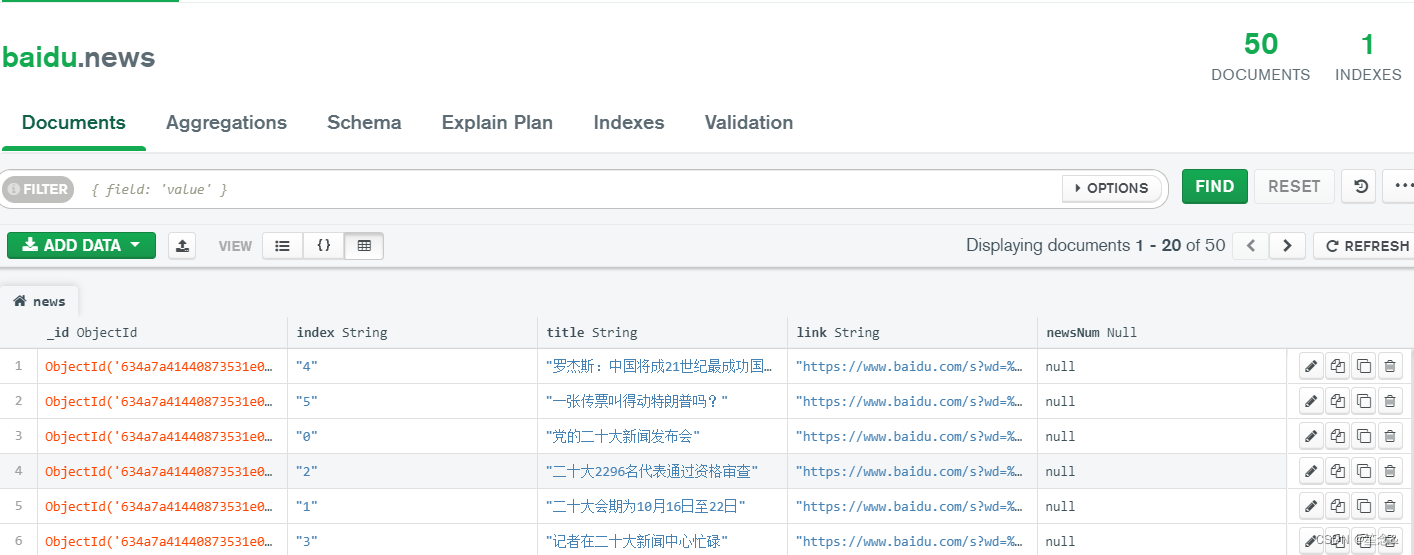
在BaiduSpider项目中创建一个爬取百度首页热榜新闻的spider脚本,命名为news,域名为www .baidu.com

![]()
#xpath返回的是列表,但是列表元素一定是Selector类型的对象
#extract可以将Selector对象中data参数存储的字符串提取出来
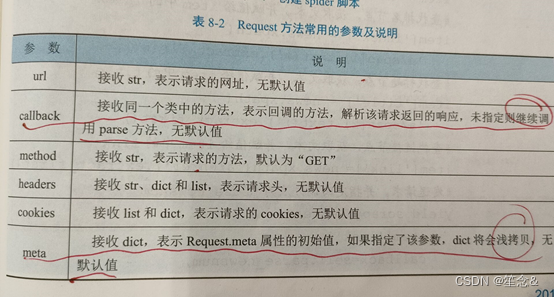
request方法常用的参数及其说明
在BadiuSpider项目中,shixiannews爬虫的过程如下:
1)在parse()方法中提取百度首页热榜新闻的排名,标题和链接,并写入NewsItem,
类的对象中,然后调用Scrapy。Request()方法请求新的链接,并使用callback参数指定回调方法为parse_newsnum,使用meta参数在两个解析方法之间传递NewsItem类的对象。
2)定义parse_newsnum()方法,解析请求新的链接返回的响应,提取每台哦新闻的搜索接过书,并写入newsItem类中
news.py:
import scrapy									#导入scrapy模块
#导入items模块中的NewsItem类
from BaiduSpider.items import NewsItem
from copy import deepcopy						#导入deepcopy模块
class NewsSpider(scrapy.Spider):				#定义NewsSpider类
    name = 'news'								#初始化name
    #初始化allowed_domains
    allowed_domains = ['www.baidu.com']
    start_urls = ['http://www.baidu.com/']	#初始化start_urls
    def parse(self, response):					#定义parse方法
        #查找ul节点下的所有li节点
        news_list = response.xpath(
            '//ul[@class="s-hotsearch-content"]/li'
        )
        for news in news_list:					#遍历li节点
            item = NewsItem()					#初始化对象item
            #查找排名节点,获取文本,并赋值给item中的index
            item['index'] = news.xpath(
                'a/span[1]/text()').extract_first()
            #查找标题节点,获取文本,并赋值给item中的title
            item['title'] = news.xpath(
                'a/span[2]/text()').extract_first()
            #查找链接节点,获取文本,并赋值给item中的link
            item['link']= news.xpath('a/@href').extract_first()
            #发送请求,并指定回调方法为parse_newsnum
            yield scrapy.Request(
                item['link'],
                callback=self.parse_newsnum,
                meta={'item': deepcopy(item)}
                #使用meta参数在两个解析方法之间传递item时,避免item数据发生错误,需使用深拷贝,而且需要导入deepcopy模块
            )

    def parse_newsnum(self, response):  # 定义parse_newsnum方法
        item = response.meta['item']  # 传递item
        # 查找搜索结果个数节点,并获取文本,赋值给news_num
        item['newsNum'] = response.xpath(
            '//span[@class="nums_text"]/text()').extract_first()
        yield item  # 返回item
提示:
scrapy.Requset()方法中使用meta参数在两个解析方法之间传递Item时,避免Item数据发生错误
需使用深拷贝,如meta={'item':deepcopy(item)},而且需要导入deepcopy模块
注意:
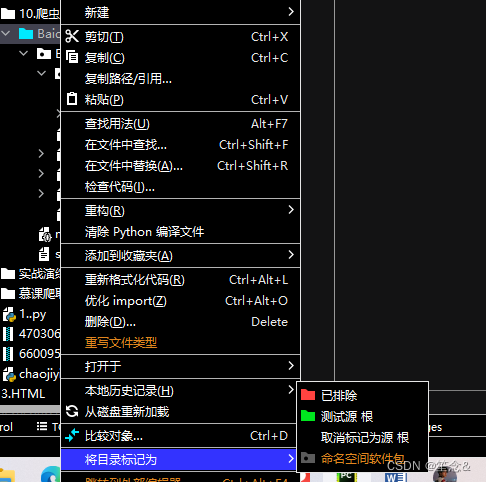
导入items模块中的newsitem类时,需要设置路径。方法为:右击项目名,在弹出的快捷菜单中选择mark directory as ->sources root即可
拓展:
scrapy还提供FormRequest()方法发送请求并使用表单提交数据如POST请求,常用的参数有url,callback,method,formdata,meta,dont_filter等,其中formdata为字典类型,表示表单提交的数据,dont)filte为bool类型,如果需要多次提交表单,切url一样,那么必须将其设置为True,以防止被当成重复请求被过滤
4)修改settings脚本
settings脚本提供键值映射的全局命名空间,可以使用代码提取其中的配置值,默认的settings文件中共有25项设置
可添加俩个
一个是只显示错误的日志信息
#显示指定类型的日志信息
LOG_LEVEL = 'ERROR'
这个是爬取的数据对于中文不乱码
FEED_EXPORT_ENCODING='utf-8'
settings:
# Scrapy settings for BaiduSpider project
#
# For simplicity, this file contains only settings considered important or
# commonly used. You can find more settings consulting the documentation:
#
#     https://docs.scrapy.org/en/latest/topics/settings.html
#     https://docs.scrapy.org/en/latest/topics/downloader-middleware.html
#     https://docs.scrapy.org/en/latest/topics/spider-middleware.html

BOT_NAME = 'BaiduSpider'

SPIDER_MODULES = ['BaiduSpider.spiders']
NEWSPIDER_MODULE = 'BaiduSpider.spiders'


# Crawl responsibly by identifying yourself (and your website) on the user-agent
#USER_AGENT = 'Mozilla/5.0 (Windows NT 10.0; Win64; x64) AppleWebKit/537.36 (KHTML, like Gecko) Chrome/83.0.4103.97 Safari/537.36'								#设置USER_AGENT

# Obey robots.txt rules
ROBOTSTXT_OBEY = False					#设置不遵守robots协议

# Configure maximum concurrent requests performed by Scrapy (default: 16)
#CONCURRENT_REQUESTS = 32

# Configure a delay for requests for the same website (default: 0)
# See https://docs.scrapy.org/en/latest/topics/settings.html#download-delay
# See also autothrottle settings and docs
#DOWNLOAD_DELAY = 3
# The download delay setting will honor only one of:
#CONCURRENT_REQUESTS_PER_DOMAIN = 16
#CONCURRENT_REQUESTS_PER_IP = 16

# Disable cookies (enabled by default)
#COOKIES_ENABLED = False

# Disable Telnet Console (enabled by default)
#TELNETCONSOLE_ENABLED = False

# Override the default request headers:
#DEFAULT_REQUEST_HEADERS = {
#   'Accept': 'text/html,application/xhtml+xml,application/xml;q=0.9,*/*;q=0.8',
#   'Accept-Language': 'en',
#}

# Enable or disable spider middlewares
# See https://docs.scrapy.org/en/latest/topics/spider-middleware.html
#SPIDER_MIDDLEWARES = {
#    'BaiduSpider.middlewares.BaiduspiderSpiderMiddleware': 543,
#}

# Enable or disable downloader middlewares
# See https://docs.scrapy.org/en/latest/topics/downloader-middleware.html
DOWNLOADER_MIDDLEWARES = {
    #启动RandomUserAgentMiddleware,并设置调用顺序
    'BaiduSpider.middlewares.RandomUserAgentMiddleware': 350,
}


# Enable or disable extensions
# See https://docs.scrapy.org/en/latest/topics/extensions.html
#EXTENSIONS = {
#    'scrapy.extensions.telnet.TelnetConsole': None,
#}

# Configure item pipelines
# See https://docs.scrapy.org/en/latest/topics/item-pipeline.html
ITEM_PIPELINES = {
    #启动TextPipeline,设置调用顺序
    'BaiduSpider.pipelines.TextPipeline': 300,
    #启动MongoPipeline,设置调用顺序
    'BaiduSpider.pipelines.MongoPipeline': 400,
}
MONGO_URI = 'localhost'				#设置数据库的连接地址
MONGO_DB = 'baidu'						#设置数据库名


# Enable and configure the AutoThrottle extension (disabled by default)
# See https://docs.scrapy.org/en/latest/topics/autothrottle.html
#AUTOTHROTTLE_ENABLED = True
# The initial download delay
#AUTOTHROTTLE_START_DELAY = 5
# The maximum download delay to be set in case of high latencies
#AUTOTHROTTLE_MAX_DELAY = 60
# The average number of requests Scrapy should be sending in parallel to
# each remote server
#AUTOTHROTTLE_TARGET_CONCURRENCY = 1.0
# Enable showing throttling stats for every response received:
#AUTOTHROTTLE_DEBUG = False

# Enable and configure HTTP caching (disabled by default)
# See https://docs.scrapy.org/en/latest/topics/downloader-middleware.html#httpcache-middleware-settings
#HTTPCACHE_ENABLED = True
#HTTPCACHE_EXPIRATION_SECS = 0
#HTTPCACHE_DIR = 'httpcache'
#HTTPCACHE_IGNORE_HTTP_CODES = []
#HTTPCACHE_STORAGE = 'scrapy.extensions.httpcache.FilesystemCacheStorage'

FEED_EXPORT_ENCODING = 'utf-8'
5)运行爬虫程序
以上BaiduSpider项目已经基本完成可以运行
语法 :scrapy crawl 项目名称
注意在 BadiduSpider目录下
也可以通过命令将爬取到的内容保存到文件中,例如输入 “scrapy crawl news -o news.json”即可将Item的内容保存到json文件中

提示:
使用-o输出json文件时,会默认使用unicode编码,当内容为中文时,输出的json文件不便于查看,此时。可以在settings。py文件中修改默认的编码方式,即增加设置FEED_EXPORT_ENCODING='utf-8'
6) 修改pipelines脚本
如果想进行更复杂的处理,如筛选一些有用的数据或者将数据保存到数据库中,可以在pipelines脚本中通过定义Item Pipeline来实现
定义Item Pipeline只需要定义一个类并实现process_item()方法即可,process_item方法有两个参数:一个是item参数,Spider生成的Item每次都会作为参数传递过来;另外一个是spider参数,他说Spider的实例(如果创建多个Spider可以通过spider.name来区分)。该方法必须返回包含数据的字典或者Item对象或者抛出DropItem异常并且删除该Item
例如在该项目中,定义一个类,实现将index为3的Item删除
并且顶一个MOngoPipeline类,实现将处理后的item存储至MongoDB数据库中
pipelines.py:
# Define your item pipelines here
#
# Don't forget to add your pipeline to the ITEM_PIPELINES setting
# See: https://docs.scrapy.org/en/latest/topics/item-pipeline.html


# useful for handling different item types with a single interface
from itemadapter import ItemAdapter


class BaiduspiderPipeline:
    def process_item(self, item, spider):
        return item

#导入DropItem模块
from scrapy.exceptions import DropItem
class TextPipeline:						#定义TextPipeline类
#定义process_item方法
    def process_item(self, item, spider):
        if item['index']=='3':			#如果item中“index”为“3”
            raise DropItem()				#删除item
        else:								#如果item中“index”不为“3”
            return item					#返回item

import csv
class CsvPipeline:
        def __init__(self):
            # csv文件的位置,无需事先创建
            store_file = 'news.csv'
            # 打开(创建)文件
            self.file = open(store_file, 'w', newline='')
            # csv写法
            self.writer = csv.writer(self.file)#, dialect="excel"
        def process_item(self, item, spider):
            # 判断字段值不为空再写入文件
            if item['title']:
                #写入csv文件
                self.writer.writerow([item['index'], item['title'], item['link']])
            return item

        def close_spider(self, spider):
            # 关闭爬虫时顺便将文件保存退出
            self.file.close()


import pymongo							#导入pymongo模块
class MongoPipeline:					#定义MongoPipeline类
    #定义__init__方法
    def __init__(self, mongo_uri, mongo_db):
         self.mongo_uri = mongo_uri	#初始化类中的mongo_uri
         self.mongo_db = mongo_db		#初始化类中的mongo_db
    @classmethod							#使用classmethod标识
    def from_crawler(cls, crawler):	#定义from_crawler方法
        #获取settings.py文件中的数据库的连接地址和数据库名
        return cls(
            mongo_uri = crawler.settings.get('MONGO_URI'),
            mongo_db = crawler.settings.get('MONGO_DB')
        )
    def open_spider(self, spider):	#定义open_spider方法
        #连接MongoDB数据库
        self.client = pymongo.MongoClient(self.mongo_uri)
        #创建数据库
        self.db = self.client[self.mongo_db]
    def close_spider(self, spider):	#定义close_spider方法
        self.client.close()				#关闭数据库连接
    #定义process_item方法
    def process_item(self, item, spider):
        data = {
            'index': item['index'],
            'title': item['title'],
            'link': item['link'],
            'newsNum': item['newsNum'],
        }									#初始化data
        table = self.db['news']		#新建集合
        table.insert_one(data)			#向数据库中插入数据
        return item						#返回item
定义了TextPipeline和MongoPipeline类后,还需要再settings文件的ITEM_PIPELINES中启动这两个Pipeline并设置掉调用顺序,调用数据库的连接地址解二数据库名,修改后的代码:
其中ITEM_PIPELINES的键值是一个数字,表示调用优先级,数字越小优先级越高
在BaiduSpider目录下,输入scrapy crawl news命令并运行,即可将内容保存至数据库中
7)定制MIiddleware
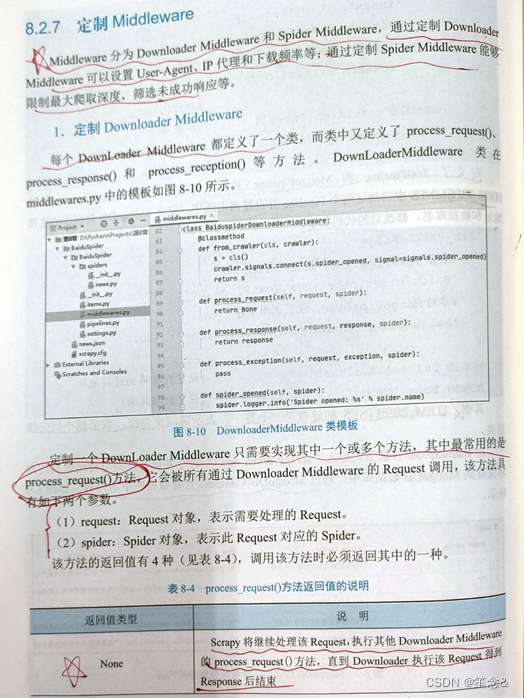

在该项目中,定制一个Downloader Middleware实现随即设置请求头的User-Agent,即在middlewares.py中定义RandomUserAgentMiddleware类:
middleware:
# Define here the models for your spider middleware
#
# See documentation in:
# https://docs.scrapy.org/en/latest/topics/spider-middleware.html

from scrapy import signals

# useful for handling different item types with a single interface
from itemadapter import is_item, ItemAdapter


'''class BaiduspiderSpiderMiddleware:
    # Not all methods need to be defined. If a method is not defined,
    # scrapy acts as if the spider middleware does not modify the
    # passed objects.

    @classmethod
    def from_crawler(cls, crawler):
        # This method is used by Scrapy to create your spiders.
        s = cls()
        crawler.signals.connect(s.spider_opened, signal=signals.spider_opened)
        return s

    def process_spider_input(self, response, spider):
        # Called for each response that goes through the spider
        # middleware and into the spider.

        # Should return None or raise an exception.
        return None

    def process_spider_output(self, response, result, spider):
        # Called with the results returned from the Spider, after
        # it has processed the response.

        # Must return an iterable of Request, or item objects.
        for i in result:
            yield i

    def process_spider_exception(self, response, exception, spider):
        # Called when a spider or process_spider_input() method
        # (from other spider middleware) raises an exception.

        # Should return either None or an iterable of Request or item objects.
        pass

    def process_start_requests(self, start_requests, spider):
        # Called with the start requests of the spider, and works
        # similarly to the process_spider_output() method, except
        # that it doesn’t have a response associated.

        # Must return only requests (not items).
        for r in start_requests:
            yield r

    def spider_opened(self, spider):
        spider.logger.info('Spider opened: %s' % spider.name)'''

class BaiduspiderSpiderMiddleware:
    @classmethod
    def from_crawler(cls, crawler):
        s = cls()
        crawler.signals.connect(s.spider_opened, signal=signals.spider_opened)
        return s

    def process_spider_input(self, response, spider):
        return None

    def process_spider_output(self, response, result, spider):
        for i in result:
            yield i

    def process_spider_exception(self, response, exception, spider):
        pass

    def process_start_requests(self, start_requests, spider):
        for r in start_requests:
            yield r

    def spider_opened(self, spider):
        spider.logger.info('Spider opened: %s' % spider.name)

class BaiduspiderDownloaderMiddleware:
    @classmethod
    def from_crawler(cls, crawler):
        s = cls()
        crawler.signals.connect(s.spider_opened, signal=signals.spider_opened)
        return s

    def process_request(self, request, spider):
        return None

    def process_response(self, request, response, spider):
        return response

    def process_exception(self, request, exception, spider):
        pass

    def spider_opened(self, spider):
        spider.logger.info('Spider opened: %s' % spider.name)

import random									#设置random模块
#定义RandomUserAgentMiddleware类
class RandomUserAgentMiddleware:
    def __init__(self):							#定义__init__方法
        self.user_agent_list = [
            'Mozilla/5.0 (Windows NT 10.0; Win64; x64) AppleWebKit/537.36 (KHTML, like Gecko) Chrome/70.0.3538.102 Safari/537.36 Edge/18.18363',
            'Mozilla/5.0 (Windows NT 10.0; Win64; x64) AppleWebKit/537.36 (KHTML, like Gecko) Chrome/83.0.4103.97 Safari/537.36',
            'Mozilla/5.0 (Windows; U; MSIE 9.0; Windows NT 9.0; en-US)',
            'Mozilla/5.0 (compatible; MSIE 9.0; Windows NT 6.1; Win64; x64; Trident/5.0; .NET CLR 3.5.30729; .NET CLR 3.0.30729; .NET CLR 2.0.50727; Media Center PC 6.0)',
            'Mozilla/5.0 (compatible; MSIE 8.0; Windows NT 6.0; Trident/4.0; WOW64; Trident/4.0; SLCC2; .NET CLR 2.0.50727; .NET CLR 3.5.30729; .NET CLR 3.0.30729; .NET CLR 1.0.3705; .NET CLR 1.1.4322)',
            'Mozilla/5.0 (Windows; U; Windows NT 5.1; zh-CN) AppleWebKit/523.15 (KHTML, like Gecko, Safari/419.3) Arora/0.3 (Change: 287 c9dfb30)',
            'Mozilla/5.0 (X11; U; Linux; en-US) AppleWebKit/527+ (KHTML, like Gecko, Safari/419.3) Arora/0.6',
            'Mozilla/5.0 (Windows; U; Windows NT 5.1; en-US; rv:1.8.1.2pre) Gecko/20070215 K-Ninja/2.1.1',
            'Mozilla/5.0 (Windows; U; Windows NT 5.1; zh-CN; rv:1.9) Gecko/20080705 Firefox/3.0 Kapiko/3.0',
            'Mozilla/5.0 (X11; Linux i686; U;) Gecko/20070322 Kazehakase/0.4.5',
            'Mozilla/5.0 (X11; U; Linux i686; en-US; rv:1.9.0.8) Gecko Fedora/1.9.0.8-1.fc10 Kazehakase/0.5.6',
            'Mozilla/5.0 (Windows NT 6.1; WOW64) AppleWebKit/535.11 (KHTML, like Gecko) Chrome/17.0.963.56 Safari/535.11',
            'Mozilla/5.0 (Macintosh; Intel Mac OS X 10_7_3) AppleWebKit/535.20 (KHTML, like Gecko) Chrome/19.0.1036.7 Safari/535.20'
        ]										#定义user_agent_list
    #定义process_request方法
    def process_request(self, request, spider):
        #在user_agent_list随机选择
        useragent = random.choice(self.user_agent_list)
        #设置请求头中的User-Agent
        request.headers.setdefault('User-Agent', useragent)
        return None						#返回None


class RandomProxyMiddleware():
    def __init__(self):
        self.proxy_list = [
            'http://121.232.148.167:9000',
            'http://39.105.28.28:8118',
            'http://113.195.18.133:9999'
        ]

    def process_request(self, request, spider):
        proxy = random.choice(self.proxy_list)
        request.meta.setdefault('proxy', proxy)
        print(request.meta['proxy'])
定制完成后,需要在settings中DOWNLOADER_MIDOLEWARES中启动Downloader Middleware并设置调用顺序,同时取消USER_AGENT设置


默认提供并开启的Spider Middleware
已经足够满足多数需求,一般不需要手动修改
四 项目实战 爬取中国大学Mooc网站课程信息
实战内容:使用scrapy框架爬取中国大学MOOC网站搜素的课程信息(如python)包括课程名称,开设学习,课程类型,参与人数,课程概述,授课目标,预备知识,并将参与人数大于10000的课程存储到MongoDB中
1)scrapy startproject MOOCSpider #创建项目
2)items:
# Define here the models for your scraped items
#
# See documentation in:
# https://docs.scrapy.org/en/latest/topics/items.html

import scrapy


class MoocspiderItem(scrapy.Item):
    # define the fields for your item here like:
    # name = scrapy.Field()
    pass

class CourseItem(scrapy.Item):
    courseName = scrapy.Field()				#定义课程名称
    university = scrapy.Field()				#定义开课学校
    category = scrapy.Field()					#定义课程类型
    enrollCount = scrapy.Field()				#定义参与人数
    overview = scrapy.Field()					#定义课程概述
    objective = scrapy.Field()					#定义授课目标
    preliminaries = scrapy.Field()			#定义预备知识


class SchoolItem(scrapy.Item):
    university = scrapy.Field()  #定义排名
    courseName = scrapy.Field()  #定义标题
    enrollCount = scrapy.Field()
    teacher = scrapy.Field()
3)创建一个spider脚本
cd MOOCSpider
scrapy genspider course www.icourse163.org
scrapy genspider school www.icourse163.org
4)修改course.py。由于启动程序时发送的是POST请求,所以删除默认的start_urls
属性,重写start_requests()方法,其中使用scrapy.FormRequest()方法发送POST请求,表单提交数据,指定回调方法为parse
在parse0方法中提取课程名称、开课学校、课程类型和参与人数,同时获取学校缩写和课程ID,拼接成新的URL(如https://www.icourse163.org/course/HENANNU-1003544138,其中HENANNU为学校缩写,1003544138 为课程ID),并使用scrapy.Request0方法请求新的URL,指定回调方法为parse_ section()以提取课程概述、授课目标和预备知识。由于获取的内容需要请求不同的网页,所以在使用scrapy.Request()方法时需要使用meta参数传递item,并用使用深拷贝。
course.py:
import scrapy #导入scrapy模块
#导入items模块中的CourseItem类
from MOOCSpider.items import CourseItem
import json #导入json模块
from copy import deepcopy #导入deepcopy模块
#定义CourseSpider类
class CourseSpider(scrapy.Spider):
name = 'course' #初始化name
#初始化allowed_domains
allowed_domains = ['www.icourse163.org']
# 由于启动程序时发送的是post请求,所以删除默认的start_urls属性,重写start_requests()方法,其中
# 使用scrapy.FormRequest()方法发送POSt请求,表单提交数据,指定回调方法为parse
# start_urls = ['http://www.icourse163.org/']
# 重写start_requests方法
#重写start_requests方法
def start_requests(self):
#定义url
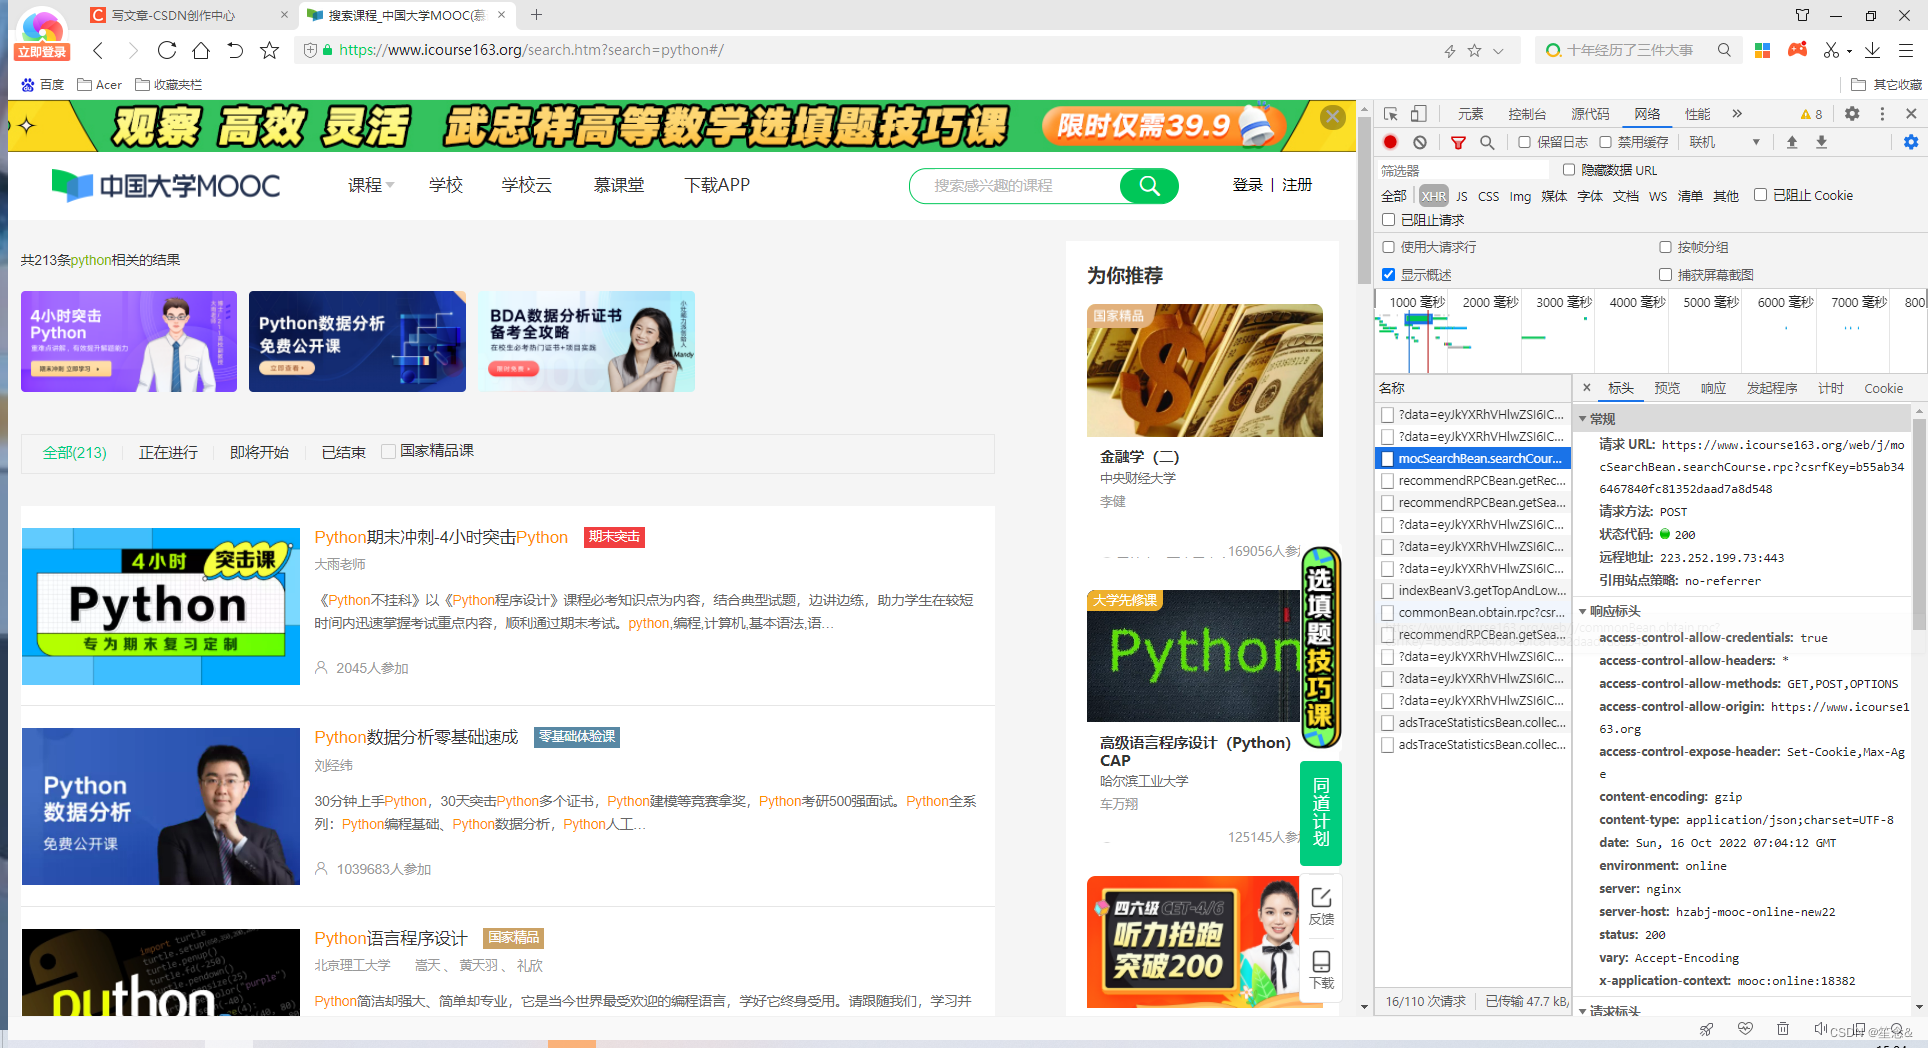
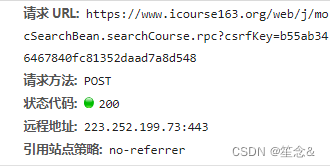
url = 'https://www.icourse163.org/web/j/' \
'mocSearchBean.searchCourse.rpc?csrfKey=' \
'6d38afce3bd84a39b368f9175f995f2b'
for i in range(7): #循环7次
#定义data_str
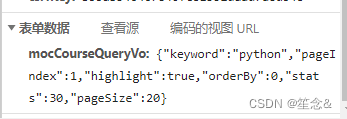
data_dict = {
'keyword': 'python',
'pageIndex': str(i+1),
'highlight': 'true',
'orderBy': 0,
'stats': 30,
'pageSize': 20
}
data_str = json.dumps(data_dict)
data = {
'mocCourseQueryVo': data_str
} #定义data
#发送POST请求,指定回调方法为parse
yield scrapy.FormRequest(
method='POST',
url=url,
formdata=data,
callback=self.parse,
dont_filter=True
)
def parse(self, response): #定义parse方法
data = response.body.decode('utf-8') #响应解码
#获取课程列表
course_list = json.loads(data)['result']['list']
item = CourseItem() #初始化对象item
for course in course_list: #遍历
#获取mocCourseCardDto键值
CourseCard=course['mocCourseCard']['mocCourseCardDto']
#提取课程名称,并写入Item
item['courseName'] = CourseCard['name']
#提取开课学校,并写入Item
item['university']=CourseCard['schoolPanel']['name']
if CourseCard['mocTagDtos']:#如果mocTagDtos键在字典中
#提取课程类型,并写入Item
item['category']=CourseCard['mocTagDtos'][0]['name']
else: #如果mocTagDtos键不在字典中
item['category'] = 'NULL'#课程类型赋值为NULL
#提取参与人数,并写入Item
item['enrollCount']=CourseCard['termPanel']['enrollCount']
#提取学校缩写
shortName = CourseCard['schoolPanel']['shortName']
#提取课程ID
course_id = course['courseId']
#拼接URL
url = 'https://www.icourse163.org/course/' + \
shortName + '-' + str(course_id)
#指定回调方法为parse_section方法
yield scrapy.Request(url,meta={'item':deepcopy(item)},
callback=self.parse_section)
def parse_section(self, response): #定义parse_section方法
item = response.meta['item'] #传递item
#初始化item的“overview”为NULL
item['overview'] = 'NULL'
#初始化item的“objective”为NULL
item['objective'] = 'NULL'
#初始化item的“preliminaries”为NULL
item['preliminaries'] = 'NULL'
#获取节点列表
course_section = response.xpath(
'//div[@id="content-section"]')[0]
for i in range(3, 10, 2): #循环,间隔为2
#定义节点路径,提取节点文本
path_str = 'div[' + str(i) + ']/span[2]/text()'
text = course_section.xpath(path_str).extract()
#定义节点路径
path = 'div[' + str(i + 1) + ']/div//p//text()'
if '课程概述' in text: #如果节点文本包含“课程概述”
#提取课程概述列表
overview = course_section.xpath(path).extract()
overview = ''.join(overview) #连接列表中元素
item['overview'] = overview #写入item
elif '授课目标' in text: #如果节点文本包含“授课目标”
#提取授课目标列表
objective = course_section.xpath(path).extract()
objective = ''.join(objective) #连接列表中元素
item['objective'] = objective #写入item
elif '预备知识' in text: #如果节点文本包含“预备知识”
#提取预备知识列表
preliminaries=course_section.xpath(path).extract()
#连接列表中元素
preliminaries = ''.join(preliminaries)
#写入item
item['preliminaries'] = preliminaries
yield item #返回item
school.py
import scrapy
import re
from MOOCSpider.items import SchoolItem#导入items模块中的NewsItem类
import json
class SchoolSpider(scrapy.Spider):
    name = 'school'
    allowed_domains = ['www.icourse163.org']
    start_urls = ['https://www.icourse163.org/university/PKU#/c']

    '''def parse(self, response):
        university_list = response.xpath('//div[@class="u-usitys f-cb"]/a')
        #for university in university_list:
        university = university_list[0]
        university_url = 'https://www.icourse163.org' + university.xpath('@href').extract_first()
        yield scrapy.Request(university_url, callback=self.parse_schoolID)'''

    def parse(self, response):
        text = re.search('window.schoolId = "(.*?)"', response.text, re.S)
        school_Id = text.group(1)
        url = 'https://www.icourse163.org/web/j/courseBean.getCourseListBySchoolId.rpc?csrfKey=6d38afce3bd84a39b368f9175f995f2b'
        for num in range(6):
            data = {
                'schoolId': school_Id,
                'p': str(num+1),
                'psize': '20',
                'type': '1',
                'courseStatus': '30'
            }
            yield scrapy.FormRequest(
                method='POST',
                url=url,
                formdata=data,
                callback=self.parse_course,
                dont_filter=True
            )

    def parse_course(self, response):
        data = response.body.decode('utf-8')
        course_list = json.loads(data)['result']['list']
        item = SchoolItem()
        for course in course_list:
            item['university'] = course['schoolName']
            item['courseName'] = course['name']
            item['enrollCount'] = course['enrollCount']
            item['teacher'] = course['teacherName']
            yield item
           #print(university, courseName, enrollCount, teacher)
5)修改pipelines.py,定义TextPipeline类,筛选出参数人数大于1000的课程,定义MongoPipeline类,将数据存储到MongoDB数据库中
# Define your item pipelines here
#
# Don't forget to add your pipeline to the ITEM_PIPELINES setting
# See: https://docs.scrapy.org/en/latest/topics/item-pipeline.html
# useful for handling different item types with a single interface
from itemadapter import ItemAdapter
class MoocspiderPipeline:
def process_item(self, item, spider):
return item
from scrapy.exceptions import DropItem #导入DropItem模块
class TextPipeline(): #定义TextPipeline类
def process_item(self, item, spider):#定义process_item方法
#如果item中的“enrollCount”大于于10000
if item['enrollCount'] > 10000:
return item #返回item
else:#如果item中的“enrollCount”小于等于10000
raise DropItem('Missing item')#删除item
import pymongo #导入pymongo模块
class MongoPipeline(): #定义MongoPipeline类
def __init__(self, mongo_uri, mongo_db):#定义__init__方法
self.mongo_uri = mongo_uri #初始化类中的mongo_uri
self.mongo_db = mongo_db #初始化类中的mongo_db
@classmethod #使用classmethod标识
def from_crawler(cls, crawler): #定义from_crawler方法
#获取settings.py文件中数据库的URI和数据库名称
return cls(
mongo_uri = crawler.settings.get('MONGO_URI'),
mongo_db = crawler.settings.get('MONGO_DB')
)
def open_spider(self, spider): #定义open_spider方法
#连接MongoDB数据库
self.client = pymongo.MongoClient(self.mongo_uri)
#创建数据库
self.db = self.client[self.mongo_db]
def close_spider(self, spider): #定义close_spider方法
self.client.close() #关闭数据库连接
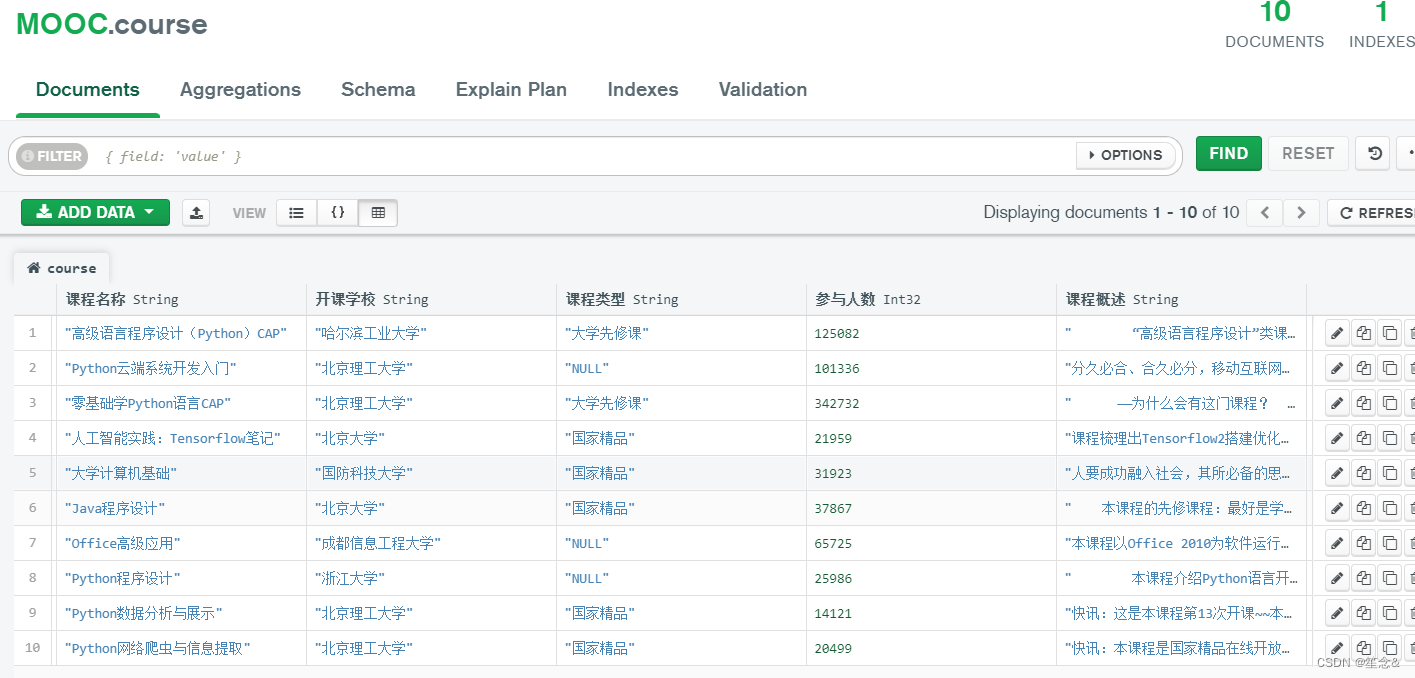
def process_item(self, item, spider):#定义process_item方法
data={
'课程名称': item['courseName'],
'开课学校': item['university'],
'课程类型': item['category'],
'参与人数': item['enrollCount'],
'课程概述': item['overview'],
'授课目标': item['objective'],
'预备知识': item['preliminaries'],
} #初始化data
table = self.db['course'] #新建集合
table.insert_one(data) #向数据库中插入数据
return item #返回item
6)修改middlewares,定义一个类实现随即设置请求头的Useragent
# Define here the models for your spider middleware
#
# See documentation in:
# https://docs.scrapy.org/en/latest/topics/spider-middleware.html

from scrapy import signals

# useful for handling different item types with a single interface
from itemadapter import is_item, ItemAdapter


class MoocspiderSpiderMiddleware:
    # Not all methods need to be defined. If a method is not defined,
    # scrapy acts as if the spider middleware does not modify the
    # passed objects.

    @classmethod
    def from_crawler(cls, crawler):
        # This method is used by Scrapy to create your spiders.
        s = cls()
        crawler.signals.connect(s.spider_opened, signal=signals.spider_opened)
        return s

    def process_spider_input(self, response, spider):
        # Called for each response that goes through the spider
        # middleware and into the spider.

        # Should return None or raise an exception.
        return None

    def process_spider_output(self, response, result, spider):
        # Called with the results returned from the Spider, after
        # it has processed the response.

        # Must return an iterable of Request, or item objects.
        for i in result:
            yield i

    def process_spider_exception(self, response, exception, spider):
        # Called when a spider or process_spider_input() method
        # (from other spider middleware) raises an exception.

        # Should return either None or an iterable of Request or item objects.
        pass

    def process_start_requests(self, start_requests, spider):
        # Called with the start requests of the spider, and works
        # similarly to the process_spider_output() method, except
        # that it doesn’t have a response associated.

        # Must return only requests (not items).
        for r in start_requests:
            yield r

    def spider_opened(self, spider):
        spider.logger.info('Spider opened: %s' % spider.name)


class MoocspiderDownloaderMiddleware:
    # Not all methods need to be defined. If a method is not defined,
    # scrapy acts as if the downloader middleware does not modify the
    # passed objects.

    @classmethod
    def from_crawler(cls, crawler):
        # This method is used by Scrapy to create your spiders.
        s = cls()
        crawler.signals.connect(s.spider_opened, signal=signals.spider_opened)
        return s

    def process_request(self, request, spider):
        # Called for each request that goes through the downloader
        # middleware.

        # Must either:
        # - return None: continue processing this request
        # - or return a Response object
        # - or return a Request object
        # - or raise IgnoreRequest: process_exception() methods of
        #   installed downloader middleware will be called
        return None

    def process_response(self, request, response, spider):
        # Called with the response returned from the downloader.

        # Must either;
        # - return a Response object
        # - return a Request object
        # - or raise IgnoreRequest
        return response

    def process_exception(self, request, exception, spider):
        # Called when a download handler or a process_request()
        # (from other downloader middleware) raises an exception.

        # Must either:
        # - return None: continue processing this exception
        # - return a Response object: stops process_exception() chain
        # - return a Request object: stops process_exception() chain
        pass

    def spider_opened(self, spider):
        spider.logger.info('Spider opened: %s' % spider.name)

import random								#导入random
#定义RandomUserAgentMiddleware类
class RandomUserAgentMiddleware:
    def __init__(self):						#定义__init__方法
        self.user_agent_list = [
            'Mozilla/5.0 (Windows NT 10.0; Win64; x64) AppleWebKit/537.36 (KHTML, like Gecko) Chrome/70.0.3538.102 Safari/537.36 Edge/18.18363',
            'Mozilla/5.0 (Windows NT 10.0; Win64; x64) AppleWebKit/537.36 (KHTML, like Gecko) Chrome/83.0.4103.97 Safari/537.36',
            'Mozilla/5.0 (Windows; U; MSIE 9.0; Windows NT 9.0; en-US)',
            'Mozilla/5.0 (compatible; MSIE 9.0; Windows NT 6.1; Win64; x64; Trident/5.0; .NET CLR 3.5.30729; .NET CLR 3.0.30729; .NET CLR 2.0.50727; Media Center PC 6.0)',
            'Mozilla/5.0 (compatible; MSIE 8.0; Windows NT 6.0; Trident/4.0; WOW64; Trident/4.0; SLCC2; .NET CLR 2.0.50727; .NET CLR 3.5.30729; .NET CLR 3.0.30729; .NET CLR 1.0.3705; .NET CLR 1.1.4322)',
            'Mozilla/5.0 (Windows; U; Windows NT 5.1; zh-CN) AppleWebKit/523.15 (KHTML, like Gecko, Safari/419.3) Arora/0.3 (Change: 287 c9dfb30)',
            'Mozilla/5.0 (X11; U; Linux; en-US) AppleWebKit/527+ (KHTML, like Gecko, Safari/419.3) Arora/0.6',
            'Mozilla/5.0 (Windows; U; Windows NT 5.1; en-US; rv:1.8.1.2pre) Gecko/20070215 K-Ninja/2.1.1',
            'Mozilla/5.0 (Windows; U; Windows NT 5.1; zh-CN; rv:1.9) Gecko/20080705 Firefox/3.0 Kapiko/3.0',
            'Mozilla/5.0 (X11; Linux i686; U;) Gecko/20070322 Kazehakase/0.4.5',
            'Mozilla/5.0 (X11; U; Linux i686; en-US; rv:1.9.0.8) Gecko Fedora/1.9.0.8-1.fc10 Kazehakase/0.5.6',
            'Mozilla/5.0 (Windows NT 6.1; WOW64) AppleWebKit/535.11 (KHTML, like Gecko) Chrome/17.0.963.56 Safari/535.11',
            'Mozilla/5.0 (Macintosh; Intel Mac OS X 10_7_3) AppleWebKit/535.20 (KHTML, like Gecko) Chrome/19.0.1036.7 Safari/535.20'
        ]									#定义user_agent_list
    #定义process_request方法
    def process_request(self, request, spider):
        #在user_agent_list中随机选择
        useragent = random.choice(self.user_agent_list)
        #设置请求头中的User-Agent
        request.headers.setdefault('User-Agent', useragent)
        return None						#返回None
7)修改settings。设置ROBOTSTXT_OBEY,DOWNLOADER_MIDDLEWARES,ITEM_PIPELINES定义连接MongoDB数据需要的地址和数据库名
# Scrapy settings for MOOCSpider project
#
# For simplicity, this file contains only settings considered important or
# commonly used. You can find more settings consulting the documentation:
#
#     https://docs.scrapy.org/en/latest/topics/settings.html
#     https://docs.scrapy.org/en/latest/topics/downloader-middleware.html
#     https://docs.scrapy.org/en/latest/topics/spider-middleware.html

BOT_NAME = 'MOOCSpider'

SPIDER_MODULES = ['MOOCSpider.spiders']
NEWSPIDER_MODULE = 'MOOCSpider.spiders'


# Crawl responsibly by identifying yourself (and your website) on the user-agent
#USER_AGENT = 'Mozilla/5.0 (Windows NT 10.0; Win64; x64) AppleWebKit/537.36 (KHTML, like Gecko) Chrome/83.0.4103.97 Safari/537.36'

# Obey robots.txt rules
ROBOTSTXT_OBEY = False

# Configure maximum concurrent requests performed by Scrapy (default: 16)
#CONCURRENT_REQUESTS = 32

# Configure a delay for requests for the same website (default: 0)
# See https://docs.scrapy.org/en/latest/topics/settings.html#download-delay
# See also autothrottle settings and docs
#DOWNLOAD_DELAY = 3
# The download delay setting will honor only one of:
#CONCURRENT_REQUESTS_PER_DOMAIN = 16
#CONCURRENT_REQUESTS_PER_IP = 16

# Disable cookies (enabled by default)
COOKIES_ENABLED = False

# Disable Telnet Console (enabled by default)
#TELNETCONSOLE_ENABLED = False

# Override the default request headers:
DEFAULT_REQUEST_HEADERS = {
#   'Accept': 'text/html,application/xhtml+xml,application/xml;q=0.9,*/*;q=0.8',
#   'Accept-Language': 'en',
    'cookie': 'EDUWEBDEVICE=ad366d00d2a448df9e8b89e8ddb2abb8; hb_MA-A976-948FFA05E931_source=www.baidu.com; __yadk_uid=BJEprvWuVabEiTPe8yD4cxTxKeAOpusu; NTESSTUDYSI=6d38afce3bd84a39b368f9175f995f2b; Hm_lvt_77dc9a9d49448cf5e629e5bebaa5500b=1601255430,1601272424,1601272688,1601273453; WM_NI=edPVgwr6D7b1I0MgK58PF%2FAm%2FIyhZPldCt5b8sM%2FhscIGdXgkmsyDgzHAmRiUa7FH5TC8pZjD4KIBeRgKqNGbQSw0HaOZchEIuwNDn4YwcBaF2UrBM7WArc6W1IvlSUJZ2M%3D; WM_NIKE=9ca17ae2e6ffcda170e2e6ee89ee69838da495d33de98e8fb3c15b829b8f85f552a69684aaf95caef5fdadd22af0fea7c3b92aa7bca0b7e67db2ea8cd8e13b8bf08388ca3ffc908ad0c467ed97b789d95cb0bc8d95b86afcad83d0eb79a1978985db6da9b3bd9ac76dba988f8ed16397bff9a7cb3f989df891d96288ec85aac16f92b98592cd4da28f9d98b344a3919684eb4f8babb9afc766f887b984c16b86ee9b93c147f5898f93e23e95ef8797ef59979696d3d037e2a3; WM_TID=gSj%2BsvyvzttFRAEVVQI7MbZOMjPj6zKS; Hm_lpvt_77dc9a9d49448cf5e629e5bebaa5500b=1601276871',
}

# Enable or disable spider middlewares
# See https://docs.scrapy.org/en/latest/topics/spider-middleware.html
#SPIDER_MIDDLEWARES = {
#    'MOOCSpider.middlewares.MoocspiderSpiderMiddleware': 543,
#}

# Enable or disable downloader middlewares
# See https://docs.scrapy.org/en/latest/topics/downloader-middleware.html
DOWNLOADER_MIDDLEWARES = {
    'MOOCSpider.middlewares.RandomUserAgentMiddleware': 350,
}

# Enable or disable extensions
# See https://docs.scrapy.org/en/latest/topics/extensions.html
#EXTENSIONS = {
#    'scrapy.extensions.telnet.TelnetConsole': None,
#}

# Configure item pipelines
# See https://docs.scrapy.org/en/latest/topics/item-pipeline.html
ITEM_PIPELINES = {
    'MOOCSpider.pipelines.TextPipeline': 400,
    'MOOCSpider.pipelines.MongoPipeline': 500,
}
MONGO_URI = 'localhost'
MONGO_DB = 'MOOC'

# Enable and configure the AutoThrottle extension (disabled by default)
# See https://docs.scrapy.org/en/latest/topics/autothrottle.html
#AUTOTHROTTLE_ENABLED = True
# The initial download delay
#AUTOTHROTTLE_START_DELAY = 5
# The maximum download delay to be set in case of high latencies
#AUTOTHROTTLE_MAX_DELAY = 60
# The average number of requests Scrapy should be sending in parallel to
# each remote server
#AUTOTHROTTLE_TARGET_CONCURRENCY = 1.0
# Enable showing throttling stats for every response received:
#AUTOTHROTTLE_DEBUG = False

# Enable and configure HTTP caching (disabled by default)
# See https://docs.scrapy.org/en/latest/topics/downloader-middleware.html#httpcache-middleware-settings
#HTTPCACHE_ENABLED = True
#HTTPCACHE_EXPIRATION_SECS = 0
#HTTPCACHE_DIR = 'httpcache'
#HTTPCACHE_IGNORE_HTTP_CODES = []
#HTTPCACHE_STORAGE = 'scrapy.extensions.httpcache.FilesystemCacheStorage'
8)运行spider脚本,查看数据内容
scrapy crawl course
五 小结
(1) Scrapy框架由Engine、Scheduler、Downloader、Spider、 Item Pipeline、DownloaderMiddleware和Spider Middleware构成。
(2)使用Scrapy 框架的一般流程为:首先,创建新项目:其次,修改items 脚本,定义Item中数据的结构;然后,创建spider 脚本,解析响应,提取数据和新的urL:接着,修改sttings.py脚本,设置Scrapy组件和定义全局变量:最后,运行爬虫程序。
六 对数据进行分析的案例
飞桨AI Studio - 人工智能学习与实训社区 (baidu.com)