前断时间公司分享技术时候,我弄了下噪声图的分享,这里再次说明下自己的一些理解和发现,希望大佬们可以多多指点,谢谢哈。文中也是结合了许多大佬的资料 会在最后贴上。本文是基于Unity进行讲解;
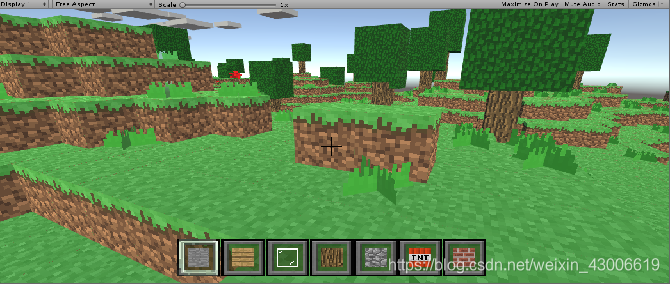
如果还没了解过噪声图的朋友 ,直观点说,噪声图是制作类似《Minecraft》的方法之一。当然还有非常之多的其他领域使用;
 <一> 浅谈噪声图 是什么?

    噪声图主要可理解为如下:
指存在于图像数据中的不必要的或多余的干扰信息。 图像中各种妨碍人们对其信息接受的因素即可称为图像噪声 。噪声在理论上可以定义为“不可预测。基于晶格进行计算的。(某些种类的噪声图不是)
因此将图像噪声看成是多维随机过程是合适的,因而描述噪声的方法完全可
借用随机过程的描述。
应用领域可以说是基本与图形渲染有关的都会有所运用,例如游戏领域、相机
领域、电影特效、图片加密等领域,比较常见的滤镜也会使用它。
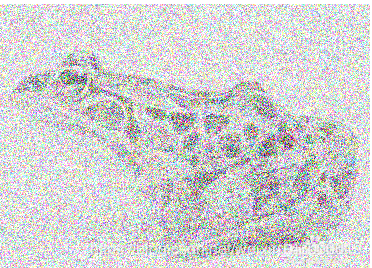
下面就是很直观的了解什么是噪声图,是不是很想以前老式电视剧 信号不好的时候。
噪声图实际上有好几种,基于我的了解与学习后,我归类出4大类,并且可分为多个维度:
2维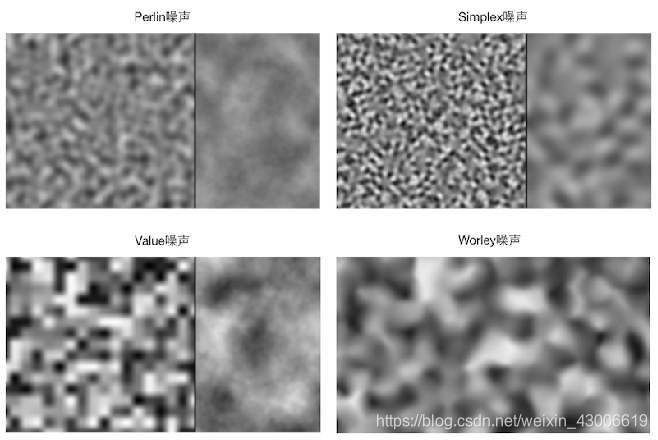
3维 (这里我找不到比较好的图,自己也没时间做三维的展示,这里请大家根据2维脑补3维)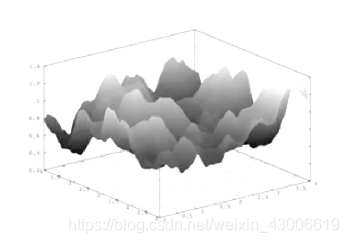
<二> 浅谈噪声图 是什么? 为什么要在游戏领域上使用噪声图?
在游戏领域上,噪声图能实现很多不同的效果,并且不仅限于图形渲染知识,对自然场景快速模拟、特殊的地貌生产等都有很明显的运用。
举个例子:
JS在产生1000个随机数 看似很均匀,但实际自然界的各种场景地形或者自然景观都有自己特点,过于均匀反而缺乏了美感。
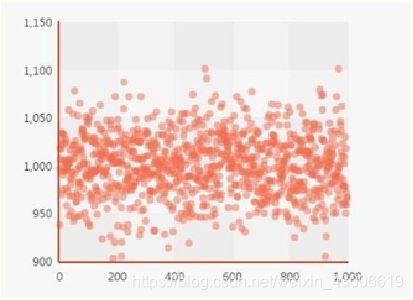
如果把所有点连成线,就会发现,整个图形都非常的平稳在950~1100左右浮动。这样就不太符合自然景物的无规律性; 我们希望是得到下面这张图一样。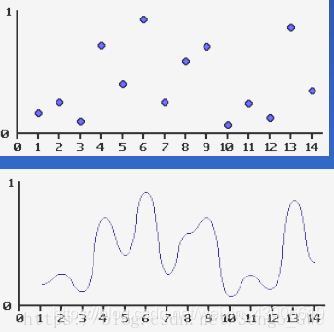
<三>入门级别的2D的噪声图(函数)应用---------柏林噪声 Mathf.PerlinNoise
回到本文开头的说明的,以《Minecraft》的地形制作,引入讲解柏林噪声函数,方便大家理解。
说明: 实际上制作出来的关键,就是用柏林函数制作出一张2D纹理图,然后再将他映射到场景中,即根据这张2D纹理图的每一个纹素的(称为像素其实也不是不可以,但也是不一样的东西哦)进行RGB颜色通道的采样,采样的通道我使用的R,其实也可以用其他的。然后根据这个值得大小、区间,进行划分定义。例如:
x<1 岩石
x <2 泥土
x<3 地面
x< 4 草地
x>8 云
等等
这样说应该大家明白了原理。
讲到这里,抛开《Minecraft》了哦。
或许某些人已经稍微了解了,但还是不懂,为什么Mathf.PerlinNoise 就可以生成出非规律性的数值。下面继续深入说说 柏林噪声函数:
下面是使用噪声函数核心代码
public class PerlinNoiseGenerator : MonoBehaviour
{
    public static int BlockFaces = 0;
    public static Texture2D NoiseHeightMap;
    int textureWidth = 200;
    int textureWHeight = 200;
    float scale1 = 1f;
    float scale2 = 10f;
    float scale3 = 20f;

    float offsetX;
    float offsetY;

    private void Awake()
    {
        offsetX = Random.Range(0, 99999);
        offsetY = Random.Range(0, 99999);

        Minecraft.SpawnNumberBlocks.Heightmap = GenerateHeightMap();
        //Minecraft.SpawnNumberBlocks.Heightmap=GenerateHeightMap()
    }
	//制作噪声图,这里也可以理解为高度图。但注意,两种是不一样的东西,只是在这里的用法和高度图差不多
    Texture2D GenerateHeightMap()
    {
        Texture2D heightMap = new Texture2D(textureWidth, textureWHeight);
        for (int x = 0; x < textureWidth; x++)
        {
            for (int y = 0; y < textureWHeight; y++)
            {
                Color color = CalculateColor(x, y);
                heightMap.SetPixel(x, y, color);
            }
        }
        heightMap.Apply();
        return heightMap;
    }
	//这方法用来计算颜色,返回出来制作噪声图的
    Color CalculateColor(int x, int y)
    {
    	//这一部分是用来 纹素 进行 缩放和偏移(这些都是可以自定义调整的)
        float xCoord1 = (float)x / textureWidth * scale1 + offsetX;
        float yCoord1 = (float)y / textureWHeight * scale1 + offsetY;
        float xCoord2 = (float)x / textureWidth * scale2 + offsetX;
        float yCoord2 = (float)y / textureWHeight * scale2 + offsetY;
        float xCoord3 = (float)x / textureWidth * scale3 + offsetX;
        float yCoord3 = (float)y / textureWHeight * scale3 + offsetY;
		//重点就在这: Mathf.PerlinNoise()这个方法Untiy早就有得,可是一般比较少人用。
		//它就是柏林函数
        float sample1 = Mathf.PerlinNoise(xCoord1, yCoord1) / 15;
        float sample2 = Mathf.PerlinNoise(xCoord2, yCoord2) / 15;
        float sample3 = Mathf.PerlinNoise(xCoord3, yCoord3) / 15;

        return new Color(sample1 + sample2 + sample3, sample1 + sample2 + sample3, sample1 + sample2 + sample3);
    }
}
特点:
1、各种噪声中算法最为简单,容易理解
2、参数必须是浮点数
主要实现方法要点
1、特殊的梯度向量
2、伪随机
3、缓和曲线(ease curves)
在放代码前,本人提供一张绝世好图,基本上整个柏林函数就是可以用这张图解释: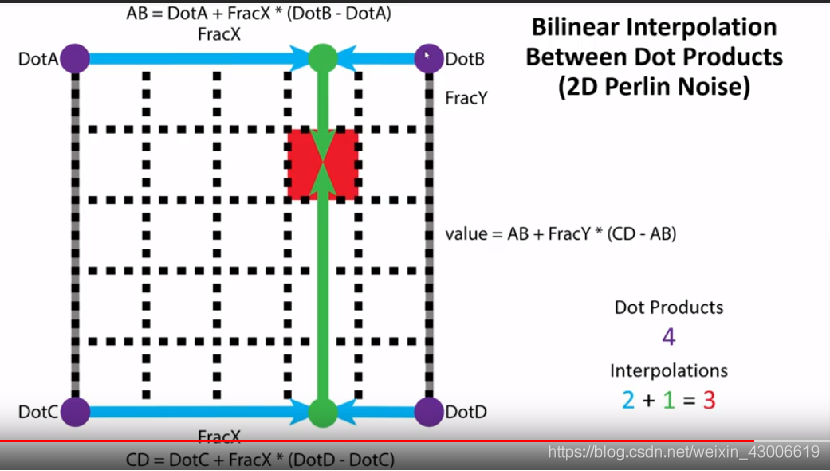
代码:
  public class PreLinNoise : MonoBehaviour
{public int width = 555;
public int height = 555;
public float scale = 100f;
 public int fractalNum = 0;
  public float offsetX = 100f;
public float offsetY = 100f;

private float randomR = 0f;
private float randomG = 0f;
private float randomB = 0f;
private Renderer render;
private void Update()
{


    //offsetY += Time.deltaTime;

    render.material.mainTexture = GenerateTexture();
}

Texture2D GenerateTexture()
{
    Texture2D texture2D = new Texture2D(width, height);

    for (int x = 0; x < width; x++)
    {
        for (int y = 0; y < height; y++)
        {
            Color color = CalculateColor(x, y);
            texture2D.SetPixel(x, y, color);
        }
    }
    texture2D.Apply();
    return texture2D;
}

Color CalculateColor(int x, int y)
{
    float xCoord = (float)x / width * scale + offsetX;
    float yCoord = (float)y / height * scale + offsetY;

    float sample = 0;

    //使用自己写得噪声函数
    for (int i = 0; i <= fractalNum; i++)
    {
        sample += (1 / Mathf.Pow(2, i)) * CustomerPerlinNoise(Mathf.Pow(2, i) * xCoord, Mathf.Pow(2, i) * yCoord);
    }

    //使用Unity自带噪声函数
    //for (int i = 0; i <= fractalNum; i++)
    //{
    //    sample += (1 / Mathf.Pow(2, i)) * Mathf.PerlinNoise(Mathf.Pow(2, i) * xCoord, Mathf.Pow(2, i) * yCoord);
    //}
    float r = sample * 5;
    float g = sample;
    float b = sample;


    return new Color(r, g, b);
}

	//  要点2:  这里我看了非常多大佬写得代码,基本都用这元素看似杂乱的数组,但
	//这个就是 柏林函数最初时候用的。
private static readonly int[] permutation = { 151,160,137,91,90,15,
131,13,201,95,96,53,194,233,7,225,140,36,103,30,69,142,8,99,37,240,21,10,23,
190, 6,148,247,120,234,75,0,26,197,62,94,252,219,203,117,35,11,32,57,177,33,
88,237,149,56,87,174,20,125,136,171,168, 68,175,74,165,71,134,139,48,27,166,
77,146,158,231,83,111,229,122,60,211,133,230,220,105,92,41,55,46,245,40,244,
102,143,54, 65,25,63,161, 1,216,80,73,209,76,132,187,208, 89,18,169,200,196,
135,130,116,188,159,86,164,100,109,198,173,186, 3,64,52,217,226,250,124,123,
5,202,38,147,118,126,255,82,85,212,207,206,59,227,47,16,58,17,182,189,28,42,
223,183,170,213,119,248,152, 2,44,154,163, 70,221,153,101,155,167, 43,172,9,
129,22,39,253, 19,98,108,110,79,113,224,232,178,185, 112,104,218,246,97,228,
251,34,242,193,238,210,144,12,191,179,162,241, 81,51,145,235,249,14,239,107,
49,192,214, 31,181,199,106,157,184, 84,204,176,115,121,50,45,127, 4,150,254,
138,236,205,93,222,114,67,29,24,72,243,141,128,195,78,66,215,61,156,180
};


private static int[] p;
static float[,] gradients;

private void Start()
{
    render = GetComponent<Renderer>();
    p = new int[256];
    Random rdm = new Random();
    int j;
    for (int x = 0; x < 256; x++)
    {
        j = x % 256;
        p[x] = permutation[j];
    }
    gradients = new float[8, 2];
    GenerateGradients();


}


float CustomerPerlinNoise(float x, float y)
{
    int Xi = (int)Mathf.Floor(x);
    int Yi = (int)Mathf.Floor(y);

    float fracX = x - Xi;
    float fracY = y - Yi;

    fracX = fade(fracX);
    fracY = fade(fracY);

    /***哈希算法***/
    int grad11 = p[(Xi + p[Yi & 255]) & 255] & 7;//& 7
    int grad12 = p[(Xi + 1 + p[Yi & 255]) & 255] & 7;
    int grad21 = p[(Xi + p[(Yi + 1) & 255]) & 255] & 7;
    int grad22 = p[(Xi + 1 + p[(Yi + 1) & 255]) & 255] & 7;
    /********************************/

    float noise11 = DotProduct(gradients[grad11, 0], gradients[grad11, 1], fracX, fracY);
    float noise12 = DotProduct(gradients[grad12, 0], gradients[grad12, 1], fracX - 1.0f, fracY);


    float noise21 = DotProduct(gradients[grad21, 0], gradients[grad21, 1], fracX, fracY - 1.0f);
    float noise22 = DotProduct(gradients[grad22, 0], gradients[grad22, 1], fracX - 1.0f, fracY - 1.0f);


    float a = Mathf.Lerp(noise11, noise12, fracX);
    float b = Mathf.Lerp(noise21, noise22, fracX);


    return Mathf.Lerp(a, b, fracY);
}

//:要点1  梯度向量的划分
private void GenerateGradients()
{
    for (int i = 0; i < 8; ++i)
    {
        gradients[i, 0] = (float)Mathf.Cos(0.785398163f * (float)i) * 2f;  // ( 2 * PI / 8) * i
        gradients[i, 1] = (float)Mathf.Sin(0.785398163f * (float)i) * 2f;
    }
}

/// <summary>
/// 这是另一种梯度函数 白噪声
/// </summary>
/// <param name="hash"></param>
/// <param name="x"></param>
/// <param name="y"></param>
/// <param name="z"></param>
/// <returns></returns>
public static float grad(float hash, float x, float y, float z)
{
    int h = (int)hash & 7;
    float u = h < 5 /* 0b1000 */ ? x : y;

    float v;

    if (h < 2 /* 0b0100 */)
        v = y;
    else if (h == 4 /* 0b1100 */ || h == 6 /* 0b1110*/)
        v = x;
    else
        v = z;

    return ((h & 1) == 0 ? u : -u) + ((h & 2) == 0 ? v : -v);
}

//要点3:缓动函数
float fade(float t)
{
    //t * t * (3 - 2 * t);
    return t * t * t * (6 * t * t - 15 * t + 10);
}

float DotProduct(float xi, float yi, float fx, float fy)
{

    return Vector2.Dot(new Vector2(xi, yi), new Vector2(fx, fy));//xi * fx + yi * fy;
}

}
结合代码分析三个要点:
要点1:梯度向量
柏林函数中,梯度向量是一个固定的值,这是柏林在论文中有提及的。
3D 12个:
(1,1,0),(-1,1,0),(1,-1,0),
(-1,-1,0), (1,0,1),(-1,0,1),
(1,0,-1),(-1,0,-1), (0,1,1),
(0,-1,1),(0,1,-1),(0,-1,-1)
2D 8个:
(1,1),(-1,1),
(1,-1),(-1,-1),
(1,0),(-1,0),
(0,-1),(0,1)
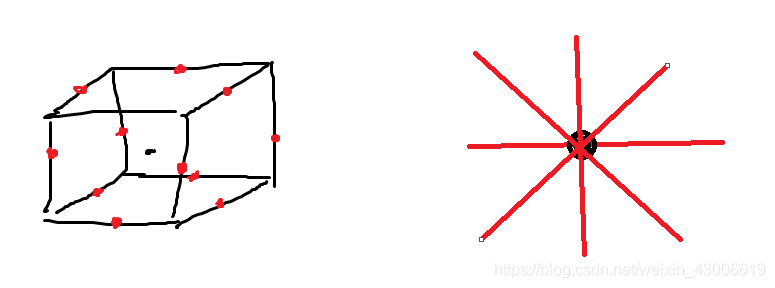
可以看到代码在Start()时候就进行了GenerateGradients(),这里是提前对梯度向量进行初始化,不同文章有不同的对梯度向量的处理,这里我是根据查阅的资料,找到一个便于理解的。在2D制作中,即直接画圆,然后分成8等分。
要点2:伪随机
需要先说明伪随机的概念:
简单理解:就是在给定的区间内,只要确定了某一点位置,那么在这位置上的值是永远不变。比如我们从圆周率π(3.14159…)的小数部分中随机抽取某一位数字,结果看似随机,但如果抽取小数点后1位,结果必定为1;抽取小数点后2位,结果必定为4。
这部分的代码 就是涉及伪随机哦。其中grad11 grad12 grad21 grad22 这些事对应着一个纹素的四个角
至于这里的哈希算法 其实也有很多版本,所以我觉得大家只要看懂他是在取数即可。
提醒下:这里的&是二进制的与哦
 /***哈希算法***/
    int grad11 = p[(Xi + p[Yi & 255]) & 255] & 7;//& 7
    int grad12 = p[(Xi + 1 + p[Yi & 255]) & 255] & 7;
    int grad21 = p[(Xi + p[(Yi + 1) & 255]) & 255] & 7;
    int grad22 = p[(Xi + 1 + p[(Yi + 1) & 255]) & 255] & 7;
    /********************************/

    float noise11 = DotProduct(gradients[grad11, 0], gradients[grad11, 1], fracX, fracY);
    float noise12 = DotProduct(gradients[grad12, 0], gradients[grad12, 1], fracX - 1.0f, fracY);


    float noise21 = DotProduct(gradients[grad21, 0], gradients[grad21, 1], fracX, fracY - 1.0f);
    float noise22 = DotProduct(gradients[grad22, 0], gradients[grad22, 1], fracX - 1.0f, fracY - 1.0f);
要点3:缓动函数 fade
这个函数表达式: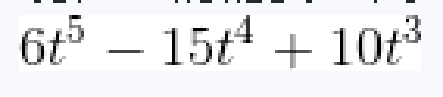
.图像: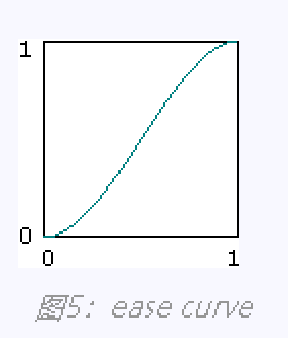
这个也是柏林在论文中提及的,上面贴的表达式是第二版的 t * t * t * (6 * t * t - 15 * t + 10);,据说是比第一版 t * t * (3 - 2 * t); 的好,但我尝试替换过,也没看到有什么特别之处。
 <四> 分型噪声 此处我基于柏林噪声
 表达式:

图形:
把张图合并后:
可以看到我在代码里面也有尝试使用分型,观察变化。
测试后发现 :颜色会越来越浅,图像会越来越分散 。 效果在N等于7之后没有明显变化了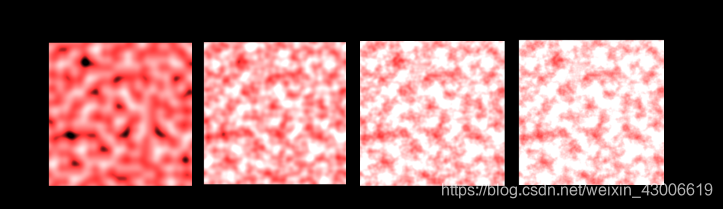
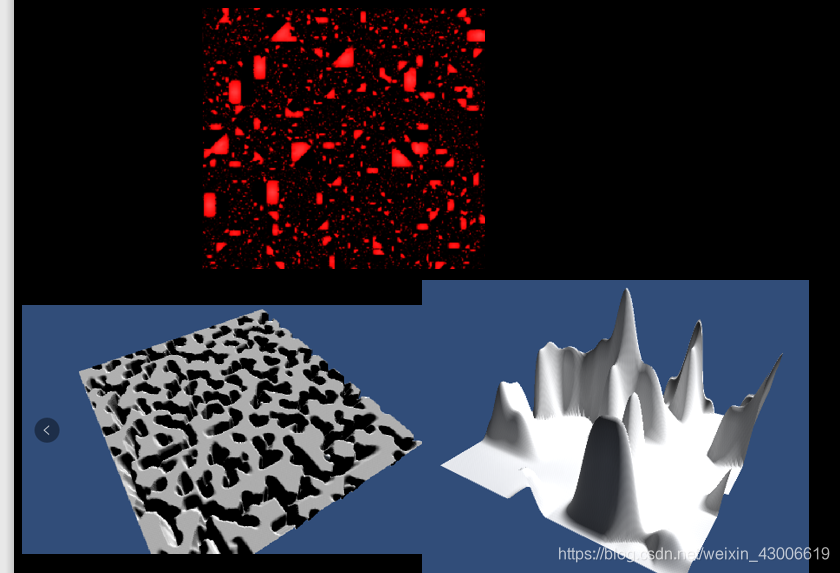
最后放出我自己做的一些小效果:
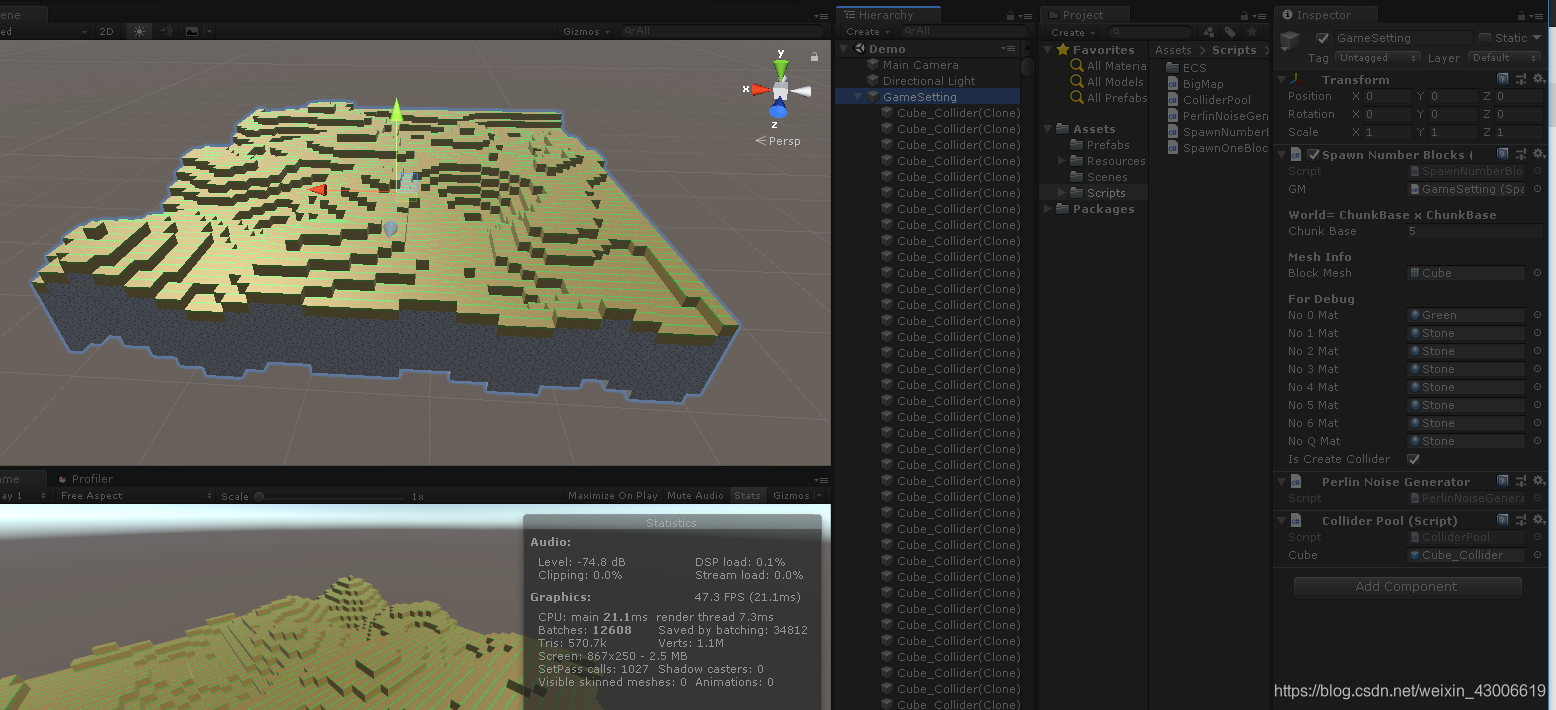
顺带一提,我这里是使用了ECS在生成 17444个Cube 来实现,实际上还可以生成很多,ECS对重复大量生成物体真的很强大。
后面如果有机会会继续学习下一个更加复杂困难的噪声 WorLey Noise(Cell Noise) 简称为细胞噪声
小弟,整理的不周到,请各位大佬多多见谅,希望有兴趣可以结合下其他大佬的说明。
对代码的写发可以看这里,网上很多大佬一一的写出了很多说明。
https://www.cnblogs.com/leoin2012/p/7218033.html
https://blog.csdn.net/candycat1992/article/details/50346469
http://www.twinklingstar.cn/2015/2581/classical-perlin-noise/
等等…太多了
柏林函数创始人的论文原文:
https://mrl.nyu.edu/~perlin/paper445.pdf