- 遇到的问题
1. 子元素相对父元素靠右或者靠左对齐的实现
父元素要设置为相对位置,子元素设置为绝对位置,然后就可以设置left、right等参数

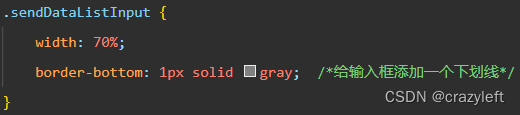
2. 给输入框添加下划线
直接在输入框样式里面添加个下边框
3. 在样式里面设置按键宽度不生效问题
如果直接在xwss里面设置按键按键宽度,是没有效果的,只能直接设置style属性

4. 多行文本输入框设置了disable后,如果数据过长,依然又可以输入了
这个应该是微信小程序的一个bug,仿真不会出现,真机上运行就有,暂时不知道怎么解决
5. 文本框换行
在文本样式里面添加: word-break: break-all;
6. 按键圆角、view圆角
在样式文件中添加:border-radius: 20rpx;
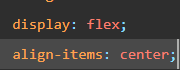
7. 按键中的文本居中
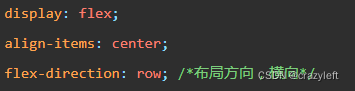
8. 布局方向
- 重要的几个UI布局
1. 发送区
发送区由顶部的功能按键区、中间的数据输入区、底部的功能按键区组成
1)顶部的功能按键区
        <!--发送区title部分-->
        <view class="sendTitleView">
            <text>发送区:</text>
            <checkbox bindtap="sendCheckBoxClick" value="0" checked="true"/>16进制发送
            <button class="sendSelectSerIdButton" style="width: 30%;" bindtap="sendSelectSerIdButtonClick">选择服务ID</button>
        </view>
这里采用了一个checkbox复选框控件,并且绑定了一个点击事件,用于记录是否为16进制发送
2)中间的数据输入区
中间输入区需要用到滚动控件、listview、文本输入框。这里为了简单,输入条数固定为10条。不可添加和减少。
        <!--数据区-->
        <scroll-view scroll-y="true" class="sendDataScrollView">
            <block class="" wx:for="{{sendDataList}}" wx:key="{{index}}">
            <!-- id="{{item.dev_mac}}"是给按下了那个item记录 bindtap应该是指定点击事件的-->
            <view class="sendDataListView">
                <checkbox id="{{index}}" bindtap="sendDataListCheckBoxClick" checked="{{item.checkBoxChecked}}"/>
                <input id="{{index}}" class="sendDataListInput" bindinput="sendDataListInputEvent" value="{{item.inputText}}"/>
                <button id="{{index}}" class="sendDataListButton" style="width: 20%;" bindtap="sendDataListButtonClick">发送</button>
            </view>
            </block>
        </scroll-view>
3)底部功能按键区
一个复选框,一个文本输入框
        <!--发送区底部bottom部分-->
        <view class="sendBottomView">
            <checkbox bindtap="cycleSendCheckBoxClick" checked="true"/>循环发送(ms):
            <input class="cycleSendInput" bindinput="cycleSendInputEvent" value="30"/>
            <!-- <button class="addSendInputItemButton" style="width: 20%;">添加</button> -->
</view>- 接收区
接收区和发送区类似,只是多了一个多行文本输入框用于显示接收到的数据。那个清空和读取按钮怎么弄,两个按钮就左右均匀分布,晕!还有就是如果按键不设置padding,里面的文字两边其实有很多空白,但是就是显示不下。
    <!--接收区-->
    <view class="recieveView">
        <!--接收区title部分-->
        <view class="recieveTitleView">
            <text>发送区:</text>
            <checkbox class="" bindtap="" value="0" checked="true">16进制接收</checkbox>
            <view class="recieveTitleButtonView" style="width: 30%;">
                <button class="recieveClearButton" style="width: 40%;">清空</button>
                <button class="recieveReadButton" style="width: 40%;">读取</button>
            </view>
            <button class="sendSelectSerIdButton" style="width: 25%;" bindtap="sendSelectSerIdButtonClick">选择服务ID</button>
        </view>
        <textarea class="recieveTextarea" maxlength="-1" value="{{recieveText}}">
        </textarea>
    </view>
到此UI布局就基本上完成了,差不过花了一个下午的时间,里面很多控件我连名字都不知道,也是根据功能然后百度,后面就是添加各种事件了
效果:
