- 为什么用OKHttp?
1. 支持HTTP2 / SPDY
2. Socket 支持最优路线,支持自动重连
3. 自动维护 Connection
4. 连接池,维护Socket,减少握手
5. 自动线程池管理请求
6. 自定义Interceptors责任链机制,可以定制性高
7. 响应缓存完全避免网络重复请求
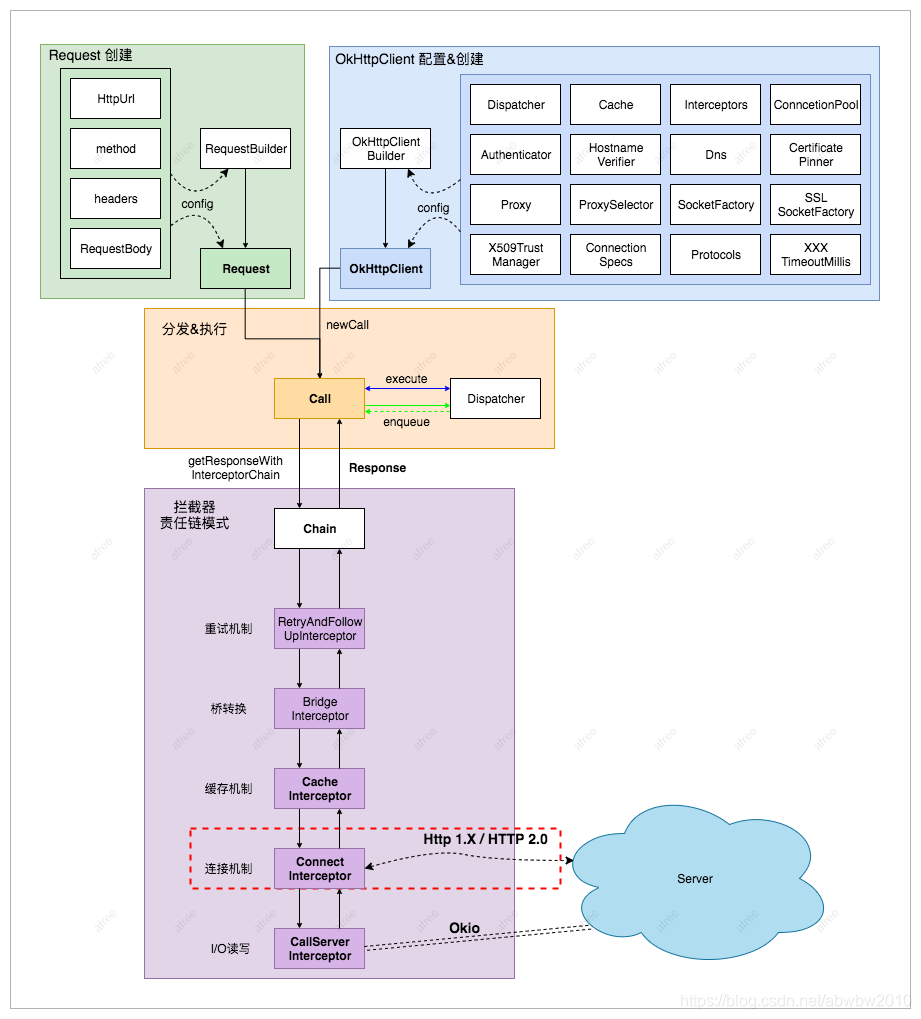
一、主要构件
- OkhttpClient 请求总引擎代理
- Request 请求体信息,通过Request.Builder构造,请求头、请求体信息
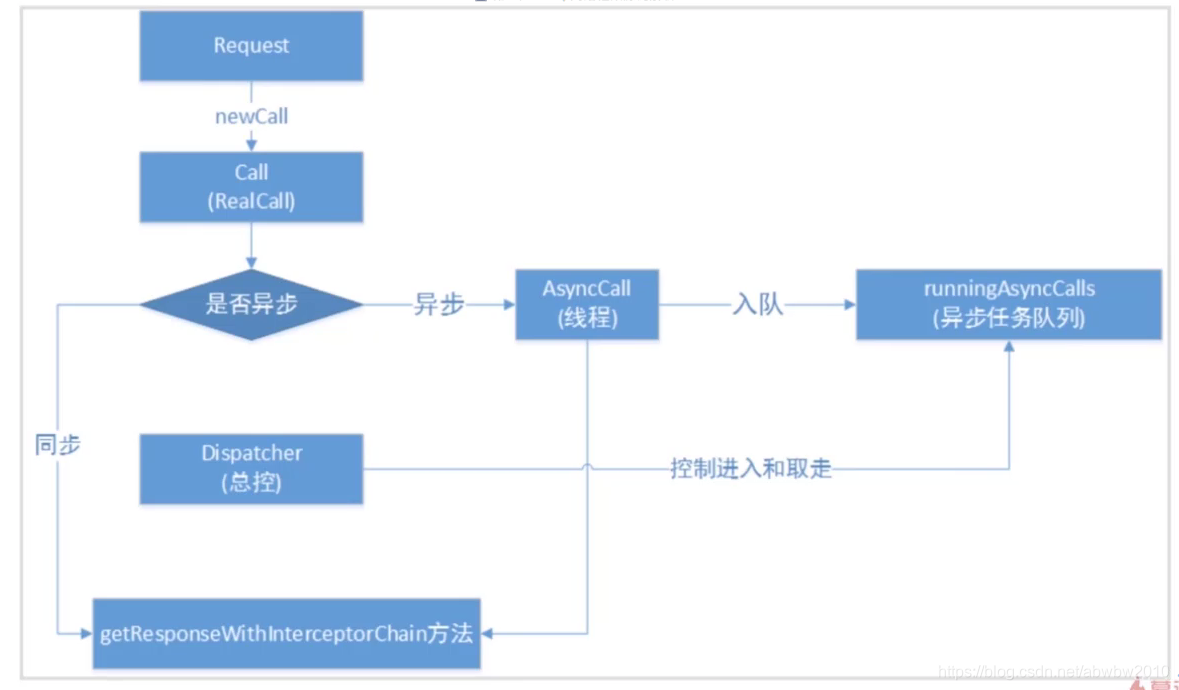
- Call 请求连接代理,通过Call可以决定是同步还异步请求处理
- Dispatcher 接收同步/异步请求要求,根据要求对请求进行同步/异步分发
- Interceptor
二、基本使用
依赖引入
implementation 'com.squareup.okhttp3:okhttp:4.4.0'
// 单元测试依赖
testImplementation 'com.squareup.okhttp3:mockwebserver:4.4.0'
请求流程
同步请求
- 创建OkHttpClient和Request(Request.Builder)对象
- 将Request封装Call对象
- 调用Call.execute()发起同步请求
OkHttpClient client = new OkHttpClient.Builder().readTimeout(5, TimeUnit.SECONDS).build();
Request request = new Request.Builder().url("http://www.baidu.com").get().build();
Call call = client.newCall(request);
try {
    Response response = call.execute(); // 发送同步请求后将进入阻塞状态
    System.out.println(response.body().string())
} catch(IOException e) {
    e.printStackTrace()
}
异步请求
- 创建OkHttpClient和Request(Request.Builder)对象
- 将Request封装Call对象
- 调用Call.enqueue()发起同步请求
OkHttpClient client = new OkHttpClient.Builder().readTimeout(5, TimeUnit.SECONDS).build();
Request request = new Request.Builder().url("http://www.baidu.com").get().build();
Call call = client.newCall(request);
call.enqueue(new Callback(){
  @Override
  public void onFailure(Call call, IOException e) {
      // 处理异常,注意该处理都是在子线程里面处理的
  }

  @Override
  public void onResponse(Call call, Response response) throw IOException{
      // 处理 成功 Response,该处理是在子线程里面处理
  }
})
try {
    Response response = call.execute(); // 发送同步请求后将进入阻塞状态
    System.out.println(response.body().string())
} catch(IOException e) {
    e.printStackTrace()
}
Builder 配置
Builder 提供了大量的配置内容,可以根据自己的需求进行对应的配置生成 Client
 public static final class Builder {
        Dispatcher dispatcher; //调度器
        /**
         * 代理类,默认有三种代理模式DIRECT(直连),HTTP(http代理),SOCKS(socks代理)
         */
        @Nullable Proxy proxy;
        /**
         * 协议集合,协议类,用来表示使用的协议版本,比如`http/1.0,`http/1.1,`spdy/3.1,`h2等
         */
        List<Protocol> protocols;
        /**
         * 连接规范,用于配置Socket连接层。对于HTTPS,还能配置安全传输层协议(TLS)版本和密码套件
         */
        List<ConnectionSpec> connectionSpecs;
        //拦截器,可以监听、重写和重试请求等
        // interceptors 针对所有连接情况,包括websocket
        final List<Interceptor> interceptors = new ArrayList<>();
        // 针对非websocket的连接
        final List<Interceptor> networkInterceptors = new ArrayList<>();
        EventListener.Factory eventListenerFactory;
        /**
         * 代理选择类,默认不使用代理,即使用直连方式,当然,我们可以自定义配置,
         * 以指定URI使用某种代理,类似代理软件的PAC功能
         */
        ProxySelector proxySelector;
        //Cookie的保存获取
        CookieJar cookieJar;
        /**
         * 缓存类,内部使用了DiskLruCache来进行管理缓存,匹配缓存的机制不仅仅是根据url,
         * 而且会根据请求方法和请求头来验证是否可以响应缓存。此外,仅支持GET请求的缓存
         */
        @Nullable Cache cache;
        //内置缓存
        @Nullable InternalCache internalCache;
        //Socket的抽象创建工厂,通过createSocket来创建Socket
        SocketFactory socketFactory;
        /**
         * 安全套接层工厂,HTTPS相关,用于创建SSLSocket。一般配置HTTPS证书信任问题都需要从这里着手。
         * 对于不受信任的证书一般会提示
         * javax.net.ssl.SSLHandshakeException异常。
         */
        @Nullable SSLSocketFactory sslSocketFactory;
        /**
         * 证书链清洁器,HTTPS相关,用于从[Java]的TLS API构建的原始数组中统计有效的证书链,
         * 然后清除跟TLS握手不相关的证书,提取可信任的证书以便可以受益于证书锁机制。
         */
        @Nullable CertificateChainCleaner certificateChainCleaner;
        /**
         * 主机名验证器,与HTTPS中的SSL相关,当握手时如果URL的主机名
         * 不是可识别的主机,就会要求进行主机名验证
         */
        HostnameVerifier hostnameVerifier;
        /**
         * 证书锁,HTTPS相关,用于约束哪些证书可以被信任,可以防止一些已知或未知
         * 的中间证书机构带来的攻击行为。如果所有证书都不被信任将抛出SSLPeerUnverifiedException异常。
         */
        CertificatePinner certificatePinner;
        /**
         * 身份认证器,当连接提示未授权时,可以通过重新设置请求头来响应一个
         * 新的Request。状态码401表示远程服务器请求授权,407表示代理服务器请求授权。
         * 该认证器在需要时会被RetryAndFollowUpInterceptor触发。
         */
        Authenticator proxyAuthenticator;
        Authenticator authenticator;
        /**
         * 连接池
         *
         * 我们通常将一个客户端和服务端和连接抽象为一个 connection,
         * 而每一个 connection 都会被存放在 connectionPool 中,由它进行统一的管理,
         * 例如有一个相同的 http 请求产生时,connection 就可以得到复用
         */
        ConnectionPool connectionPool;
        //域名解析系统
        Dns dns;
        //是否遵循SSL重定向
        boolean followSslRedirects;
        //是否重定向
        boolean followRedirects;
        //失败是否重新连接 hhhhhh6****** 3tn
        boolean retryOnConnectionFailure;
        //回调超时
        int callTimeout;
        //连接超时
        int connectTimeout;
        //读取超时
        int readTimeout;
        //写入超时
        int writeTimeout;
        //与WebSocket有关,为了保持长连接,我们必须间隔一段时间发送一个ping指令进行保;
        int pingInterval;
        ...
}
三、请求流程分析
大体全貌图
同步请求
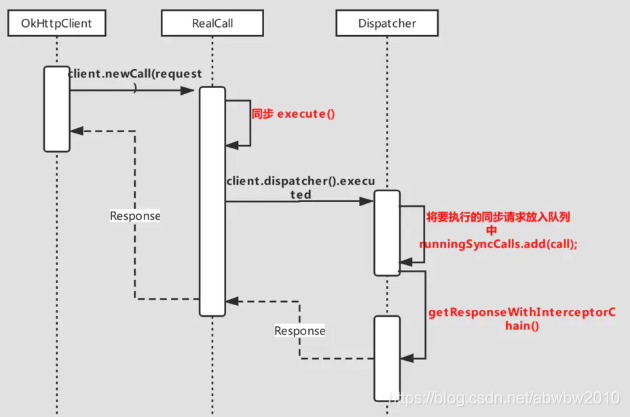
RealCalll.execute()
这方法主要处理:
- 校验任务是否被执行过
- 将任务加入同步队列
- 触发拦截器处理Request队列内容
 override fun execute(): Response {
    // 如果Call已经被执行过,则不允许被重复执行
    synchronized(this) {
      check(!executed) { "Already Executed" }
      executed = true
    }
    timeout.enter()
    callStart()
    try {
      // Dispatcher 只是将该同步任务加入 runnigSyncCalls 队列中
      client.dispatcher.executed(this)
      // 拦截器
      return getResponseWithInterceptorChain()
    } finally {
      client.dispatcher.finished(this)
    }
  }
Dispatcher.executed(call:RealCall)
在Dispatcher 维护着多种队列runningAsyncCalls、runningSyncCalls、‘readyAsyncCalls,这里触发的同步任务,是将任务添加到 runningSyncCalls 中
...
// ArrayDeque 是Deque的实现类,同样是使用一个数组维护,是线程不安全的集合对象,效率高于栈和LinkeList,可以作为双端队列也可以作为栈
private val runningSyncCalls = ArrayDeque<RealCall>()
...
@Synchronized internal fun executed(call: RealCall) {
    runningSyncCalls.add(call)
  }
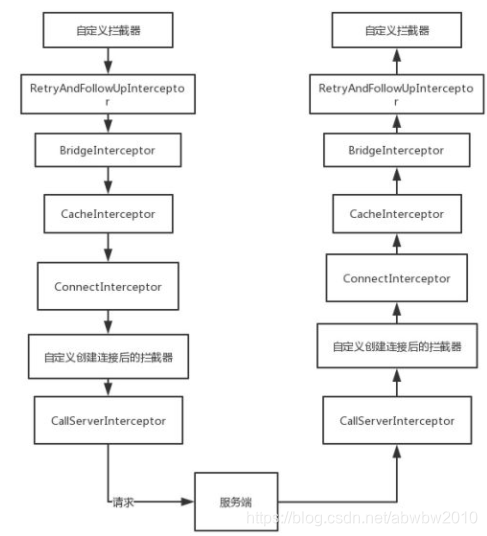
getResponseWithInterceptorChain 触发拦截器处理
在Okhttp所有请求中最终都将进入对拦截器的处理
 @Throws(IOException::class)
  internal fun getResponseWithInterceptorChain(): Response {
    // Build a full stack of interceptors.
    val interceptors = mutableListOf<Interceptor>()

    // 添加所有应用拦截器
    interceptors += client.interceptors

    // 重试拦截器
    interceptors += RetryAndFollowUpInterceptor(client)
    interceptors += BridgeInterceptor(client.cookieJar)

    // 缓存专用拦截器
    interceptors += CacheInterceptor(client.cache)
    interceptors += ConnectInterceptor

    if (!forWebSocket) {
      // 如果不是websocket 则添加Network拦截器
      interceptors += client.networkInterceptors
    }
    // 最后一个才是真正调用服务器请求入口,因此需要保证是最后一个
    interceptors += CallServerInterceptor(forWebSocket)

    // 开始组建责任链,建立包装类,index指向拦截器队列的头部
    val chain = RealInterceptorChain(interceptors, this, null, 0, originalRequest,
        client.connectTimeoutMillis,
        client.readTimeoutMillis, client.writeTimeoutMillis)

    var calledNoMoreExchanges = false
    try {
      // 责任链开始,在每一级的Interceptor都要求调用chain的process方法,这样构成了一级一级向下的责任
      val response = chain.proceed(originalRequest)
      if (isCanceled()) {
        response.closeQuietly()
        throw IOException("Canceled")
      }
      return response
    } catch (e: IOException) {
      calledNoMoreExchanges = true
      throw noMoreExchanges(e) as Throwable
    } finally {
      if (!calledNoMoreExchanges) {
        noMoreExchanges(null)
      }
    }
  }
- RealInterceptorChain.proceed(request: Request, exchange: Exchange?)
proceed(request: Requst) 最终由 proceed(request: Request, exchange: Exchange?) 代理执行。
@Throws(IOException::class)
  fun proceed(request: Request, exchange: Exchange?): Response {
    if (index >= interceptors.size) throw AssertionError()

    // 记录调用proceed次数
    calls++

    // 如果有 Exchange,
    check(this.exchange == null || this.exchange.connection()!!.supportsUrl(request.url)) {
      "network interceptor ${interceptors[index - 1]} must retain the same host and port"
    }

    // 确保每个chain.proceed 只能被调用一次
    check(this.exchange == null || calls <= 1) {
      "network interceptor ${interceptors[index - 1]} must call proceed() exactly once"
    }

    // 这里产生指向下一个拦截器(index + 1)的处理链,并将这个作为参数传入给当前的拦截器(index)
    val next = RealInterceptorChain(interceptors, call, exchange,
        index + 1, request, connectTimeout, readTimeout, writeTimeout)
    val interceptor = interceptors[index]

    // 执行当前所指向的拦截器的intercept方法
    @Suppress("USELESS_ELVIS")
    val response = interceptor.intercept(next) ?: throw NullPointerException(
        "interceptor $interceptor returned null")

    // 确保 procceed() 只能被调用一次
    check(exchange == null || index + 1 >= interceptors.size || next.calls == 1) {
      "network interceptor $interceptor must call proceed() exactly once"
    }

    // 校验Response
    check(response.body != null) { "interceptor $interceptor returned a response with no body" }

    return response
  }
Chain 提供的是将interceptor 进行串联 并以以递归的形式向下传递(要求子intercptor 必须调用 intercept(chain: Interceptor.Chain) 参数 chain.process() 方法),最终进行网络请求的是最后的拦截器类 CallServerInterceptor
- CallServerInterceptor.intercept(chain: Interceptor.Chain) 处理网络请求
在 proceed 的方法处理中,提到了 Exchange 类,这里 Exchange 是对 HTTP 事务的包装(实际指向 ExchangeCodec),因此在这里面最重要的是使用该类进行处理的过程。
override fun intercept(chain: Interceptor.Chain): Response {
    val realChain = chain as RealInterceptorChain
    val exchange = realChain.exchange()
    val request = realChain.request()
    val requestBody = request.body
    val sentRequestMillis = System.currentTimeMillis()

    // 对头部数据进行写入
    exchange.writeRequestHeaders(request)

    var invokeStartEvent = true
    var responseBuilder: Response.Builder? = null

    // 处理非 GET 和 HEAD 方式的请求,对body进行处理
    if (HttpMethod.permitsRequestBody(request.method) && requestBody != null) {
      // HTTP/1.1 协议里设计100 (Continue) HTTP 状态码的的目的是,在客户端发送 Request Message 之前,HTTP/1.1 协议允许客户端先判定服务器是否愿意接受客户端发来的消息主体(基于 Request Headers)。即, 客户端 在 Post(较大)数据到服务端之前,允许双方“握手”,如果匹配上了,Client 才开始发送(较大)数据,如果 client 预期等待“100-continue”的应答,那么它发的请求必须包含一个 " Expect: 100-continue"  的头域!

      if ("100-continue".equals(request.header("Expect"), ignoreCase = true)) {
        // 如果头部域包含 Expect:100-continue 则进行预请求,判断服务器是否允许body传递,防止服务器拒收
        exchange.flushRequest()
        responseBuilder = exchange.readResponseHeaders(expectContinue = true)
        exchange.responseHeadersStart()
        invokeStartEvent = false
      }
      if (responseBuilder == null) {
        // HTTP/2 的全双工,暂时忽略,需要客户端和服务端的支持
        if (requestBody.isDuplex()) {
          // Prepare a duplex body so that the application can send a request body later.
          exchange.flushRequest()
          val bufferedRequestBody = exchange.createRequestBody(request, true).buffer()
          requestBody.writeTo(bufferedRequestBody)
        } else {
          // Write the request body if the "Expect: 100-continue" expectation was met.
          val bufferedRequestBody = exchange.createRequestBody(request, false).buffer()
          requestBody.writeTo(bufferedRequestBody)
          bufferedRequestBody.close()
        }
      } else {
        // 使用了 Expect: 100-continue 情况
        exchange.noRequestBody()
        // 如果不是多路复用的情况
        if (!exchange.connection()!!.isMultiplexed) {
          // If the "Expect: 100-continue" expectation wasn't met, prevent the HTTP/1 connection
          // from being reused. Otherwise we're still obligated to transmit the request body to
          // leave the connection in a consistent state.
          // 执行了该动作,会导致不会有进一步的数据事务发生,
          exchange.noNewExchangesOnConnection()
        }
      }
    } else {
      // 因为不存在 body 体,释放request body资源释放
      exchange.noRequestBody()
    }

    // 结束请求(返回Response),实际也调用了 Sink.flush()
    if (requestBody == null || !requestBody.isDuplex()) {
      exchange.finishRequest()
    }

    // 读取 Response 信息(如果还未产生 Response 构建的情况)
    if (responseBuilder == null) {
      responseBuilder = exchange.readResponseHeaders(expectContinue = false)!!
      if (invokeStartEvent) {
        exchange.responseHeadersStart()
        invokeStartEvent = false
      }
    }
    var response = responseBuilder
        .request(request)
        .handshake(exchange.connection()!!.handshake())
        .sentRequestAtMillis(sentRequestMillis)
        .receivedResponseAtMillis(System.currentTimeMillis())
        .build()
    var code = response.code
    if (code == 100) {
      // Server sent a 100-continue even though we did not request one. Try again to read the actual
      // response status.
      responseBuilder = exchange.readResponseHeaders(expectContinue = false)!!
      if (invokeStartEvent) {
        exchange.responseHeadersStart()
      }
      response = responseBuilder
          .request(request)
          .handshake(exchange.connection()!!.handshake())
          .sentRequestAtMillis(sentRequestMillis)
          .receivedResponseAtMillis(System.currentTimeMillis())
          .build()
      code = response.code
    }

    exchange.responseHeadersEnd(response)

    response = if (forWebSocket && code == 101) {
      // Connection is upgrading, but we need to ensure interceptors see a non-null response body.
      // 对于 websocket 和 100-continue 情况
      response.newBuilder()
          .body(EMPTY_RESPONSE)
          .build()
    } else {
      // 普通请求
      response.newBuilder()
          .body(exchange.openResponseBody(response))
          .build()
    }
    if ("close".equals(response.request.header("Connection"), ignoreCase = true) ||
        "close".equals(response.header("Connection"), ignoreCase = true)) {
      exchange.noNewExchangesOnConnection()
    }
    if ((code == 204 || code == 205) && response.body?.contentLength() ?: -1L > 0L) {
      throw ProtocolException(
          "HTTP $code had non-zero Content-Length: ${response.body?.contentLength()}")
    }
    return response
  }
异步请求
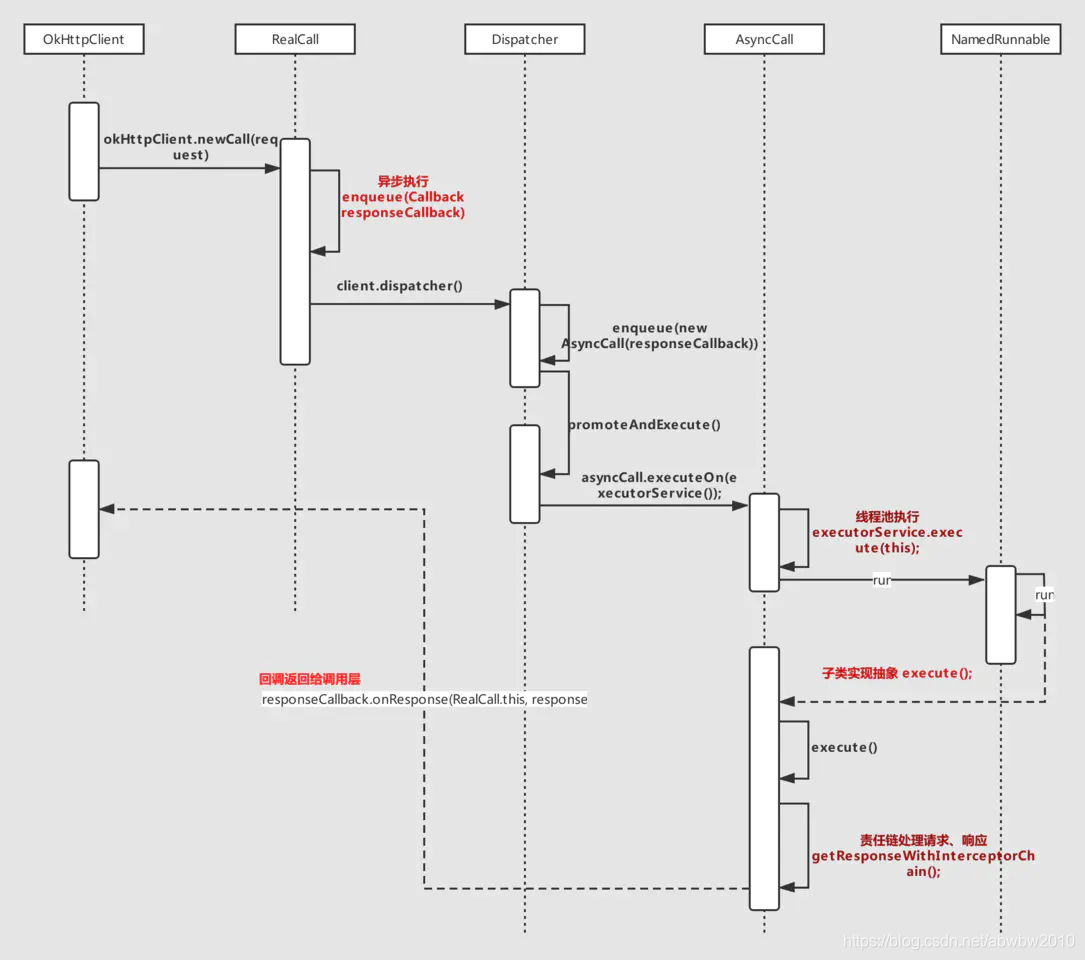
Call.enqueue(responseCallback: Callback)
  override fun enqueue(responseCallback: Callback) {
    synchronized(this) {
      check(!executed) { "Already Executed" }
      executed = true
    }
    callStart()
    client.dispatcher.enqueue(AsyncCall(responseCallback))
  }
- 同样需要对Call进行是否执行过的校验
- 对RealCall使用AsyncCall进行包装
- 将AsynCall添加Dispatcher的异步队列中
Dispatcher.enqueue(call: AsyncCall)
  internal fun enqueue(call: AsyncCall) {
    synchronized(this) {
      // 添加异步任务的就绪异步执行队列
      readyAsyncCalls.add(call)

      // Mutate the AsyncCall so that it shares the AtomicInteger of an existing running call to
      // the same host.
      if (!call.get().forWebSocket) {
        val existingCall = findExistingCallWithHost(call.host())
        if (existingCall != null) call.reuseCallsPerHostFrom(existingCall)
      }
    }

    // 触发执行异步内容
    promoteAndExecute()
  }
Dispatcher.promoteAndExecute()
- 检查正在请求总数是否超限、检查单个Host正在请求数是否超限
- 自增当前可请求Host计数器
- 开始执行
  ...

  // 提供线程池用于异步请求任务执行
  @get:Synchronized
  @get:JvmName("executorService") val executorService: ExecutorService
    get() {
      if (executorServiceOrNull == null) {
       // 无核心线程,并且不限制所启动的线程数量,保留60即退出线程
        executorServiceOrNull = ThreadPoolExecutor(0, Int.MAX_VALUE, 60, TimeUnit.SECONDS,
            SynchronousQueue(), threadFactory("$okHttpName Dispatcher", false))
      }
      return executorServiceOrNull!!
    }

  ...

  private fun promoteAndExecute(): Boolean {
    this.assertThreadDoesntHoldLock()

    val executableCalls = mutableListOf<AsyncCall>()
    val isRunning: Boolean
    synchronized(this) {
      val i = readyAsyncCalls.iterator()
      while (i.hasNext()) {
        val asyncCall = i.next()
        // 当前执行的异步认为大于最大数量则终止
        if (runningAsyncCalls.size >= this.maxRequests) break // Max capacity.

        // 当前所调用的host请求数量大于最大限制,跳过当前请求
        if (asyncCall.callsPerHost().get() >= this.maxRequestsPerHost) continue // Host max capacity.

        // 将允许执行的任务从就绪队列中移除
        i.remove()
        // 记录当前请求host数量计数器
        asyncCall.callsPerHost().incrementAndGet()

        // 将允许执行的任务添加到正在执行队列中
        executableCalls.add(asyncCall)
        runningAsyncCalls.add(asyncCall)
      }
      // 是否有正在执行的任务(包括异步和同步任务)
      isRunning = runningCallsCount() > 0
    }

    // 开始执行允许执行的队列,executorService 为线程池
    for (i in 0 until executableCalls.size) {
      val asyncCall = executableCalls[i]
      asyncCall.executeOn(executorService)
    }

    return isRunning
  }
RealCall.executeOn(executorService: ExecutorService)
- 执行任务并且处理启动过程中(非执行)发生的异常捕获
- 对于异常启动的情况,需要回调给Dispatcher通知结束状态
fun executeOn(executorService: ExecutorService) {
     // 检查当前线程是否持有 Dispatcher 锁
      client.dispatcher.assertThreadDoesntHoldLock()

      var success = false
      try {
        // 线程池执行该内容,
        executorService.execute(this)
        success = true
      } catch (e: RejectedExecutionException) {
        val ioException = InterruptedIOException("executor rejected")
        ioException.initCause(e)
        // 对于异常情况,会在 noMoreExchanges中根据情况释放连接
        noMoreExchanges(ioException)
        // 回调给之前传入的Callback失败信息
        responseCallback.onFailure(this@RealCall, ioException)
      } finally {
        // 通知Dispatcher结束请求
        if (!success) {
          client.dispatcher.finished(this) // This call is no longer running!
        }
      }
    }
从以上线程池执行可以看出AsyncCall本身是一个Runnable对象,因此具体的执行内容需要从AsyncCall.run() 入手。
    override fun run() {
        // 这里只是命名线程名,并且对闭包内容在内部进行执行
      threadName("OkHttp ${redactedUrl()}") {
        // 标记是否需要进行回调结果,由于异常可能发生在 onResponse 的时候,所以为了避免两次callback回调,进行标记处理
        var signalledCallback = false
        timeout.enter()
        try {
          // 在这里又重新进入了 getResponseWithInterceptorChain 的分析,参照同步请求的流程
          val response = getResponseWithInterceptorChain()

          // 为下面的回调进行标记,以及被回调过,防止再次发生异常时,重复执行回调(异常的回调)
          signalledCallback = true

          // 对之前传入的 callback 进行成功回调
          responseCallback.onResponse(this@RealCall, response)
        } catch (e: IOException) {
          if (signalledCallback) {
            // Do not signal the callback twice!
            Platform.get().log("Callback failure for ${toLoggableString()}", Platform.INFO, e)
          } else {
            responseCallback.onFailure(this@RealCall, e)
          }
        } catch (t: Throwable) {

          // 异常发生时,对请求进行一些取消行为
          cancel()
          if (!signalledCallback) {

            // 同样是对失败时的处理,包装异常类,通知之前的回调callback
            val canceledException = IOException("canceled due to $t")
            canceledException.addSuppressed(t)
            responseCallback.onFailure(this@RealCall, canceledException)
          }
          throw t
        } finally {
          //  结束通知
          client.dispatcher.finished(this)
        }
      }
    }
  }
Dispatcher.finished()
无论是在成功或失败请求后,都需要在最后通知Dispatcher进行finished()动作。
- 在结束任务通知后 继续调用promoteAndExecute()尝试启动新一轮任务(如果还有异步任务的话)。
 private fun <T> finished(calls: Deque<T>, call: T) {
    // 单元测试时用到
    val idleCallback: Runnable?
    synchronized(this) {
      if (!calls.remove(call)) throw AssertionError("Call wasn't in-flight!")
      idleCallback = this.idleCallback
    }

    val isRunning = promoteAndExecute()

    if (!isRunning && idleCallback != null) {
      idleCallback.run()
    }
  }
在每次结束后都持续检测是否仍然有需要进行处理的任务。
四、拦截器
在以上的流程中,我们不难看出,Okhttp 在具体请求优化方面会体现在拦截器中,通过责任链模式,下面解析下各个拦截器的能力。
RetryAndFollowUpInterceptor
该拦截器主要负责:
- 创建连接ExchangeFinder 用于连接要求
- 当发生异常,对可进行恢复重试的连接进行恢复请求
- 当发生多次连接情况(重定向、授权要求),自动进行二次或多次连接
- 连接资源释放
  override fun intercept(chain: Interceptor.Chain): Response {
    var request = chain.request()
    val realChain = chain as RealInterceptorChain
    val call = realChain.call()
    // 用于计数循环请求(重定向)次数,该次数不能超过20次,否则抛出异常
    var followUpCount = 0

    // 用于存储上个循环中所获得的Response,用于下次循环产生的Response对之前Response的追溯,可以跟踪重定向的来源等信息
    var priorResponse: Response? = null
    while (true) {
      // 初始化ExchangeFinder ,为后面连接使用
      call.prepareExchangeFinder(request)

      // 判断是否发生取消
      if (call.isCanceled()) {
        throw IOException("Canceled")
      }

      // 对于异常情况,根据异常信息进行重试处理
      var response: Response
      var success = false
      try {
        // 获取请求后的 Response
        response = realChain.proceed(request, null)
        success = true
      } catch (e: RouteException) {
        // RouteException发生于请求开始,因此requestSendStarted为false,如果该连接不可恢复则抛出异常,否则继续循环
        if (!recover(e.lastConnectException, call, false, request)) {
          throw e.firstConnectException
        }
        continue
      } catch (e: IOException) {
        // IOException 可能发生于连接过程中,可能已发送部分请求或全部成功,如果是在连接后发生的异常,则请求可能是以及被发送出去了,标记requestSendStarted为true
        val requestSendStarted = e !is ConnectionShutdownException
        if (!recover(e, call, requestSendStarted, request)) throw e
        continue
      } finally {
        // 不成功时强制关闭资源
        if (!success) {
          call.exchangeDoneDueToException()
        }
      }

      // 如果上一个请求有返回Response,并且进入二次请求要求的话,则进行重新包装,用于之后的再次请求,
      if (priorResponse != null) {
        response = response.newBuilder()
            .priorResponse(priorResponse.newBuilder()
                .body(null)
                .build())
            .build()
      }

      val exchange = response.exchange
      val route = exchange?.connection()?.route()

      // 根据Response结果要求产生新的Request,比如重定向、授权要求等
      val followUp = followUpRequest(response, route)

      // 如果没有进一步请求要求则直接返回当前的Response
      if (followUp == null) {
        if (exchange != null && exchange.isDuplex) {
          call.timeoutEarlyExit()
        }
        return response
      }

      // 如果有多次请求要求,但是设置只允许请求一次的情况,只能返回Response
      val followUpBody = followUp.body
      if (followUpBody != null && followUpBody.isOneShot()) {
        return response
      }

      // 处理只有关闭的连接和资源的动作
      response.body?.closeQuietly()
      if (call.hasExchange()) {
        exchange?.detachWithViolence()
      }

      // 限制最大重定向(重新请求)次数不能超过20次
      if (++followUpCount > MAX_FOLLOW_UPS) {
        throw ProtocolException("Too many follow-up requests: $followUpCount")
      }

      // 将请求信息预留给下次循环的请求
      request = followUp
      priorResponse = response
    }
  }

  ...
    private fun recover(
    e: IOException,
    call: RealCall,
    requestSendStarted: Boolean,
    userRequest: Request
  ): Boolean {
    // 如果设置了禁止重试(OkHttpClient.Builder.retryOnConnectionFailure(Boolean)),则不进行重试
    if (!client.retryOnConnectionFailure) return false

    // 对于 设置有body的 Request 的 RequestBody.isOneShot 的方法返回trues时,则只允许发送一次,不允许重试请求
    if (requestSendStarted && requestIsOneShot(e, userRequest)) return false

    // 根据异常信息判断该连接是否可以进行恢复重试
    // 1. 如果是协议异常则不进行重试
    // 2. 如果为中断异常但是不是连接超时的情况也不允许
    // 3. 如果是SSL握手异常并且是证书相关异常则不允许
    // 4. 如果是SSL验证结果不可信异常则不允许
    if (!isRecoverable(e, requestSendStarted)) return false

    // 检测如果不是流传输异常或者没有Route可以尝试的话,则不进行重试
    if (!call.canRetry()) return false
    return true
  }
BridgeInterceptor
该拦截器用于处理:
- 头部信息修正或者默认值处理,具体修改参考下面注释
- Cookie支持,对服务器返回的Cookie信息回传给CookieJar处理
- Gzip支持,对支持Gzip的请求结果Response进行解析
/**
   * 主要进行头部信息填充
   * Content-Type:  来源于 RequestBody.contentType() (覆盖设置)
   * Content-Length: 来源于 RequestBody.contentLength(),如果length = -1 则进行 Transfer-Encoding: chunked 头部填充 (覆盖设置)
   * Host: 来源于 Request.url.toHostHeader() (没有才进行填充)
   * Connection: 默认设置 Keep-Alive (如果没有的话才设置,有的话则不继续替换)
   * Accept-Encoding: 如果没设置 Accept-Encoding 并且没有设置Range(断点) 则默认设置 Accept-Encoding: gzip
   * Cookie:这里的 Cookie 来源于 OkHttpClient.Builder.cookieJar(cookieJar: CookieJar)的设置,默认OkHttpClient为 CookieJar.NoCookies,没有Cookie 信息 (覆盖设置)
   * User-Agent: 如果没设置,默认 okhttp/4.4.0-SNAPSHOT
   */
  @Throws(IOException::class)
  override fun intercept(chain: Interceptor.Chain): Response {
    val userRequest = chain.request()
    val requestBuilder = userRequest.newBuilder()

    val body = userRequest.body
    if (body != null) {
      val contentType = body.contentType()
      if (contentType != null) {
        // 根据body的contentType 信息进行 mime 内容头部信息填充
        requestBuilder.header("Content-Type", contentType.toString())
      }

      val contentLength = body.contentLength()
      if (contentLength != -1L) {

        requestBuilder.header("Content-Length", contentLength.toString())
        requestBuilder.removeHeader("Transfer-Encoding")
      } else {
        requestBuilder.header("Transfer-Encoding", "chunked")
        requestBuilder.removeHeader("Content-Length")
      }
    }

    if (userRequest.header("Host") == null) {
      requestBuilder.header("Host", userRequest.url.toHostHeader())
    }

    if (userRequest.header("Connection") == null) {
      requestBuilder.header("Connection", "Keep-Alive")
    }

    // 标记gzip是否设置,用于后面解析Response判断
    var transparentGzip = false
    // 如果没设置 Accept-Encoding 并且没有设置Range(断点) 则默认设置 Accept-Encoding: gzip
    if (userRequest.header("Accept-Encoding") == null && userRequest.header("Range") == null) {
      transparentGzip = true
      requestBuilder.header("Accept-Encoding", "gzip")
    }

    // 这里的 cookieJar 来源于 OkHttpClient.Builder.cookieJar(cookieJar: CookieJar)的设置,默认OkHttpClient为 CookieJar.NoCookies
    // 不设置Cookie 支持(Cookies 为空非null),如果有则生成头部 Cookie 段
    val cookies = cookieJar.loadForRequest(userRequest.url)
    if (cookies.isNotEmpty()) {
      requestBuilder.header("Cookie", cookieHeader(cookies))
    }

    if (userRequest.header("User-Agent") == null) {
      requestBuilder.header("User-Agent", userAgent)
    }

    val networkResponse = chain.proceed(requestBuilder.build())

    // 解析Cookie 并回传给 CookieJar 进行处理
    cookieJar.receiveHeaders(userRequest.url, networkResponse.headers)

    val responseBuilder = networkResponse.newBuilder()
        .request(userRequest)

    // 处理gzip内容,如果之前设置了 gzip 支持,并且所返回的服务器 Response 同样 Content-Encoding 支持 gzip,则对返回的Response
    // 进行 gzip 解析并添加到新的Reponse 中
    if (transparentGzip &&
        "gzip".equals(networkResponse.header("Content-Encoding"), ignoreCase = true) &&
        networkResponse.promisesBody()) {
      val responseBody = networkResponse.body
      if (responseBody != null) {
        val gzipSource = GzipSource(responseBody.source())
        val strippedHeaders = networkResponse.headers.newBuilder()
            .removeAll("Content-Encoding")
            .removeAll("Content-Length")
            .build()
        responseBuilder.headers(strippedHeaders)
        val contentType = networkResponse.header("Content-Type")
        responseBuilder.body(RealResponseBody(contentType, -1L, gzipSource.buffer()))
      }
    }

    return responseBuilder.build()
  }
CacheInterceptor
前面提到OkHttp 缓存拦截器 CacheInterceptor,在该拦截器中实现了网络缓存的绝大逻辑。
在intercept 工作中主要处理:
- 根据 HTTP的缓存规则(比如根据头部信息、Tag等缓存条件)判断当前所进行的请求,以及在缓存中缓存的内容是否能命中该次请求(通过CacheStrategy进行构造处理)
- 对Request是否满足和Response是否满足进行分别处理:
- 如果Request不满足条件(策略会校验是否有网络等情况,如果不满足则返回null) 而缓存Response 满足,则返回缓存Response
- 如果Request 和缓存Response 都不满足,则返回504 Response
- 如果Request 满足 而 缓存Response不满足,则使用请求后的Respnse
- 对于304结果,更新缓存并且返回缓存Response
  override fun intercept(chain: Interceptor.Chain): Response {
    // cache 来源于 OkHttpClient.Builder.cache(cache: Cache?),默认为null
    val cacheCandidate = cache?.get(chain.request())

    val now = System.currentTimeMillis()

    // 传入当前请求信息和获得的候选缓存Response,根据一些HTTP缓存规则,判断当前候选Reponse是否可用,对Request也会进行一些判断,比如当前网络是否可用
    val strategy = CacheStrategy.Factory(now, chain.request(), cacheCandidate).compute()
    val networkRequest = strategy.networkRequest // 如果网络不可用,则默认这里会为null
    val cacheResponse = strategy.cacheResponse // 如果cacheCandidate可用,则这里会返回一致,如果不可用则返回null(缓存过期之类的)

    // 单元测试使用
    cache?.trackResponse(strategy)

    // 当前从缓存中获得的缓存候选和实际计算出的缓存Response不匹配(不符合条件,为空),则抛弃候选缓存Cache
    if (cacheCandidate != null && cacheResponse == null) {
      // The cache candidate wasn't applicable. Close it.
      cacheCandidate.body?.closeQuietly()
    }

    // 如果返回的网络请求为空,则说明网络当前不可用,并且允许缓存Response也为空,则默认返回504即可
    if (networkRequest == null && cacheResponse == null) {
      return Response.Builder()
          .request(chain.request())
          .protocol(Protocol.HTTP_1_1)
          .code(HTTP_GATEWAY_TIMEOUT)
          .message("Unsatisfiable Request (only-if-cached)")
          .body(EMPTY_RESPONSE)
          .sentRequestAtMillis(-1L)
          .receivedResponseAtMillis(System.currentTimeMillis())
          .build()
    }

    // 如果仅是网络不可用导致Request不能请求,那么直接返回命中的Response缓存即可,复用结果
    if (networkRequest == null) {
      return cacheResponse!!.newBuilder()
          .cacheResponse(stripBody(cacheResponse))
          .build()
    }

    // 执行网络请求
    var networkResponse: Response? = null
    try {
      networkResponse = chain.proceed(networkRequest)
    } finally {
      // If we're crashing on I/O or otherwise, don't leak the cache body.
      if (networkResponse == null && cacheCandidate != null) {
        cacheCandidate.body?.closeQuietly()
      }
    }

    // 如果缓存存在,并且服务器返回304则更新下缓存信息并返回
    if (cacheResponse != null) {
      if (networkResponse?.code == HTTP_NOT_MODIFIED) {
        val response = cacheResponse.newBuilder()
            .headers(combine(cacheResponse.headers, networkResponse.headers))
            .sentRequestAtMillis(networkResponse.sentRequestAtMillis)
            .receivedResponseAtMillis(networkResponse.receivedResponseAtMillis)
            .cacheResponse(stripBody(cacheResponse))
            .networkResponse(stripBody(networkResponse))
            .build()

        networkResponse.body!!.close()

        // Update the cache after combining headers but before stripping the
        // Content-Encoding header (as performed by initContentStream()).
        cache!!.trackConditionalCacheHit()
        cache.update(cacheResponse, response)
        return response
      } else {
        cacheResponse.body?.closeQuietly()
      }
    }

    val response = networkResponse!!.newBuilder()
        .cacheResponse(stripBody(cacheResponse))
        .networkResponse(stripBody(networkResponse))
        .build()

    // 如果有缓存器,并且缓存策略允许被缓存,则添加到缓存中
    if (cache != null) {
      if (response.promisesBody() && CacheStrategy.isCacheable(response, networkRequest)) {
        // Offer this request to the cache.
        val cacheRequest = cache.put(response)
        return cacheWritingResponse(cacheRequest, response)
      }

      //  目前缓存只缓存GET请求内容,官方解释说,如果所有的形式都缓存,复杂度高但是收效低,则对于非法的缓存进行移除(GET不需要?)
      if (HttpMethod.invalidatesCache(networkRequest.method)) {
        try {
          cache.remove(networkRequest)
        } catch (_: IOException) {
          // The cache cannot be written.
        }
      }
    }

    return response
  }
缓存
在CacheInterceptor 中比较重要的是 Cache 类,它提供了整个缓存下的功能。这里分析下该类的主要构成。
从 Cache 中,我们不难发现,它所有的缓存行为都是通过 DiskLruCache进行代理。
 ...
  internal val cache = DiskLruCache(
      fileSystem = fileSystem,
      directory = directory,
      appVersion = VERSION,
      valueCount = ENTRY_COUNT,
      maxSize = maxSize,
      taskRunner = TaskRunner.INSTANCE
  )

  ...

  internal fun get(request: Request): Response? {

   // Okhttp 都是简单用Url作为索引
    val key = key(request.url)
    val snapshot: DiskLruCache.Snapshot = try {
        // 通过DiskLruCache 获取缓存中的对象,如果没有则直接异常返回null
      cache[key] ?: return null
    } catch (_: IOException) {
      return null // Give up because the cache cannot be read.
    }

   // 包装为Cache.Entry 对象,在Entry 中对 Snapshot对象进行解析,并对Entry中的字段进行赋值,转化为业务含义的的信息
    val entry: Entry = try {
      Entry(snapshot.getSource(ENTRY_METADATA))
    } catch (_: IOException) {
      snapshot.closeQuietly()
      return null
    }

    // 解析Snaphost中的 Reponse缓存信息,并转化为 Reponse 业务对象
    val response = entry.response(snapshot)
    if (!entry.matches(request, response)) {
      response.body?.closeQuietly()
      return null
    }

    return response
  }

  ...

   fun response(snapshot: DiskLruCache.Snapshot): Response {
      val contentType = responseHeaders["Content-Type"]
      val contentLength = responseHeaders["Content-Length"]
      val cacheRequest = Request.Builder()
          .url(url)
          .method(requestMethod, null)
          .headers(varyHeaders)
          .build()
      return Response.Builder()
          .request(cacheRequest)
          .protocol(protocol)
          .code(code)
          .message(message)
          .headers(responseHeaders)
          .body(CacheResponseBody(snapshot, contentType, contentLength))
          .handshake(handshake)
          .sentRequestAtMillis(sentRequestMillis)
          .receivedResponseAtMillis(receivedResponseMillis)
          .build()
    }
在Cache中更多的是对DiskLruCache 所需要处理的信息进行拆包和包装,因此这里我们直接看 DiskLruCache。
DiskLruCache
在 DiskLruCache 主要分成几种对象结构:
- Entry 单个缓存数据的代理对象,用于在 LinkHashMap 中的存储,规定了缓存文件(cleanFiles)、临时文件(dirtyFiles)以及提供了 Snapshot 对象入口,Entry 不对数据有写入能力。
internal inner class Entry internal constructor(
    internal val key: String
  ) {

    // 数据长度
    internal val lengths: LongArray = LongArray(valueCount)

    // 用于正式写入的文件
    internal val cleanFiles = mutableListOf<File>()

    // 用于临时数据写入的文件,目前默认都是2个,最终需要调用Edit.commit 才能写入正式文件
    internal val dirtyFiles = mutableListOf<File>()

    // 文件是否可读取
    internal var readable: Boolean = false

    // 记录当前被编辑的对象,有且只能有一个在编辑
    internal var currentEditor: Editor? = null

    // 每一个Snapshot 会产生一个序列号,每次发生Edit.commit后 序列号都会发生变化
    internal var sequenceNumber: Long = 0

    ...
    // 产生当前Entry对应的Snapshot对象
    internal fun snapshot(): Snapshot?
    ...
}
- Snapshot 负责对缓存数据的详细源记录,包括值信息、磁盘缓存数据源(File Source)、数据长度等。提供给外部获取具体缓存内容使用。
  inner class Snapshot internal constructor(
    private val key: String,
    private val sequenceNumber: Long, // 每个独立提交都对应一个
    private val sources: List<Source>, // 缓存文件目前只有两个 0 index 为头文件 1 为 body 文件
    private val lengths: LongArray // 数据长度信息
  ) : Closeable {
    fun key(): String = key
    // 获得一个Edit 对象,对内容进行编辑事务处理。
    fun edit(): Editor? = this@DiskLruCache.edit(key, sequenceNumber)
    fun getSource(index: Int): Source = sources[index]
    override fun close() {
      for (source in sources) {
        source.closeQuietly()
      }
    }
  }
- Edit 负责对数据的写入事务处理,在完成事务有需要进行 commit 提交
 /** Edits the values for an entry. */
  inner class Editor internal constructor(internal val entry: Entry) {
    // 用来标记开启几个写入文件
    internal val written: BooleanArray? = if (entry.readable) null else BooleanArray(valueCount)

    // 检查 edit事务是否完成 commit 和 abort 可以触发 done = true 动作
    private var done: Boolean = false

    // 移除临时目录下所有文件
    internal fun detach()

    // 返回指定的数据源(正式数据)(目前index = 0 为头文件  index = 1 为body文件)
    fun newSource(index: Int): Source?

    // 创建临时文件的写入代理
    fun newSink(index: Int): Sink

    // 提交修改的数据,将临时文件转为正式缓存文件
    fun commit()

    // 放弃修改,会将所有临时文件删除
    fun abort()
  }
缓存溢出处理
在每次发生修改、提交都将对内容进行队列内容进行检测
  // 一个包装的线程池
  private val cleanupQueue = taskRunner.newQueue()

  // 清理任务
  private val cleanupTask = object : Task("$okHttpName Cache") {
    override fun runOnce(): Long {
      synchronized(this@DiskLruCache) {
        if (!initialized || closed) {
          return -1L // Nothing to do.
        }

        try {
         // LinkHashMap 容量检测
          trimToSize()
        } catch (_: IOException) {
          mostRecentTrimFailed = true
        }

        try {
         // 日志清除
          if (journalRebuildRequired()) {
            rebuildJournal()
            redundantOpCount = 0
          }
        } catch (_: IOException) {
          mostRecentRebuildFailed = true
          journalWriter = blackholeSink().buffer()
        }

        return -1L
      }
    }
  }

  ...
   @get:Synchronized @set:Synchronized var maxSize: Long = maxSize
   set(value) {
      field = value
      if (initialized) {
        cleanupQueue.schedule(cleanupTask) // 初始化缓存容量时对当前缓存进行一次清理
      }
   }


  ...
  fun trimToSize() {
    while (size > maxSize) {
      val toEvict = lruEntries.values.iterator().next()
      removeEntry(toEvict)
    }
    mostRecentTrimFailed = false
  }
  ...

  internal fun removeEntry(entry: Entry): Boolean {
    entry.currentEditor?.detach() // Prevent the edit from completing normally.

    // 移除Entry文件,目前为两个
    for (i in 0 until valueCount) {
      fileSystem.delete(entry.cleanFiles[i])
      size -= entry.lengths[i]
      entry.lengths[i] = 0
    }

    redundantOpCount++

    // 日志记录
    journalWriter!!.writeUtf8(REMOVE)
        .writeByte(' '.toInt())
        .writeUtf8(entry.key)
        .writeByte('\n'.toInt())
    lruEntries.remove(entry.key)

    if (journalRebuildRequired()) {
      cleanupQueue.schedule(cleanupTask)
    }

    return true
  }
  ...

  // 获取时清理
  operator fun get(key: String): Snapshot? {
    ...
    if (journalRebuildRequired()) {
      // 执行清理
      cleanupQueue.schedule(cleanupTask)
    }

    return snapshot
  }

  ...

  // 删除时清理
 internal fun removeEntry(entry: Entry): Boolean {
    ....
    if (journalRebuildRequired()) {
      cleanupQueue.schedule(cleanupTask)
    }

    return true
  }

  ...
产生 Edit
  @Synchronized @Throws(IOException::class)
  @JvmOverloads
  fun edit(key: String, expectedSequenceNumber: Long = ANY_SEQUENCE_NUMBER): Editor? {
    initialize()

    checkNotClosed()
    // 正则命名验证
    validateKey(key)
    var entry: Entry? = lruEntries[key]
    // 如果指定了序列话数值 expectedSequenceeNumber , 那么就是为了找到之前存入Entry的内容,找不到返回null
    if (expectedSequenceNumber != ANY_SEQUENCE_NUMBER &&
        (entry == null || entry.sequenceNumber != expectedSequenceNumber)) {
      return null // Snapshot is stale.
    }

    // 正在编辑中的Entry 不被允许重复编辑
    if (entry?.currentEditor != null) {
      return null // Another edit is in progress.
    }

    // 保险丝机制,mostRecentTrimFailed 标记对最近移除溢出数据时发生失败的情况,mostRecentRebuildFailed 日志写入失败的情况
    // 如果发生该情况,表示当前该工具存储状态异常,因此执行重新清理的任务,拒绝进行编辑
    if (mostRecentTrimFailed || mostRecentRebuildFailed) {
      cleanupQueue.schedule(cleanupTask)
      return null
    }

    // Flush the journal before creating files to prevent file leaks.
    val journalWriter = this.journalWriter!!
    journalWriter.writeUtf8(DIRTY)
        .writeByte(' '.toInt())
        .writeUtf8(key)
        .writeByte('\n'.toInt())
    journalWriter.flush()

    // 日志写入发生异常,不允许进行编辑
    if (hasJournalErrors) {
      return null // Don't edit; the journal can't be written.
    }

    if (entry == null) {
      entry = Entry(key)
      lruEntries[key] = entry
    }
    val editor = Editor(entry)
    entry.currentEditor = editor
    return editor
  }
初始化与备份
初始化包括几个流程:
- 校验文件系统情况,如果丢失则用备份进行还原
- 正常初始化,读取目录下所有缓存文件信息
- 如果初始化失败,则移除整个缓存文件夹,并重新建立整个缓存文件夹。
fun initialize() {
    this.assertThreadHoldsLock()

    if (initialized) {
      return // Already initialized.
    }

    // 验证文件是否正常,如果丢失日志则进行备份还原
    if (fileSystem.exists(journalFileBackup)) {
      if (fileSystem.exists(journalFile)) {
        // 如果正常则删除备份文件,否则使用备份文件
        fileSystem.delete(journalFileBackup)
      } else {
        fileSystem.rename(journalFileBackup, journalFile)
      }
    }

    // Prefer to pick up where we left off.
    if (fileSystem.exists(journalFile)) {
      try {
        readJournal()
        processJournal()
        initialized = true

        // 到此初始化完成
        return
      } catch (journalIsCorrupt: IOException) {
        Platform.get().log(
            "DiskLruCache $directory is corrupt: ${journalIsCorrupt.message}, removing",
            WARN,
            journalIsCorrupt)
      }

      // 如果初始化失败则删除整个缓存文件夹,重建整个缓存,维持正常的执行(保险丝机制)
      try {
        delete()
      } finally {
        closed = false
      }
    }

    rebuildJournal()

    initialized = true
  }
ConnectInterceptor
ConnectInterceptor 主要负责在执行内容传输前的连接建立流程,比如TCP、TLS等连接的建立,以及授权、验证等。并且在产生连接通道后(RealConnection)将对连接进行缓存(RealConnectionPool),以便于在后面中进行连接复用。在该连接中不涉及数据交互。
OkHttp对连接做了比较多的优化,在结构上比较复杂,需要先对数据结构熟悉:
- ConnectionSpec
描述在HTTP进行连接通道时所需要的配置内容,目前仅涉及HTTPS在TLS版本、加密套件 - ConnectionSpecSelector
根据提供的ConnectionSpec列表,对SSLSocket进行配置 - Route
用来描述网络数据包的传输路径,主要描述出和TCP建立的目标点,包括代理的描述。路由信息通过RouteSelector产生,在一个host下可能存在多个链接点,因此可能产生多个Route信息。 - RouteDatabase
记录失败的Route信息,避免下次使用无效Route,配合RouteSelector使用 - RouteSelector
根据Proxie代理信息和Address进行合适的Route选择,在RouteSelector 中会将URL、Port信息转化为Proxy,并通过DNS进行查询,将多个连接点封装为所有Route - Protocol
连接所使用的协议信息 - Address
用于存储所有连接前置信息,包含连接所需要的主机名host、端口号port,Dns、代理服务器Proxy、对于包含Https要求,则提供 SSLSocketFactory、HostnameVerifier、CertificatePinner、Authenticator等授权信息, - RealConnection
代表着socket链路,每一个RealConnection代表一条跟服务器的通信链路,在该类中完成主要的连接流程(TCP握手、TLS连接验证、协议连接)
RouteSelector、Route 与 Proxy
在OkHttp 中,同一个域名host下可能存在多个连接点(或者多个代理连接点),对于这些连接点,OkHttp 抽象成 Route 信息以方便进行连接。
预处理Proxy
RouteSelector 初始化中,对Proxy进行预处理
 init {
    // 初始化 proxy 信息
    resetNextProxy(address.url, address.proxy)
  }

  // 如果在OkHttpClient.Builder.proxy 定义了则使用该定义内容,否则判断是否设置了 proxySelector(目前只有单元测试用到)
  // 如果 ProxySelector.select 返回为null 则返回 默认 Proxy.NO_PROXY 兜底 proxy 。
  private fun resetNextProxy(url: HttpUrl, proxy: Proxy?) {
    eventListener.proxySelectStart(call, url)
    proxies = if (proxy != null) {
     // 如果 OkHttpClient.Builder.proxy 主动设置了代理信息,那么只记录该代理
      listOf(proxy)
    } else {
      // 如果在OkHttpClient 中设置了 proxy 则proxySelector 为 NullProxySelector,否则这里
      // proxySelector 返回的是系统(平台)的ProxySelector 否则还是为 NullProxySelector
      // NullProxySelector 默认 select 返回一个空集合,因此如果到空集合的话最红返回的是只有一个 NO_PROXY的集合
      // 作为兜底,NO_PROXY 默认 type = Proxy.Type.DIRECT
      val proxiesOrNull = address.proxySelector.select(url.toUri())
      if (proxiesOrNull != null && proxiesOrNull.isNotEmpty()) {
        proxiesOrNull.toImmutableList()
      } else {
        immutableListOf(Proxy.NO_PROXY)
      }
    }
    nextProxyIndex = 0
    eventListener.proxySelectEnd(call, url, proxies)
  }
RouteSelector的使用
RouteSelector 关键方法为 next,执行该方法将产生一个 Selection对象,用于存储所产生的Route候选集合内容
// nextProxyIndex 用来标记当前所处理的代理集合的位置,在next和nextProxy中开始进行解析
private fun hasNextProxy(): Boolean = nextProxyIndex < proxies.size


@Throws(IOException::class)
private fun nextProxy(): Proxy {
  // proxy一定会有一个值,至少存在一个 NO_PROXY
  if (!hasNextProxy()) {
    throw SocketException(
        "No route to ${address.url.host}; exhausted proxy configurations: $proxies")
  }
   val result = proxies[nextProxyIndex++]
   resetNextInetSocketAddress(result)
   return result
}

// 根据Proxy和host dns解析所有可用的 InetSocketAddress 并存在 inetSocketAddresses 字段中
 private fun resetNextInetSocketAddress(proxy: Proxy) {
    val mutableInetSocketAddresses = mutableListOf<InetSocketAddress>()

    // 初始化RouteSelector.inetSocketAddresses 属性,将解析的结果存储在该列表中
    inetSocketAddresses = mutableInetSocketAddresses

    val socketHost: String
    val socketPort: Int
    // 如果代理类型为直连或者Socket类型,则可以直接用他们提供的host port ,否则通过InetSocketAddress获取真实地址
    if (proxy.type() == Proxy.Type.DIRECT || proxy.type() == Proxy.Type.SOCKS) {
      socketHost = address.url.host
      socketPort = address.url.port
    } else {
      val proxyAddress = proxy.address()
      require(proxyAddress is InetSocketAddress) {
        "Proxy.address() is not an InetSocketAddress: ${proxyAddress.javaClass}"
      }
      socketHost = proxyAddress.socketHost
      socketPort = proxyAddress.port
    }

    // 检查端口设置是否超过范围
    if (socketPort !in 1..65535) {
      throw SocketException("No route to $socketHost:$socketPort; port is out of range")
    }

    // 如果 proxy 为 SOCKTS 代理则不需要处理 host dns,否则预处理host 的dns解析结果
    if (proxy.type() == Proxy.Type.SOCKS) {
     // SOCKS 代理不需要解析host ip, 根据主机名和端口号创建未解析的套接字地址
      mutableInetSocketAddresses += InetSocketAddress.createUnresolved(socketHost, socketPort)
    } else {
      eventListener.dnsStart(call, socketHost)

      // 根据提供的host查询到支持的所有ip地址信息
      val addresses = address.dns.lookup(socketHost)
      if (addresses.isEmpty()) {
        throw UnknownHostException("${address.dns} returned no addresses for $socketHost")
      }

      eventListener.dnsEnd(call, socketHost, addresses)
      // 将所解析出来的所有地址封装套接字地址
      for (inetAddress in addresses) {
        mutableInetSocketAddresses += InetSocketAddress(inetAddress, socketPort)
      }
    }
  }

operator fun next(): Selection {
    if (!hasNext()) throw NoSuchElementException()

    val routes = mutableListOf<Route>()
    while (hasNextProxy()) {
      // nextProxy() 读取一个Proxy信息,并对inetSocketAddresses 连接点进行预处理
      val proxy = nextProxy()
      for (inetSocketAddress in inetSocketAddresses) {
      //  将 inetSocketAddress 包装成 Route
        val route = Route(address, proxy, inetSocketAddress)

        // 该Route是否在黑名单中,否则添加到候选routes中
        if (routeDatabase.shouldPostpone(route)) {
          postponedRoutes += route
        } else {
          routes += route
        }
      }

      if (routes.isNotEmpty()) {
        break
      }
    }
    // 如果没有可用的 Route 就将之前不可用的 Route拿来尽可能尝试下
    if (routes.isEmpty()) {
      routes += postponedRoutes
      postponedRoutes.clear()
    }

    return Selection(routes)
  }
在next中主要处理:
- 读取Proxy信息,如果非Socket代理则对host提前进行dns解析,得到ip
- 对Proxy和所解析出所有结果进行Route包装
- 将所获得的Route包装集合封装到Selection中,提供给使用方选择连接点
ConnectionSpec 与 ConnectionSpecSelector
ConnectionSpec 主要是对连接时对Socket的配置,这里面包括TLS所需要进行的版本和密码套件协商信息,而ConnectionSpecSelector 则对最终选择的ConnectionSpec 进行筛选,目前仅对SSLSocket进行配置。
// 主要对Socket所支持的协议和加密配套进行交集判断
  fun isCompatible(socket: SSLSocket): Boolean {
    if (!isTls) {
      return false
    }

    if (tlsVersionsAsString != null &&
        !tlsVersionsAsString.hasIntersection(socket.enabledProtocols, naturalOrder())) {
      return false
    }

    if (cipherSuitesAsString != null &&
        !cipherSuitesAsString.hasIntersection(
            socket.enabledCipherSuites, CipherSuite.ORDER_BY_NAME)) {
      return false
    }

    return true
  }

  fun configureSecureSocket(sslSocket: SSLSocket): ConnectionSpec {
    var tlsConfiguration: ConnectionSpec? = null
    for (i in nextModeIndex until connectionSpecs.size) {
      val connectionSpec = connectionSpecs[i]
      // 判断该配置是否和当前连接兼容
      if (connectionSpec.isCompatible(sslSocket)) {
        tlsConfiguration = connectionSpec
        nextModeIndex = i + 1
        break
      }
    }

    if (tlsConfiguration == null) {
      throw UnknownServiceException("Unable to find acceptable protocols. isFallback=$isFallback," +
          " modes=$connectionSpecs," +
          " supported protocols=${sslSocket.enabledProtocols!!.contentToString()}")
    }

    isFallbackPossible = isFallbackPossible(sslSocket)

    // 对SSLSocket进行配置应用
    tlsConfiguration.apply(sslSocket, isFallback)

    return tlsConfiguration
  }
OkHttp 中配置了几个基本的默认配置
    //通用加密套件
    private val RESTRICTED_CIPHER_SUITES = arrayOf(
        // TLSv1.3.
        CipherSuite.TLS_AES_128_GCM_SHA256,
        CipherSuite.TLS_AES_256_GCM_SHA384,
        CipherSuite.TLS_CHACHA20_POLY1305_SHA256,

        // TLSv1.0, TLSv1.1, TLSv1.2.
        CipherSuite.TLS_ECDHE_ECDSA_WITH_AES_128_GCM_SHA256,
        CipherSuite.TLS_ECDHE_RSA_WITH_AES_128_GCM_SHA256,
        CipherSuite.TLS_ECDHE_ECDSA_WITH_AES_256_GCM_SHA384,
        CipherSuite.TLS_ECDHE_RSA_WITH_AES_256_GCM_SHA384,
        CipherSuite.TLS_ECDHE_ECDSA_WITH_CHACHA20_POLY1305_SHA256,
        CipherSuite.TLS_ECDHE_RSA_WITH_CHACHA20_POLY1305_SHA256)

    // 所有支持的加密套件,包括后面可能不被支持的加密,用于兼容一些老平台
    private val APPROVED_CIPHER_SUITES = arrayOf(
        // TLSv1.3.
        CipherSuite.TLS_AES_128_GCM_SHA256,
        CipherSuite.TLS_AES_256_GCM_SHA384,
        CipherSuite.TLS_CHACHA20_POLY1305_SHA256,

        // TLSv1.0, TLSv1.1, TLSv1.2.
        CipherSuite.TLS_ECDHE_ECDSA_WITH_AES_128_GCM_SHA256,
        CipherSuite.TLS_ECDHE_RSA_WITH_AES_128_GCM_SHA256,
        CipherSuite.TLS_ECDHE_ECDSA_WITH_AES_256_GCM_SHA384,
        CipherSuite.TLS_ECDHE_RSA_WITH_AES_256_GCM_SHA384,
        CipherSuite.TLS_ECDHE_ECDSA_WITH_CHACHA20_POLY1305_SHA256,
        CipherSuite.TLS_ECDHE_RSA_WITH_CHACHA20_POLY1305_SHA256,

        // 以下加密套在Http2.0可能被废弃
        CipherSuite.TLS_ECDHE_RSA_WITH_AES_128_CBC_SHA,
        CipherSuite.TLS_ECDHE_RSA_WITH_AES_256_CBC_SHA,
        CipherSuite.TLS_RSA_WITH_AES_128_GCM_SHA256,
        CipherSuite.TLS_RSA_WITH_AES_256_GCM_SHA384,
        CipherSuite.TLS_RSA_WITH_AES_128_CBC_SHA,
        CipherSuite.TLS_RSA_WITH_AES_256_CBC_SHA,
        CipherSuite.TLS_RSA_WITH_3DES_EDE_CBC_SHA)

    /** 目前主流的配置方案 */
    @JvmField
    val RESTRICTED_TLS = Builder(true)
        .cipherSuites(*RESTRICTED_CIPHER_SUITES) // 密码套件
        .tlsVersions(TlsVersion.TLS_1_3, TlsVersion.TLS_1_2) // TLS 支持版本
        .supportsTlsExtensions(true) // TLS异常
        .build()

    /**
     * 适配大部分平台的配置方案(扩大加密套件的支持,以兼容一些平台)
     */
    @JvmField
    val MODERN_TLS = Builder(true)
        .cipherSuites(*APPROVED_CIPHER_SUITES)
        .tlsVersions(TlsVersion.TLS_1_3, TlsVersion.TLS_1_2)
        .supportsTlsExtensions(true)
        .build()

    /**
     * 向后大部分兼容的的配置方案,包含 TLS1.3、TLS1.2、TLS1.1、TLS1.0
     */
    @JvmField
    val COMPATIBLE_TLS = Builder(true)
        .cipherSuites(*APPROVED_CIPHER_SUITES)
        .tlsVersions(TlsVersion.TLS_1_3, TlsVersion.TLS_1_2, TlsVersion.TLS_1_1, TlsVersion.TLS_1_0)
        .supportsTlsExtensions(true)
        .build()

    /** 明文配置,用于Http,不进行TLS */
    @JvmField
    val CLEARTEXT = Builder(false).build()
通过OkHttpClient.Builder.connectionSpecs可以对候选配置内容进行配置,默认情况下使用 DEFAULT_CONNECTION_SPECS 组合
ConnectionSpec.apply 配置
apply 主要对最终连接的 SSLSocket 的加密配套和 TLS版本根据 SSLSocket支持的情况和 OkHttp 配置要求的情况进行交集配置。
如果需要对OkHttp TLS 版本或者加密配套相关调整,需要注意改动不仅仅是OkHttp的配置还需要对SSLSocket.setEnableCipherSuites 进行处理,这些内容都可以在 OkHttpClient.Build.sslSocketFactory 进行配置
  internal fun apply(sslSocket: SSLSocket, isFallback: Boolean) {
    val specToApply = supportedSpec(sslSocket, isFallback)

    if (specToApply.tlsVersions != null) {
      sslSocket.enabledProtocols = specToApply.tlsVersionsAsString
    }

    if (specToApply.cipherSuites != null) {
      sslSocket.enabledCipherSuites = specToApply.cipherSuitesAsString
    }
  }


  // 主要对SSLSocket 一些支持信息(TLS版本、加密套)和 所配置的内容进行匹配,取交集得到最终要求的TLS版本和配件套
  private fun supportedSpec(sslSocket: SSLSocket, isFallback: Boolean): ConnectionSpec {
    // 所配置的加密配件和SSLSocket.enabledCipherSuites所支持的配件套交集
    var cipherSuitesIntersection = if (cipherSuitesAsString != null) {
      sslSocket.enabledCipherSuites.intersect(cipherSuitesAsString, CipherSuite.ORDER_BY_NAME)
    } else {
      sslSocket.enabledCipherSuites
    }

    // 所配置的TLS版本和SSLSocket.enabledProtocols所支持交集结果
    val tlsVersionsIntersection = if (tlsVersionsAsString != null) {
      sslSocket.enabledProtocols.intersect(tlsVersionsAsString, naturalOrder())
    } else {
      sslSocket.enabledProtocols
    }

    // TLS_FALLBACK_SCSV 支持
    val supportedCipherSuites = sslSocket.supportedCipherSuites
    val indexOfFallbackScsv = supportedCipherSuites.indexOf(
        "TLS_FALLBACK_SCSV", CipherSuite.ORDER_BY_NAME)
    if (isFallback && indexOfFallbackScsv != -1) {
      cipherSuitesIntersection = cipherSuitesIntersection.concat(
          supportedCipherSuites[indexOfFallbackScsv])
    }

    return Builder(this)
        .cipherSuites(*cipherSuitesIntersection)
        .tlsVersions(*tlsVersionsIntersection)
        .build()
  }
RealConnection中的连接
真正通道连接发生在 RealConnect.connet 。
connet 主要分为几个流程:
- 获取Socket配置(ConnectionSpec、ConnectionSpecSelector)
- 校验如果没有配置SSLSocketFactory,是否支持明文配置(ConnectionSpec.CLEARTEXT),平台是否支持明文传输
- 根据Route连接要求,是否只是建立 TCP连接或者隧道连接,在建立连接后进行协议连接(TLS连接、HTTP2.0连接)
 fun connect(
    connectTimeout: Int,
    readTimeout: Int,
    writeTimeout: Int,
    pingIntervalMillis: Int,
    connectionRetryEnabled: Boolean,
    call: Call,
    eventListener: EventListener
  ) {
    // 要求 protocol 必须为null , 没有连接过
    check(protocol == null) { "already connected" }

    var routeException: RouteException? = null

    // 获取连接配套配置
    val connectionSpecs = route.address.connectionSpecs
    // 获得配置选择器
    val connectionSpecSelector = ConnectionSpecSelector(connectionSpecs)

    // 如果 OkHttpClient.Builder 没有配置 SSLSocketFactory 则表示协议使用明文传输(不适用HTTPS)
    if (route.address.sslSocketFactory == null) {
      // 检查明文配置是否在配置列表中
      if (ConnectionSpec.CLEARTEXT !in connectionSpecs) {
        throw RouteException(UnknownServiceException(
            "CLEARTEXT communication not enabled for client"))
      }
      // 检查平台是否支持该域名的明文传输(9.0 默认不支持Http明文传输)
      val host = route.address.url.host
      if (!Platform.get().isCleartextTrafficPermitted(host)) {
        throw RouteException(UnknownServiceException(
            "CLEARTEXT communication to $host not permitted by network security policy"))
      }
    } else {
      // 如果设置了SSL 则不允许 H2_PRIOR_KNOWLEDGE 协议(需要明文传输)
      if (Protocol.H2_PRIOR_KNOWLEDGE in route.address.protocols) {
        throw RouteException(UnknownServiceException(
            "H2_PRIOR_KNOWLEDGE cannot be used with HTTPS"))
      }
    }

    while (true) {
      try {
        // 是否要求隧道连接
        if (route.requiresTunnel()) {
          connectTunnel(connectTimeout, readTimeout, writeTimeout, call, eventListener)
          if (rawSocket == null) {
            // We were unable to connect the tunnel but properly closed down our resources.
            break
          }
        } else {
          // 建立Socket连接
          connectSocket(connectTimeout, readTimeout, call, eventListener)
        }
        // 确定协议和TLS连接,如果为HTTP2.0 则直接建立连接
        establishProtocol(connectionSpecSelector, pingIntervalMillis, call, eventListener)
        eventListener.connectEnd(call, route.socketAddress, route.proxy, protocol)
        break
      } catch (e: IOException) {
        ...
      }
    }

    ...
  }

  // 建立TCP Socket连接
  private fun connectSocket(
    connectTimeout: Int,
    readTimeout: Int,
    call: Call,
    eventListener: EventListener
  ) {
    val proxy = route.proxy
    val address = route.address

    // 如果是直连或者HTTP代理,都需要建立Socket,否则直接创建proxy的Socket代理
    val rawSocket = when (proxy.type()) {
      Proxy.Type.DIRECT, Proxy.Type.HTTP -> address.socketFactory.createSocket()!!
      else -> Socket(proxy)
    }
    this.rawSocket = rawSocket

    eventListener.connectStart(call, route.socketAddress, proxy)
    rawSocket.soTimeout = readTimeout
    try {
      // 调用平台创建连接Socket的方法
      Platform.get().connectSocket(rawSocket, route.socketAddress, connectTimeout)
    } catch (e: ConnectException) {
      throw ConnectException("Failed to connect to ${route.socketAddress}").apply {
        initCause(e)
      }
    }


    try {
      // 建立TCP连接后的流控制
      source = rawSocket.source().buffer()
      sink = rawSocket.sink().buffer()
    } catch (npe: NullPointerException) {
      if (npe.message == NPE_THROW_WITH_NULL) {
        throw IOException(npe)
      }
    }
  }


  // 建立TLS连接
  private fun connectTls(connectionSpecSelector: ConnectionSpecSelector) {
    val address = route.address
    val sslSocketFactory = address.sslSocketFactory
    var success = false
    var sslSocket: SSLSocket? = null
    try {
      // 调用 OkHttpClient.Build.sslSocketFactory 构造 SSLSocket
      // Create the wrapper over the connected socket.
      sslSocket = sslSocketFactory!!.createSocket(
          rawSocket, address.url.host, address.url.port, true /* autoClose */) as SSLSocket

      // 定义TLS版本和加密配套及其扩展
      val connectionSpec = connectionSpecSelector.configureSecureSocket(sslSocket)
      // 如果支持TLS扩展,调用平台扩展
      if (connectionSpec.supportsTlsExtensions) {
        Platform.get().configureTlsExtensions(sslSocket, address.url.host, address.protocols)
      }

      // 进行握手
      // Force handshake. This can throw!
      sslSocket.startHandshake()
      // block for session establishment
      val sslSocketSession = sslSocket.session
      val unverifiedHandshake = sslSocketSession.handshake()

      // 证书验证(OkHostnameVerifier),验证地址和目标地址ip,如果不通过则抛出
      if (!address.hostnameVerifier!!.verify(address.url.host, sslSocketSession)) {
        // 验证不通过则抛出异常
        val peerCertificates = unverifiedHandshake.peerCertificates
        if (peerCertificates.isNotEmpty()) {
          val cert = peerCertificates[0] as X509Certificate
          throw SSLPeerUnverifiedException("""
              |Hostname ${address.url.host} not verified:
              |    certificate: ${CertificatePinner.pin(cert)}
              |    DN: ${cert.subjectDN.name}
              |    subjectAltNames: ${OkHostnameVerifier.allSubjectAltNames(cert)}
              """.trimMargin())
        } else {
          throw SSLPeerUnverifiedException(
              "Hostname ${address.url.host} not verified (no certificates)")
        }
      }

      // 证书锁定器,用来抵抗CA攻击、中间人攻击
      val certificatePinner = address.certificatePinner!!

      handshake = Handshake(unverifiedHandshake.tlsVersion, unverifiedHandshake.cipherSuite,
          unverifiedHandshake.localCertificates) {
        // certificateChainCleaner 用来验证证书链,并且排除一些和TLS握手无关的证书,返回可用的CA证书链
        certificatePinner.certificateChainCleaner!!.clean(unverifiedHandshake.peerCertificates,
            address.url.host)
      }

      // 验证该host的证书支持的 hash 类型
      certificatePinner.check(address.url.host) {
        handshake!!.peerCertificates.map { it as X509Certificate }
      }

      // ALPN 扩展协议处理
      val maybeProtocol = if (connectionSpec.supportsTlsExtensions) {
        Platform.get().getSelectedProtocol(sslSocket)
      } else {
        null
      }
      socket = sslSocket
      source = sslSocket.source().buffer()
      sink = sslSocket.sink().buffer()
      protocol = if (maybeProtocol != null) Protocol.get(maybeProtocol) else Protocol.HTTP_1_1
      success = true
    } finally {
      // 握手后操作
      if (sslSocket != null) {
        Platform.get().afterHandshake(sslSocket)
      }
      if (!success) {
        sslSocket?.closeQuietly()
      }
    }
  }


  // 建立隧道连接
  private fun connectTunnel(
    connectTimeout: Int,
    readTimeout: Int,
    writeTimeout: Int,
    call: Call,
    eventListener: EventListener
  ) {
    // 封装请求头
    var tunnelRequest: Request = createTunnelRequest()
    val url = tunnelRequest.url
    // 做多尝试21次建立
    for (i in 0 until MAX_TUNNEL_ATTEMPTS) {
      // 先建立TCP连接
      connectSocket(connectTimeout, readTimeout, call, eventListener)

      // 创建隧道连接
      tunnelRequest = createTunnel(readTimeout, writeTimeout, tunnelRequest, url)
          ?: break

      rawSocket?.closeQuietly()
      rawSocket = null
      sink = null
      source = null
      eventListener.connectEnd(call, route.socketAddress, route.proxy, null)
    }
  }
回归findConnection
回归到 ConnectInterceptor.intercept 方法,在该方法中,主要对调用 RealCall.newExchange 获取 Exchange 代理对象,通过 Exchange 可以建立的连接上进行数据交互。
在 newExchange 中主要经历几个流程:
RealCall.newExchange(返回 Exchange) -> ExchangeFinder.find (返回 ExchangeCodec) -> ExchangeFinder.findHealthyConnection (返回 RealConnection )-> ExchangeFinder.findConnection (返回 RealConnection)
在 findConnection 中获得主要负责连接的代理对象 RealConnection。
  private fun findConnection(
    connectTimeout: Int,
    readTimeout: Int,
    writeTimeout: Int,
    pingIntervalMillis: Int,
    connectionRetryEnabled: Boolean
  ): RealConnection {
    var foundPooledConnection = false
    var result: RealConnection? = null
    var selectedRoute: Route? = null
    var releasedConnection: RealConnection?
    val toClose: Socket?
    synchronized(connectionPool) {
      // 调用被取消则直接退出
      if (call.isCanceled()) throw IOException("Canceled")
      hasStreamFailure = false // This is a fresh attempt.

      releasedConnection = call.connection

      // 如果call.connection的连接不允许创建新的传输(noNewExcahnges),则返回当前连接的Socket,以用于释放连接
      toClose = if (call.connection != null && call.connection!!.noNewExchanges) {
        call.releaseConnectionNoEvents()
      } else {
        null
      }

      // 如果call 以及存在 connection 则复用结果
      if (call.connection != null) {
        // 使用以及存在连接代替
        // We had an already-allocated connection and it's good.
        result = call.connection
        releasedConnection = null
      }

      // 如果为null ,代表当前call 不存在使用中的连接,从之前的连接池中查询
      if (result == null) {
        // 判断连接池中是否存在符合条件的连接(已经被回收)
        if (connectionPool.callAcquirePooledConnection(address, call, null, false)) {
          foundPooledConnection = true
          result = call.connection
        } else if (nextRouteToTry != null) {
          // 如果未找到合适复用连接 则查看是否有需要优先选择的路由路线
          selectedRoute = nextRouteToTry
          nextRouteToTry = null
        } else if (retryCurrentRoute()) {
          // 如果没有,则直接重新计算路由
          selectedRoute = call.connection!!.route()
        }
      }
    }
    toClose?.closeQuietly()

    if (releasedConnection != null) {
      eventListener.connectionReleased(call, releasedConnection!!)
    }
    if (foundPooledConnection) {
      eventListener.connectionAcquired(call, result!!)
    }

    // 在之前中已经找到已经可使用的连接
    if (result != null) {
      return result!!
    }

    var newRouteSelection = false

    // 如果还没有Route选定并且 RouteSelection 还未初始化,则进行初始化,以备下面使用
    if (selectedRoute == null && (routeSelection == null || !routeSelection!!.hasNext())) {
      newRouteSelection = true
      routeSelection = routeSelector.next()
    }

    var routes: List<Route>? = null
    synchronized(connectionPool) {
      // 检查调用是否被取消
      if (call.isCanceled()) throw IOException("Canceled")

      // 如果新建 RouteSelection 则进行重新Route的获取
      if (newRouteSelection) {
        routes = routeSelection!!.routes
        // 获取连接池中适合call所使用的连接,如果返回true在表示已有合适的连接和call绑定(call.acquireConnectionNoEvents)
        if (connectionPool.callAcquirePooledConnection(address, call, routes, false)) {
          foundPooledConnection = true
          result = call.connection // 获取当前所获得的复用的连接
        }
      }

      // 如果没在连接池中获得复用连接,则从路由节点中获得新的路由点(尝试在接下来中进行连接)
      if (!foundPooledConnection) {
        if (selectedRoute == null) {
          // 如果之前还没对Route路线进行选择,则进行路由选择
          selectedRoute = routeSelection!!.next()
        }

        // 创建连接
        result = RealConnection(connectionPool, selectedRoute!!)
        connectingConnection = result
      }
    }

    // 如果在连接池中找到则返回结果
    if (foundPooledConnection) {
      eventListener.connectionAcquired(call, result!!)
      return result!!
    }

    // 开执TCP TLS 连接
    result!!.connect(
        connectTimeout,
        readTimeout,
        writeTimeout,
        pingIntervalMillis,
        connectionRetryEnabled,
        call,
        eventListener
    )
    // 连接成功后,如果routeDatabase列表中(失败节点)存在该Route则从黑名单中移除
    call.client.routeDatabase.connected(result!!.route())

    var socket: Socket? = null
    synchronized(connectionPool) {
      connectingConnection = null
      if (connectionPool.callAcquirePooledConnection(address, call, routes, true)) {
        result!!.noNewExchanges = true
        socket = result!!.socket()
        result = call.connection

        nextRouteToTry = selectedRoute
      } else {
        connectionPool.put(result!!)
        call.acquireConnectionNoEvents(result!!)
      }
    }
    socket?.closeQuietly()

    eventListener.connectionAcquired(call, result!!)
    return result!!
  }
在流程中 findConnection 是比较重要的一个流程。这里实现了OkHttp 连接复用流程。对于连接成功后的连接 通过 RealConnectionPool.put 进行缓存。
ConnectionPool 连接复用
ConnectionPool 在整个连接过程中,记录着连接的变化
CallServerInterceptor
CallServerInterceptor 负责在数据传输上的处理,包括在HTTP上传递头部和Body信息(应用层数据传输)
 override fun intercept(chain: Interceptor.Chain): Response {
    val realChain = chain as RealInterceptorChain
    val exchange = realChain.exchange()
    val request = realChain.request()
    val requestBody = request.body
    val sentRequestMillis = System.currentTimeMillis()
    // 向 Exchange 写入头部信息
    exchange.writeRequestHeaders(request)

    var invokeStartEvent = true
    var responseBuilder: Response.Builder? = null


    // 组装RequestBody,如果该次事务不需要则 exchange.noRequestBody()
    if (HttpMethod.permitsRequestBody(request.method) && requestBody != null) {
      // 处理 100-continue 状况,表示需要多次传输
      if ("100-continue".equals(request.header("Expect"), ignoreCase = true)) {
        // 执行请求
        exchange.flushRequest()
        responseBuilder = exchange.readResponseHeaders(expectContinue = true)
        exchange.responseHeadersStart()
        invokeStartEvent = false
      }
      if (responseBuilder == null) {
        // 是否支持二进制body(HTTP2.0)
        if (requestBody.isDuplex()) {
          // 创建二进制RequestBody
          exchange.flushRequest()
          val bufferedRequestBody = exchange.createRequestBody(request, true).buffer()
          requestBody.writeTo(bufferedRequestBody)
        } else {
          // 直接发送body内容
          val bufferedRequestBody = exchange.createRequestBody(request, false).buffer()
          requestBody.writeTo(bufferedRequestBody)
          bufferedRequestBody.close()
        }
      } else {
        exchange.noRequestBody()
        // 不支持多路,关闭事务
        if (!exchange.connection()!!.isMultiplexed) {
          exchange.noNewExchangesOnConnection()
        }
      }
    } else {
      // 执行不带body的请求
      exchange.noRequestBody()
    }

    // 到这里如果不支持二进制body HTTP2.0 则完成该次请求
    if (requestBody == null || !requestBody.isDuplex()) {
      exchange.finishRequest()
    }

    // 获取请求结果
    if (responseBuilder == null) {
      responseBuilder = exchange.readResponseHeaders(expectContinue = false)!!
      if (invokeStartEvent) {
        exchange.responseHeadersStart()
        invokeStartEvent = false
      }
    }
    var response = responseBuilder
        .request(request)
        .handshake(exchange.connection()!!.handshake())
        .sentRequestAtMillis(sentRequestMillis)
        .receivedResponseAtMillis(System.currentTimeMillis())
        .build()
    var code = response.code
    if (code == 100) {
      // Server sent a 100-continue even though we did not request one. Try again to read the actual
      // response status.
      responseBuilder = exchange.readResponseHeaders(expectContinue = false)!!
      if (invokeStartEvent) {
        exchange.responseHeadersStart()
      }
      response = responseBuilder
          .request(request)
          .handshake(exchange.connection()!!.handshake())
          .sentRequestAtMillis(sentRequestMillis)
          .receivedResponseAtMillis(System.currentTimeMillis())
          .build()
      code = response.code
    }

    exchange.responseHeadersEnd(response)

    response = if (forWebSocket && code == 101) {
      // Connection is upgrading, but we need to ensure interceptors see a non-null response body.
      response.newBuilder()
          .body(EMPTY_RESPONSE)
          .build()
    } else {
      response.newBuilder()
          .body(exchange.openResponseBody(response))
          .build()
    }
    if ("close".equals(response.request.header("Connection"), ignoreCase = true) ||
        "close".equals(response.header("Connection"), ignoreCase = true)) {
      exchange.noNewExchangesOnConnection()
    }
    if ((code == 204 || code == 205) && response.body?.contentLength() ?: -1L > 0L) {
      throw ProtocolException(
          "HTTP $code had non-zero Content-Length: ${response.body?.contentLength()}")
    }
    return response
  }
}