vue动态添加表单
Define form fields once, as schema, and render them anywhere!
一次将表单字段定义为架构,然后将其呈现在任何地方!
How much code does it take for you to render all forms in your application? Do you find yourself adding the same fields to multiple forms? How hard would it be for you to change UI frameworks based on your forms?
在您的应用程序中呈现所有表单需要花费多少代码? 您是否发现自己将相同的字段添加到多个表单中? 根据表单更改UI框架会有多困难?
These are just some of the reasons I decided to focus some time to design dynamic forms for my projects.
这些只是我决定花一些时间为项目设计动态表单的一些原因。
There are numerous packages available to provide dynamic forms; however, I was not able to find one that met my needs.
有许多软件包可以提供动态表格。 但是,我找不到能满足我需求的产品。
问题 (Problem)
I have been using Vue.js and Quasar Framework for about 6 months now. I love Quasar Framework because it provides all of the UI components I require and it gives me the option to write code once and build it as a web, desktop and/or mobile application. I absolutely love this platform. ?
我已经使用Vue.js和Quasar Framework大约6个月了。 我喜欢Quasar Framework,因为它提供了我需要的所有UI组件,并且使我可以选择编写一次代码并将其构建为Web,桌面和/或移动应用程序。 我绝对喜欢这个平台。 ?
I’m currently working on a decent sized project where I manage numerous types of collections (e.g. Users, Projects, Tasks, etc.). I have several forms for each of these to list, create, update and delete the different collection items. After a time I started to recognize a lot of duplicate code. One area of duplicates I found was in my forms and their components. If I want a form to add a user I would build it and include all of the UI components necessary.
我目前正在做一个体面的项目,负责管理多种类型的馆藏(例如,用户,项目,任务等)。 我有几种形式可以列出,创建,更新和删除不同的收集项目。 一段时间后,我开始认识到很多重复的代码。 我发现重复项的一个方面是我的表单及其组成部分。 如果要添加用户的表单,则可以构建它并包括所有必需的UI组件。
<q-form>
  <q-input color='primary' label='First Name' v-model='fname' ... />
  <q-input color='primary' label='Last Name' v-model='lname' ... /></q-form>
The small example here is building a form to gather the first name and last name of this collection (let’s say it is a collection of ‘doctors’).
这里的一个小例子是构建一个表单来收集此集合的名字和姓氏(假设它是“医生”的集合)。
Now I need a form to add nurses. I need another form to add administrative staff. Etc. I end up with multiple forms, all of which have a First Name and Last Name field defined.
现在,我需要一个表格来添加护士。 我需要另一张表格来添加管理人员。 等等,我最终得到多种形式,所有形式都定义了“名”和“姓”字段。
In the past I would create component templates. I call them “templates” because when I import them I’m providing their configuration through props. Here is a simple example of what I mean:
在过去,我将创建组件模板。 我称它们为“模板”,因为导入它们时,我是通过道具提供其配置的。 这是我的意思的简单示例:
<!-- components/MyInput.vue -->
<template>
  <q-input :class="class" :color="color" :label="label" :value="model" />
</template><script>
export default {
  props: ['class', 'color', 'label', 'value']
}
</script>
My form from above would now look like this:
我上面的表格现在看起来像这样:
<q-form>
  <my-input color='primary' label='First Name' value='fname' ... />
  <my-input color='primary' label='Last Name' value='lname' ... /></q-form>
There really isn’t much benefit to this approach. In fact, I end up with more lines of code to support than before.
这种方法确实没有太大的好处。 实际上,与以前相比,我最终要支持更多的代码行。
There is a use case for templates. For example, when you are in a large team and you want to make sure everyone is using the same components. In this case you wouldn’t expose very many options for those components because you purposefully want them to always look and act the same.
模板有一个用例。 例如,当您在一个大型团队中时,您想确保每个人都使用相同的组件。 在这种情况下,您不会为这些组件公开太多选项,因为您有目的地希望它们始终外观和行为相同。
This is an overly simple example but enough to make my points. What if I wanted to populate an attribute besides class (Quasar’s QInputcomponent alone offers dozens of properties)? I would have to add that attribute to my template and my props.
这是一个过于简单的示例,但足以说明我的观点。 如果我想填充类之外的属性(Quasar的QInput组件仅提供数十个属性)怎么办? 我将不得不将该属性添加到我的模板和道具中。
On a side note, this is exactly why organizations use tools like Storybook. They need a way to document their components all of the props they expose.
顺便说一句,这就是组织为什么使用Storybook之类的工具的原因。 他们需要一种方法来记录其所暴露的所有道具的组件。
It gets worse before it gets better. My input component template was simple. To demonstrate the other extreme, here is an example using a Quasar Framework component, QDate. You can use this component by itself but normally you want to use it with a popup for a QInputcomponent. Below is the Quasar documentation showing how to define such a component.
在变得更好之前,它变得更糟。 我的输入组件模板很简单。 为了说明另一个极端,这是一个使用Quasar Framework组件QDate的示例。 您可以 单独使用此组件,但是通常您希望将其与QInput组件的弹出窗口一起使用。 以下是Quasar文档,显示了如何定义这样的组件。
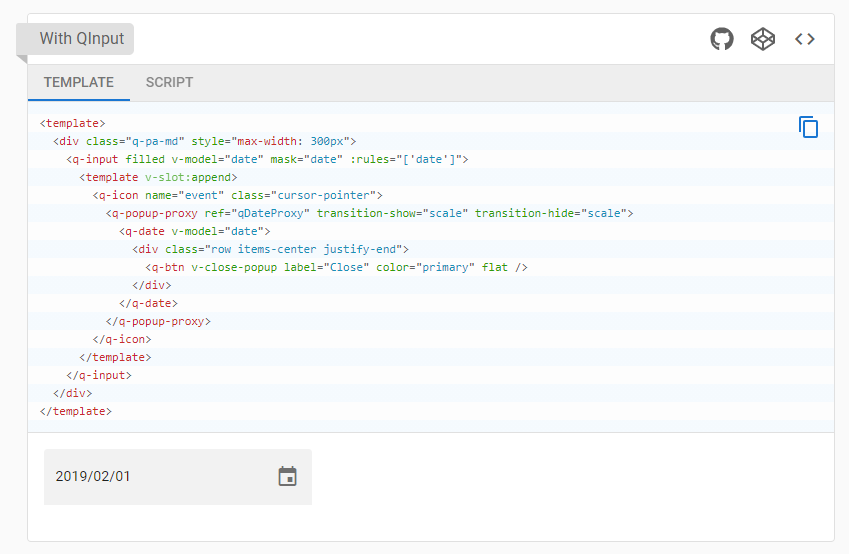
Excluding the outer template and div elements, it takes 7 nested components to create this date field. To make this into a “templatized” component would require providing props for each component in this nest. I didn’t count but this could easily result in over 100 props in order to support every combination of configuration possible!
除外部template和div元素外,它需要7个嵌套组件才能创建此date字段。 为了使其成为“模板化”组件,需要为此嵌套中的每个组件提供道具。 我没有数,但这很容易导致超过100个道具,以支持可能的每种组合配置!
I don’t want to manage component templates anymore. I want to have a schema definition that can fully render my components that supports any UI component along with all of it attributes.
我不想再管理组件模板。 我希望有一个架构定义,它可以完全呈现支持所有UI组件及其所有属性的组件。
研究 (Research)
In my research I came across how Vue renders the UI and how, as a developer, you can use the same render function in your code. In fact, everything inside of template is rendered this way behind-the-scenes. The render syntax can be a little tough to grasp at first. Here is a small example:
在我的研究中,我遇到了Vue如何呈现 UI以及作为开发人员如何在代码中使用相同的呈现功能。 实际上, template内部的所有内容都是在幕后以这种方式呈现的。 首先,渲染语法可能有点难以掌握。 这是一个小例子:
<script>
export default {
  render(h) {
    h('q-input', {
      class: ['text-body1'],
      props: {
        color: 'primary',
        label: 'First Name',
        value: 'fname',
      }
    })
  }
}
</script>
NOTE: I purposely left out the
templatesection of this Vue component because it cannot be in the file for the render function to take precedence. I learned this the hard way! ?注意:我特意忽略了此Vue组件的
template部分,因为它不能在文件中使render函数具有优先权。 我经过惨痛的教训才学到这个! ?
This is the “raw” Vue render code to present my first name field using the QInputcomponent from Quasar Framework.
这是“原始” Vue渲染代码,用于使用Quasar Framework中的QInput组件显示我的名字字段。
What about my nested example from before? That is also covered by the render function! It isn’t in the example above but later on you will see that each component rendered has an optional children parameter. There is no limit to how many children deep you can go. From the Vue documentation, here is the actual syntax of a render component.
那我以前的嵌套示例呢? 渲染功能也涵盖了这一点! 上面的示例中没有,但是稍后您将看到每个渲染的组件都有一个可选的children参数。 您可以深入到多少个孩子没有限制。 在Vue文档中,这是渲染组件的实际语法。
// @returns {VNode}
createElement(
  // {String | Object | Function}
  // An HTML tag name, component options, or async
  // function resolving to one of these. Required.
  'div',  // {Object}
  // A data object corresponding to the attributes
  // you would use in a template. Optional.
  {
    // (see details in the next section below)
  },      // {String | Array}
  // Children VNodes, built using `createElement()`,
  // or using strings to get 'text VNodes'. Optional.
  [
    'Some text comes first.',
    createElement('h1', 'A headline'),
    createElement(MyComponent, {
      props: {
        someProp: 'foobar'
      }
    })
  ]
)
原型 (Prototype)
The prototype was frustrating but fun to build. Let’s walk through a scenario.
原型令人沮丧,但是建造起来很有趣。 让我们来看一个场景。
When the user clicks on an Add button we know their intention (“add”) and context (e.g. “doctor”). We load our Form component. The Form component gathers the schema for this context. The Form component then uses a Field component which renders the field UI based on the schema provided. Easy! ?
当用户单击“添加”按钮时,我们知道他们的意图(“添加”)和上下文(例如“医生”)。 我们加载表单组件。 Form组件收集此上下文的架构。 然后, Form组件使用Field组件,该组件根据提供的架构来呈现Field UI。 简单! ?
Working backwards, here is my prototype. We will start with example field schema definition.
向后工作,这是我的原型。 我们将从示例字段模式定义开始。
fieldSchema.js
fieldSchema.js
/*
 * <field-name>: {
 *    component: '<ui-component-name>',
 *    default: '',               // Default value
 *    label: '<field-label>',
 *    model: '<model-field-name>',
 *    fieldOptions: {
 *       attrs: {                // Native component attributes
 *          _type: 'password'    // Prefix keyword with '_'
 *       },
 *       class: [],
 *       key: '',
 *       id: '',
 *       on: {
 *          input: true,         // Required to update model
 *          <event-name>: <event-function>,
 *       },
 *       props: {},              // Custom component attributes
 *       ref: '',
 *       slot: '',               // Named slot for 'template' components
 *       style: {},
 *    },
 *    children: []
 * }
 */


export const defs = {
   birthdate: {
      component: 'q-input',
      label: 'Birthdate',
      model: 'birthdate',
      fieldOptions: {
         props: {
            filled: true,
            readonly: true,
            value: 'birthdate',
         },
         style: {
            width: '200px',
         },
      },
      children: [
         {
            component: 'template',
            fieldOptions: {
               slot: 'append',
            },
            children: [
               {
                  component: 'q-icon',
                  fieldOptions: {
                     class: ['cursor-pointer'],
                     props: { name: 'event' },
                  },
                  children: [
                     {
                        component: 'q-popup-proxy',
                        fieldOptions: {
                           props: {
                              'transition-show': 'scale',
                              'transition-hide': 'scale',
                           },
                        },
                        children: [
                           {
                              component: 'q-date',
                              model: 'birthdate',
                              fieldOptions: {
                                 props: {
                                    mask: 'X',
                                    minimal: true,
                                    value: 'birthdate',
                                 },
                                 on: { input: true },
                              },
                              children: [
                                 {
                                    component: 'template',
                                    fieldOptions: {
                                       slot: 'default',
                                    },
                                    children: [
                                       {
                                          component: 'div',
                                          fieldOptions: {
                                             class: ['row', 'items-center', 'justify-end'],
                                          },
                                          children: [
                                             {
                                                component: 'q-btn',
                                                fieldOptions: {
                                                   props: {
                                                      label: 'Close',
                                                      color: 'primary',
                                                      flat: true,
                                                   },
                                                },
                                             },
                                          ],
                                       },
                                    ],
                                 },
                              ],
                           },
                        ],
                     },
                  ],
               },
            ],
         },
      ],
   },


   gender: {
      component: 'q-select',
      label: 'Gender',
      model: 'gender',
      fieldOptions: {
         class: [],
         on: { input: true },
         attrs: {},
         props: {
            filled: true,
            options: ['Female', 'Male'],
         },
         style: {
            width: '200px',
         },
      },
   },


   name: {
      component: 'q-input',
      label: 'Name',
      model: 'name',
      fieldOptions: {
         class: [],
         on: { input: true },
         attrs: {
            placeholder: 'Enter your full name',
         },
         props: {
            filled: true,
            rules: [val => !!val || 'Field is required'],
         },
         style: {
            width: '200px',
         },
      },
   },


   mobile: {
      component: 'q-input',
      label: 'Mobile Number',
      model: 'mobile',
      fieldOptions: {
         class: [],
         on: { input: true },
         attrs: {},
         props: {
            filled: true,
            mask: '+1 ### ### ####',
            'unmasked-value': true,
         },
         style: {
            width: '200px',
         },
      },
      children: [
         {
            component: 'template',
            fieldOptions: {
               class: [],
               attrs: {},
               slot: 'before',
               style: {},
            },
            children: [
               {
                  component: 'q-icon',
                  fieldOptions: {
                     class: [],
                     attrs: {},
                     props: {
                        name: 'phone',
                     },
                     style: {},
                  },
               },
            ],
         },
      ],
   },
}
This particular schema is only defining four fields: name, birthdate, gender and mobile. The name component is the simplest because it contains no children. The birthdate component is the most complex as it is handling eight nested components.
该特定模式仅定义四个字段:姓名,生日,性别和移动电话。 名称组件是最简单的,因为它不包含任何子代。 生日组件最复杂,因为它要处理八个嵌套组件。
Even though this file could get really large we are only defining form fields one time for the entire application (and all other projects if we choose to re-use it elsewhere).
即使此文件可能会变得很大,我们也只能为整个应用程序(以及所有其他项目,如果我们选择在其他地方重复使用)一次定义表单字段。
The schema includes all aspects of the UI component definition (component name, styles, attributes, classes, props, etc.). Right now I’m using Quasar Framework components. If I start another project that requires another framework I just modify this file and it’s implemented (at least for all form fields).
该架构包括UI组件定义的所有方面(组件名称,样式,属性,类,道具等)。 现在,我正在使用Quasar Framework组件。 如果我启动另一个需要另一个框架的项目,我只需修改此文件即可(至少对于所有表单字段而言)。
Next let’s look at the form schema definitions.
接下来,让我们看一下表单模式定义。
export const users = {
   add: {
      name: {},
      birthdate: {},
      gender: {},
   },
   update: {
      name: {},
      birthdate: {},
      gender: {},
   },
}


export const person = {
   ...users,
   add: {
      ...users.add,
      mobile: {},
   },
   update: {
      ...users.update,
      mobile: {},
   },
}


export const pet = {
   ...users,
}
The purpose of the form schema is to map the form fields we want to the current context. The context in this case is a combination of collection and event. In other words, if I create a form to add users then, according to this file, I would have a form with the fields: name, birthdate, and gender.
表单架构的目的是将我们想要的表单字段映射到当前上下文。 在这种情况下,上下文是集合和事件的组合。 换句话说,如果我创建一个添加用户的表单,那么根据该文件,我将拥有一个包含以下字段的表单:姓名,生日和性别。
Thanks to spread operators it is also very simple to implement inheritance. If my context is adding a person, the fields rendered would be name, birthdate, gender and mobile. This can make for a very efficient schema definition.
多亏了传播算子,实现继承也非常简单。 如果我要添加一个人,则显示的字段将是姓名,生日,性别和移动电话。 这可以实现非常有效的架构定义。
Next is the work horse of the prototype, the field rendering component.
接下来是原型的工作马,即场渲染组件。
<script>
export default {
   props: {
      field: {
         type: Object,
         required: true,
      },
      model: {
         type: Object,
         required: true,
      },
      onInput: {
         type: Function,
         required: true,
      },
   },
   methods: {
      assignFieldData(f) {
         if (!f.fieldOptions) return {}
         const fo = f.fieldOptions
         let data = {}
         if (fo.attrs && Object.keys(fo.attrs).length) {
            data.attrs = {}
            Object.keys(fo.attrs).map(key => {
               if (key.startsWith('_')) {
                  data.attrs[key.substr(1)] = fo.attrs[key]
               } else {
                  data.attrs[key] = fo.attrs[key]
               }
            })
         }
         if (fo.class && fo.class.length) {
            data.class = fo.class
         }
         if (fo.on && Object.keys(fo.on).length) {
            data.on = {}
            Object.keys(fo.on).map(e => {
               if (e === 'input') {
                  data.on.input = (v) => this.onInput(v, f.model)
               } else {
                  data.on[e] = fo.on[e]
               }
            })
         }
         if (fo.props && Object.keys(fo.props).length) {
            data.props = fo.props
         }
         if (f.model) data.props.value = this.model[f.model]
         if (fo.ref) data.ref = fo.ref
         if (fo.slot) data.slot = fo.slot
         data.style = fo.style && Object.keys(fo.style).length ?
            fo.style : null
         return data
      },
      appendLabel(h, f) {
         return h('div', {
            class: ['text-caption'],
         }, [
            f.label,
         ])
      },
      appendComponent(h, f) {
         if (f.children && Array.isArray(f.children)) {
            return h(f.component, this.assignFieldData(f), f.children.map(child => this.appendComponent(h, child)))
         }
         return h(f.component, this.assignFieldData(f), f.children)
      }
   },
   render(h) {
      const field = this.field
      const child = [this.appendLabel(h, field)]
      child.push(this.appendComponent(h, field))
      const data = { class: ['column', 'q-gutter-xs'] }
      return h('div', data, child)
   },
}
</script>
Each of our field schema definitions gets passed into this component as field prop. From this schema the component, in its entirety, is rendered.
我们的每个字段架构定义都作为field支持传递到此组件中。 根据此架构,可以完整呈现该组件。
There is nothing hard coded to render any component, regardless of its complexity.
不管其复杂性如何,都没有硬编码来呈现任何组件。
This implementation also supports every configuration possible for every component and nested component you throw at it.
此实现还支持您向其抛出的每个组件和嵌套组件的所有可能配置。
Let this sink in a minute. Nothing hard coded. All attributes, props, classes, etc., supported.
让它在一分钟内下沉。 没有硬编码。 支持所有属性,道具,类等。
Lastly let’s look at the form component.
最后,让我们看一下表单组件。
<template>
   <q-page padding>
      <q-form class="q-gutter-md" @submit="mxFormSubmit(model)">
         <f-field-render
            v-for="field in fields"
            :key="field.model"
            :field="field"
            :onInput="(value,field) => onInput(value,field)"
            :model="model"
         />


         <div class="row q-gutter-md">
            <q-btn label="Cancel" outline no-caps
                   :to="{ name: 'collection-list', params: { collection: mxCollection } }" />
            <q-btn label="Reset" outline no-caps type="reset" />
            <q-btn color="primary" label="Save" :loading="mxLoading" no-caps type="submit" />
         </div>
      </q-form>
   </q-page>
</template>


<script>
import { mapGetters } from 'vuex'
import mxCollections from 'src/mixins/mxCollections'
import mxCRUD from 'src/mixins/mxCRUD'
import * as collectionFields from 'src/models/collectionSchema'
import * as fieldDefs from 'src/models/uiFieldDefs'
export default {
   data() {
      return {
         model: {},
      }
   },
   computed: {
      ...mapGetters(['collection/item']),
      op() {
         let op
         let pathArray = this.$route.path.split('/')
         if (pathArray.includes('add')) op = 'add'
         if (pathArray.includes('update')) op = 'update'
         return op
      },
      fields() {
         let fields = {}
         let fieldNames = Object.keys(collectionFields[this.mxCollection][this.op])
         fieldNames.map(name => {
            fields[name] = fieldDefs.defs[name]
         })
         return fields
      },
   },
   methods: {
      initModel() {
         if (this.op === 'update') {
            this.model = {...this['collection/item']({
                  collection: this.mxCollection,
                  collectionId: this.mxCollectionId
            })}
         }
      },
      onInput(value, field) {
         this.$set(this.model, field, value)
      },
   },
   mixins: [mxCollections, mxCRUD],
   components: {
      FFieldRender: () => import('components/FField'),
   },
   mounted() {
      console.log('***** FForm', 'op', this.op, 'field', fieldDefs.defs)
      this.initModel()
   },
}
</script>
The form component is the orchestrator of our awesome solution. This is the only form component we need in our app. It determines context (with the help of Vue Router and some simple mixins to reduce code), gathers the field schema, renders those fields and returns a fully rendered form to the user.
表单组件是我们出色解决方案的协调器。 这是我们应用程序中唯一需要的表单组件。 它确定上下文(借助Vue Router和一些简单的mixin来减少代码),收集字段架构,呈现这些字段,并将完全呈现的形式返回给用户。
结论 (Conclusion)
I assume this is a lot to digest for many of you at first. I suggest you play with the concept to fully grasp the flexibility something like this offers. I’m hoping it drastically reduces my development time while reducing troubleshooting complexities.
我认为一开始对很多人来说,这是很多东西。 我建议您使用该概念,以完全掌握此类提供的灵活性。 我希望它可以大大减少开发时间,同时减少故障排除的复杂性。
Based on this solution, what would it take to add a new field to a form? Let’s say we want to track email address for our person context.
基于此解决方案,向表单添加新字段将需要什么? 假设我们要跟踪个人背景的电子邮件地址。
- Since we don’t have email address defined in our field schema, let’s start there by adding a new key to the root of our schema object.由于我们没有在字段架构中定义电子邮件地址,因此我们首先在架构对象的根目录中添加一个新密钥。
{
  ...  email: {
    component: 'q-input',
    label: 'Email Address',
    model: 'email',
    fieldOptions: {
      class: [],
      on: { input: true },
      attrs: {
        placeholder: 'Enter your email address',
      },
      props: {
        filled: true,
        rules: [
          val => !!val || 'Field is required',
          val => <enter email validation regex> || 'Must be valid
              email address',
        ],
      },
      style: {
        width: '200px',
      },
    },
  }
  ...
}
2. Then we need to add the field to our add person context.
2.然后,我们需要将该字段添加到我们的添加person上下文中。
export const person = {
   ...users,
   add: {
      ...users.add,
      mobile: {},
+     email: {},
   },
   update: {
      ...users.update,
      mobile: {},
+     email: {},
    },
}
That’s it! Next time our add person form displays our email address field will be rendered, including its model, components, style, validation, etc.
而已! 下次我们的添加人表单显示时,将呈现我们的电子邮件地址字段,包括其模型,组件,样式,验证等。
There are several aspects to this implementation that I didn’t cover. If anyone is interested into me diving further into this implementation please don’t hesitate to ask.
我没有涉及该实现的几个方面。 如果有人对我感兴趣,请进一步研究此实现。
翻译自: https://levelup.gitconnected.com/add-dynamic-forms-to-your-vue-app-609de4005a2b
vue动态添加表单