Python 使用列表表示树
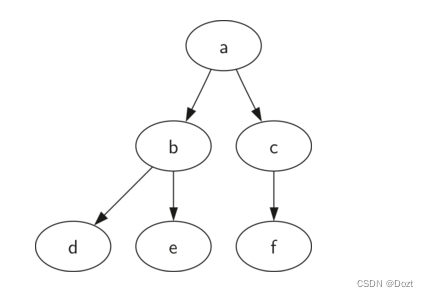
使用列表表示树,会让我们更容易了解和观察树的结构,而且,这样也为我们提供了可以递归的数据结构,方便我们进行检查和查看。在列表树的列表中,我们将根节点作为第一个元素,列表的第二个元素,则表示左子树列表,第三个元素表示右子树列表。
mytree = [
	'a',  # 根节点
	['b', # 左子树
	['d', [], []],  # 叶子结点
	['e', [], []]   # 叶子结点
	],
	['c',  # 右子树
	['f', [], []],  # 叶子结点
	[]  # 叶子结点
	]
]
通过上边的代码,我们可以清晰地看到,列表的第一个元素,代表根节点,列表的第二个元素,代表左子树,列表的第三个元素代表右子树。而深入左子树和右子树去看,则每一个都遵从树的定义结构,这个结构本身就是递归的。当我们到达叶子结点时,我们使用一个具备根值和两个空列表表示,这样我们就很清晰的知道这个是叶子结点。
myTree = ['a', ['b', ['d',[],[]], ['e',[],[]]], ['c', ['f',[],[]], []]]
print(myTree)  # 打印树
print('左子树:', myTree[1])  # 左子树:['b', ['d',[],[]], ['e',[],[]]]
print('根节点 ', myTree[0])  # 根节点:'a'
print('右子树:', myTree[2])  # 右子树:['c', ['f',[],[]], []]
插入左子节点:首先我们要先获得与当前左子节点对应的列表(可能为空列表),然后我们添加新的左子树,添加旧的左子树为新子节点的左子节点。
def insertLeft(root, newBranch):
    """
	插入左子节点
    :param root: 树
    :type root: ['a', ['b', ['d', [], []], ['e', [], []]], ['c', ['f', [], []]]]
    :param newBranch: 节点
    :type newBranch: 1
    :return:
    :rtype:
    """
    t = root.pop(1)
    if len(t) > 1:
    	# [1, ['b', ['d',[],[]], ['e',[],[]]], []] 生成一个新的子树,将旧的左子树作为新的左子节点的左子树
        root.insert(1, [newBranch, t, []])
    else:
        root.insert(1, [newBranch, [], []])
    return root
print(insertLeft(['a', ['b', ['d', [], []], ['e', [], []]], ['c', ['f', [], []]]], 1))

['a', [1, ['b', ['d', [], []], ['e', [], []]], []], ['c', ['f', [], []]]]
插入右子节点同理:
def insertRight(root,newBranch):
    t = root.pop(2)
    if len(t) > 1:
        root.insert(2,[newBranch,[],t])
    else:
        root.insert(2,[newBranch,[],[]])
    return root
访问树的结构
# 根节点
def getRootVal(root):
    return root[0]

# 设置根节点
def setRootVal(root,newVal):
    root[0] = newVal

# 获取左子树
def getLeftChild(root):
    return root[1]

# 获取右子树
def getRightChild(root):
    return root[2]
版权声明:本文为weixin_42253753原创文章,遵循CC 4.0 BY-SA版权协议,转载请附上原文出处链接和本声明。