res/layout/activity_main.xml
布局文件对分栏的布局以及与res/navigation和res/menu的对应
<?xml version="1.0" encoding="utf-8"?>
<androidx.constraintlayout.widget.ConstraintLayout xmlns:android="http://schemas.android.com/apk/res/android"
    xmlns:app="http://schemas.android.com/apk/res-auto"
    xmlns:tools="http://schemas.android.com/tools"
    android:id="@+id/container"
    android:layout_width="match_parent"
    android:layout_height="match_parent"
    android:paddingTop="?attr/actionBarSize">


    <fragment
        android:id="@+id/nav_host_fragment"
        android:name="androidx.navigation.fragment.NavHostFragment"
        android:layout_width="match_parent"
        android:layout_height="match_parent"
        app:defaultNavHost="true"
        app:layout_constraintBottom_toTopOf="@id/nav_view"
        app:layout_constraintHorizontal_bias="0.0"
        app:layout_constraintLeft_toLeftOf="parent"
        app:layout_constraintRight_toRightOf="parent"
        app:layout_constraintTop_toTopOf="parent"
        app:layout_constraintVertical_bias="1.0"
        app:navGraph="@navigation/mobile_navigation" /><!--这一行是对应了res/navigation文件-->

    <com.google.android.material.bottomnavigation.BottomNavigationView
        android:id="@+id/nav_view"
        android:layout_width="0dp"
        android:layout_height="wrap_content"
        android:layout_marginStart="0dp"
        android:layout_marginEnd="0dp"
        android:background="?android:attr/windowBackground"
        app:layout_constraintBottom_toBottomOf="parent"
        app:layout_constraintLeft_toLeftOf="parent"
        app:layout_constraintRight_toRightOf="parent"
        app:menu="@menu/bottom_nav_menu" /><!--这一行是对应了res/menu文件-->
</androidx.constraintlayout.widget.ConstraintLayout>
res/menu

<?xml version="1.0" encoding="utf-8"?>
<menu xmlns:android="http://schemas.android.com/apk/res/android">

    <item
        android:id="@+id/navigation_home"
        android:icon="@drawable/ic_home_black_24dp"
        android:title="@string/title_home" />

    <item
        android:id="@+id/navigation_dashboard"
        android:icon="@drawable/ic_dashboard_black_24dp"
        android:title="@string/title_dashboard" />

    <item
        android:id="@+id/navigation_notifications"
        android:icon="@drawable/ic_notifications_black_24dp"
        android:title="@string/title_notifications" />

    <item
        android:id="@+id/navigation_user_information"
        android:icon="@drawable/ic_myinformation_black_24dp"
        android:title="@string/title_userinformation" />

</menu>
item与fragment的对应(res/navigation)

<?xml version="1.0" encoding="utf-8"?>
<navigation xmlns:android="http://schemas.android.com/apk/res/android"
    xmlns:app="http://schemas.android.com/apk/res-auto"
    xmlns:tools="http://schemas.android.com/tools"
    android:id="@+id/mobile_navigation"
    app:startDestination="@+id/navigation_home"><!--这一行声明了起始Fragement-->

    <fragment
        android:id="@+id/navigation_home"
        android:name="com.example.alarm1.ui.home.HomeFragment"
        android:label="@string/title_home"
        tools:layout="@layout/fragment_home" />

    <fragment
        android:id="@+id/navigation_dashboard"
        android:name="com.example.alarm1.ui.dashboard.DashboardFragment"
        android:label="@string/title_dashboard"
        tools:layout="@layout/fragment_dashboard" />

    <fragment
        android:id="@+id/navigation_notifications"
        android:name="com.example.alarm1.ui.notifications.NotificationsFragment"
        android:label="@string/title_notifications"
        tools:layout="@layout/fragment_notifications" />

    <fragment
        android:id="@+id/navigation_user_information"
        android:name="com.example.alarm1.ui.information.InformationFragment" <!-- 这一行是为了将fragment与下面的java类文件对应 -->
        android:label="@string/title_userinformation"
        tools:layout="@layout/fragment_information" />     <!-- 这一行是为了将fragment与下面的xml布局文件对应 -->
</navigation>
fragment和java类的对应关系
这些java类用来加载视图(*****Fragment.class),以及对视图进行动态处理(*****ViewModel.class)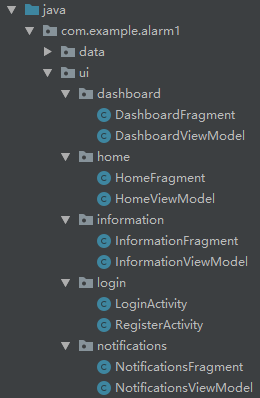
举例:
import androidx.annotation.Nullable;
import androidx.fragment.app.Fragment;
import androidx.lifecycle.Observer;
import androidx.lifecycle.ViewModelProviders;

import com.example.alarm1.R;
import com.example.alarm1.ui.dashboard.DashboardViewModel;

public class InformationFragment extends Fragment {

    private InformationViewModel informationViewModel;

    public View onCreateView(@NonNull LayoutInflater inflater,
                             ViewGroup container, Bundle savedInstanceState) {
        informationViewModel =
                ViewModelProviders.of(this).get(InformationViewModel.class);
        View root = inflater.inflate(R.layout.fragment_information, container, false);
        final TextView textView = root.findViewById(R.id.text_information);
        informationViewModel.getText().observe(this, new Observer<String>() {
            @Override
            public void onChanged(@Nullable String s) {
                textView.setText(s);
            }
        });
        return root;
    }
}
package com.example.alarm1.ui.information;

import androidx.lifecycle.LiveData;
import androidx.lifecycle.MutableLiveData;
import androidx.lifecycle.ViewModel;

public class InformationViewModel extends ViewModel {
    private MutableLiveData<String> mText;

    public InformationViewModel() {
        mText = new MutableLiveData<>();
        mText.setValue("This is information fragment.Nice!");
    }

    public LiveData<String> getText() {
        return mText;
    }
}
java类和xml视图布局的对应关系(res/layout)
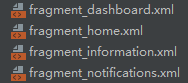
举例:
<?xml version="1.0" encoding="utf-8"?>
<androidx.constraintlayout.widget.ConstraintLayout xmlns:android="http://schemas.android.com/apk/res/android"
    xmlns:app="http://schemas.android.com/apk/res-auto"
    android:layout_width="match_parent"
    android:layout_height="match_parent">

    <TextView
        android:id="@+id/text_information"
        android:layout_width="match_parent"
        android:layout_height="wrap_content"
        android:layout_marginStart="8dp"
        android:layout_marginTop="8dp"
        android:layout_marginEnd="8dp"
        android:textAlignment="center"
        android:textSize="20sp"
        app:layout_constraintEnd_toEndOf="parent"
        app:layout_constraintStart_toStartOf="parent"
        app:layout_constraintTop_toTopOf="parent" />

</androidx.constraintlayout.widget.ConstraintLayout>
版权声明:本文为qq_35090060原创文章,遵循CC 4.0 BY-SA版权协议,转载请附上原文出处链接和本声明。