参考连接:
https://blog.csdn.net/zhang970187013/article/details/81098175
https://blog.csdn.net/sinat_23853639/article/details/80276848
https://zhuanlan.zhihu.com/p/33441113
一、easy_handeye安装、相关功能包的配置、工作空间的编译
在安装之前首先要按照以下步骤安装依赖包(注意版本号):
1.安装ros-kinetic-visp
sudo apt-get install ros-kinetic-visp
2.新建工作空间catkin_ws3
cd ~/catkin_ws3/src
git clone -b kinetic-devel https://github.com/lagadic/vision_visp.git
注:直接下载速度比较慢,也可以从网站下载,解压到src文件夹下,下载链接:https://github.com/lagadic/vision_visp.git
3.重复第二步,下载aruco_ros
cd ~/catkin_ws3/src
git clone -b kinetic-devel https://github.com/pal-robotics/aruco_ros
4.下载vision_visp
cd ~/catkin_ws3/src
git clone -b kinetic-devel https://github.com/lagadic/vision_visp.git
5.easy_handeye安装
cd ~/catkin_ws3/src
git clone https://github.com/IFL-CAMP/easy_handeye
cd ..
catkin_make
6.标定过程中需要UR5 机器人相关文件、kinect2相关文件,将以前下载或安装好的功能包iai_kinect2、universal_robot-kinetic-devel拷贝到catkin_ws3/src文件夹下面,编译工作空间
cd ~/catkin_ws3
catkin_make
******************************************************************************************8
二、具体标定过程
1、制作标定板:
找到/home/li/catkin_ws3/src/aruco_ros-kinetic-devel/aruco_ros/etc夹下的图片,文件夹下面有多幅图片,如marker582_5cm.jpg;582为图片的ID地址,根据大小需要打印图片,我打印的10×10厘米的。
2、准备工作完成后,为了能够同时启动UR5,Kinect2和标定程序,需要重新写一个launch文件,作者给出了launch文件的模板在/home/li/catkin_ws3/src/easy_handeye-master/docs/example_launch文件夹下
我的ur5_kinect_calibration.launch文件内容如下:
<launch>
    <arg name="namespace_prefix" default="ur5_kinect_handeyecalibration" />

    <arg name="robot_ip" doc="The IP address of the UR5 robot" />
		<!--<arg name="marker_frame" default="aruco_marker_frame"/>-->
    <arg name="marker_size" doc="Size of the ArUco marker used, in meters" default="0.1" />  //图片尺寸
    <arg name="marker_id" doc="The ID of the ArUco marker used" default="582" />       //图片ID,需要与打印标定板对应
    <!-- start the Kinect -->
    <include file="$(find kinect2_bridge)/launch/kinect2_bridge.launch" />
    <!--    <arg name="depth_registration" value="true" />
    </include>-->

    <!-- start ArUco -->
    <node name="aruco_tracker" pkg="aruco_ros" type="single">
        <remap from="/camera_info" to="/kinect2/hd/camera_info" />
        <remap from="/image" to="/kinect2/hd/image_color_rect" />
        <param name="image_is_rectified" value="true"/>
        <param name="marker_size"        value="$(arg marker_size)"/>
        <param name="marker_id"          value="$(arg marker_id)"/>
       <param name="reference_frame"    value="kinect2_rgb_optical_frame"/>             //坐标系需要设置正确
        <param name="camera_frame"       value="kinect2_rgb_optical_frame"/>
        <param name="marker_frame"       value="camera_marker" />
    </node>

    <!-- start the robot -->
    <include file="$(find ur_modern_driver)/launch/ur5_bringup.launch">
        <arg name="limited" value="true" />
        <arg name="robot_ip" value="192.168.1.101" />                                      //UR 5机器人IP地址
    </include>
    <include file="$(find ur5_moveit_config)/launch/ur5_moveit_planning_execution.launch">
        <arg name="limited" value="true" />
    </include>

    <!-- start easy_handeye -->
    <include file="$(find easy_handeye)/launch/calibrate.launch" >
        <arg name="namespace_prefix" value="$(arg namespace_prefix)" />
        <arg name="eye_on_hand" value="false" />

        <arg name="tracking_base_frame" value="kinect2_rgb_optical_frame" />
        <arg name="tracking_marker_frame" value="camera_marker" />
        <arg name="robot_base_frame" value="base_link" />
        <arg name="robot_effector_frame" value="wrist_3_link" />

        <arg name="freehand_robot_movement" value="false" />
        <arg name="robot_velocity_scaling" value="0.5" />
        <arg name="robot_acceleration_scaling" value="0.2" />
    </include>

</launch>
将修改好的launch文件放到easy_handeye/launch文件夹下,启动launch文件
roslaunch easy_handeye ur5_kinect_calibration.launch
出现如下三个界面,分别定义为图1、 2、 3(自己的图没有保存,盗用大神的图)
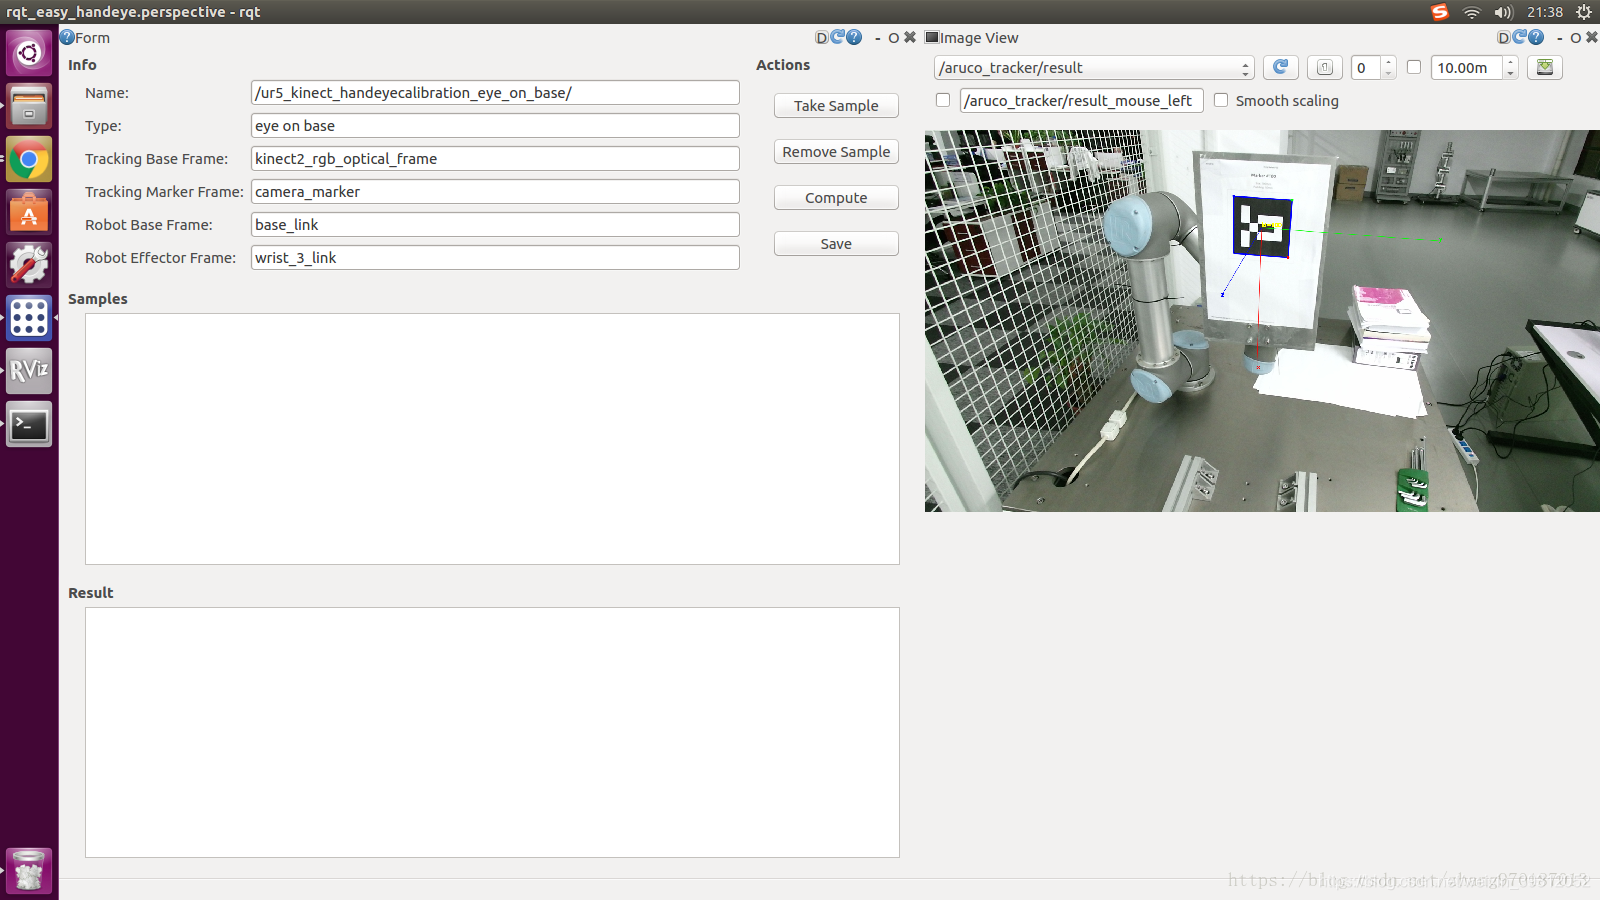
注.第二张图可能会没有右边的image viewer,打开图二菜单栏选择Plugins—visualization—image view,继续选择/aruco_tracker/result
3.标定过程
打开图1,将机器人的速度、加速度设置为0.1。
初始位置设置在视图的中间,保证机器人末端可以上下左右偏移。
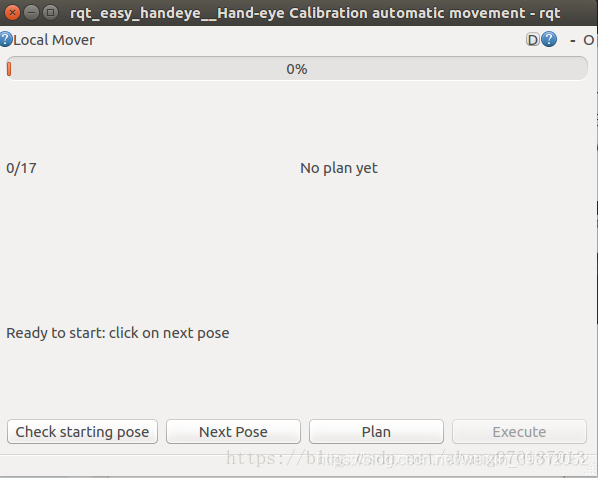
设置完后打开图3,如果显示0/17就正常,如果不是就按check starting pose。
(1)点击next pose,再点击plan,出现绿色就当前位姿可以达到,最后点击execute。出现红色表示当前点不可用,继续点击next pose,重复操作;
(2)返回图2界面点击take sample。重复(1)(2)操作,直到17个点全部采集完;
(3)返回图2界面,点击compute,得到一组7个解的变换矩阵(四元数表示)
保存后将他们发布出去:
roslaunch easy_handeye publish.launch
这一步可能会出现错误,先不要管。查看home隐藏文件夹.ros/easy_handeye下标定结果文件yaml(在home文件夹下ctrl+h显示隐藏文件)。
将变换矩阵按照以下格式写成static_transform_publisher.launch文件(跳过这步在下一步中实现):
<launch>
<node pkg="tf" type="static_transform_publisher" name="link1_broadcaster" args="1 0 0 0 0 0 1 link1_parent link1 100" />
</launch>
其中args的值分别对应x y z qx qy qz qw frame_id child_frame_id period_in_ms
3、启动文件的编写和moveit配置(3D传感器配置)
1.为了减少启动的窗口,将UR5、Kinect2、moveit和上一步的坐标变换写到上一步中建立的static_transform_publisher.launch文件中:
<launch>

		<!-- start the robot -->
  <include file="$(find ur_modern_driver)/launch/ur5_bringup.launch">
      <arg name="limited" value="true" />
      <arg name="robot_ip" value="192.168.1.101" />      //机器人IP地址
  </include>
  <include file="$(find ur5_moveit_config)/launch/ur5_moveit_planning_execution.launch">
      <arg name="limited" value="true" />
  </include>

  <include file="$(find ur5_moveit_config)/launch/moveit_rviz.launch">
      <arg name="config" value="true" />
  </include>


	<include file="$(find kinect2_bridge)/launch/kinect2_bridge.launch" />


	<!--<include file="$(find easy_handeye)/launch/publish.launch" />-->

	<node pkg="tf" type="static_transform_publisher" name="ur5_broadcaster" args="0.5667557831693902 0.7619108536371114 0.03519512632106377 0.36734258929057223 -0.21565448383709002 -0.8275744125657967 0.3656133987706588 base_link kinect2_rgb_optical_frame 100" />     //标定获取的矩阵信息

</launch>
把static_transform_publisher.launch文件放在了ur_modern_driver的launch下
其中未加入点云处理。因为使用了点云图像,所以要对moveit的octomap进行配置:
http://docs.ros.org/kinetic/api/moveit_tutorials/html/doc/perception_configuration/perception_configuration_tutorial.html?highlight=octomap
这个网站我打不开,可以先打开http://docs.ros.org/kinetic/api/moveit_tutorials然后一步步寻找。
2.点云图像配置文件sensors_kinect.yaml:
sensors:
  - sensor_plugin: occupancy_map_monitor/PointCloudOctomapUpdater
    point_cloud_topic:  /head_mount_kinect/depth_registered/points
    max_range: 5.0
    point_subsample: 1
    padding_offset: 0.1
    padding_scale: 1.0
    max_update_rate: 1.0
    filtered_cloud_topic: /kinect2/qhd/points
注意:point_cloud_topic需要进行修改,我是用的是Kinect相机,topic在iai_kinect2/kinect2_bridge/README.md里面。因为在手眼标定的时候使用的rgb表示坐标(具体参考标定启动文件reference_frame的value),所以topic使用hd或者qhd的point(qhd显示精度地,但是速度快)。
编写好的yaml文件放到ur5_moveit_config/config下
3.sensor_manager.launch文件配置:
打开ur5_moveit_config/launch/sensor_manager.launch.xml文件,在文本最后添加以下内容:
  <rosparam command="load" file="$(find ur5_moveit_config)/config/sensors_kinect.yaml" />
  <param name="octomap_frame" type="string" value="odom_combined" />
  <param name="octomap_resolution" type="double" value="0.05" />
  <param name="max_range" type="double" value="5.0" />
到此为止配置完成了,启动launch文件。
roslaunch ur_modern_driver static_transform_publisher.launch
点击add,添加pointcloud2,选择topic为/kinect2/qhd/points
运行结果如下: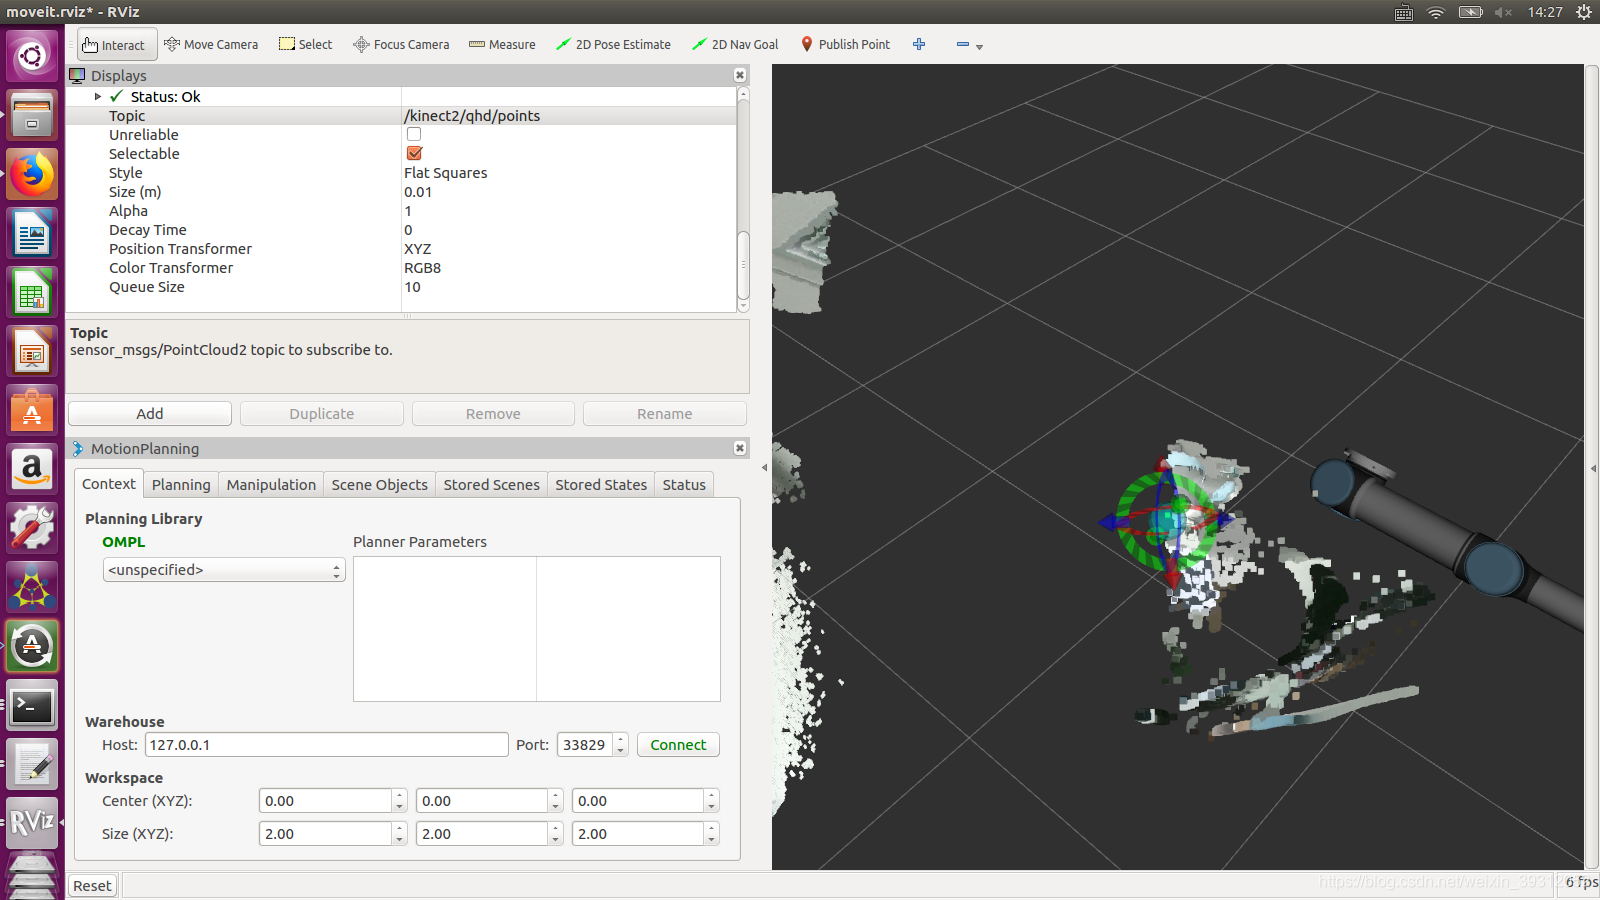
另外关于其他机器人与相机的手眼标定过程,参考知乎文章
https://zhuanlan.zhihu.com/p/33441113
下面是摘录
start handeye
这一部分主要需要注意4个frame: tracking_base_frame就是相机的frame, tracking_marker_frame是标志物的frame, 这两者之间的关系由aruco_ros发布, 所以要对上; robot_base_frame就是机械臂底座, robot_effector_frame是末端, 这两个跟UR5发布的要对上. 这几个frame之间变化的都能被观测到, 所以可以通过几个样本得出不变的相机到底座之间的关系. 注意namespace_prefix要跟publish.launch里的对上, 因为保存标定结果的时候文件名按照这个取的.
<!-- start easy_handeye -->
    <include file="$(find easy_handeye)/launch/calibrate.launch" >
        <arg name="namespace_prefix" value="$(arg namespace_prefix)" />
        <arg name="eye_on_hand" value="false" />

        <arg name="tracking_base_frame" value="kinect2_rgb_optical_frame" />
        <arg name="tracking_marker_frame" value="camera_marker" />
        <arg name="robot_base_frame" value="base_link" />
        <arg name="robot_effector_frame" value="wrist_3_link" />

        <arg name="freehand_robot_movement" value="false" />
        <arg name="robot_velocity_scaling" value="0.5" />
        <arg name="robot_acceleration_scaling" value="0.2" />
    </include>
你好,请问一下kinova等其他机械臂能用么?
可以,4个frame对上就行