C++封装
总体参考文章:https://juejin.im/post/6844903701522415624
现在假设我们的项目实现为两个文件:
需要实现为一个.cpp和一个.h。生成一个DLL项目:

.h文件如下:
#ifdef DETECT_EXPORTS
#define DETECT_API __declspec(dllexport)
#else
#define DETECT_API __declspec(dllimport)
#endif

#include "stdafx.h"
#include <stdlib.h>
#include <iostream>
#include <string>
#include <vector>

using namespace std;

struct detect_out {
	//预测类型:遥感
	string type;

	//预测图片的唯一id
	string img_id;

	//预测的框数量
	int pred_box_num;

	//预测的框的[xt_cener, y_center, w, h, 置信度]
	vector<vector<double>> pred_box;
};


// 此类是从 Win32Project1.dll 导出的
class  DETECT_API DETECT {
public:
	detect_out  DETECT::detection(string img_dir, string img_id, string result_dir, string img_type, int bit_type, int img_channel, int use_gpu);
	// TODO:  在此添加您的方法。
};
第一版.cpp文件(调用.bash来调用python tzb.py)如下:
#include "stdafx.h"
#include <stdlib.h>
#include <iostream>
#include <string>
#include <vector>
#include <fstream>
#include <sstream>
#include <cstring>
#include "DETECT.h"

using namespace std;

DETECT::DETECT(string skynet_dir1, string skynet_file1)
{
	skynet_dir = skynet_dir1;
	skynet_file = skynet_file1;
}

int write_string_to_file_append(const std::string & file_string, const std::string str)

{
	std::ofstream	OsWrite(file_string, std::ofstream::app);
	OsWrite << str;
	OsWrite << std::endl;
	OsWrite.close();
	return 0;
}

detect_out  DETECT::detection(string img_dir, string img_id, string result_dir, string img_type, int bit_type, int img_channel, int use_gpu) {

	string bat_str = "cd " + skynet_dir + "&& conda activate SenseNet &&  "
		+ "python " + skynet_file + " --img_dir " + img_dir + " --img_id " +
		img_id + " --result_dir " + result_dir + " --img_type " + img_type;
	int res = system(bat_str.c_str());

	//从python输出的结果img_id_pred.txt传入C++
	ostringstream oss1;
	oss1 << result_dir << img_id << "_pred.txt";
	string tmp1 = oss1.str();
	fstream in(tmp1, ios::in);

	int pred_box_num;
	in >> pred_box_num;
	string line;

	vector<vector<double>> pred_box(pred_box_num);
	for (int i = 0; i < pred_box_num; i++) {
		pred_box[i].resize(9);
	}
	for (int i = 0; i < pred_box_num; ++i) {
		for (int j = 0; j < 9; ++j) {
			in >> pred_box[i][j];
		}
	}

	in.close();

	detect_out out;
	out.type = "yaogan";
	out.img_id = img_id;
	out.pred_box = pred_box;
	out.pred_box_num = pred_box_num;
	return out;

}
第二版.cpp文件(运行python集成好的exe文件)如下:
 Win32Project1.cpp : 定义 DLL 应用程序的导出函数。

#include "stdafx.h"
#include <stdlib.h>
#include <iostream>
#include <string>
#include <vector>
#include <iostream>
#include <fstream>
#include <sstream>
#include <cstring>
#include "Win32Project1.h"

using namespace std;


detect_out  DETECT::detection(string img_dir, string img_id, string result_dir, string img_type, int bit_type, int img_channel, int use_gpu) {
	ostringstream oss;
	oss << "D:\work\1_509\jiance\change\PythonExe\tzb2.0.exe " << img_dir << "' " << "'" << img_id << "' " << " '" << result_dir << "' " << " '" << img_type << "' " << bit_type << ' ' << img_channel << ' ' << use_gpu;
	string tmp = oss.str();
	cout << tmp.c_str() << endl;
	int res = system(tmp.c_str());

	ostringstream oss1;
	oss1 << result_dir << img_id << "_pred.txt";
	string tmp1 = oss1.str();
	//fstream in("D:\\work\\1_509\\jiance\\change\\SkyNet\\samples\\test_mul_new\\img_id_pred.txt", ios::in);
	fstream in(tmp1, ios::in);

	int pred_box_num;
	in >> pred_box_num;
	//cout << n;
	string line;

	vector<vector<double>> pred_box(pred_box_num);
	for (int i = 0; i < pred_box_num; i++) {
		pred_box[i].resize(9);
	}
	for (int i = 0; i < pred_box_num; ++i) {
		for (int j = 0; j < 9; ++j) {
			in >> pred_box[i][j];
		}
	}

	in.close();
	//for (int i = 0; i < pred_box_num; ++i) {
	//	for (int j = 0; j < 5; ++j) {
	//		cout << pred_box[i][j];
	//		cout << " ";
	//	}
	//	cout << " " << endl;
	//}
	detect_out out;
	out.type = "yaogan";
	out.img_id = img_id;
	out.pred_box = pred_box;
	out.pred_box_num = pred_box_num;
	return out;
};

//DETECT::DETECT(string img_dir1, string img_id1, string result_dir1, string img_type1, int bit_type1, int img_channel1, int use_gpu1)
//{
//	img_dir = img_dir1;
//	img_id = img_id1;
//	result_dir = result_dir1;
//	img_type = img_type1;
//	bit_type = bit_type1;
//	img_channel = img_channel1;
//	use_gpu = use_gpu1;
//};
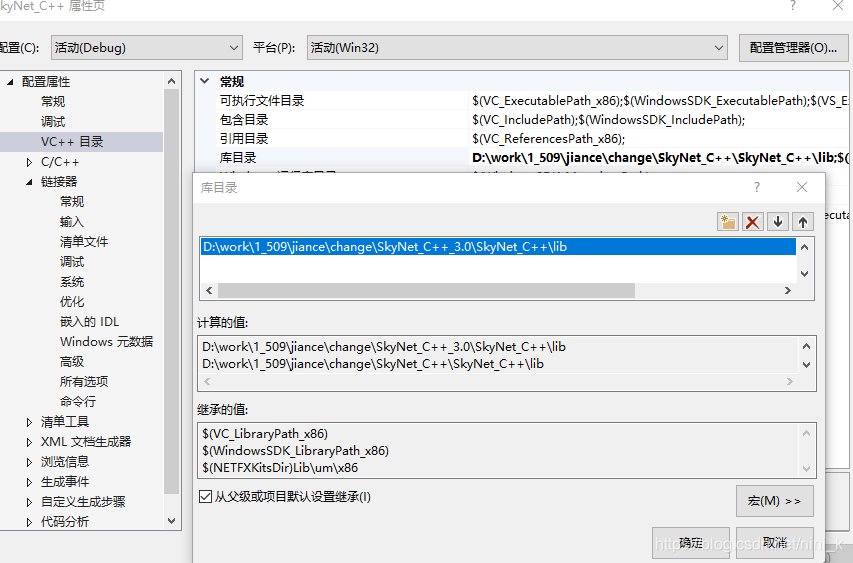
然后点击这个项目,点击**“生成”**,按照给定的路径找到相应的dll文件和lib文件,然后把dll和lib加入到需要使用这个项目的C++路径下的lib文件夹:
1)在原项目中新建两个文件夹「include」和「lib」,其中「include」中存放上述第二步中编写的「VisionIMAX.h」文件,「lib」中存放上述第二步中生成的dll和lib文件。

将Lib和dll目录加入工程:
版权声明:本文为nini_k原创文章,遵循CC 4.0 BY-SA版权协议,转载请附上原文出处链接和本声明。