微服务学习笔记2.0
一、Spring Cloud
接上一篇文章,Spring Cloud是专门用来开发微服务的框架,它结合了SpringBoot的开发特性,通俗来讲,使用该框架开发微服务就是:1.使用SpringBoot开发一个个的服务 2.在各服务内或者他们之间添加springcloud的相关组件。这样结合起来就可以实现一个微服务的开发。
Spring Cloud本身集成了服务发现注册、配置中心、消息总线、负载均衡、断路器、数据监控等组件,目的就是为了让使用者可以快速的搭建一个微服务模版,降低微服务开发的复杂性。
所以,使用Spring Cloud首要的第一步就要搞清楚它和SpringBoot版本依赖关系,不然项目搭建就会出问题,他两的版本依赖关系如下: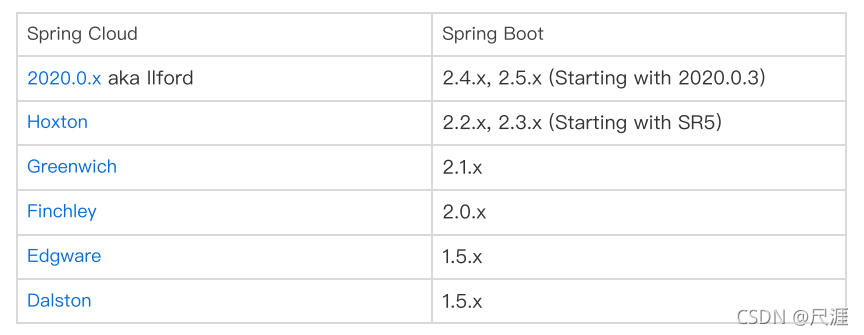
二、搭建一个简单的微服务案例
介绍:该项目包含两个微服务,一个是支付微服务,一个是订单微服务,订单微服务调用支付微服务完成订单支付功能。
1.创建一个maven项目,里面只包含一个支付实体类,作为本项目的公共实体类和工具类
pom文件如下:
<?xml version="1.0" encoding="UTF-8"?>
<project xmlns="http://maven.apache.org/POM/4.0.0"
         xmlns:xsi="http://www.w3.org/2001/XMLSchema-instance"
         xsi:schemaLocation="http://maven.apache.org/POM/4.0.0 http://maven.apache.org/xsd/maven-4.0.0.xsd">
    <modelVersion>4.0.0</modelVersion>

    <groupId>com.king</groupId>
    <artifactId>cloud_common</artifactId>
    <version>1.0-SNAPSHOT</version>

    <dependencies>
        <dependency>
            <groupId>org.projectlombok</groupId>
            <artifactId>lombok</artifactId>
            <version>1.18.22</version>
        </dependency>
    </dependencies>

</project>
支付实体类:
package com.king.demo.entity;

import lombok.AllArgsConstructor;
import lombok.Data;
import lombok.NoArgsConstructor;

/**
 * @author: jjk
 * @time: 2021-10-28-20:59
 * @description: 支付实体类
 * @function:
 */
@Data
@NoArgsConstructor
@AllArgsConstructor
public class Payment {
    //订单编号
    private Integer id;
    //支付状态
    private String message;
}
2.使用springboot创建支付服务项目
pom文件:
<?xml version="1.0" encoding="UTF-8"?>
<project xmlns="http://maven.apache.org/POM/4.0.0" xmlns:xsi="http://www.w3.org/2001/XMLSchema-instance"
         xsi:schemaLocation="http://maven.apache.org/POM/4.0.0 https://maven.apache.org/xsd/maven-4.0.0.xsd">
    <modelVersion>4.0.0</modelVersion>
    <parent>
        <groupId>org.springframework.boot</groupId>
        <artifactId>spring-boot-starter-parent</artifactId>
        <version>2.4.9</version>
        <relativePath/> <!-- lookup parent from repository -->
    </parent>
    <groupId>com.king.demo</groupId>
    <artifactId>cloud_payment_01</artifactId>
    <version>0.0.1-SNAPSHOT</version>
    <name>cloud_payment_01</name>
    <description>Demo project for Spring Boot</description>
    <properties>
        <java.version>1.8</java.version>
    </properties>
    <dependencies>
        <dependency>
            <groupId>org.springframework.boot</groupId>
            <artifactId>spring-boot-starter-web</artifactId>
        </dependency>

        <dependency>
            <groupId>org.springframework.boot</groupId>
            <artifactId>spring-boot-devtools</artifactId>
            <scope>runtime</scope>
            <optional>true</optional>
        </dependency>
        <dependency>
            <groupId>org.projectlombok</groupId>
            <artifactId>lombok</artifactId>
            <optional>true</optional>
        </dependency>
        <dependency>
            <groupId>org.springframework.boot</groupId>
            <artifactId>spring-boot-starter-test</artifactId>
            <scope>test</scope>
        </dependency>
        <dependency>
            <groupId>com.king</groupId>
            <artifactId>cloud_common</artifactId>
            <version>1.0-SNAPSHOT</version>
        </dependency>
    <build>
        <plugins>
            <plugin>
                <groupId>org.springframework.boot</groupId>
                <artifactId>spring-boot-maven-plugin</artifactId>
                <configuration>
                    <excludes>
                        <exclude>
                            <groupId>org.projectlombok</groupId>
                            <artifactId>lombok</artifactId>
                        </exclude>
                    </excludes>
                </configuration>
            </plugin>
        </plugins>
    </build>

</project>
可以看到,这里我们在pom文件中引入了之前创建的公共实体类的依赖。
作为示例支付服务中只写controller:
package com.king.demo.controller;

import com.king.demo.entity.Payment;
import lombok.extern.slf4j.Slf4j;
import org.springframework.beans.factory.annotation.Value;
import org.springframework.cloud.context.config.annotation.RefreshScope;
import org.springframework.http.ResponseEntity;
import org.springframework.web.bind.annotation.CrossOrigin;
import org.springframework.web.bind.annotation.PathVariable;
import org.springframework.web.bind.annotation.RequestMapping;
import org.springframework.web.bind.annotation.RestController;

/**
 * @author: jjk
 * @time: 2021-10-28-21:14
 * @description:
 * @function:
 */
@RestController
@RequestMapping("/payment")
public class PaymentController {
    //使用@value注解,将配置文件中的某配置赋值给该类的一个属性
    @Value("${server.port}")
    private String serverPort;
    @RequestMapping("/{id}")
    public ResponseEntity<Payment> payment(@PathVariable Integer id){
        Payment payment=new Payment();
        payment.setId(id);
        payment.setMessage("支付成功,服务端口:"+serverPort);
        return ResponseEntity.ok(payment);
    }
}
配置文件:
server:
  port: ${port:9001}
3.使用springboot创建订单服务项目
pom文件:
<?xml version="1.0" encoding="UTF-8"?>
<project xmlns="http://maven.apache.org/POM/4.0.0" xmlns:xsi="http://www.w3.org/2001/XMLSchema-instance"
         xsi:schemaLocation="http://maven.apache.org/POM/4.0.0 https://maven.apache.org/xsd/maven-4.0.0.xsd">
    <modelVersion>4.0.0</modelVersion>
    <parent>
        <groupId>org.springframework.boot</groupId>
        <artifactId>spring-boot-starter-parent</artifactId>
        <version>2.4.9</version>
        <relativePath/> <!-- lookup parent from repository -->
    </parent>
    <groupId>com.king.demo</groupId>
    <artifactId>cloud_order_01</artifactId>
    <version>0.0.1-SNAPSHOT</version>
    <name>cloud_order_01</name>
    <description>Demo project for Spring Boot</description>
    <properties>
        <java.version>1.8</java.version>
    </properties>
    <dependencies>
        <dependency>
            <groupId>org.springframework.boot</groupId>
            <artifactId>spring-boot-starter-web</artifactId>
        </dependency>

        <dependency>
            <groupId>org.springframework.boot</groupId>
            <artifactId>spring-boot-devtools</artifactId>
            <scope>runtime</scope>
            <optional>true</optional>
        </dependency>
        <dependency>
            <groupId>org.projectlombok</groupId>
            <artifactId>lombok</artifactId>
            <optional>true</optional>
        </dependency>
        <dependency>
            <groupId>org.springframework.boot</groupId>
            <artifactId>spring-boot-starter-test</artifactId>
            <scope>test</scope>
        </dependency>
        <dependency>
            <groupId>com.king</groupId>
            <artifactId>cloud_common</artifactId>
            <version>1.0-SNAPSHOT</version>
        </dependency>
    <build>
        <plugins>
            <plugin>
                <groupId>org.springframework.boot</groupId>
                <artifactId>spring-boot-maven-plugin</artifactId>
                <configuration>
                    <excludes>
                        <exclude>
                            <groupId>org.projectlombok</groupId>
                            <artifactId>lombok</artifactId>
                        </exclude>
                    </excludes>
                </configuration>
            </plugin>
        </plugins>
    </build>

</project>
订单服务也只写controller:
package com.king.demo.controller;

import com.king.demo.client.PaymentClient;
import com.king.demo.entity.Payment;
import org.springframework.beans.factory.annotation.Autowired;
import org.springframework.beans.factory.annotation.Qualifier;
import org.springframework.cloud.client.ServiceInstance;
import org.springframework.cloud.client.discovery.DiscoveryClient;
import org.springframework.http.ResponseEntity;
import org.springframework.web.bind.annotation.PathVariable;
import org.springframework.web.bind.annotation.RequestMapping;
import org.springframework.web.bind.annotation.RestController;
import org.springframework.web.client.RestTemplate;

import java.util.List;

/**
 * @author: jjk
 * @time: 2021-10-28-21:53
 * @description: 订单服务
 * @function:
 */
@RestController
@RequestMapping("/order")
public class OrderController {
    @Autowired
    private RestTemplate restTemplate;
    @RequestMapping("/payment/{id}")
    public ResponseEntity<Payment> getPayment(@PathVariable Integer id){
        String url="http://localhost:9001/payment/"+id;
        Payment payment = restTemplate.getForObject(url, Payment.class);
        return ResponseEntity.ok(payment);
    }
启动器:
package com.king.demo;

import org.springframework.boot.SpringApplication;
import org.springframework.boot.autoconfigure.SpringBootApplication;
import org.springframework.cloud.client.discovery.EnableDiscoveryClient;
import org.springframework.cloud.client.loadbalancer.LoadBalanced;
import org.springframework.cloud.openfeign.EnableFeignClients;
import org.springframework.context.annotation.Bean;
import org.springframework.web.client.RestTemplate;

@SpringBootApplication
public class OrderApplication {

    public static void main(String[] args) {

        SpringApplication.run(OrderApplication.class, args);

    }
    @Bean
    public RestTemplate restTemplate(){
        return new RestTemplate();
    }

}
在order项目中,我们需要调用支付服务,这是跨项目调用,Spring提供了一个RestTemplate模板工具类,对基于Http的客户端进行了封装,并且实现了对象与json 的序列化和反序列化。他的使用需要我们在启动器中创建一个RestTemplate 的对象,并将其注册到容器中,然后就可以在controller方法中注入,并使用他的方法了。
配置文件:
server:
  port: 9002
4.测试
启动两个服务项目,然后在浏览器访问:http://localhost:9002/order/payment/123
结果: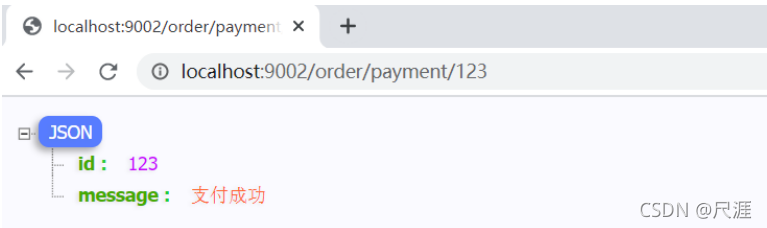
版权声明:本文为qq_36602118原创文章,遵循CC 4.0 BY-SA版权协议,转载请附上原文出处链接和本声明。