第一步:新建圆形View代理类RoundViewDelegate.class
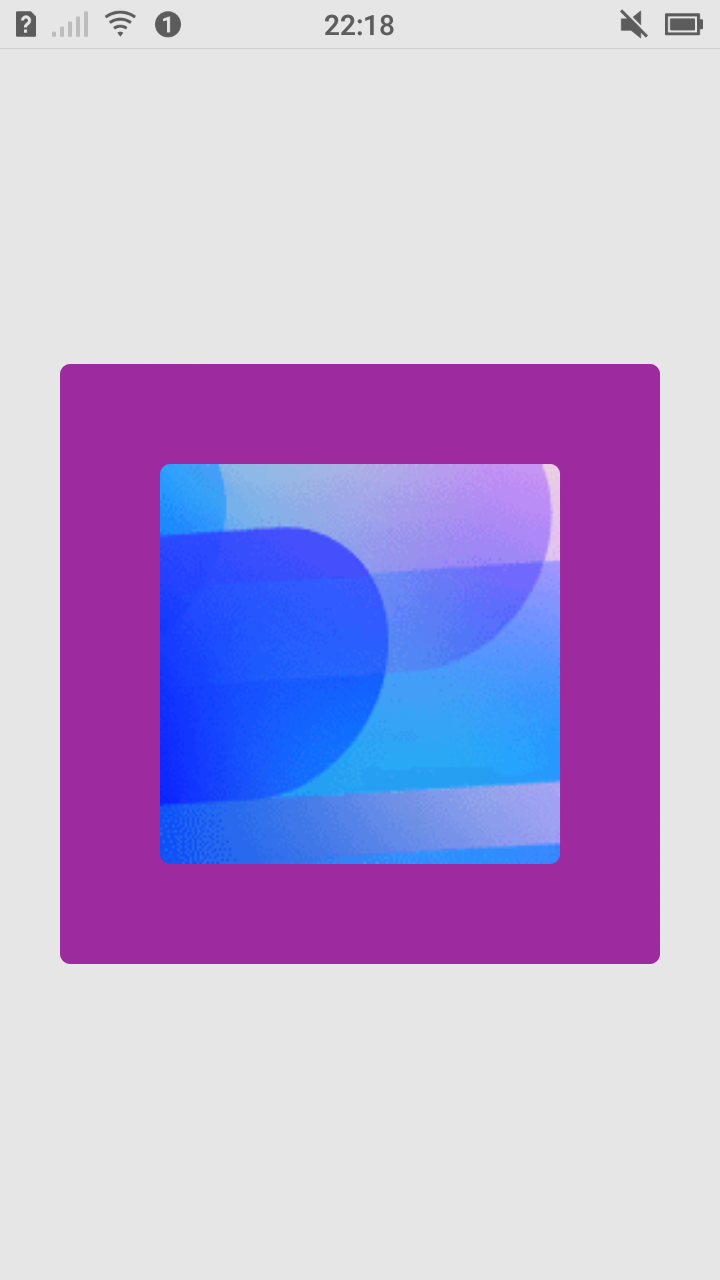
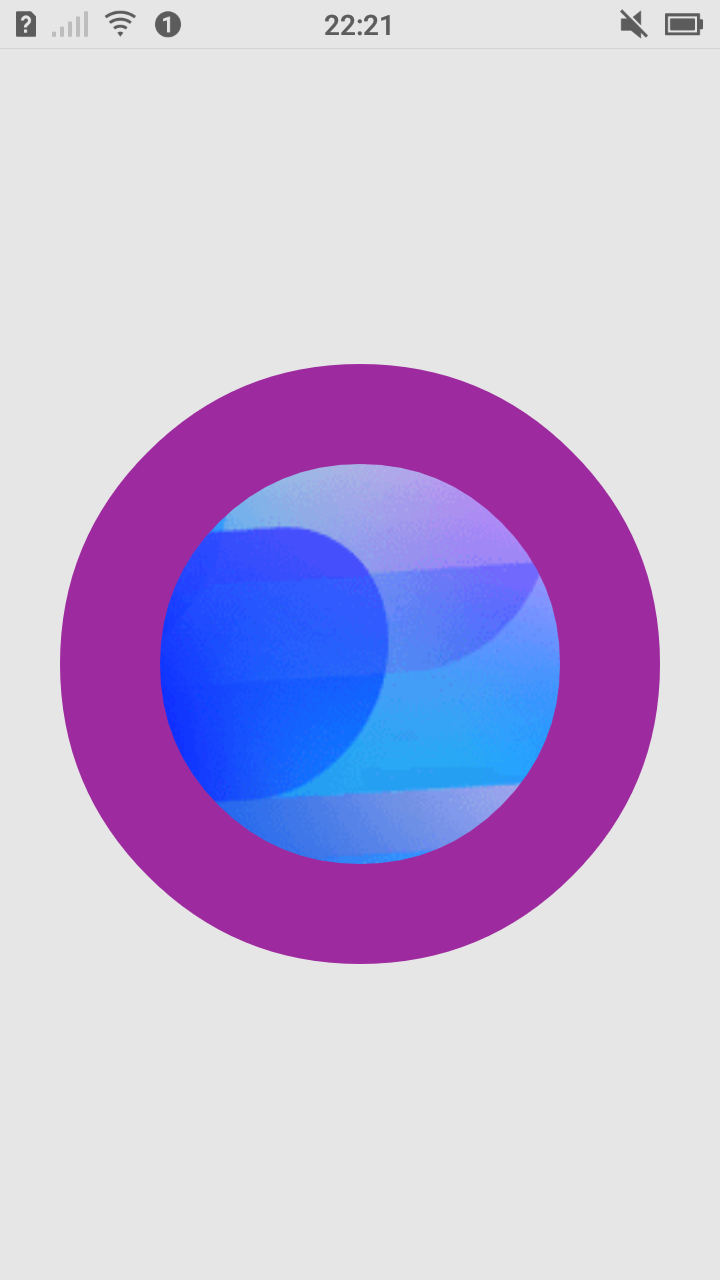
如果想改为圆形view,修改rect_adius为很大的数字,比如10000import android.content.Context;
import android.graphics.Canvas;
import android.graphics.Color;
import android.graphics.Paint;
import android.graphics.PorterDuff;
import android.graphics.PorterDuffXfermode;
import android.graphics.RectF;
import android.view.View;
/**
* 圆角View 代理
*如果想改为圆形view,修改rect_adius为很大的数字,比如10000
*/
public class RoundViewDelegate{
private final RectF roundRect = new RectF();
private float rect_adius = 10; //单位为像素
private final Paint maskPaint = new Paint();
private final Paint zonePaint = new Paint();
private View mView;
private Context mContext;
public RoundViewDelegate(View view, Context context){
this.mView = view;
this.mContext = context;
init();
}
private void init(){
maskPaint.setAntiAlias(true);
maskPaint.setXfermode(new PorterDuffXfermode(PorterDuff.Mode.SRC_IN));
//
zonePaint.setAntiAlias(true);
zonePaint.setColor(Color.WHITE);
}
/**
* 从新设置圆角
* @param adius
*/
public void setRectAdius(float adius) {
rect_adius = adius;
if(mView != null){
mView.invalidate();
}
}
/**
* 圆角区域设置
* @param width
* @param height
*/
public void roundRectSet(int width,int height){
roundRect.set(0, 0, width, height);
}
/**
* 画布区域裁剪
* @param canvas
*/
public void canvasSetLayer(Canvas canvas){
canvas.saveLayer(roundRect, zonePaint, Canvas.ALL_SAVE_FLAG);
canvas.drawRoundRect(roundRect, rect_adius, rect_adius, zonePaint);
//
canvas.saveLayer(roundRect, maskPaint, Canvas.ALL_SAVE_FLAG);
}
}第二步:新建 RoundRelativeLayout..class自定义控件类
import android.content.Context;
import android.graphics.Canvas;
import android.util.AttributeSet;
import android.widget.RelativeLayout;

/**
 * 自定义控件:圆角RelativeLayout
 */
public class RoundRelativeLayout extends RelativeLayout {
    private RoundViewDelegate mRoundViewDelegate;

    public RoundRelativeLayout(Context context, AttributeSet attrs) {
        super(context, attrs);
        if (mRoundViewDelegate == null) {
            mRoundViewDelegate = new RoundViewDelegate(this, getContext());
        }
    }

    public RoundRelativeLayout(Context context, AttributeSet attrs, int defStyle) {
        super(context, attrs, defStyle);
        if (mRoundViewDelegate == null) {
            mRoundViewDelegate = new RoundViewDelegate(this, getContext());
        }
    }

    public RoundRelativeLayout(Context context) {
        super(context);
        if (mRoundViewDelegate == null) {
            mRoundViewDelegate = new RoundViewDelegate(this, getContext());
        }
    }

    @Override
    protected void onLayout(boolean changed, int left, int top, int right,
                            int bottom) {
        super.onLayout(changed, left, top, right, bottom);
        int w = getWidth();
        int h = getHeight();
        mRoundViewDelegate.roundRectSet(w, h);
    }

    @Override
    public void draw(Canvas canvas) {
        mRoundViewDelegate.canvasSetLayer(canvas);
        super.draw(canvas);
        canvas.restore();
    }

}
想要其它的圆角自定义控件,只需要新建一个类,复制上面的代码,修改下继承就行了。
第三步:在布局文件中使用自定义控件
<?xml version="1.0" encoding="UTF-8"?>
<RelativeLayout xmlns:android="http://schemas.android.com/apk/res/android"
    xmlns:tools="http://schemas.android.com/tools"
    android:layout_width="match_parent"
    android:layout_height="match_parent"
    android:background="#fff"
    tools:context="com.animator.san.myapplication.MainActivity">

    <com.xiong.a.roundview.RoundRelativeLayout
        android:layout_width="300dp"
        android:layout_height="300dp"
        android:gravity="center"
        android:layout_centerInParent="true"
        android:background="#9E2A9F">

        <com.xiong.a.roundview.RoundImageView
            android:layout_width="200dp"
            android:layout_height="200dp"
            android:layout_centerInParent="true"
            android:background="@mipmap/test" />
    </com.xiong.a.roundview.RoundRelativeLayout>


</RelativeLayout>
注意修改自定义控件包名为你自己的。
第四步:运行效果截图
版权声明:本文为wenweidev原创文章,遵循CC 4.0 BY-SA版权协议,转载请附上原文出处链接和本声明。