事务的作用:
事务特征(ACID)
对事务的处理方式
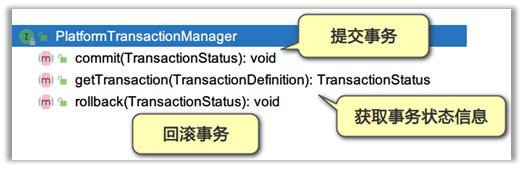
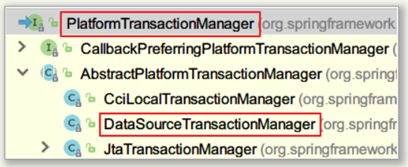
事务管理器:PlatformTransactionManager
事务的顶层接口,定义了:提交事务、获取事务、回滚事务的方法。
org.springframework.jdbc.datasource.DataSourceTransactionManager
作用:支持使用SpringJDBC或者mybatis框架的事务管理器。
事务定义对象:TransactionDefinition
定义了事务的隔离级别、传播行为、超时时间等。

事务传播行为:

事务状态:TransactionStatus
提供了获取事务状态的方法,事务是否是新的,事务是否完成,事务是否是只读等

XML方式实现声明式事务:
1.添加依赖
<dependencies>
<!--junit-->
<dependency>
<groupId>junit</groupId>
<artifactId>junit</artifactId>
<version>4.12</version>
<scope>test</scope>
</dependency><!--spring-test-->
<dependency>
<groupId>org.springframework</groupId>
<artifactId>spring-test</artifactId>
<version>5.1.8.RELEASE</version>
</dependency><!--spring-context:IOC-->
<dependency>
<groupId>org.springframework</groupId>
<artifactId>spring-context</artifactId>
<version>5.1.8.RELEASE</version>
</dependency><!--AOP-->
<dependency>
<groupId>org.aspectj</groupId>
<artifactId>aspectjweaver</artifactId>
<version>1.8.7</version>
</dependency><!--spring-jdbc:已经包含了jdbc和tx-->
<dependency>
<groupId>org.springframework</groupId>
<artifactId>spring-jdbc</artifactId>
<version>5.1.8.RELEASE</version>
</dependency><!--druid-->
<dependency>
<groupId>com.alibaba</groupId>
<artifactId>druid</artifactId>
<version>1.1.7</version>
</dependency><!--mysql驱动-->
<dependency>
<groupId>mysql</groupId>
<artifactId>mysql-connector-java</artifactId>
<version>5.1.47</version>
</dependency>
</dependencies>
2、编写实体类
public class Account {
private Integer accountId;
private Integer uid;
private Double money;(省略gei 、set、tostring方法)}
3. 编写dao 接口、实现类
dao接口:
public interface AccountDao {
void save(Account account);
}dao实现类:
@Repository //注入IOC容器
public class AccountDaoImpl implements AccountDao {//注入JdbcTemplate
@Autowired
private JdbcTemplate jdbcTemplate;
@Override
public void save(Account account) {
jdbcTemplate.update("insert into account values(null,?,?)",account.getUid(),account.getMoney());
}
}
4、编写service接口、实现
service接口:
public interface AccountService {
void save(Account account);
}service接口实现类:
@Service
public class AccountServiceImpl implements AccountService {@Autowired
private AccountDao accountDao;@Override
public void save(Account account) {//第一条sql语句
accountDao.save(account);//模拟异常
int a = 1/0;//第二条sql语句
accountDao.save(account);
}
}
5、准备jdbc.properties
jdbc.driver = com.mysql.jdbc.Driver
jdbc.url = jdbc:mysql://localhost:3306/mybatis?characterEncoding=utf8
jdbc.username = root
jdbc.password = root
jdbc.initialSize = 3
jdbc.maxActive = 50
jdbc.minIdle = 3
jdbc.maxWait = 6000
6、编写bean.xml
<!--1.开启IOC注解扫描-->
<context:component-scan base-package="com.itheima"></context:component-scan><!--2.加载外部的jdbc.properties配置文件-->
<context:property-placeholder location="classpath:jdbc.properties"></context:property-placeholder><!--3.创建DataSource连接池对象-->
<bean id="dataSource" class="com.alibaba.druid.pool.DruidDataSource">
<property name="url" value="${jdbc.url}"></property>
<property name="driverClassName" value="${jdbc.driver}"></property>
<property name="username" value="${jdbc.username}"></property>
<property name="password" value="${jdbc.password}"></property>
</bean><!--4.创建JdbcTemplate对象-->
<bean id="jdbcTemplate" class="org.springframework.jdbc.core.JdbcTemplate">
<property name="dataSource" ref="dataSource"></property>
</bean><!--创建事务管理器DataSourceTransactionManager(切面类)创建对象并且加入IOC容器-->
<bean class="org.springframework.jdbc.datasource.DataSourceTransactionManager" id="transactionManager">
<!--注入连接池对象,通过操作里面的数据库连接控制事务增强,使用setDataSource()方法注入-->
<property name="dataSource" ref="dataSource"></property>
</bean><!--配置声明式事务通知的状态信息,主要配置不同的方法采用不同的事务传播行为-->
<tx:advice id="txAdvice" transaction-manager="transactionManager">
<tx:attributes>
<!--给不同的方法配置不同的事务,原则:查询不用事务,增删改使用事务
<tx:method> 用于配置每个方法
name="get*" 设置方法名以get开头的,查询方法开头还有 query/find/search/select...
propagation="SUPPORTS", 设置事务的传播行为,这里不使用事务。如果不设置默认值:REQUIRED
SUPPORTS:环境中已有事务直接加入,如果没有则不用事务
REQUIRED:环境中已有事务直接加入,如果没有则创建新的事务
read-only="true",设置事务只读,查询都配置只读。如果不设置默认值:false, 适合增删改的方法<tx:method name="*"/> 剩余的所有其他方法,propagation="REQUIRED",read-only="false",代表所有增删改使用事务
-->
<tx:method name="get*" read-only="true" propagation="SUPPORTS"/>
<tx:method name="find*" read-only="true" propagation="SUPPORTS"/>
<tx:method name="query*" read-only="true" propagation="SUPPORTS"/>
<tx:method name="select*" read-only="true" propagation="SUPPORTS"/>
<tx:method name="search*" read-only="true" propagation="SUPPORTS"/>
<tx:method name="*" propagation="REQUIRED"></tx:method>
</tx:attributes>
</tx:advice><!--配置aop将指定的切面通知给到指定的切入点表达式去增强实现事务功能-->
<aop:config>
<!--配置切入点-->
<aop:pointcut id="pt" expression="execution(* com.itheima..service.impl.*.*(..))"/>
<!--配置将通知给到切入点去增强-->
<aop:advisor advice-ref="txAdvice" pointcut-ref="pt"></aop:advisor>
</aop:config>
XML+注解方式实现声明式事务:
1.添加依赖
<dependencies>
<!--junit-->
<dependency>
<groupId>junit</groupId>
<artifactId>junit</artifactId>
<version>4.12</version>
<scope>test</scope>
</dependency><!--spring-test-->
<dependency>
<groupId>org.springframework</groupId>
<artifactId>spring-test</artifactId>
<version>5.1.8.RELEASE</version>
</dependency><!--spring-context:IOC-->
<dependency>
<groupId>org.springframework</groupId>
<artifactId>spring-context</artifactId>
<version>5.1.8.RELEASE</version>
</dependency><!--AOP-->
<dependency>
<groupId>org.aspectj</groupId>
<artifactId>aspectjweaver</artifactId>
<version>1.8.7</version>
</dependency><!--spring-jdbc:已经包含了jdbc和tx-->
<dependency>
<groupId>org.springframework</groupId>
<artifactId>spring-jdbc</artifactId>
<version>5.1.8.RELEASE</version>
</dependency><!--druid-->
<dependency>
<groupId>com.alibaba</groupId>
<artifactId>druid</artifactId>
<version>1.1.7</version>
</dependency><!--mysql驱动-->
<dependency>
<groupId>mysql</groupId>
<artifactId>mysql-connector-java</artifactId>
<version>5.1.47</version>
</dependency>
</dependencies>
2、编写实体类
public class Account {
private Integer accountId;
private Integer uid;
private Double money;(省略gei 、set、tostring方法)}
3. 编写dao 接口、实现类
dao接口:
public interface AccountDao {
void save(Account account);
}dao实现类:
@Repository //注入IOC容器
public class AccountDaoImpl implements AccountDao {//注入JdbcTemplate
@Autowired
private JdbcTemplate jdbcTemplate;
@Override
public void save(Account account) {
jdbcTemplate.update("insert into account values(null,?,?)",account.getUid(),account.getMoney());
}
}
4、编写service接口、实现
service接口:
public interface AccountService {
void save(Account account);
}service接口实现类:
@Service
@Transactional * @Transactional的使用, 加上事务的管理
* 使用方式:
* 1) 配置在接口上,接口的所有实现类所有方法都使用事务
* 2)配置在类上,当前类里面所有的方法都使用事务
* 3)配置在指定方法上,只有当前方法使用事务【推荐】
public class AccountServiceImpl implements AccountService {@Autowired
private AccountDao accountDao;@Override
public void save(Account account) {//第一条sql语句
accountDao.save(account);//模拟异常
int a = 1/0;//第二条sql语句
accountDao.save(account);
}
}
5、准备jdbc.properties
jdbc.driver = com.mysql.jdbc.Driver
jdbc.url = jdbc:mysql://localhost:3306/mybatis?characterEncoding=utf8
jdbc.username = root
jdbc.password = root
jdbc.initialSize = 3
jdbc.maxActive = 50
jdbc.minIdle = 3
jdbc.maxWait = 6000
6、编写bean.xml
<!--1.开启IOC注解扫描-->
<context:component-scan base-package="com.itheima"></context:component-scan><!--2.加载外部的jdbc.properties配置文件-->
<context:property-placeholder location="classpath:jdbc.properties"></context:property-placeholder><!--3.创建DataSource连接池对象-->
<bean id="dataSource" class="com.alibaba.druid.pool.DruidDataSource">
<property name="url" value="${jdbc.url}"></property>
<property name="driverClassName" value="${jdbc.driver}"></property>
<property name="username" value="${jdbc.username}"></property>
<property name="password" value="${jdbc.password}"></property>
</bean><!--4.创建JdbcTemplate对象-->
<bean id="jdbcTemplate" class="org.springframework.jdbc.core.JdbcTemplate">
<property name="dataSource" ref="dataSource"></property>
</bean><!--5.spring声明式事务配置-->
<!--5.1 配置事务管理器:实现事务提交或回滚功能-->
<bean id="transactionManager" class="org.springframework.jdbc.datasource.DataSourceTransactionManager">
<!--注入连接池-->
<property name="dataSource" ref="dataSource"></property>
</bean>
<!--5.2 事务通知配置:配置传播行为,事务隔离级别,是否可读-->
<tx:annotation-driven transaction-manager="transactionManager"></tx:annotation-driven>
* @Transactional的使用, 加上事务的管理
* 使用方式:
* 1) 配置在接口上,接口的所有实现类所有方法都使用事务
* 2)配置在类上,当前类里面所有的方法都使用事务
* 3)配置在指定方法上,只有当前方法使用事务【推荐】
第一步:bean.xml中开启事务注解支持
第二步:使用@Transactional事务注解
UserServiceImpl实现类
@Service
@Transactional
public class AccountServcieImpl implements AccountService {//注入AccountDao
@Autowired
private AccountDao accountDao;/**
* 保存业务
*
* @param account
*/
@Override
@Transactional
public void save(Account account) {//第一条sql语句
accountDao.save(account);//模拟异常
//int a = 1/0;//第二条sql语句
accountDao.save(account);
}
Spring声明式事务零配置实现
通过下面的注解,取代对应的配置
编写配置管理类SpringConfiguration:
@Configuration //代替 bean.xml 文件
@ComponentScan(basePackages = "com.itheima") //开启 IOC 注解扫描
@EnableTransactionManagement //开启 事务 注解扫描
@Import(JdbcConfig.class) //加载 JdbcConfig 配置类数据
public class SpringConfiguration {
}
编写JdbcConfig
配置数据库连接相关的配置(加载jdbc.properties,创建连接池,创建jdbcTempate)
*
* 实现步骤:
* 1.使用 @PropertySource 注解加载外部属性配置文件jdbc.properties
* 语法:定义在类上,@PropertySource("classpath:类路径下属性配置文件名")
* 2.定义属性成员字段,使用 @Value 依赖注入数据库连接字符串url,驱动类drvierClassName,用户名username,密码password
* 3.使用 @Bean 注解定义在一个方法上面,会将方法的返回值连接池对象加入IOC容器
* 4.使用 @Bean 注解定义在一个方法上面,会将方法的返回值JdbcTemplate对象加入IOC容器
* 5.使用 @Bean 注解定义在一个方法上面,会将方法的返回值DataSourceTransactionManager对象加入IOC容器
*
*/
@PropertySource("classpath:jdbc.properties") //载外部属性配置文件jdbc.properties
public class JdbcConfig {
//2.定义属性成员字段,使用 @Value 依赖注入数据库连接字符串url,驱动类drvierClassName,用户名username,密码password
//数据库连接池字符串
@Value("${jdbc.url}")
private String url;//驱动类名称
@Value("${jdbc.driver}")
private String driverClassName;//数据库用户名
@Value("${jdbc.username}")
private String username;//数据库用户密码
@Value("${jdbc.password}")
private String password;//3.使用 @Bean 注解定义在一个方法上面,会将方法的返回值连接池对象加入IOC容器
@Bean
public DataSource createDataSource(){
DruidDataSource dataSource = new DruidDataSource();
dataSource.setUrl(this.url);
dataSource.setDriverClassName(this.driverClassName);
dataSource.setUsername(this.username);
dataSource.setPassword(this.password);
return dataSource;
}
//4.使用 @Bean 注解定义在一个方法上面,会将方法的返回值JdbcTemplate对象加入IOC容器
@Bean
public JdbcTemplate createJdbcTemplate(DataSource dataSource){
JdbcTemplate jdbcTemplate = new JdbcTemplate();
jdbcTemplate.setDataSource(dataSource);
return jdbcTemplate;
}//5.使用 @Bean 注解定义在一个方法上面,会将方法的返回值DataSourceTransactionManager对象加入IOC容器
@Bean
public DataSourceTransactionManager createDataSourceTransactionManager(DataSource dataSource){
DataSourceTransactionManager dataSourceTransactionManager = new DataSourceTransactionManager();
dataSourceTransactionManager.setDataSource(dataSource);
return dataSourceTransactionManager;
}
}