
在 idea中添加代码
Test1测试
package test;

import org.apache.commons.pool2.impl.GenericObjectPoolConfig;
import redis.clients.jedis.JedisPoolConfig;
import redis.clients.jedis.JedisShardInfo;
import redis.clients.jedis.ShardedJedis;
import redis.clients.jedis.ShardedJedisPool;

import java.util.ArrayList;
import java.util.List;

public class Test1 {
    public static void main(String[] args) {
        //服务器的列表
        List<JedisShardInfo> list = new ArrayList();
        list.add(new JedisShardInfo("192.168.64.150",7000));
        list.add(new JedisShardInfo("192.168.64.150",7001));
        list.add(new JedisShardInfo("192.168.64.150",7002));
        //配置对象
        GenericObjectPoolConfig conf = new JedisPoolConfig();
        //分片连接池
        ShardedJedisPool pool = new ShardedJedisPool(conf, list);
        //创建数据操作工具对象
        ShardedJedis j = pool.getResource();
        //循环放100 条数据
        for (int i = 0; i <100 ; i++) {
            j.set("k"+i,"v"+i);
        }
        pool.close();
    }
}
Docker搭建redis主从+哨兵
redis 哨兵
redis主从复制结构中,当主服务器宕机,哨兵可以监控到服务宕机,在从服务器中选举产生一个新的主服务器。

图片中的操作内容
搭建主从服务器 —— 一主两从
清理容器(可选)
docker rm -f $(docker ps -aq)
启动主服务器
# --net=host 容器直接使用宿主机的端口,不需要做端口映射
docker run -d --name redis6379 --net=host --restart=always redis

# 进入容器,运行redis客户端
docker exec -it redis6379 redis-cli

# 查看集群信息,默认是主服务器
> info replication
启动两个从服务器
# 启动redis6380容器,作为 redis6379 的从服务器启动
# --port 和 --slaveof 是 redis-server 命令的参数
docker run -d --name redis6380 --net=host --restart=always redis \
redis-server --port 6380 --slaveof 192.168.64.150 6379

# 启动redis6381容器,作为 redis6379 的从服务器启动
docker run -d --name redis6381 --net=host --restart=always redis \
redis-server --port 6381 --slaveof 192.168.64.150 6379

# 查看三个 redis 服务的角色
docker exec -it redis6379 redis-cli
> info replication

docker exec -it redis6380 redis-cli -p 6380
> info replication

docker exec -it redis6381 redis-cli -p 6381
> info replication
测试

启动哨兵
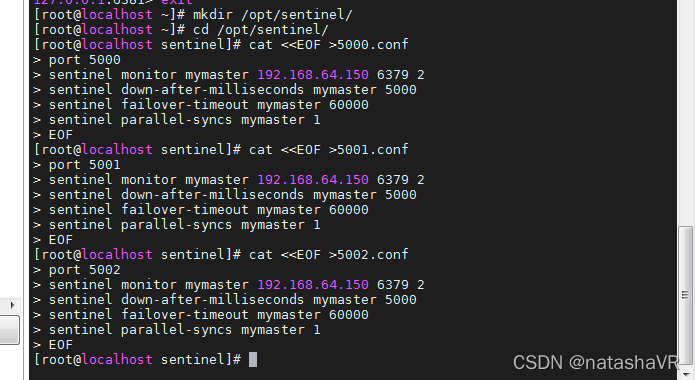
哨兵的配置文件:
mkdir /opt/sentinel/
cd /opt/sentinel/

# 配置文件中的 "sentinel monitor mymaster 192.168.64.150 6379 2"
# 末尾的 2 表示两个哨兵投票确认主服务器宕机,哨兵才会认为主服务器宕机
cat <<EOF >5000.conf
port 5000
sentinel monitor mymaster 192.168.64.150 6379 2
sentinel down-after-milliseconds mymaster 5000
sentinel failover-timeout mymaster 60000
sentinel parallel-syncs mymaster 1
EOF

cat <<EOF >5001.conf
port 5001
sentinel monitor mymaster 192.168.64.150 6379 2
sentinel down-after-milliseconds mymaster 5000
sentinel failover-timeout mymaster 60000
sentinel parallel-syncs mymaster 1
EOF

cat <<EOF >5002.conf
port 5002
sentinel monitor mymaster 192.168.64.150 6379 2
sentinel down-after-milliseconds mymaster 5000
sentinel failover-timeout mymaster 60000
sentinel parallel-syncs mymaster 1
EOF
上面内容从官方文档上抄过来的,端口和主服务器地址调整一下就行了
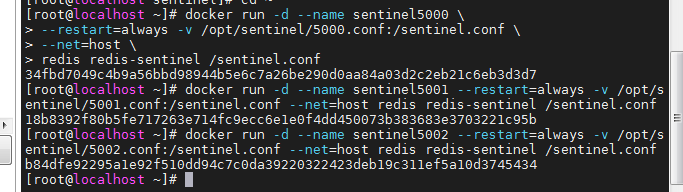
启动三个哨兵:
docker run -d --name sentinel5000 --restart=always -v /opt/sentinel/5000.conf:/sentinel.conf --net=host redis redis-sentinel /sentinel.conf


docker run -d --name sentinel5001 --restart=always -v /opt/sentinel/5001.conf:/sentinel.conf --net=host redis redis-sentinel /sentinel.conf


docker run -d --name sentinel5002 --restart=always -v /opt/sentinel/5002.conf:/sentinel.conf --net=host redis redis-sentinel /sentinel.conf
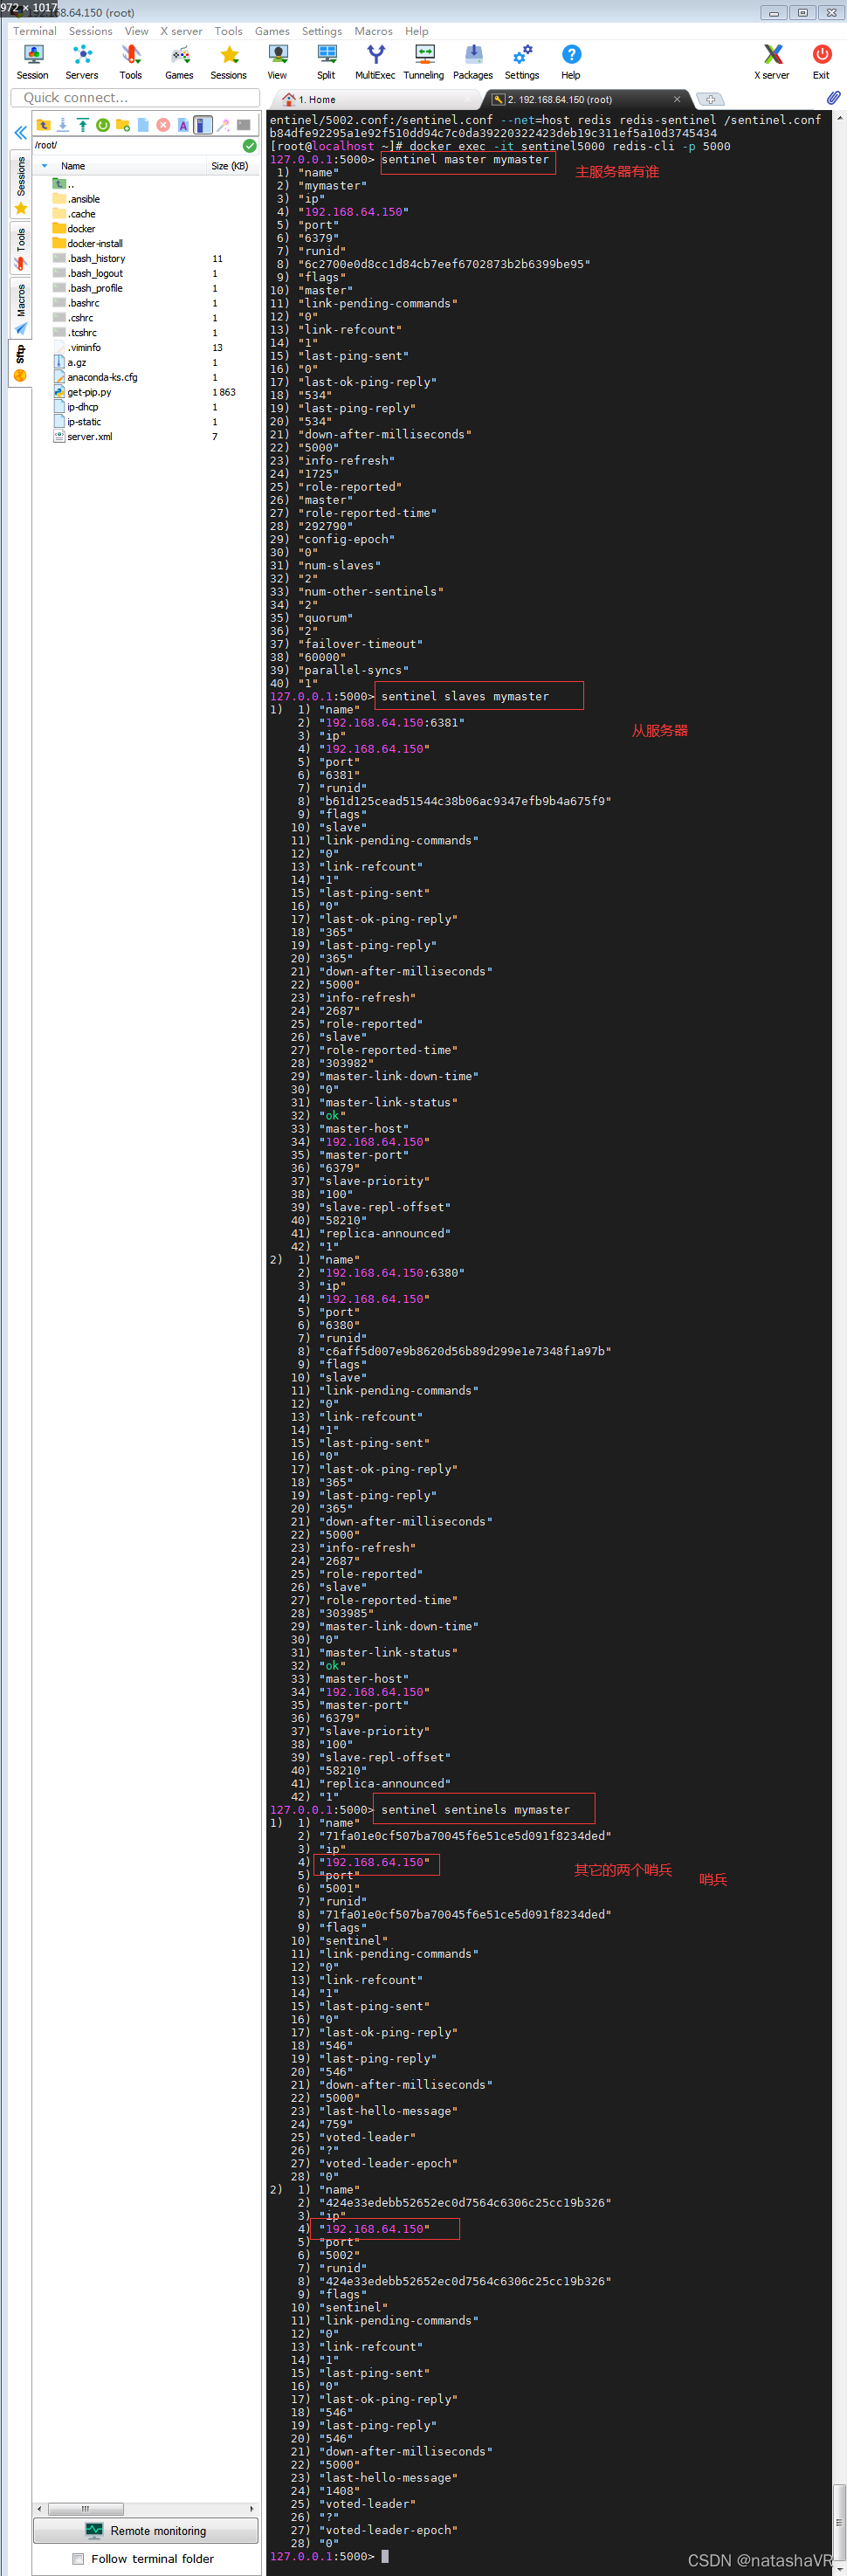
操作如下的效果:
# 进入一个哨兵容器,查看它监控的主从服务器和其他哨兵
docker exec -it sentinel5000 redis-cli -p 5000
> sentinel master mymaster
> sentinel slaves mymaster
> sentinel sentinels mymaster
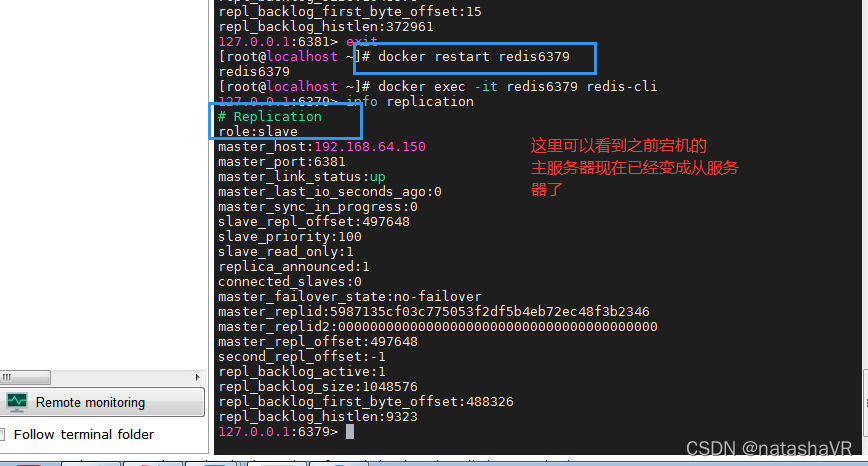
停止主服务器,测试主服务器重新选举:
# 停止主服务器
docker stop redis6379
# 在哨兵日志中查看服务器切换日志: +switch-master mymaster 192.168.64.150 6379 192.168.64.150 6381
docker logs sentinel5000

# 查看 6380 和 6381 服务器的角色变化
docker exec -it redis6380 redis-cli -p 6380
> info replication

docker exec -it redis6381 redis-cli -p 6381
> info replication
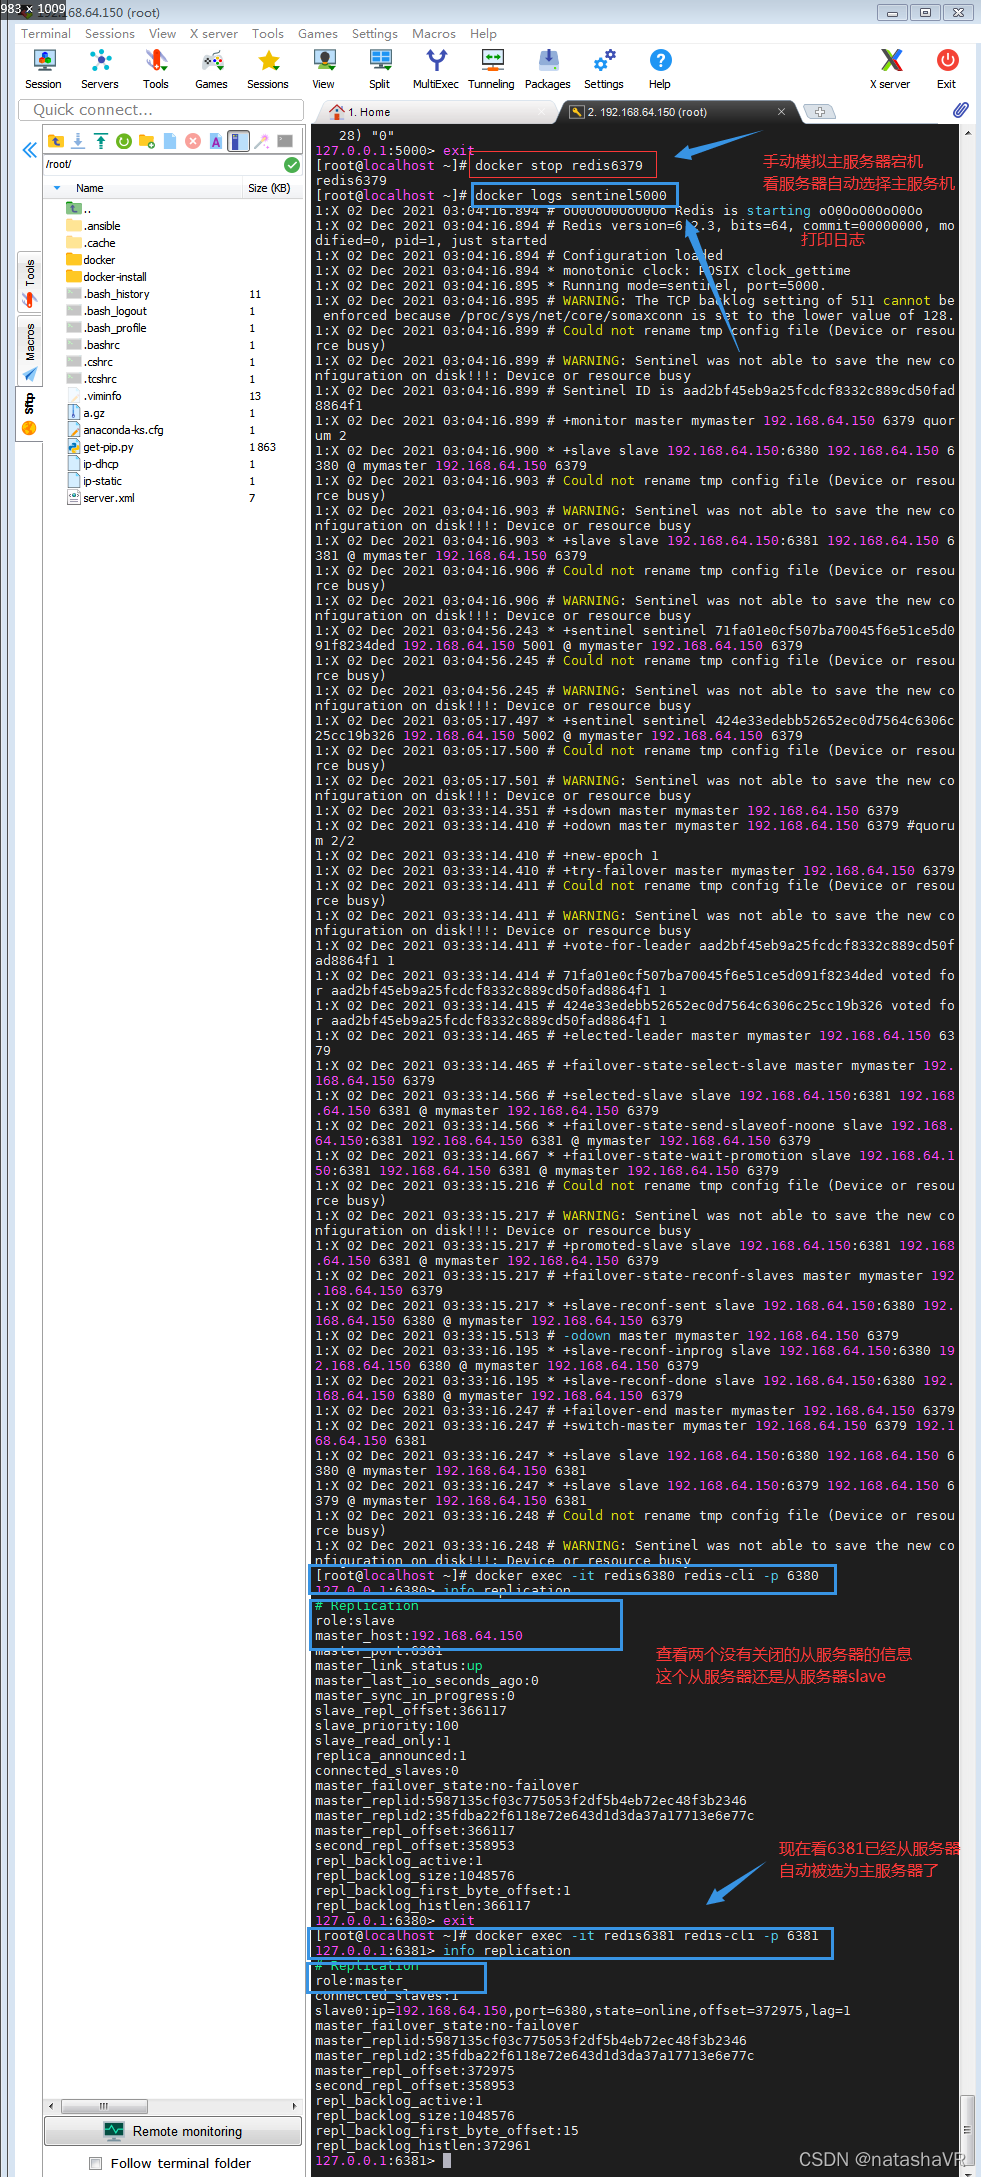
主服务突然宕机之后,系统会自动从 ,从服务机里选一个主服务,后面之前的主服务再启动就变为从服务器
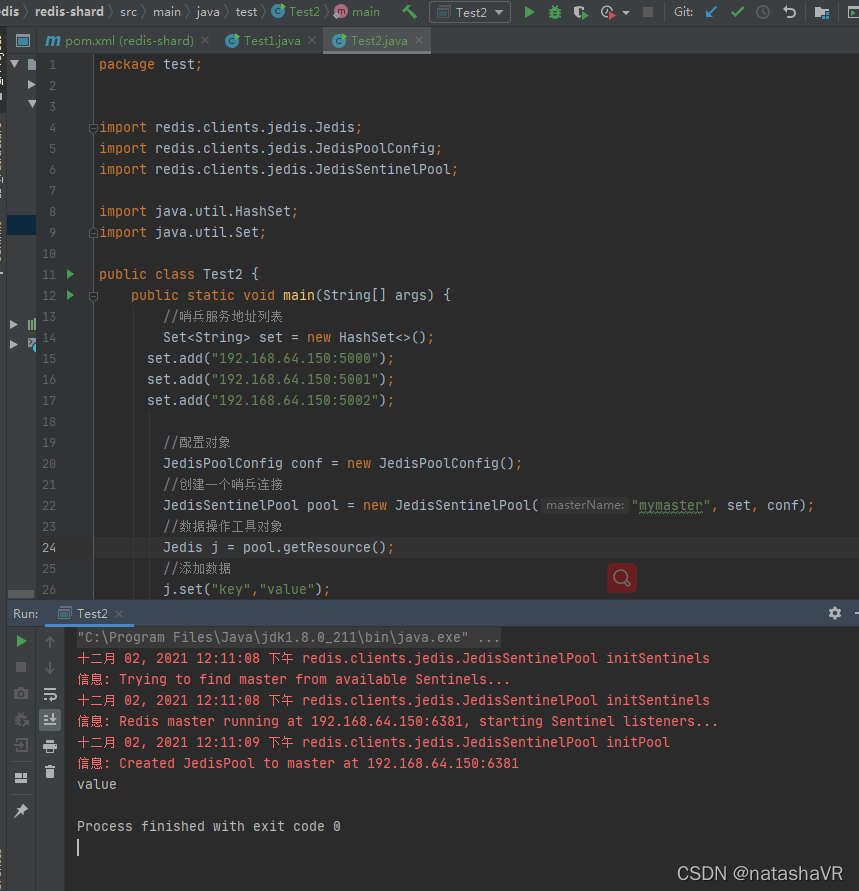
在idea中使用redis 的主从兵机制
package test;


import redis.clients.jedis.Jedis;
import redis.clients.jedis.JedisPoolConfig;
import redis.clients.jedis.JedisSentinelPool;

import java.util.HashSet;
import java.util.Set;

public class Test2 {
    public static void main(String[] args) {
        //哨兵服务地址列表
        Set<String> set = new HashSet<>();
      set.add("192.168.64.150:5000");
      set.add("192.168.64.150:5001");
      set.add("192.168.64.150:5002");

        //配置对象
        JedisPoolConfig conf = new JedisPoolConfig();
        //创建一个哨兵连接
        JedisSentinelPool pool = new JedisSentinelPool("mymaster", set, conf);
        //数据操作工具对象
        Jedis j = pool.getResource();
        //添加数据
        j.set("key","value");
        String v = j.get("key");
        System.out.println(v);

    }
}

Docker 搭建redis集群

参考官方文档:https://redis.io/topic/cluster-tutorial
端口:7000
六个Redis实例的配置文件:
redis.conf
port 7000
cluster-enabled yes
cluster-config-file nodes.conf
cluster-node-timeout 5000
appendonly yes
/opt/redis
		/7000/redis.conf
		/7001/redis.conf
		/7002/redis.conf
		/7003/redis.conf
		/7004/redis.conf
		/7005/redis.conf
开始执行命令
mkdir /opt/redis
cd /opt/redis
mkdir 7000 7001 7002 7003 7004 7005

cat <<EOF >7000/redis.conf
port 7000
cluster-enabled yes
cluster-config-file nodes.conf
cluster-node-timeout 5000
appendonly yes
EOF

cat <<EOF >7001/redis.conf
port 7001
cluster-enabled yes
cluster-config-file nodes.conf
cluster-node-timeout 5000
appendonly yes
EOF

cat <<EOF >7002/redis.conf
port 7002
cluster-enabled yes
cluster-config-file nodes.conf
cluster-node-timeout 5000
appendonly yes
EOF

cat <<EOF >7003/redis.conf
port 7003
cluster-enabled yes
cluster-config-file nodes.conf
cluster-node-timeout 5000
appendonly yes
EOF

cat <<EOF >7004/redis.conf
port 7004
cluster-enabled yes
cluster-config-file nodes.conf
cluster-node-timeout 5000
appendonly yes
EOF

cat <<EOF >7005/redis.conf
port 7005
cluster-enabled yes
cluster-config-file nodes.conf
cluster-node-timeout 5000
appendonly yes
EOF
先启动6个redis实例:
docker run -d --name redis7000 \
-v /opt/redis/7000/redis.conf:/redis.conf \
--net=host \
--restart=always \
redis \
redis-server /redis.conf

docker run -d --name redis7001 \
-v /opt/redis/7001/redis.conf:/redis.conf \
--net=host \
--restart=always \
redis \
redis-server /redis.conf

docker run -d --name redis7002 \
-v /opt/redis/7002/redis.conf:/redis.conf \
--net=host \
--restart=always \
redis \
redis-server /redis.conf

docker run -d --name redis7003 \
-v /opt/redis/7003/redis.conf:/redis.conf \
--net=host \
--restart=always \
redis \
redis-server /redis.conf

docker run -d --name redis7004 \
-v /opt/redis/7004/redis.conf:/redis.conf \
--net=host \
--restart=always \
redis \
redis-server /redis.conf

docker run -d --name redis7005 \
-v /opt/redis/7005/redis.conf:/redis.conf \
--net=host \
--restart=always \
redis \
redis-server /redis.conf
操作效果:
执行命令配置集群:
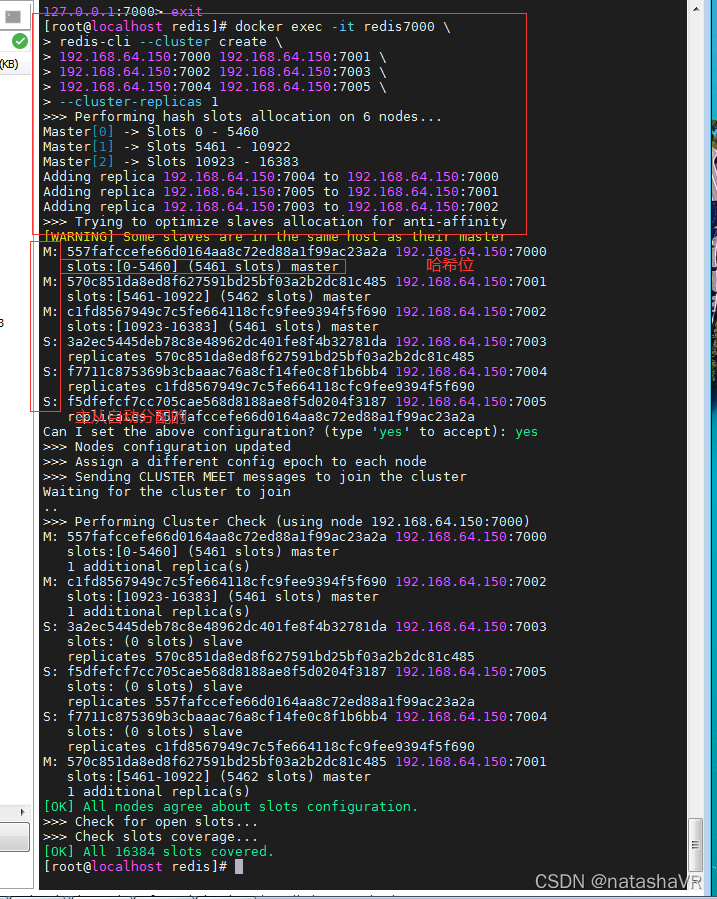
# 进入容器执行集群配置命令

docker exec -it redis7000 \
redis-cli --cluster create \
192.168.64.150:7000 192.168.64.150:7001 \
192.168.64.150:7002 192.168.64.150:7003 \
192.168.64.150:7004 192.168.64.150:7005 \
--cluster-replicas 1
其中 --cluster-replicas 1 表示每台主服务器携带一个从服务器
指定六台服务器
执行效果
查看集群信息:
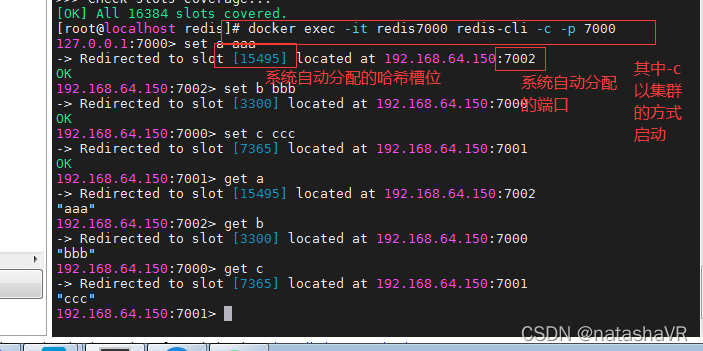
docker exec -it redis7000 redis-cli -c -p 7000

cluster info

cluster nodes
存数据:
docker exec -it redis7000 redis-cli -c -p 7000
# 7002
set a aaaaaaaaaaaaa
# 7000
set b bbbbbbbbbbb
# 7001
set c cccccccccccccccc
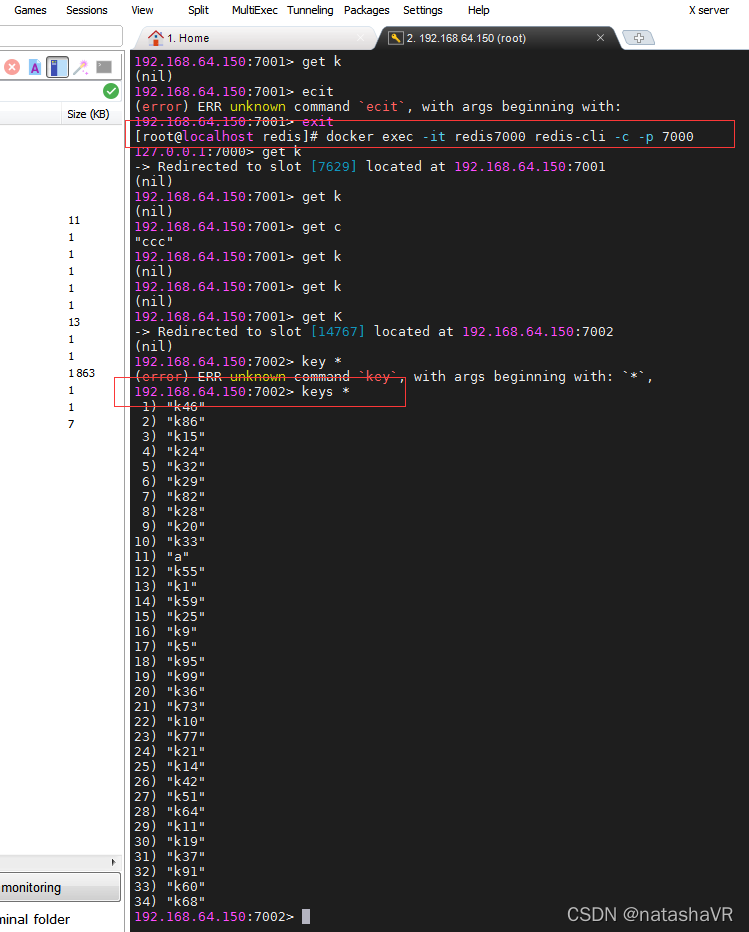
操作效果:
spring redis api:
        <dependency>
            <groupId>org.springframework.boot</groupId>
            <artifactId>spring-boot-starter-data-redis</artifactId>
        </dependency>


spring:
  redis:
    cluster:
      nodes:
        - 192.168.64.150:7000
        - 192.168.64.150:7001
        - 192.168.64.150:7002
        - 192.168.64.150:7003
        - 192.168.64.150:7004
        - 192.168.64.150:7005


    @Autowired
    private RedisConnectionFactory connectionFactory;

    public void test() {
        RedisClusterConnection c = connectionFactory.getClusterConnection();
        for (int i = 0; i < 100; i++) {
            c.set(("k"+i).getBytes(StandardCharsets.UTF_8),
                    ("v"+i).getBytes(StandardCharsets.UTF_8));
        }
    }


    @Autowired
    @Qualifier("stringRedisTemplate")
    private RedisTemplate t;

    public void test() {
        ValueOperations<String, Object> o = t.opsForValue();
        o.set("hhhh", "vvvv");
        o.set("nnnn", "gggg");
    }
新建spring boot 工程
使用spirng封装的redis 这样更方便些
pom:
<?xml version="1.0" encoding="UTF-8"?>
<project xmlns="http://maven.apache.org/POM/4.0.0" xmlns:xsi="http://www.w3.org/2001/XMLSchema-instance"
         xsi:schemaLocation="http://maven.apache.org/POM/4.0.0 https://maven.apache.org/xsd/maven-4.0.0.xsd">
    <modelVersion>4.0.0</modelVersion>
    <parent>
        <groupId>org.springframework.boot</groupId>
        <artifactId>spring-boot-starter-parent</artifactId>
        <version>2.3.2.RELEASE</version>
        <relativePath/> <!-- lookup parent from repository -->
    </parent>
    <groupId>cn.tedu</groupId>
    <artifactId>redis-cluster</artifactId>
    <version>0.0.1-SNAPSHOT</version>
    <name>redis-cluster</name>
    <description>Demo project for Spring Boot</description>
    <properties>
        <java.version>1.8</java.version>
    </properties>
    <dependencies>
        <dependency>
            <groupId>org.springframework.boot</groupId>
            <artifactId>spring-boot-starter-data-redis</artifactId>
        </dependency>

        <dependency>
            <groupId>org.springframework.boot</groupId>
            <artifactId>spring-boot-starter-test</artifactId>
            <scope>test</scope>
        </dependency>
    </dependencies>

    <build>
        <plugins>
            <plugin>
                <groupId>org.springframework.boot</groupId>
                <artifactId>spring-boot-maven-plugin</artifactId>
            </plugin>
        </plugins>
    </build>

</project>
application 文件:
spring:
  redis:
    cluster:
      nodes:
        - 192.168.64.150:7000
        - 192.168.64.150:7001
        - 192.168.64.150:7002
        - 192.168.64.150:7003
        - 192.168.64.150:7004
        - 192.168.64.150:7005
Test:
package cn.tedu;

import org.junit.jupiter.api.Test;
import org.springframework.beans.factory.annotation.Autowired;
import org.springframework.boot.test.context.SpringBootTest;
import org.springframework.data.redis.connection.RedisClusterConnection;
import org.springframework.data.redis.connection.RedisConnectionFactory;

import java.nio.charset.StandardCharsets;


@SpringBootTest
public class Test1 {
    @Autowired
    private RedisConnectionFactory f;

    @Test
    public void  test1(){
        RedisClusterConnection c = f.getClusterConnection();
        for (int i = 0; i <100 ; i++) {
            String k = "k"+i;
            String v = "v"+i;

            c.set(k.getBytes(StandardCharsets.UTF_8),
                    v.getBytes(StandardCharsets.UTF_8));
        }
    }
}
测试结果:
版权声明:本文为liymaVR原创文章,遵循CC 4.0 BY-SA版权协议,转载请附上原文出处链接和本声明。