使用antd以来,有些东西总是现用现查,现总结一波,以提升开发效率
一:表格下钻及默认展开一级
{
              treeData && treeData.length > 0 ? (
                <Table
                  rowKey={record => `${record.deptCode}`}
                  loading={tableLoading}
                  defaultExpandedRowKeys={treeData.map(item => item.deptCode)}
                  columns={this.state.columns}
                  dataSource={treeData}
                  pagination={false}
                  onExpand={this.handldOnExpand}
                  scroll={{ y: 450 }}

                />
              ) : (<div style={{ minHeight: 450, textAlign: 'center', boxSizing: 'border-box', paddingTop: '200px' }}><Spin /></div>)
  }

解释一:
      modal里面的table,为什么要判断 treeData.length>0? 再展示table? 因为这个treedata的值是在state: treeData:[],上定义的,接口返回再赋值,如果不判断的话,组件初次render之后,
就会执行defaultExpandedRowKeys={treeData.map(item => item.deptCode)} ,等数据回来,第一级数据就不会展开了,因为初次识别的是一个空数组,所以,这里判断
length>0才展示就会默认展示返回的一级数据了。

解释二:
   根据部门的deptCodePaths值判断的
   onExpand={this.handldOnExpand}是按照部门数下钻的,所以,这里有三个函数比较重要,注意理解:
    // 展开加号
  handldOnExpand = async (expanded, record) => {
    if (!expanded || record.children.length) return
    let {
      treeData,
    } = this.state
    let res = await this.getTableChildrenData({ deptIsUserChoose: false, deptCodePaths: [record.deptCodePath] })
    let node = this.findTreeNode(record.deptCode, treeData)
    node.children = res
    this.setState({ tableLoading: false })
  }

  //根据传入的nodeId查找到节点
  findTreeNode = (nodeId, treeList) => {
    let node = null
    if (!treeList || treeList === []) {
      return []
    }
    for (const value of treeList) {
      if (+value.deptCode === +nodeId) {
        node = value
        return node
      } else if (Array.isArray(value.children)) {
        node = this.findTreeNode(nodeId, value.children)
        if (node) return node
      }
    }
  }

  // 得到子节点
  getTableChildrenData({ deptIsUserChoose = false, deptCodePaths = [] }) {

    let {
      tableLoading,
    } = this.state
    if (tableLoading) return
    this.setState({ tableLoading: true })
    return  // this.props.enpsStore.getEnpsSituationDetail({ 掉接口
      // ...this.props.searchParams,
      // deptIsUserChoose,
     //  deptCodePaths
   // }).then(res => res)

  }
二: select多选一行显示可滑动:

注意:如果只是这一个需要这样的话,那么就需要在外面套一个盒子,进行局部更改,否则,更改的就是全局的了
// treeSelect
.ant-select-selection--multiple{
  .ant-select-selection__rendered {
    display: flex;
    overflow: auto;
    >li {
      flex-shrink: 0;
    }
    &::-webkit-scrollbar {
      display: none;
    }
  }
}

// 多选select
  .ant-select-selection--multiple {
            width: 100%;
            .ant-select-selection__rendered {
              height: 30px;
              ul {
                display: flex;
                width: 100%;
                overflow: auto;
                &::-webkit-scrollbar {
                  display: none;
                }
                >li {
                  flex-shrink: 0;
                }
              }
            }
          }

如果遇到选中抖动的情况,有可能是line-height影响的,可以加上:(外层封一个盒子)
.chart_statement { // 外层盒子,免得干扰了全局
  .ant-form-item-label {
    line-height: 31px !important;
  }
  .ant-form-item-control {
    line-height: 25px !important
  }
}
三:upload手动上传
即:不是及时上传,是先保存文件,然后,点击提交按钮之后再上传,注意文件的类型和写法:
需要转化成formdata格式上传:
this.state = {
      buttonLoading: false,
      fileList: [],
      disableBtn: false,
    };

 handleSubmit = (e) => {
    e.preventDefault();
    this.props.form.validateFields((err, values) => {
      if (!err) {
        const { fileList } = this.state;
        // console.log('filelist----', fileList[0]);
        const formData = new FormData();
        fileList.forEach((file) => {
          formData.append('file', file);
        });
        // console.log('file----', formData.get('file'))
        this.props.appContext.adminActions.uploadBillFile({
          file: formData,
          periodId: values.name,
          templateId: values.belong,
        }).then((res) => {
          if (res.msg === '成功') {
            message.success('上传成功');
          } else {
            message.error(`${res.msg}`);
          }
        })
        this.setState({
          fileList: [],
          disableBtn: false,
        })
        this.onCancel('reload')
      }
    });
  }

render: (){
   const props = {
      onRemove: (file) => {
        this.setState((state) => {
          const index = state.fileList.indexOf(file);
          const newFileList = state.fileList.slice();
          newFileList.splice(index, 1);
          return {
            fileList: newFileList,
          };
        }, () => {
          if (this.state.fileList < 1) {
            this.setState({
              disableBtn: false,
            })
          }
        });
      },
      beforeUpload: (file) => {
        this.setState(state => ({
          fileList: [...state.fileList, file],
        }), () => {
          if (this.state.fileList.length >= 1) {
            this.setState({
              disableBtn: true, // 如果上传的有一个文件了,就不让上传,用户删除当前文件之后放可上传
            })
          }
        });

        return false;
      },
      fileList,
    };

}

// 组件显示
<Upload
      {...props}
      accept=".doc,.docx,application/msword,application/vnd.openxmlformats-officedocument.wordprocessingml.document,application/vnd.openxmlformats-officedocument.spreadsheetml.sheet"
       >

       <Button style={{ width: '400px', display: 'flex', alignItems: 'center', justifyContent: 'center', fontSize: '14px' }} disabled={this.state.disableBtn}>
          <Icon type="cloud-upload" style={{ fontSize: '16px' }} />
              请上传文件
       </Button>
</Upload>

// upload上没有action,是先转化成流文件,再传给后端的

// 这里有一个坑,就是我封装的request自定义了请求头,导致文件上传不对,所以,修改之后的request是:
async function uploadRequest(url, options = {}) {
  const response = await fetch(url, Object.assign({
    headers: {
      'x-kylin-proxy-with': 'apirequest', // 用于麒麟 未登录接口不会302而是返回接口真实数据
    },
    credentials: 'include',
    responseType: 'arraybuffer',
  }, options));

  const data = await response.json();
  if (data) {
    return data;
  }
}

export default uploadRequest;

headers看下是否需要带,不要自定义'Content-Type': 'application/json;charset=UTF-8',注意了
四:对于顶部搜索的栅格布局,常用的是这种类型
 const formItemLayout = {
      labelCol: {
        xs: { span: 4 },
        md: { span: 6 },
      },
      wrapperCol: {
        xs: { span: 20 },
        md: { span: 18 },
      },
    };

 <Row type="flex" justify="start" align="top">
              <Col span={8}>
                <FormItem {...formItemLayout} label="费用类型">
                  {getFieldDecorator('expenseId')(
                    <Select allowClear style={{ width: '100%' }} placeholder="请选择费用类型" onChange={this.selectChange}>
                      {
                        this.state.selectList.length > 0 ? this.state.selectList.map(item => (
                          <Option value={item.id} key={item.id} style={{ fontSize: '14px' }}>{item.expenseName}</Option>
                        )) : ''
                      }
                    </Select>
                  )}
                </FormItem>
              </Col>
              <Col span={8} push={2}>
                <FormItem {...formItemLayout} label="模板名称">
                  {getFieldDecorator('templateName')(<Input allowClear onChange={this.inputChange} placeholder="请输入模板名称" />)}
                </FormItem>
              </Col>
              <Col span={4} push={4}>
                <div style={{ marginTop: 5 }}>
                  <Button onClick={this.handleReset} shape="round" style={{ fontSize: '14px' }}>重置</Button>
                </div>
              </Col>
            </Row>
五: table定栏滑动,scrollX算法
有时候,表格比较宽的时候,可能需要定最左栏,或者几栏,其余可以滑动的效果,坑就是这个scrollX的值是动态算出来的,不是直接写死的值,如果直接写死的,那么,到了其他屏幕上就会有空隙的情况;
render: (){
  const columns = [{
      title: '费用类型',
      dataIndex: 'expenseName',
      width: '500px',

    }, {
      title: '模板名称',
      dataIndex: 'name',
      width: '240px',
    }, {
      title: '更新人',
      dataIndex: 'updater',
      width: '240px',
    }, {
      title: '更新时间',
      width: '300px',
      render: record => (
        <span>{this.time(record.updateAt)}</span>
      ),
    }]

let scrollX = columns.reduce((sum, item, idx) => {
  // console.log('sum, item, idx--->',sum, item, idx)
  if (idx !== 0) {
    item.width = item.title.split('').length * 15 < 240
      ? 240
      : item.title.split('').length * 15
  }
  return sum + item.width
}, 0)

// 如果有某一列小于240,也按照240展示了,这样算出来的scrollX就是动态的了,
             <Table
                  rowKey={record => `${record.deptCode}`}
                  loading={tableLoading}
                  defaultExpandedRowKeys={treeData.map(item => item.deptCode)}
                  columns={columns}
                  dataSource={treeData}
                  pagination={false}
                  onExpand={this.handldOnExpand}
                  scroll={{ y: 450, x: scrollX}}
                />
}
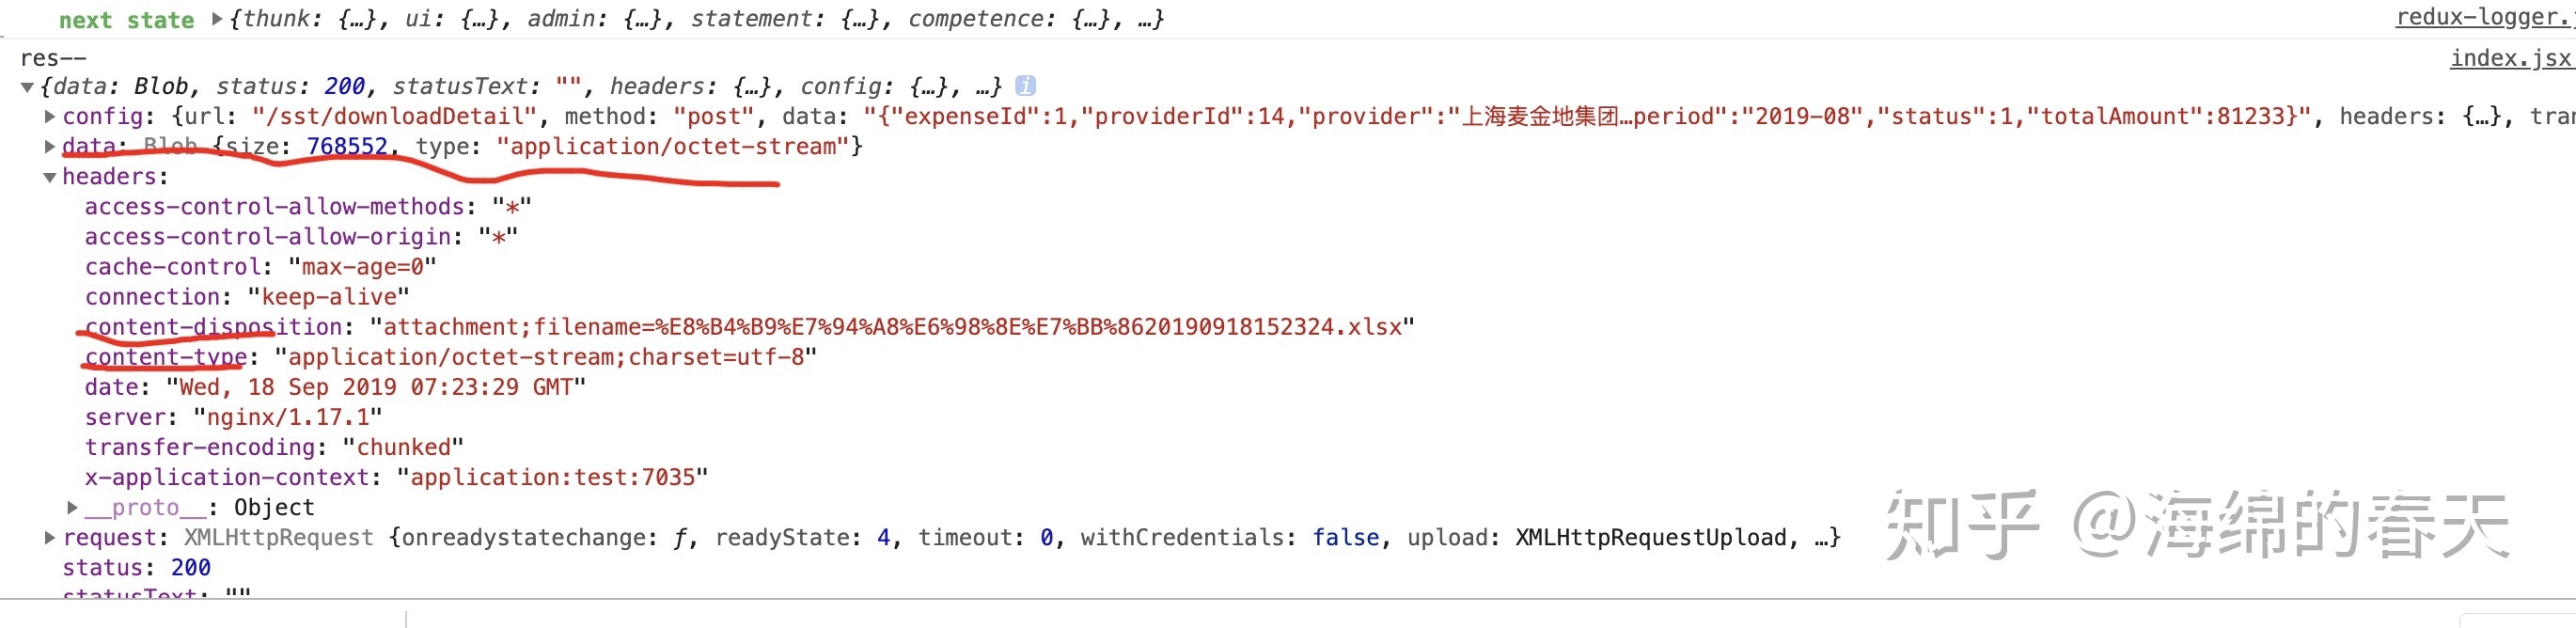
六:下载流文件的坑:
后端返回的excal前端下载一般有两种方式,一种是返回路径:window.open打开下载,另一种是后端直接返回一种流文件,坑是本来我用的是fetch请求的,但是,headers里面不仅需要用get()
方法取出来,请求头也做了拦截转化,所以,这种情况下,还是用axios比较好,省去了一堆bug,在这点上,axios优于fetch
server里面:

import axios from 'axios';
export const downloadSummaryData = data => axios('/sst/downloadSummaryData', { // 下载
  method: 'POST', // 注意这里是post还是get,如果是get,就要在路径上拼接参数了
  data,
  responseType: 'blob', // 转化成流文件
});

页面上:

// 下载明细
  downLoadDetail = (record) => {
    this.props.appContext.adminActions.downloadDetail({ // 参数
      expenseId: record.expenseId
    })
      .then((res) => {
        const contentType = res.headers['content-type'];
        const disposition = res.headers['content-disposition'];
        const fileName = decodeURI(disposition.substring(disposition.indexOf('filename=') + 9, disposition.length));
        // console.log('fileName---', fileName, res);
        const blob = new Blob([res.data], { type: contentType });
        const link = document.createElement('a');
        link.href = window.URL.createObjectURL(blob);
        link.download = fileName;
        link.click();
        link.remove();
      });
  }
版权声明:本文为weixin_29605607原创文章,遵循CC 4.0 BY-SA版权协议,转载请附上原文出处链接和本声明。