
这一篇博客我们使用 SpringBoot 整合 ElasticSearch。其实,我们可以把 ElasticSearch 设想成数据库!操作数据库的思想来操作即可。
版本说明:
1、SpringBoot 1.5 版本的,只能使用 ElasticSearch 2.X 的版本。
2、SpringBoot 2.0 以上的版本,必须使用 ElasticSearch 5.0 以上的版本。
3、ElasticSearch 6.0 以上的版本,建议使用 SpringBoot 2.2+ 的版本。
因为我们下载的是官网最新版本的 ElasticSearch 7.12 ,所以我们的 SpringBoot 版本使用 2.2.0 的,对应的,SpringCloud 版本是 Greenwich.SR2。
给出一个版本表: Greenwich.SR2 对SpringBoot最低版本要求是 2.1
spring-cloud
Finchley.M2                     "Spring Boot >=2.0.0.M3 and <2.0.0.M5"
Finchley.M3                     "Spring Boot >=2.0.0.M5 and <=2.0.0.M5"
Finchley.M4                     "Spring Boot >=2.0.0.M6 and <=2.0.0.M6"
Finchley.M5    "Spring Boot >=2.0.0.M7 and <=2.0.0.M7"
Finchley.M6    "Spring Boot >=2.0.0.RC1 and <=2.0.0.RC1"
Finchley.M7    "Spring Boot >=2.0.0.RC2 and <=2.0.0.RC2"
Finchley.M9    "Spring Boot >=2.0.0.RELEASE and <=2.0.0.RELEASE"
Finchley.RC1    "Spring Boot >=2.0.1.RELEASE and <2.0.2.RELEASE"
Finchley.RC2    "Spring Boot >=2.0.2.RELEASE and <2.0.3.RELEASE"
Finchley.SR4    "Spring Boot >=2.0.3.RELEASE and <2.0.999.BUILD-SNAPSHOT"
Finchley.BUILD-SNAPSHOT    "Spring Boot >=2.0.999.BUILD-SNAPSHOT and <2.1.0.M3"
Greenwich.M1    "Spring Boot >=2.1.0.M3 and <2.1.0.RELEASE"
Greenwich.SR2    "Spring Boot >=2.1.0.RELEASE and <2.1.9.BUILD-SNAPSHOT"
Greenwich.BUILD-SNAPSHOT    "Spring Boot >=2.1.9.BUILD-SNAPSHOT and <2.2.0.M4"
Hoxton.M2    "Spring Boot >=2.2.0.M4 and <=2.2.0.M5"
Hoxton.BUILD-SNAPSHOT    "Spring Boot >=2.2.0.BUILD-SNAPSHOT"
如果版本不兼容,容易报错,如图:
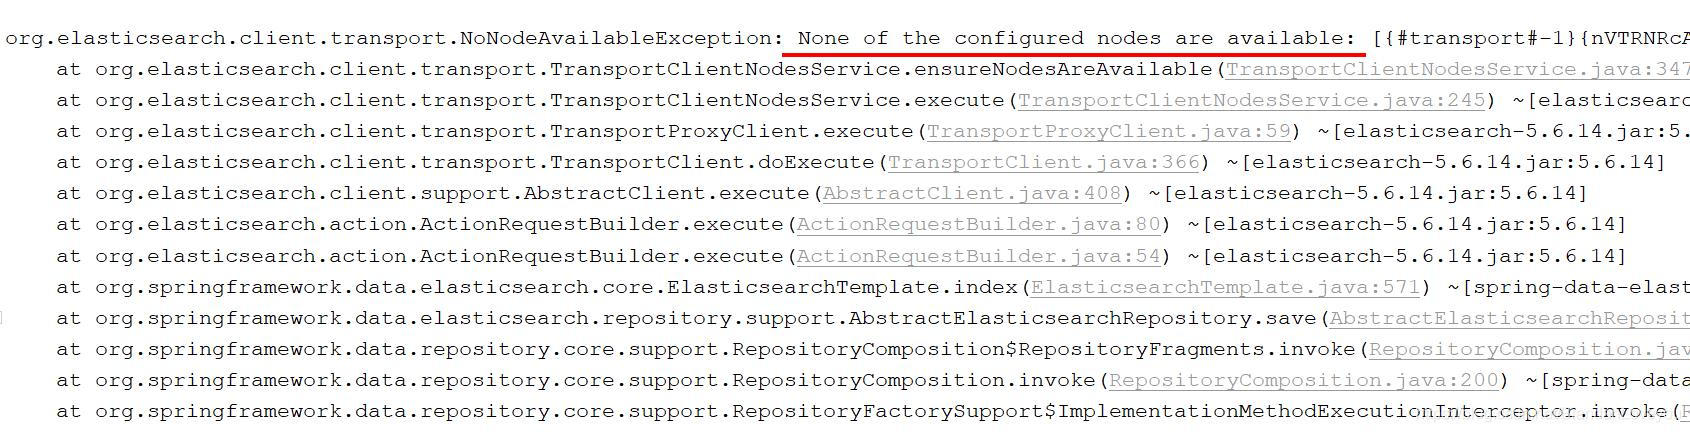
org.elasticsearch.client.transport.NoNodeAvailableException: None of the configured nodes are available: [{#transport#-1}{G4N8V-wnTIyerIavigtnBw}{127.0.0.1}{127.0.0.1:9300}]
	at org.elasticsearch.client.transport.TransportClientNodesService.ensureNodesAreAvailable(TransportClientNodesService.java:347) ~[elasticsearch-5.6.14.jar:5.6.14]
	at org.elasticsearch.client.transport.TransportClientNodesService.execute(TransportClientNodesService.java:245) ~[elasticsearch-5.6.14.jar:5.6.14]
	at org.elasticsearch.client.transport.TransportProxyClient.execute(TransportProxyClient.java:59) ~[elasticsearch-5.6.14.jar:5.6.14]
	at org.elasticsearch.client.transport.TransportClient.doExecute(TransportClient.java:366) ~[elasticsearch-5.6.14.jar:5.6.14]
	at org.elasticsearch.client.support.AbstractClient.execute(AbstractClient.java:408) ~[elasticsearch-5.6.14.jar:5.6.14]
	at org.elasticsearch.action.ActionRequestBuilder.execute(ActionRequestBuilder.java:80) ~[elasticsearch-5.6.14.jar:5.6.14]
	at org.elasticsearch.action.ActionRequestBuilder.execute(ActionRequestBuilder.java:54) ~[elasticsearch-5.6.14.jar:5.6.14]
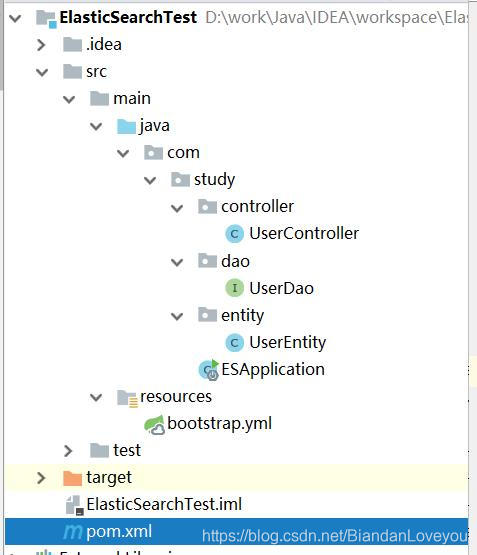
我们创建一个项目,项目结构如图:
pom.xml 代码如下:
<?xml version="1.0" encoding="UTF-8"?>
<project xmlns="http://maven.apache.org/POM/4.0.0"
         xmlns:xsi="http://www.w3.org/2001/XMLSchema-instance"
         xsi:schemaLocation="http://maven.apache.org/POM/4.0.0 http://maven.apache.org/xsd/maven-4.0.0.xsd">
    <modelVersion>4.0.0</modelVersion>

    <groupId>com.study</groupId>
    <artifactId>ElasticSearchTest</artifactId>
    <version>1.0-SNAPSHOT</version>

    <parent>
        <groupId>org.springframework.boot</groupId>
        <artifactId>spring-boot-starter-parent</artifactId>
        <version>2.2.0.RELEASE</version>
    </parent>

    <dependencies>
        <!--Spring boot 集成包-->
        <dependency>
            <groupId>org.springframework.cloud</groupId>
            <artifactId>spring-cloud-starter-netflix-eureka-client</artifactId>
        </dependency>
        <!--web支持-->
        <dependency>
            <groupId>org.springframework.boot</groupId>
            <artifactId>spring-boot-starter-web</artifactId>
        </dependency>
        <dependency>
            <groupId>org.springframework.boot</groupId>
            <artifactId>spring-boot-starter-test</artifactId>
            <scope>test</scope>
        </dependency>
        <dependency>
            <groupId>org.springframework.boot</groupId>
            <artifactId>spring-boot-starter-data-elasticsearch</artifactId>
        </dependency>
    </dependencies>

    <dependencyManagement>
        <dependencies>
            <dependency>
                <groupId>org.springframework.cloud</groupId>
                <artifactId>spring-cloud-dependencies</artifactId>
                <version>Greenwich.SR2</version>
                <type>pom</type>
                <scope>import</scope>
            </dependency>
        </dependencies>
    </dependencyManagement>


</project>
bootstrap.yml 配置如下:
spring:
  data:
    elasticsearch:
      # 集群名称,默认是 elasticsearch,如果需要改名字,需修改配置 ES 的配置文件 elasticsearch.yml
      cluster-name: elasticsearch
      # ElasticSearch 节点地址,注意端口号是 9300,而9200是http协议端口
      cluster-nodes: 127.0.0.1:9300

server:
  port: 8080

# 将SpringBoot项目作为单实例部署调试时,不需要注册到注册中心
eureka:
  client:
    fetch-registry: false
    register-with-eureka: false
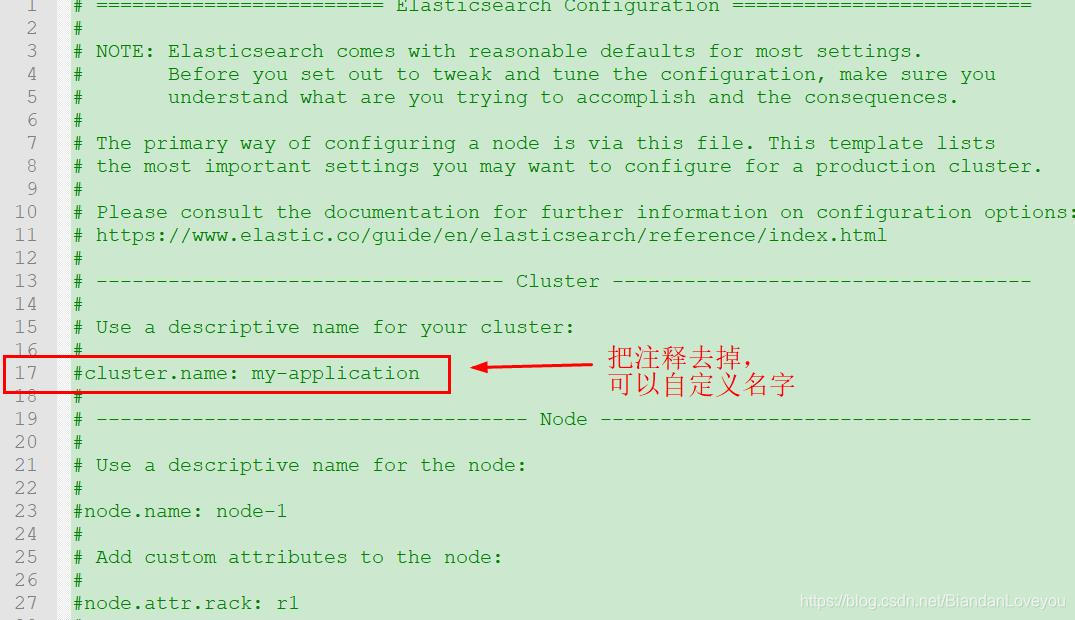
说明:我们配置集群名称默认为 elasticsearch,如果需要改名字,需要把 ES 的配置文件 elasticsearch.yml修改,位置在:elastic\elasticsearch\config 如图:
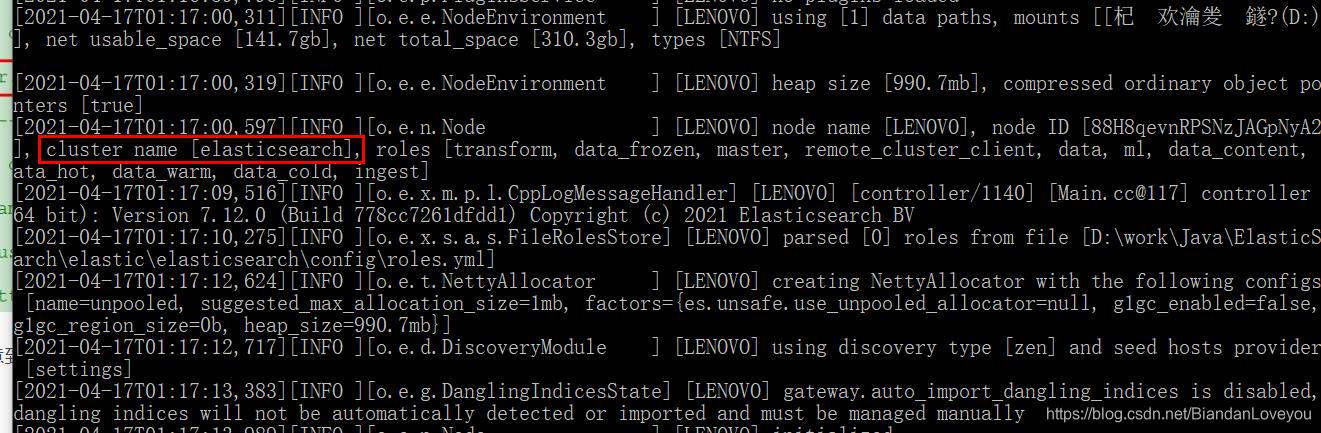
其实,我们会注意到,ElasticSearch 启动的时候,有一行集群名字的信息,如图,这就是默认的集群名称。
实体类 UserEntity:说明,需要增加注解:org.springframework.data.elasticsearch.annotations.Document 和 org.springframework.data.annotation.Id
package com.study.entity;

import org.springframework.data.annotation.Id;
import org.springframework.data.elasticsearch.annotations.Document;

/**
 * @author biandan
 * @description
 * @signature 让天下没有难写的代码
 * @create 2021-04-16 下午 11:30
 */
@Document(indexName = "biandan",type = "user")
public class UserEntity {

    //这是ES文档要求的ID,必须添加 @Id 注解,实际项目中需要区分业务逻辑的ID
    @Id
    private String esID;

    private String name;

    private String sign;

    public String getEsID() {
        return esID;
    }

    public void setEsID(String esID) {
        this.esID = esID;
    }

    public String getName() {
        return name;
    }

    public void setName(String name) {
        this.name = name;
    }

    public String getSign() {
        return sign;
    }

    public void setSign(String sign) {
        this.sign = sign;
    }
}
Dao 层
package com.study.dao;

import com.study.entity.UserEntity;
import org.springframework.data.repository.CrudRepository;

/**
 * @author biandan
 * @description
 * @signature 让天下没有难写的代码
 * @create 2021-04-16 下午 11:32
 */
public interface UserDao extends CrudRepository<UserEntity,String> {

}
controller 层:
package com.study.controller;

import com.study.dao.UserDao;
import com.study.entity.UserEntity;
import org.springframework.beans.factory.annotation.Autowired;
import org.springframework.stereotype.Controller;
import org.springframework.web.bind.annotation.*;

import java.util.Optional;

/**
 * @author biandan
 * @description
 * @signature 让天下没有难写的代码
 * @create 2021-04-16 下午 11:33
 */
@RestController
public class UserController {

    @Autowired
    private UserDao userDao;

    /**
     * 增加用户信息
     *
     * @param entity
     * @return
     */
    @RequestMapping(value = "/addUser", method = RequestMethod.POST)
    public Boolean addUser(@RequestBody UserEntity entity) {
        UserEntity result = userDao.save(entity);
        if (null != result) {
            return true;
        }
        return false;
    }

    /**
     * 根据ID查询用户信息
     *
     * @param id
     * @return
     */
    @RequestMapping(value = "/findById", method = RequestMethod.GET)
    public Optional<UserEntity> findById(String id) {
        Optional<UserEntity> userEntity = userDao.findById(id);
        return userEntity;
    }

}
启动类:需要增加注解 @EnableElasticsearchRepositories
package com.study;

import org.springframework.boot.SpringApplication;
import org.springframework.boot.autoconfigure.SpringBootApplication;
import org.springframework.data.elasticsearch.repository.config.EnableElasticsearchRepositories;

/**
 * @author biandan
 * @description
 * @signature 让天下没有难写的代码
 * @create 2021-04-16 下午 11:26
 */
@SpringBootApplication
@EnableElasticsearchRepositories(basePackages = "com.study.dao")//扫描dao包
public class ESApplication {

    public static void main(String[] args) {
        SpringApplication.run(ESApplication.class,args);
    }

}
OK,我们启动项目(需要提前启动 ElasticSearch 服务器),使用 postman 工具发送请求:
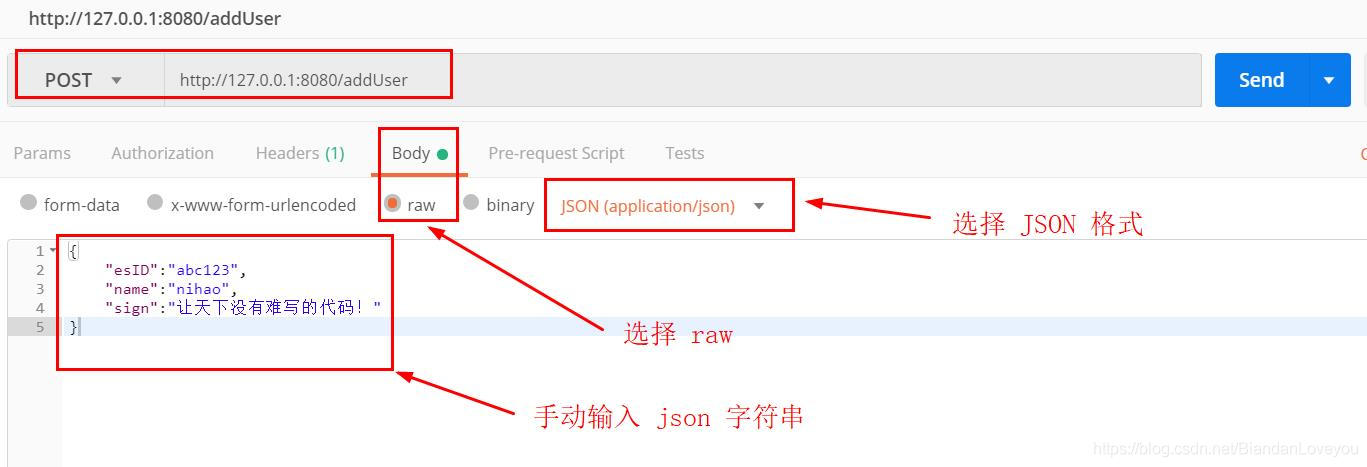
说明:因为我们的 controller 层使用注解 @RequestBody 来接收一个实体,因此前端的 Body 请求数据需要使用 raw 形式,并且使用 json 格式,如图:
{
	"esID":"abc123",
	"name":"nihao",
	"sign":"让天下没有难写的代码!"
}
否则报错:415
{
    "timestamp": "2021-04-16T17:31:32.450+0000",
    "status": 415,
    "error": "Unsupported Media Type",
    "message": "Content type 'multipart/form-data;boundary=--------------------------553947066698032990914355;charset=UTF-8' not supported",
    "path": "/addUser"
}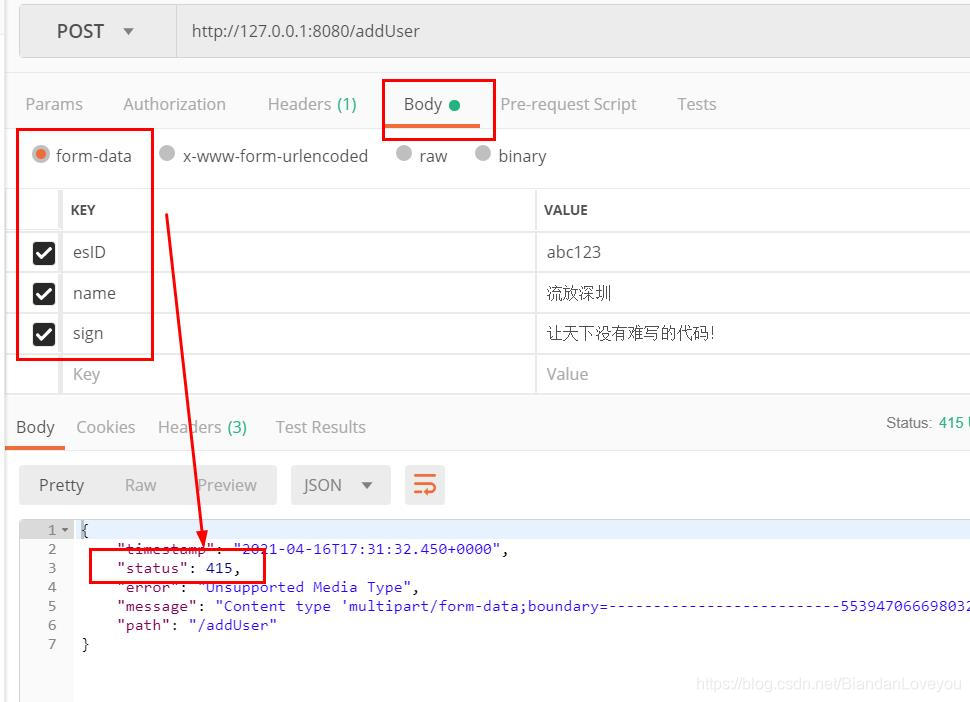
如果想用 form-data 的形式,就必须修改 controller 层如下:
    @RequestMapping(value = "/addUser", method = RequestMethod.POST)
    public Boolean addUser(@RequestParam String esID,@RequestParam String name,@RequestParam String sign) {
        UserEntity entity = new UserEntity();
        entity.setEsID(esID);
        entity.setName(name);
        entity.setSign(sign);
        UserEntity result = userDao.save(entity);
        if (null != result) {
            return true;
        }
        return false;
    }
这时候,打开我们的 Kibana 管理后台,查看已经添加的数据:
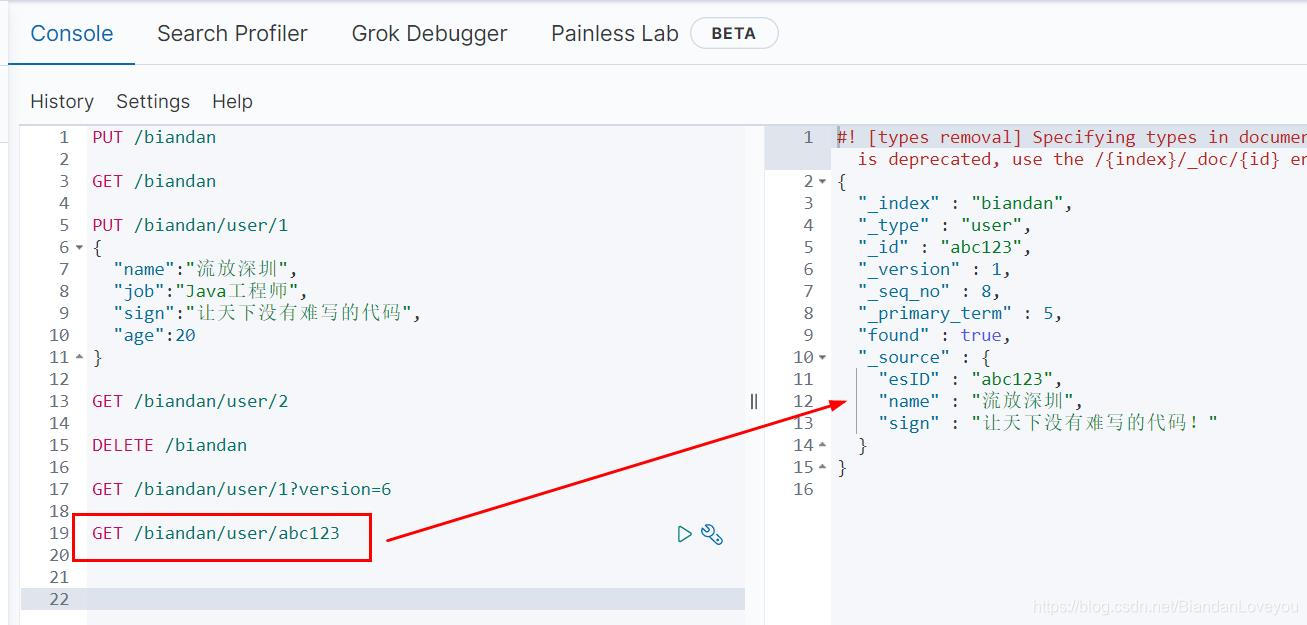
我们注意到:我们注入到实体的esID,由于使用注解 org.springframework.data.annotation.Id,因此成为了 ElasticSearch 的文档 ID。
我们再调用 findById 方法,如图:
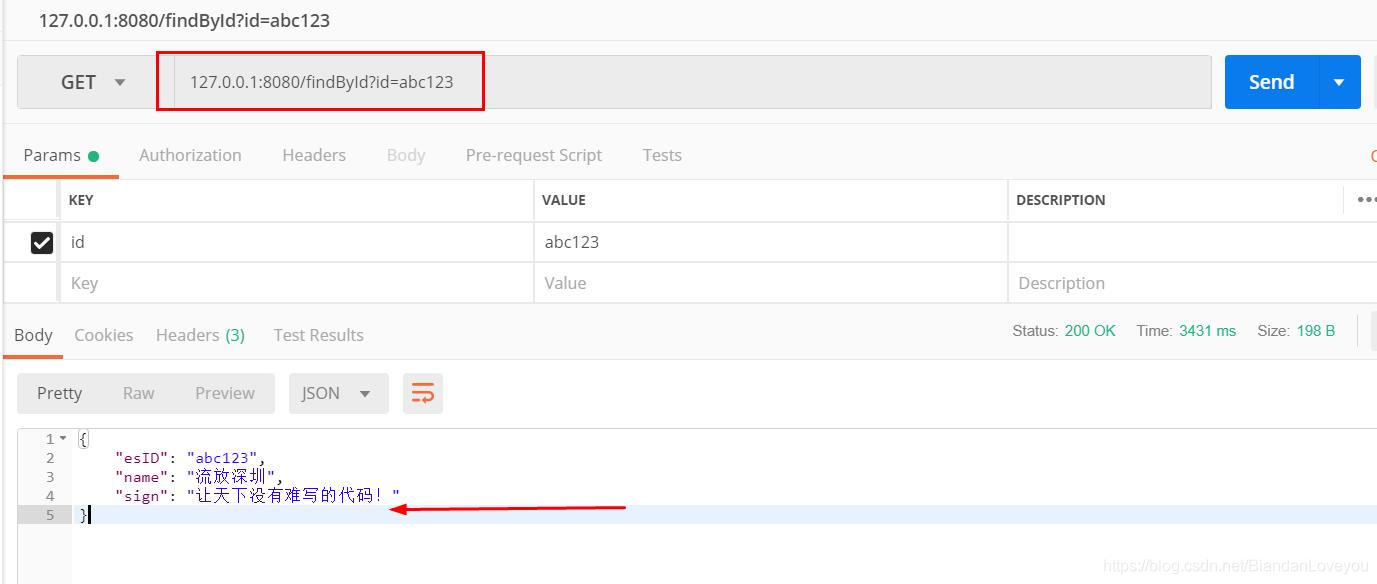
得到了正确的结果。OK。SpringBoot 整合 ElasticSearch 就是这样简单。
端口号:9300与9200区别
9300端口: 是TCP协议端口,ES节点之间通讯使用,ES集群之间通讯端口号
9200端口: http 协议端口,是ES节点和外部通讯使用的端口,暴露ES RESTful接口端口号
本篇博客代码:https://pan.baidu.com/s/1GnLrGGrP7nhw2Xovq3MtxQ 提取码:mhbi