jQuery实现:
之前在刚学习前端时使用的jQuery实现的ul二级菜单的点击展开和收缩,以下是jQuery的代码:
$(".menu>li a").click(function () {
    $(this).next().toggle(300);
})
使用jQuery实现二级菜单的展开和收缩是相当简洁和方便的,只需要获取到一级菜单的元素,然后添加点击事件,在点击事件里就可以实现二级菜单的展开和收缩。注:(300)是展开和收缩的延时,数字越小,延时越低,展开和收缩的反应就越快。反之,则越慢。
Vue实现:
之后在学习了Vue之后想实现ul二级菜单的收放,但是不知道如何下手,因为之前jquery是调用方法进行实现的,之后查阅了网上诸多的资料之后,才使用了一种相当笨的方法来进行实现。
首先上效果图:

点击引导页之后可以展开二级菜单:
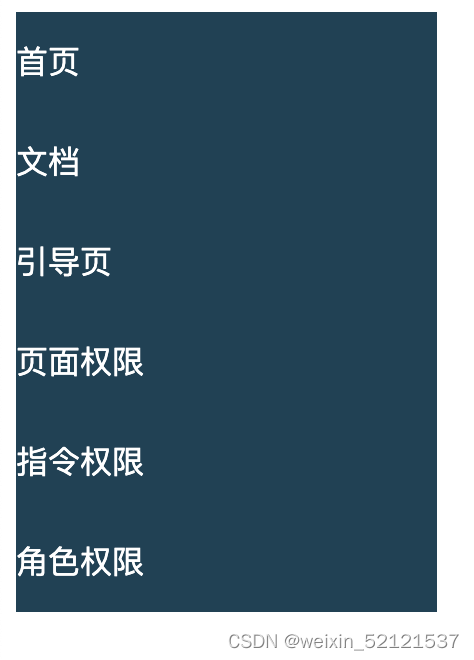
再次点击之后就会进行收缩。
废话不多说,直接上Vue代码:
<template>
  <div class="aside">
      <ul class="first" v-for="(meu,index) in meus" :key="meu.id">
        <li><a href="#" @click="f1(index)">{{meu.name}}</a></li>
        <ul v-for="(meu2,index) in meu.childMenu" :key="meu2.id" >
          <li :class="meu2.secondLiStyle"><a href="#">{{meu2.name}}</a></li>
        </ul>
      </ul>
    </div>
</template>

<script>
export default {
  name: "asidebar",
  data() {
    return {
      meus:[
        {id:0,name:'首页',
          secondLiStyle:{
            secondLiNone:false,
            secondLiBlock:true,
          },childMenu: null},
        {id:1,name:'文档',
          secondLiStyle:{
            secondLiNone:false,
            secondLiBlock:true,
          },childMenu: null},
        {id:2,name:'引导页',
          secondLiStyle:{
            secondLiNone:false,
            secondLiBlock:true,
          },childMenu: [
            {
              id: 0,
              name: "页面权限",
              secondLiStyle:{
                secondLiNone:true,
                secondLiBlock:false,
              },
              childMenu: null
            },
            {
              id: 1,
              name: "指令权限",
              secondLiStyle:{
                secondLiNone:true,
                secondLiBlock:false,
              },
              childMenu: null
            },
            {
              id: 2,
              name: "角色权限",
              secondLiStyle:{
                secondLiNone:true,
                secondLiBlock:false,
              },
              childMenu: null
            },

          ]}
      ]
    }
  },
  methods:{
    f1(index){
      console.log("aaaa")
        for(var i=0;i<this.meus[index].childMenu.length;i++){
          console.log("bbbb")
          if((this.meus[index].childMenu[i].secondLiStyle.secondLiNone==true)&&(this.meus[index].childMenu[i].secondLiStyle.secondLiBlock==false)){
            console.log("cccc")
            this.meus[index].childMenu[i].secondLiStyle.secondLiNone=false
            this.meus[index].childMenu[i].secondLiStyle.secondLiBlock=true
          }else {
            this.meus[index].childMenu[i].secondLiStyle.secondLiNone=true
            this.meus[index].childMenu[i].secondLiStyle.secondLiBlock=false
          }
      }
    }
  }
}
</script>

<style scoped>
  *{
    margin: 0;
    padding: 0;
  }
  .aside{
    width: 15%;
    height: 100%;
    background-color: #214155;
  }
  ul{
    list-style: none;
  }
  a{
    display: block;
    height: 50px;
    width: 100%;
    color: white;
    text-decoration: none;
    line-height: 50px;
  }
  a:hover{
    background-color: #263445;
  }
  .second li{
    display: none;
  }
  .secondLiNone{
    display: none;
  }
  .secondLiBlock{
    display: block;
  }

</style>
在现实过程中主要分为以下几步:
1.首先data(){}里定义菜单的数据,因为之后可能需要与后端进行交互,所以数据不能写死在
template里
我这里使用的数组来定义二级菜单的结构,以下是整个二级菜单的结构:
meus:[
        {id:0,name:'首页',
          secondLiStyle:{
            secondLiNone:false,
            secondLiBlock:true,
          },childMenu: null},
        {id:1,name:'文档',
          secondLiStyle:{
            secondLiNone:false,
            secondLiBlock:true,
          },childMenu: null},
        {id:2,name:'引导页',
          secondLiStyle:{
            secondLiNone:false,
            secondLiBlock:true,
          },childMenu: [
            {
              id: 0,
              name: "页面权限",
              secondLiStyle:{
                secondLiNone:true,
                secondLiBlock:false,
              },
              childMenu: null
            },
            {
              id: 1,
              name: "指令权限",
              secondLiStyle:{
                secondLiNone:true,
                secondLiBlock:false,
              },
              childMenu: null
            },
            {
              id: 2,
              name: "角色权限",
              secondLiStyle:{
                secondLiNone:true,
                secondLiBlock:false,
              },
              childMenu: null
            },

          ]}
      ]
其中
secondLiStyle:{
    secondLiNone:false,
    secondLiBlock:true,
}
表示的是每个<li>显示方式,这里默认一级菜单显示,二级菜单不显示。
在定义这个显示方式之前我们需要在<style>中定义相应的css
  .secondLiNone{
    display: none;
  }
  .secondLiBlock{
    display: block;
  }
就是一个为不显示,一个为显示。
2.之后我们需要在template中写前端的代码
  <div class="aside">
      <ul class="first" v-for="(meu,index) in meus" :key="meu.id">
        <li><a href="#" @click="f1(index)">{{meu.name}}</a></li>
        <ul v-for="(meu2,index) in meu.childMenu" :key="meu2.id" >
          <li :class="meu2.secondLiStyle"><a href="#">{{meu2.name}}</a></li>
        </ul>
      </ul>
    </div>
其中一级菜单和二级菜单都是使用v-for来动态的获取。
注意:我们一开始是不显示二级菜单的,所以在二级菜单的<li>都需要添加一个class来获取第一步数组中字菜单的数据来实现二级菜单的隐藏。
3.最后一步,也是最关键的一步,我们需要在一级菜单的<li>中的a标签里加上点击事件来调用一个函数,通过函数实现二级菜单的展开与隐藏。
  methods:{
    f1(index){
      console.log("aaaa")
        for(var i=0;i<this.meus[index].childMenu.length;i++){
          console.log("bbbb")
          if((this.meus[index].childMenu[i].secondLiStyle.secondLiNone==true)&&(this.meus[index].childMenu[i].secondLiStyle.secondLiBlock==false)){
            console.log("cccc")
            this.meus[index].childMenu[i].secondLiStyle.secondLiNone=false
            this.meus[index].childMenu[i].secondLiStyle.secondLiBlock=true
          }else {
            this.meus[index].childMenu[i].secondLiStyle.secondLiNone=true
            this.meus[index].childMenu[i].secondLiStyle.secondLiBlock=false
          }
      }
这里首先通过传入的index来确定是一级菜单的哪个<li>,然后通过判断这个<li>下的二级菜单的块是隐藏还是显示的,如果是隐藏就让它显示,如果是显示就让它隐藏。最后就可以同意一个点击事件来实现二级菜单的展开和收缩了。