前言
在RocketMQ读写消息时,用的是Java NIO类库中的类,关于这些类的介绍和使用,可以先看我的前一篇文章Java传统IO和NIO有什么区别。接下来就从源码来分析当broker接收到消息时是如何处理的。
一、消息处理入口
消息处理入口:BrokerController.registerProcessor(),Broker为每一种请求的Code都注册了一个处理类,其中用于处理接收消息的类为SendMessageProcessor。
        /**
         * SendMessageProcessor
         */
        SendMessageProcessor sendProcessor = new SendMessageProcessor(this);
        sendProcessor.registerSendMessageHook(sendMessageHookList);
        sendProcessor.registerConsumeMessageHook(consumeMessageHookList);

        this.remotingServer.registerProcessor(RequestCode.SEND_MESSAGE, sendProcessor, this.sendMessageExecutor);
        this.remotingServer.registerProcessor(RequestCode.SEND_MESSAGE_V2, sendProcessor, this.sendMessageExecutor);
        this.remotingServer.registerProcessor(RequestCode.SEND_BATCH_MESSAGE, sendProcessor, this.sendMessageExecutor);
        this.remotingServer.registerProcessor(RequestCode.CONSUMER_SEND_MSG_BACK, sendProcessor, this.sendMessageExecutor);
        this.fastRemotingServer.registerProcessor(RequestCode.SEND_MESSAGE, sendProcessor, this.sendMessageExecutor);
        this.fastRemotingServer.registerProcessor(RequestCode.SEND_MESSAGE_V2, sendProcessor, this.sendMessageExecutor);
        this.fastRemotingServer.registerProcessor(RequestCode.SEND_BATCH_MESSAGE, sendProcessor, this.sendMessageExecutor);
        this.fastRemotingServer.registerProcessor(RequestCode.CONSUMER_SEND_MSG_BACK, sendProcessor, this.sendMessageExecutor);
当消息到达时,会调用SendMessageProcessor.processRequest()
    public RemotingCommand processRequest(ChannelHandlerContext ctx,
                                          RemotingCommand request) throws RemotingCommandException {
        SendMessageContext mqtraceContext;
        switch (request.getCode()) {
            case RequestCode.CONSUMER_SEND_MSG_BACK:
                return this.consumerSendMsgBack(ctx, request);
            default:// 默认走这里
                SendMessageRequestHeader requestHeader = parseRequestHeader(request);
                if (requestHeader == null) {
                    return null;
                }

                mqtraceContext = buildMsgContext(ctx, requestHeader);
                this.executeSendMessageHookBefore(ctx, request, mqtraceContext);

                RemotingCommand response;
                if (requestHeader.isBatch()) {
                	// 处理批消息
                    response = this.sendBatchMessage(ctx, request, mqtraceContext, requestHeader);
                } else {
                	// 处理普通消息
                    response = this.sendMessage(ctx, request, mqtraceContext, requestHeader);
                }

                this.executeSendMessageHookAfter(response, mqtraceContext);
                return response;
        }
    }
接下来就来看看处理普通消息的过程,即sendMessage()方法。大致可以分为两步:
- 根据接收到的消息,封装成一个
MessageExtBrokerInner对象 - 调用
MessageStore.putMessage()方法
    private RemotingCommand sendMessage(final ChannelHandlerContext ctx,
                                        final RemotingCommand request,
                                        final SendMessageContext sendMessageContext,
                                        final SendMessageRequestHeader requestHeader) throws RemotingCommandException {

        // 部分代码省略


        final byte[] body = request.getBody();

        int queueIdInt = requestHeader.getQueueId();
        TopicConfig topicConfig = this.brokerController.getTopicConfigManager().selectTopicConfig(requestHeader.getTopic());

        if (queueIdInt < 0) {
            queueIdInt = Math.abs(this.random.nextInt() % 99999999) % topicConfig.getWriteQueueNums();
        }

		// 第一步:从请求中取出消息的相关内容,并封装成一个MessageExtBrokerInner对象。
		// 后续在broker内的消息处理都会使用这个MessageExtBrokerInner对象
        MessageExtBrokerInner msgInner = new MessageExtBrokerInner();
        msgInner.setTopic(requestHeader.getTopic());
        msgInner.setQueueId(queueIdInt);

        if (!handleRetryAndDLQ(requestHeader, response, request, msgInner, topicConfig)) {
            return response;
        }

        msgInner.setBody(body);
        msgInner.setFlag(requestHeader.getFlag());
        MessageAccessor.setProperties(msgInner, MessageDecoder.string2messageProperties(requestHeader.getProperties()));
        msgInner.setBornTimestamp(requestHeader.getBornTimestamp());
        msgInner.setBornHost(ctx.channel().remoteAddress());
        msgInner.setStoreHost(this.getStoreHost());
        msgInner.setReconsumeTimes(requestHeader.getReconsumeTimes() == null ? 0 : requestHeader.getReconsumeTimes());
        String clusterName = this.brokerController.getBrokerConfig().getBrokerClusterName();
        MessageAccessor.putProperty(msgInner, MessageConst.PROPERTY_CLUSTER, clusterName);
        msgInner.setPropertiesString(MessageDecoder.messageProperties2String(msgInner.getProperties()));
        PutMessageResult putMessageResult = null;
        Map<String, String> oriProps = MessageDecoder.string2messageProperties(requestHeader.getProperties());
        String traFlag = oriProps.get(MessageConst.PROPERTY_TRANSACTION_PREPARED);
        if (traFlag != null && Boolean.parseBoolean(traFlag)) {
            if (this.brokerController.getBrokerConfig().isRejectTransactionMessage()) {
                response.setCode(ResponseCode.NO_PERMISSION);
                response.setRemark(
                    "the broker[" + this.brokerController.getBrokerConfig().getBrokerIP1()
                        + "] sending transaction message is forbidden");
                return response;
            }
            putMessageResult = this.brokerController.getTransactionalMessageService().prepareMessage(msgInner);
        } else {
        	// 第二步:普通消息的处理,执行MessageStore的putMessage方法
        	// 传入的参数就是上面构建的MessageExtBrokerInner对象
            putMessageResult = this.brokerController.getMessageStore().putMessage(msgInner);
        }

        return handlePutMessageResult(putMessageResult, response, request, msgInner, responseHeader, sendMessageContext, ctx, queueIdInt);

    }
接下来重点就是这个MessageStore.putMessage()方法啦,再看这个方法之前,我们先来了解一下接下来会涉及到的各种结构,对后面理解代码会很有帮助。
二、CommitLog结构
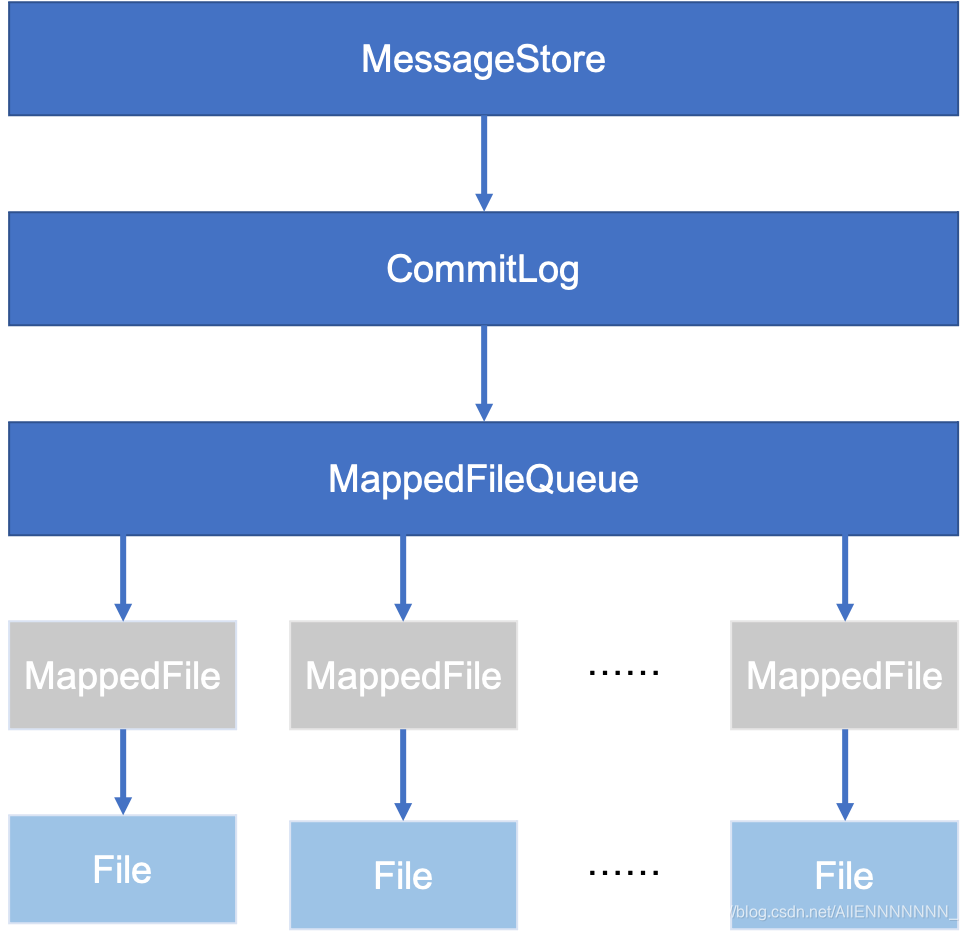
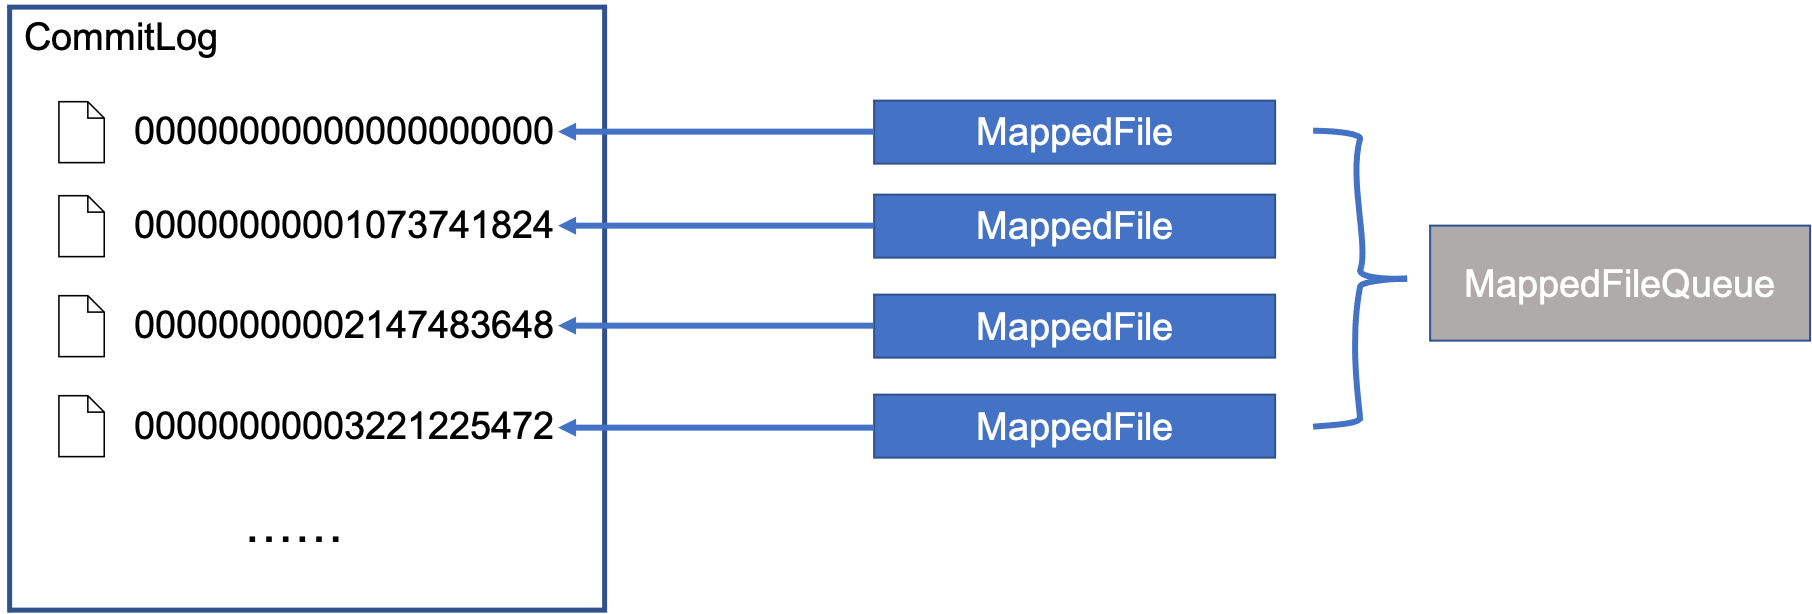
结合上面这两张图,首先,每个broker都有一个MessageStore,MessageStore是一个接口,它的实现类为DefaultMessageStore。DefaultMessageStore中有一个成员变量CommitLog,而CommitLog中又有一个MappedFileQueue,MappedFileQueue中保存了一个MappedFile的List,其中每一个MappedFile都对应了磁盘上的一个文件,这些文件才是真正存储消息的地方。
可以这么理解,从我们用户的角度来看,所有消息都好像被保存到了一个很大的文件CommitLog上,而实际上RocketMQ在实现的时候把这个CommitLog拆成了一个个小文件MappedFile,而这些MappedFile都被一个MappedFileQueue所管理。
上面第二张图中CommitLog中那些数字代表什么?
在RocketMQ中,每个MappedFile默认大小都是1G,每个MappedFile的文件名都是一个20位的数字,如“00000000001073741824”,如果把左边的0都去掉,即"1073741824",这个数字就是当前MappedFile中第一个byte在整个CommitLog中的位置,也就是偏移量。假设给定一个CommitLog偏移量为1073741830,那么我们很容易就可以知道,这个数据一定是在第二个MappedFile中,并且在第二个MappedFile中的相对偏移量为1073741830 - 1073741824 = 6
当一个MappedFile写满以后,就会创建一个新的MappedFile然后往这个新的MappedFile写。
好了,接下来我们再回到上面的那个代码中的第二步,也就是创建了MessageExtBrokerInner对象以后调用的MessageStore.putMessage()方法。这里大家其实应该能猜到后面要干什么了吧,因为最终目的是要往MappedFile里面写数据, 那MessageStore.putMessage()肯定得先调用CommitLog的某个put方法,那CommitLog肯定会去MappedFileQueue找一个MappedFile,然后调用MappedFile的某个put方法。下面看实际代码
三、CommitLog处理消息写入主流程
代码DefaultMessageStore.putMessage()
    public PutMessageResult putMessage(MessageExtBrokerInner msg) {

    	// 此处省略了broker状态和消息校验的代码

        long beginTime = this.getSystemClock().now();
        // 果然调用了commitLog的putMessage方法,接下来看这个方法
        PutMessageResult result = this.commitLog.putMessage(msg);

        long elapsedTime = this.getSystemClock().now() - beginTime;
        if (elapsedTime > 500) {
            log.warn("putMessage not in lock elapsed time(ms)={}, bodyLength={}", elapsedTime, msg.getBody().length);
        }
        this.storeStatsService.setPutMessageEntireTimeMax(elapsedTime);

        if (null == result || !result.isOk()) {
            this.storeStatsService.getPutMessageFailedTimes().incrementAndGet();
        }

        return result;
    }
代码:CommitLog.putMessage()
    public PutMessageResult putMessage(final MessageExtBrokerInner msg) {
        // Set the storage time
        msg.setStoreTimestamp(System.currentTimeMillis());
        // Set the message body BODY CRC (consider the most appropriate setting
        // on the client)
        msg.setBodyCRC(UtilAll.crc32(msg.getBody()));
        // Back to Results
        AppendMessageResult result = null;

		// 一个数据统计的服务,不用管
        StoreStatsService storeStatsService = this.defaultMessageStore.getStoreStatsService();

        String topic = msg.getTopic();
        int queueId = msg.getQueueId();

        final int tranType = MessageSysFlag.getTransactionValue(msg.getSysFlag());
        // 处理事务消息,先不管
        if (tranType == MessageSysFlag.TRANSACTION_NOT_TYPE
            || tranType == MessageSysFlag.TRANSACTION_COMMIT_TYPE) {
            // Delay Delivery
            if (msg.getDelayTimeLevel() > 0) {
                if (msg.getDelayTimeLevel() > this.defaultMessageStore.getScheduleMessageService().getMaxDelayLevel()) {
                    msg.setDelayTimeLevel(this.defaultMessageStore.getScheduleMessageService().getMaxDelayLevel());
                }

                topic = ScheduleMessageService.SCHEDULE_TOPIC;
                queueId = ScheduleMessageService.delayLevel2QueueId(msg.getDelayTimeLevel());

                // Backup real topic, queueId
                MessageAccessor.putProperty(msg, MessageConst.PROPERTY_REAL_TOPIC, msg.getTopic());
                MessageAccessor.putProperty(msg, MessageConst.PROPERTY_REAL_QUEUE_ID, String.valueOf(msg.getQueueId()));
                msg.setPropertiesString(MessageDecoder.messageProperties2String(msg.getProperties()));

                msg.setTopic(topic);
                msg.setQueueId(queueId);
            }
        }

        InetSocketAddress bornSocketAddress = (InetSocketAddress) msg.getBornHost();
        if (bornSocketAddress.getAddress() instanceof Inet6Address) {
            msg.setBornHostV6Flag();
        }

        InetSocketAddress storeSocketAddress = (InetSocketAddress) msg.getStoreHost();
        if (storeSocketAddress.getAddress() instanceof Inet6Address) {
            msg.setStoreHostAddressV6Flag();
        }

        long eclipsedTimeInLock = 0;

		// *************************  主流程  *************************
		// 下面开始是主要内容
        MappedFile unlockMappedFile = null;
        // 1.从MappedFileQueue中获取一个MappedFile
        MappedFile mappedFile = this.mappedFileQueue.getLastMappedFile();

		// 加锁
        putMessageLock.lock(); //spin or ReentrantLock ,depending on store config
        try {
            long beginLockTimestamp = this.defaultMessageStore.getSystemClock().now();
            this.beginTimeInLock = beginLockTimestamp;

            // Here settings are stored timestamp, in order to ensure an orderly
            // global
            msg.setStoreTimestamp(beginLockTimestamp);

            if (null == mappedFile || mappedFile.isFull()) {
            	// 2. 上一步获取的MappedFile为空或者满了,就要创建一个新的MappedFile
                mappedFile = this.mappedFileQueue.getLastMappedFile(0); // Mark: NewFile may be cause noise
            }
            if (null == mappedFile) {
                log.error("create mapped file1 error, topic: " + msg.getTopic() + " clientAddr: " + msg.getBornHostString());
                beginTimeInLock = 0;
                return new PutMessageResult(PutMessageStatus.CREATE_MAPEDFILE_FAILED, null);
            }

			// 3.调用MappedFile的appendMessage来写入数据
            result = mappedFile.appendMessage(msg, this.appendMessageCallback);
            switch (result.getStatus()) {
                case PUT_OK:
                    break;
                case END_OF_FILE:
                    unlockMappedFile = mappedFile;
                    // Create a new file, re-write the message
                    mappedFile = this.mappedFileQueue.getLastMappedFile(0);
                    if (null == mappedFile) {
                        // XXX: warn and notify me
                        log.error("create mapped file2 error, topic: " + msg.getTopic() + " clientAddr: " + msg.getBornHostString());
                        beginTimeInLock = 0;
                        return new PutMessageResult(PutMessageStatus.CREATE_MAPEDFILE_FAILED, result);
                    }
                    result = mappedFile.appendMessage(msg, this.appendMessageCallback);
                    break;
                case MESSAGE_SIZE_EXCEEDED:
                case PROPERTIES_SIZE_EXCEEDED:
                    beginTimeInLock = 0;
                    return new PutMessageResult(PutMessageStatus.MESSAGE_ILLEGAL, result);
                case UNKNOWN_ERROR:
                    beginTimeInLock = 0;
                    return new PutMessageResult(PutMessageStatus.UNKNOWN_ERROR, result);
                default:
                    beginTimeInLock = 0;
                    return new PutMessageResult(PutMessageStatus.UNKNOWN_ERROR, result);
            }

            eclipsedTimeInLock = this.defaultMessageStore.getSystemClock().now() - beginLockTimestamp;
            beginTimeInLock = 0;
        } finally {
            putMessageLock.unlock();
        }

        if (eclipsedTimeInLock > 500) {
            log.warn("[NOTIFYME]putMessage in lock cost time(ms)={}, bodyLength={} AppendMessageResult={}", eclipsedTimeInLock, msg.getBody().length, result);
        }

        if (null != unlockMappedFile && this.defaultMessageStore.getMessageStoreConfig().isWarmMapedFileEnable()) {
            this.defaultMessageStore.unlockMappedFile(unlockMappedFile);
        }

        PutMessageResult putMessageResult = new PutMessageResult(PutMessageStatus.PUT_OK, result);

        // Statistics
        storeStatsService.getSinglePutMessageTopicTimesTotal(msg.getTopic()).incrementAndGet();
        storeStatsService.getSinglePutMessageTopicSizeTotal(topic).addAndGet(result.getWroteBytes());

		// 4.消息刷盘
        handleDiskFlush(result, putMessageResult, msg);
        // 涉及主从同步,先不管
        handleHA(result, putMessageResult, msg);

        return putMessageResult;
    }
3.1 主流程第一步
在Commit.putMessage()中,存放消息的主流程大致可以分为四步:
- 从
MappedFileQueue中获取一个MappedFile - 第一步获取的
MappedFile为空或者满了,就要创建一个新的MappedFile,否则不需要第二步 - 调用
MappedFile.appendMessage()方法将数据写入MappedFile - 消息刷盘
接下来我们详细分析前三步,消息刷盘后面再完成。
主流程第一步
从MappedFileQueue中获取一个MappedFile- 第一步获取的MappedFile为空或者满了,就要创建一个新的MappedFile,否则不需要第二步
- 调用MappedFile.appendMessage()方法将数据写入MappedFile
代码:MappedFileQueue.getLastMappedFile()
    public MappedFile getLastMappedFile() {
        MappedFile mappedFileLast = null;

        while (!this.mappedFiles.isEmpty()) {
            try {
            	// 直接获取List中的最后一个MappedFile
                mappedFileLast = this.mappedFiles.get(this.mappedFiles.size() - 1);
                break;
            } catch (IndexOutOfBoundsException e) {
                //continue;
            } catch (Exception e) {
                log.error("getLastMappedFile has exception.", e);
                break;
            }
        }
        return mappedFileLast;
    }
这个方法很简单,直接返回了MappedFileQueue中保存的最后一个MappedFile。为什么是最后一个?前面说到过,MappedFile默认大小为1G,写满就创建一个新的加到MappedFileQueue里面,因此在MappedFileQueue中,只有最后一个MappedFile有可能还没写满,前面的肯定已经写满了,因此直接获取最后一个就可以了。
还有一个问题,MappedFileQueue里的MappedFile是怎么来的呢?如果是一台全新的服务器,那肯定没有MappedFile,那就直接返回null,后面会创建。那如果是运行过的服务器呢?肯定会在服务器启动的时候去读这些MappedFile文件,然后初始化好这个MappedFileQueue。
看一下MappedFileQueue,果然有一个load会根据文件路径去加载这些MappedFile。
    public boolean load() {
        File dir = new File(this.storePath);
        File[] files = dir.listFiles();
        if (files != null) {
            // ascending order
            Arrays.sort(files);
            for (File file : files) {

                if (file.length() != this.mappedFileSize) {
                    log.warn(file + "\t" + file.length()
                        + " length not matched message store config value, please check it manually");
                    return false;
                }

                try {
                	// 根据文件路径创建MappedFile
                    MappedFile mappedFile = new MappedFile(file.getPath(), mappedFileSize);

                    mappedFile.setWrotePosition(this.mappedFileSize);
                    mappedFile.setFlushedPosition(this.mappedFileSize);
                    mappedFile.setCommittedPosition(this.mappedFileSize);
                    // 加入到MappedFile的List中
                    this.mappedFiles.add(mappedFile);
                    log.info("load " + file.getPath() + " OK");
                } catch (IOException e) {
                    log.error("load file " + file + " error", e);
                    return false;
                }
            }
        }
        return true;
    }
那MappedFile.load()是什么时候调用的呢?是在CommitLog.load()中,而CommitLog.load()是在DefaultMessageStore.load()中调用,而DefaultMessageStore.load()又是在broker启动的时候调用的,现在大家应该清楚了。
3.2 主流程第二步
主流程第二步
- 从MappedFileQueue中获取一个MappedFile
第一步获取的MappedFile为空或者满了,就要创建一个新的MappedFile,否则不需要第二步- 调用MappedFile.appendMessage()方法将数据写入MappedFile
假设第一步获取的MappedFile为空或者满了,需要创建新的MappedFile,下面来详细看看MappedFile是怎么创建的,也就是主流程注释2的那段代码
mappedFile = this.mappedFileQueue.getLastMappedFile(0);
虽然和主流程第一步一样,都是调用的MappedFileQueue.getLastMappedFile()方法,但是第二步调的是一个重载版本的,传了个参数0,该方法实际调用的是
    public MappedFile getLastMappedFile(final long startOffset) {
    	// 其中needCreate参数为true,表示需要创建新的MappedFile
        return getLastMappedFile(startOffset, true);
    }
下面详细看看这个MappedFileQueue.getLastMappedFile(final long startOffset, boolean needCreate)
    public MappedFile getLastMappedFile(final long startOffset, boolean needCreate) {
    	// 1.看下面解释
        long createOffset = -1;
        MappedFile mappedFileLast = getLastMappedFile();

        if (mappedFileLast == null) {
            createOffset = startOffset - (startOffset % this.mappedFileSize);
        }

        if (mappedFileLast != null && mappedFileLast.isFull()) {
            createOffset = mappedFileLast.getFileFromOffset() + this.mappedFileSize;
        }

        if (createOffset != -1 && needCreate) {
        	// 2.看下面解释
            String nextFilePath = this.storePath + File.separator + UtilAll.offset2FileName(createOffset);
            // 3.看下面解释
            String nextNextFilePath = this.storePath + File.separator
                + UtilAll.offset2FileName(createOffset + this.mappedFileSize);
            MappedFile mappedFile = null;

            if (this.allocateMappedFileService != null) {
            	// 4.看下面解释
                mappedFile = this.allocateMappedFileService.putRequestAndReturnMappedFile(nextFilePath,
                    nextNextFilePath, this.mappedFileSize);
            } else {
                try {
                    mappedFile = new MappedFile(nextFilePath, this.mappedFileSize);
                } catch (IOException e) {
                    log.error("create mappedFile exception", e);
                }
            }

            if (mappedFile != null) {
                if (this.mappedFiles.isEmpty()) {
                    mappedFile.setFirstCreateInQueue(true);
                }
                this.mappedFiles.add(mappedFile);
            }

            return mappedFile;
        }

        return mappedFileLast;
    }
下面按注释的序号来解释
- 这个
createOffset是个啥?还记得上面说到的MappedFile的文件名是一串20位的数字吗,除了左侧的0以外剩下的数字就代表这个MappedFile的第一个byte在整个CommitLog中的偏移量。那现在既然要创建新的MappedFile,那它的第一个byte在CommitLog中的偏移量是不是得算出来,这样才能知道要创建的MappedFile的文件名叫什么。怎么计算呢?如果这是一台全新的服务器,从来没有过MappedFile,那文件名肯定是"00000000000000000000",如果之前创建过MappedFile呢,那也很简单,比如现在有两个MappedFile,分别是“00000000000000000000”和“00000000001073741824”(也就是1G),这两都写满了,那下一个MappedFile的文件名不就是刚才最后一个MappedFile文件名加上文件大小吗(1G),也就是1073741824(上一个MappedFile的文件名)+1073741824(文件大小)=2147483648,然后左边补0到20位,就好了。现在再看上面注释1下面的代码是不是就很清楚了。 - 有了
createOffset,现在就可以用它把文件的全路径名组装起来了,就是MappedFile的存储路径+转换后的createOffset。就是UtilAll.offset2FileName(createOffset)方法,就是在createOffset左边补0到20位。最后得到下一个文件创建的路径,也就是nextFilePath。 - 为啥又来一个
nextNextFilePath,看名字创建一个MappedFile还不够,它要创建两个呀,没错,当要创建新的MappedFile的时候,就是会尝试去创建两个,但是第一个创建完就可以返回了,第二个在后台自己创建,能不能创建成功不关心。 - 真开始创建
MappedFile了。
关于第4点涉及到满多东西,这里单独讲一下。这里又出现了一个新的东西,AllocateMappedFileService,这是MappedFileQueue的一个成员变量。
private final AllocateMappedFileService allocateMappedFileService;
看名字也知道这是一个分配MappedFile的服务线程,既然是服务线程,看一下它的run方法
    public void run() {
        log.info(this.getServiceName() + " service started");

        while (!this.isStopped() && this.mmapOperation()) {

        }
        log.info(this.getServiceName() + " service end");
    }
就是一个死循环,不停执行这个mmapOperation()方法,这个方法稍后再看,先回到第四点:
mappedFile = this.allocateMappedFileService.putRequestAndReturnMappedFile(nextFilePath,
                    nextNextFilePath, this.mappedFileSize);
看一下这个putRequestAndReturnMappedFile方法。看名字好像是把一个创建MappedFile的请求放到某个地方,接下来这个服务线程的mmapOperation就会把这个请求拿出来并创建一个MappedFile返回。
这个AllocateMappedFileService有几个成员变量需要注意一下
    // 创建等待时间,默认是5s
    private static int waitTimeOut = 1000 * 5;
    // 一个请求的Map,key表示的是创建的文件名,value就是AllocateRequest对象
    private ConcurrentMap<String, AllocateRequest> requestTable =
        new ConcurrentHashMap<String, AllocateRequest>();
    // 一个优先阻塞队列
    private PriorityBlockingQueue<AllocateRequest> requestQueue =
        new PriorityBlockingQueue<AllocateRequest>();
在看一眼这个AllocateRequest,它是AllocateMappedFileService的一个内部类
    static class AllocateRequest implements Comparable<AllocateRequest> {
        // Full file path
        private String filePath;
        private int fileSize;
        private CountDownLatch countDownLatch = new CountDownLatch(1);
        // 这就是用来存放创建好的MappedFile,刚开始是null
        private volatile MappedFile mappedFile = null;
        ......
    }
OK,现在我们来梳理一下这个创建的流程,看下面这张图

首先根据文件的路径和大小,创建一个AllocateRequest,然后把这个AllocateRequest放到requestTable和requestQueue里面,注意,是同一个AllocateRequest引用放到了这两个结构里,对其中一个的修改也会影响到另一个。之后,putRequestAndReturnMappedFile就会调用刚才AllocateRequest中countDownLatch.await(),等待MappedFile创建完成。而上面提到了,AllocateMappedFileService中的run方法一直在循环,运行mmapOperation方法,该方法就会从requestQueue中取出一个AllocateRequest,然后根据里面的参数去创建MappedFile,并把这个新建的MappedFile放到AllocateRequest中。完成后调用该AllocateRequest中countDownLatch.countDown方法,相当于通知上面的等待过程,我已经创建好啦,你可以取走这个MappedFile了。这时,putRequestAndReturnMappedFile就会恢复执行,并从requestTable中取出这个新建的MappedFile。
看一下代码:AllocateMappedFileService.putRequestAndReturnMappedFile()
    public MappedFile putRequestAndReturnMappedFile(String nextFilePath, String nextNextFilePath, int fileSize) {
    	// 默认可以提交两个创建请求
        int canSubmitRequests = 2;
        // 这里和TransientStorePool有关系,这个enable默认是false,先不考虑这个,后面再分析
        if (this.messageStore.getMessageStoreConfig().isTransientStorePoolEnable()) {
            if (this.messageStore.getMessageStoreConfig().isFastFailIfNoBufferInStorePool()
                && BrokerRole.SLAVE != this.messageStore.getMessageStoreConfig().getBrokerRole()) { //if broker is slave, don't fast fail even no buffer in pool
                canSubmitRequests = this.messageStore.getTransientStorePool().availableBufferNums() - this.requestQueue.size();
            }
        }
		// 还记得上面说过,创建MappedFile的时候,默认会创建两个,分别是nextFilePath和nextNextFilePath
		// 创建一个AllocateRequest,这是我们第一个要创建的MappedFile
        AllocateRequest nextReq = new AllocateRequest(nextFilePath, fileSize);
        // 把这个AllocateRequest放到requestTable里面
        boolean nextPutOK = this.requestTable.putIfAbsent(nextFilePath, nextReq) == null;

        if (nextPutOK) {
        	// 此时是>0的,不用管这里
            if (canSubmitRequests <= 0) {
                log.warn("[NOTIFYME]TransientStorePool is not enough, so create mapped file error, " +
                    "RequestQueueSize : {}, StorePoolSize: {}", this.requestQueue.size(), this.messageStore.getTransientStorePool().availableBufferNums());
                this.requestTable.remove(nextFilePath);
                return null;
            }
            // 把AllocateRequest放到requestQueue里面,可以看到,和requestTable是同一个AllocateRequest
            boolean offerOK = this.requestQueue.offer(nextReq);
            if (!offerOK) {
                log.warn("never expected here, add a request to preallocate queue failed");
            }
            // 能提交的请求数减1
            canSubmitRequests--;
        }

		// 上面同样的操作,对nextNextFilePath,也就是第二个MappedFile执行一遍
        AllocateRequest nextNextReq = new AllocateRequest(nextNextFilePath, fileSize);
        boolean nextNextPutOK = this.requestTable.putIfAbsent(nextNextFilePath, nextNextReq) == null;
        if (nextNextPutOK) {
            if (canSubmitRequests <= 0) {
                log.warn("[NOTIFYME]TransientStorePool is not enough, so skip preallocate mapped file, " +
                    "RequestQueueSize : {}, StorePoolSize: {}", this.requestQueue.size(), this.messageStore.getTransientStorePool().availableBufferNums());
                this.requestTable.remove(nextNextFilePath);
            } else {
                boolean offerOK = this.requestQueue.offer(nextNextReq);
                if (!offerOK) {
                    log.warn("never expected here, add a request to preallocate queue failed");
                }
            }
        }

        if (hasException) {
            log.warn(this.getServiceName() + " service has exception. so return null");
            return null;
        }

		// 这里从requestTable获取第一个要创建的MappedFile
        AllocateRequest result = this.requestTable.get(nextFilePath);
        try {
            if (result != null) {
            	// 等待第一个MappedFile创建完成,默认等待5s
                boolean waitOK = result.getCountDownLatch().await(waitTimeOut, TimeUnit.MILLISECONDS);
                if (!waitOK) {
                    log.warn("create mmap timeout " + result.getFilePath() + " " + result.getFileSize());
                    return null;
                } else {
                	// 从requestTable中移除这个请求
                    this.requestTable.remove(nextFilePath);
                    // 直接返回创建的第一个MappedFile
                    return result.getMappedFile();
                }
            } else {
                log.error("find preallocate mmap failed, this never happen");
            }
        } catch (InterruptedException e) {
            log.warn(this.getServiceName() + " service has exception. ", e);
        }

        return null;
    }
看完代码应该可以理解为什么只关心第一个MappedFile是否创建完成了,虽然发了两个创建请求,但是只等待第一个创建请求完成,就直接返回对应的MappedFile了,至于第二个请求,继续在后台创建。
真正创建MappedFIle是由mmapOperation()完成的,看一下它的代码
    private boolean mmapOperation() {
        boolean isSuccess = false;
        AllocateRequest req = null;
        try {
        	// 从requestQueue中取出一个AllocateRequest
            req = this.requestQueue.take();
            // 再从requestTable取出对应的AllocateRequest
            AllocateRequest expectedRequest = this.requestTable.get(req.getFilePath());
            if (null == expectedRequest) {
                log.warn("this mmap request expired, maybe cause timeout " + req.getFilePath() + " "
                    + req.getFileSize());
                return true;
            }
            // 从requestQueue和requestTable取出来的AllocateRequest应该是一样的,前面说到了,放进去的时候就是放一样的
            if (expectedRequest != req) {
                log.warn("never expected here,  maybe cause timeout " + req.getFilePath() + " "
                    + req.getFileSize() + ", req:" + req + ", expectedRequest:" + expectedRequest);
                return true;
            }

            if (req.getMappedFile() == null) {
                long beginTime = System.currentTimeMillis();

                MappedFile mappedFile;
                // 这个默认是false
                if (messageStore.getMessageStoreConfig().isTransientStorePoolEnable()) {
                    try {
                        mappedFile = ServiceLoader.load(MappedFile.class).iterator().next();
                        mappedFile.init(req.getFilePath(), req.getFileSize(), messageStore.getTransientStorePool());
                    } catch (RuntimeException e) {
                        log.warn("Use default implementation.");
                        mappedFile = new MappedFile(req.getFilePath(), req.getFileSize(), messageStore.getTransientStorePool());
                    }
                } else {
                	// 所以是在这里创建了MappedFile,直接new了一个
                    mappedFile = new MappedFile(req.getFilePath(), req.getFileSize());
                }

                long elapsedTime = UtilAll.computeElapsedTimeMilliseconds(beginTime);
                if (elapsedTime > 10) {
                    int queueSize = this.requestQueue.size();
                    log.warn("create mappedFile spent time(ms) " + elapsedTime + " queue size " + queueSize
                        + " " + req.getFilePath() + " " + req.getFileSize());
                }

                // 文件预热,下面会讲
                if (mappedFile.getFileSize() >= this.messageStore.getMessageStoreConfig()
                    .getMappedFileSizeCommitLog()
                    &&
                    this.messageStore.getMessageStoreConfig().isWarmMapedFileEnable()) {
                    mappedFile.warmMappedFile(this.messageStore.getMessageStoreConfig().getFlushDiskType(),
                        this.messageStore.getMessageStoreConfig().getFlushLeastPagesWhenWarmMapedFile());
                }

				// 把创建好的MappedFile在放到对应的AllocateRequest里面
                req.setMappedFile(mappedFile);
                this.hasException = false;
                isSuccess = true;
            }
        } catch (InterruptedException e) {
            log.warn(this.getServiceName() + " interrupted, possibly by shutdown.");
            this.hasException = true;
            return false;
        } catch (IOException e) {
            log.warn(this.getServiceName() + " service has exception. ", e);
            this.hasException = true;
            if (null != req) {
                requestQueue.offer(req);
                try {
                    Thread.sleep(1);
                } catch (InterruptedException ignored) {
                }
            }
        } finally {
            if (req != null && isSuccess)
            	// 通知等待创建的线程,以及创建好MappedFile了
                req.getCountDownLatch().countDown();
        }
        return true;
    }
看一下是怎么直接new一个MappedFile的
    public MappedFile(final String fileName, final int fileSize) throws IOException {
        init(fileName, fileSize);
    }
    private void init(final String fileName, final int fileSize) throws IOException {
    	// 文件名
        this.fileName = fileName;
        // 大小
        this.fileSize = fileSize;
        this.file = new File(fileName);
        // fileFromOffset就是文件名去掉左边的0,前面说过了
        this.fileFromOffset = Long.parseLong(this.file.getName());
        boolean ok = false;

        ensureDirOK(this.file.getParent());

        try {
            this.fileChannel = new RandomAccessFile(this.file, "rw").getChannel();
            // 原来就是用fileChannel.map()创建了一个MappedByteBuffer
            this.mappedByteBuffer = this.fileChannel.map(MapMode.READ_WRITE, 0, fileSize);
            TOTAL_MAPPED_VIRTUAL_MEMORY.addAndGet(fileSize);
            TOTAL_MAPPED_FILES.incrementAndGet();
            ok = true;
        } catch (FileNotFoundException e) {
            log.error("Failed to create file " + this.fileName, e);
            throw e;
        } catch (IOException e) {
            log.error("Failed to map file " + this.fileName, e);
            throw e;
        } finally {
            if (!ok && this.fileChannel != null) {
                this.fileChannel.close();
            }
        }
    }
看过上一篇文章(Java传统IO和NIO有什么区别)以后,对这个创建MappedByteBuffer应该不陌生了。所以这个创建过程很简单,MappedFile中有一个成员变量mappedByteBuffer,它的类型就是MappedByteBuffer,所以就是通过FileChannel.map()创建了一个MappedByteBuffer并保存在了MappedFile的成员变量mappedByteBuffer里面,以及一些其他成员变量的赋值。这样一个MappedFile就创建好啦。
刚才mmapOperation()中还提到了一个文件预热,这里简单讲一下。在创建了一个MappedByteBuffer以后,物理内存中真的就有一块空间了和文件对应了吗?还是在上一篇文章中(Java传统IO和NIO有什么区别)说到过,其实是没有,仅仅是做了一个映射,创建了一些数据结构而已,那当我们真正访问这块虚拟地址的时候,会发生缺页中断,然后才会把磁盘的数据读到内存。而文件预热干的事情,就是提前访问这块虚拟空间,把缺的页提前调进内存,这样当RocketMQ真的往里写数据的时候,就不会缺页中断了。提前访问的方式就是往每一页都写入一个0。
这样会不会有问题?我提前把页换进来了,但是操作系统此时运行着很多很多的进程,我们知道内存空间不够用了就会产生换页,万一我们刚刚提前换进来的页又被换出去了怎么办,那刚才做的文件预热不是白干了吗?RocketMQ中还有一段代码,会把文件预热过程中换进来的页都锁定在内存里,也就是不会被换出去。具体代码大家感兴趣可以自己去看看。
大家还记得我们讲到主流程的哪一步了吗?
主流程第二步
- 从MappedFileQueue中获取一个MappedFile
第一步获取的MappedFile为空或者满了,就要创建一个新的MappedFile,否则不需要第二步- 调用MappedFile.appendMessage()方法将数据写入MappedFile
才刚讲完第二步,创建一个新的MappedFile的过程,这部分有点多,大家多看看就会理解了。
最后:
3.3 主流程第三步
主流程第三步
- 从MappedFileQueue中获取一个MappedFile
- 第一步获取的MappedFile为空或者满了,就要创建一个新的MappedFile,否则不需要第二步
调用MappedFile.appendMessage()方法将数据写入MappedFile
终于要写入数据了。主流程代码在太上面了,提醒大家一下是在ComitLog.public PutMessageResult putMessage(final MessageExtBrokerInner msg)方法中。第三步即:
result = mappedFile.appendMessage(msg, this.appendMessageCallback);
调用的是MappedFile.appendMessage()方法
    public AppendMessageResult appendMessage(final MessageExtBrokerInner msg, final AppendMessageCallback cb) {
        return appendMessagesInner(msg, cb);
    }
    public AppendMessageResult appendMessagesInner(final MessageExt messageExt, final AppendMessageCallback cb) {
        assert messageExt != null;
        assert cb != null;

		// 当前的写入位置
        int currentPos = this.wrotePosition.get();

		// 写入位置小于文件大小,说明还可以往里写
        if (currentPos < this.fileSize) {
        	// 这个writeBuffer和前面提到的transientStorePool有关系
        	// 只有开启了transientStorePool这个writeBuffer才不是空
        	// 前面提到默认是没有开启的,因此这个byteBuffer就是this.mappedByteBuffer.slice()
        	// mappedByteBuffer.slice()会创建一个新的byte buffer,新旧buffer的在内容上是共享的,因此在新的buffer上做的修改也会反应的旧的buffer
            ByteBuffer byteBuffer = writeBuffer != null ? writeBuffer.slice() : this.mappedByteBuffer.slice();
            // 把位置调整的当前写入位置
            byteBuffer.position(currentPos);
            AppendMessageResult result;
            // 走这里
            if (messageExt instanceof MessageExtBrokerInner) {
            	// 开始写入buffer,第一个参数就是文件名去掉左边的0,表示在整个CommitLog中的偏移量
            	// 第三个参数fileSize - currentPos不就是剩余能写入的长度吗
                result = cb.doAppend(this.getFileFromOffset(), byteBuffer, this.fileSize - currentPos, (MessageExtBrokerInner) messageExt);
            } else if (messageExt instanceof MessageExtBatch) {
                result = cb.doAppend(this.getFileFromOffset(), byteBuffer, this.fileSize - currentPos, (MessageExtBatch) messageExt);
            } else {
                return new AppendMessageResult(AppendMessageStatus.UNKNOWN_ERROR);
            }
            // 修改写位置
            this.wrotePosition.addAndGet(result.getWroteBytes());
            // 修改时间戳
            this.storeTimestamp = result.getStoreTimestamp();
            return result;
        }
        log.error("MappedFile.appendMessage return null, wrotePosition: {} fileSize: {}", currentPos, this.fileSize);
        return new AppendMessageResult(AppendMessageStatus.UNKNOWN_ERROR);
    }
这个AppendMessageCallback是从CommitLog里传进来的, AppendMessageCallback是一个接口,CommitLog中有一个内部类DefaultAppendMessageCallback实现了这个接口,CommitLog在创建的时候就会创建一个DefaultAppendMessageCallback的实例。
接下来看看这个DefaultAppendMessageCallback.doAppend()方法,方法挺长,但是并不复杂,就是将msgInner里面消息数据都写到前面得到的MappedByteBuffer里
// 第二个参数,我们上面传进来的是一个MappedByteBuffer
public AppendMessageResult doAppend(final long fileFromOffset, final ByteBuffer byteBuffer, final int maxBlank,
            final MessageExtBrokerInner msgInner) {
            // STORETIMESTAMP + STOREHOSTADDRESS + OFFSET <br>

            // PHY OFFSET
            // 在CommitLog中的偏移量,就是文件名+相对偏移量
            long wroteOffset = fileFromOffset + byteBuffer.position();

            int sysflag = msgInner.getSysFlag();

            int bornHostLength = (sysflag & MessageSysFlag.BORNHOST_V6_FLAG) == 0 ? 4 + 4 : 16 + 4;
            int storeHostLength = (sysflag & MessageSysFlag.STOREHOSTADDRESS_V6_FLAG) == 0 ? 4 + 4 : 16 + 4;
            ByteBuffer bornHostHolder = ByteBuffer.allocate(bornHostLength);
            ByteBuffer storeHostHolder = ByteBuffer.allocate(storeHostLength);

            this.resetByteBuffer(storeHostHolder, storeHostLength);
            // 计算msgID,前四个字节是host的ip地址,5-8字节是port,最后8个字节是wroteOffset
            String msgId;
            if ((sysflag & MessageSysFlag.STOREHOSTADDRESS_V6_FLAG) == 0) {
                msgId = MessageDecoder.createMessageId(this.msgIdMemory, msgInner.getStoreHostBytes(storeHostHolder), wroteOffset);
            } else {
                msgId = MessageDecoder.createMessageId(this.msgIdV6Memory, msgInner.getStoreHostBytes(storeHostHolder), wroteOffset);
            }

            // Record ConsumeQueue information
            keyBuilder.setLength(0);
            keyBuilder.append(msgInner.getTopic());
            keyBuilder.append('-');
            keyBuilder.append(msgInner.getQueueId());
            String key = keyBuilder.toString();
            Long queueOffset = CommitLog.this.topicQueueTable.get(key);
            if (null == queueOffset) {
                queueOffset = 0L;
                CommitLog.this.topicQueueTable.put(key, queueOffset);
            }

            // Transaction messages that require special handling
            final int tranType = MessageSysFlag.getTransactionValue(msgInner.getSysFlag());
            switch (tranType) {
                // Prepared and Rollback message is not consumed, will not enter the
                // consumer queuec
                case MessageSysFlag.TRANSACTION_PREPARED_TYPE:
                case MessageSysFlag.TRANSACTION_ROLLBACK_TYPE:
                    queueOffset = 0L;
                    break;
                case MessageSysFlag.TRANSACTION_NOT_TYPE:
                case MessageSysFlag.TRANSACTION_COMMIT_TYPE:
                default:
                    break;
            }

            /**
             * Serialize message
             */
            final byte[] propertiesData =
                msgInner.getPropertiesString() == null ? null : msgInner.getPropertiesString().getBytes(MessageDecoder.CHARSET_UTF8);

            final int propertiesLength = propertiesData == null ? 0 : propertiesData.length;

            if (propertiesLength > Short.MAX_VALUE) {
                log.warn("putMessage message properties length too long. length={}", propertiesData.length);
                return new AppendMessageResult(AppendMessageStatus.PROPERTIES_SIZE_EXCEEDED);
            }

            final byte[] topicData = msgInner.getTopic().getBytes(MessageDecoder.CHARSET_UTF8);
            final int topicLength = topicData.length;
            final int bodyLength = msgInner.getBody() == null ? 0 : msgInner.getBody().length;

			// 计算消息的长度,也就是要写入的长度
            final int msgLen = calMsgLength(msgInner.getSysFlag(), bodyLength, topicLength, propertiesLength);

            // Exceeds the maximum message
            // 消息长度超过最大阈值
            if (msgLen > this.maxMessageSize) {
                CommitLog.log.warn("message size exceeded, msg total size: " + msgLen + ", msg body size: " + bodyLength
                    + ", maxMessageSize: " + this.maxMessageSize);
                return new AppendMessageResult(AppendMessageStatus.MESSAGE_SIZE_EXCEEDED);
            }

            // Determines whether there is sufficient free space
            // 是否有足够的可用空间
            if ((msgLen + END_FILE_MIN_BLANK_LENGTH) > maxBlank) {//没有足够空间
                this.resetByteBuffer(this.msgStoreItemMemory, maxBlank);
                // 1 TOTALSIZE
                this.msgStoreItemMemory.putInt(maxBlank);
                // 2 MAGICCODE
                this.msgStoreItemMemory.putInt(CommitLog.BLANK_MAGIC_CODE);
                // 3 The remaining space may be any value
                // Here the length of the specially set maxBlank
                final long beginTimeMills = CommitLog.this.defaultMessageStore.now();
                byteBuffer.put(this.msgStoreItemMemory.array(), 0, maxBlank);
                return new AppendMessageResult(AppendMessageStatus.END_OF_FILE, wroteOffset, maxBlank, msgId, msgInner.getStoreTimestamp(),
                    queueOffset, CommitLog.this.defaultMessageStore.now() - beginTimeMills);
            }

            // Initialization of storage space
            // 消息最终存储在CommitLog中的格式
            this.resetByteBuffer(msgStoreItemMemory, msgLen);
            // 1 TOTALSIZE
            this.msgStoreItemMemory.putInt(msgLen);
            // 2 MAGICCODE
            this.msgStoreItemMemory.putInt(CommitLog.MESSAGE_MAGIC_CODE);
            // 3 BODYCRC
            this.msgStoreItemMemory.putInt(msgInner.getBodyCRC());
            // 4 QUEUEID
            this.msgStoreItemMemory.putInt(msgInner.getQueueId());
            // 5 FLAG
            this.msgStoreItemMemory.putInt(msgInner.getFlag());
            // 6 QUEUEOFFSET
            this.msgStoreItemMemory.putLong(queueOffset);
            // 7 PHYSICALOFFSET
            this.msgStoreItemMemory.putLong(fileFromOffset + byteBuffer.position());
            // 8 SYSFLAG
            this.msgStoreItemMemory.putInt(msgInner.getSysFlag());
            // 9 BORNTIMESTAMP
            this.msgStoreItemMemory.putLong(msgInner.getBornTimestamp());
            // 10 BORNHOST
            this.resetByteBuffer(bornHostHolder, bornHostLength);
            this.msgStoreItemMemory.put(msgInner.getBornHostBytes(bornHostHolder));
            // 11 STORETIMESTAMP
            this.msgStoreItemMemory.putLong(msgInner.getStoreTimestamp());
            // 12 STOREHOSTADDRESS
            this.resetByteBuffer(storeHostHolder, storeHostLength);
            this.msgStoreItemMemory.put(msgInner.getStoreHostBytes(storeHostHolder));
            // 13 RECONSUMETIMES
            this.msgStoreItemMemory.putInt(msgInner.getReconsumeTimes());
            // 14 Prepared Transaction Offset
            this.msgStoreItemMemory.putLong(msgInner.getPreparedTransactionOffset());
            // 15 BODY
            this.msgStoreItemMemory.putInt(bodyLength);
            if (bodyLength > 0)
                this.msgStoreItemMemory.put(msgInner.getBody());
            // 16 TOPIC
            this.msgStoreItemMemory.put((byte) topicLength);
            this.msgStoreItemMemory.put(topicData);
            // 17 PROPERTIES
            this.msgStoreItemMemory.putShort((short) propertiesLength);
            if (propertiesLength > 0)
                this.msgStoreItemMemory.put(propertiesData);

            final long beginTimeMills = CommitLog.this.defaultMessageStore.now();
            // Write messages to the queue buffer
            // 写到byteBuffer里
            byteBuffer.put(this.msgStoreItemMemory.array(), 0, msgLen);

            AppendMessageResult result = new AppendMessageResult(AppendMessageStatus.PUT_OK, wroteOffset, msgLen, msgId,
                msgInner.getStoreTimestamp(), queueOffset, CommitLog.this.defaultMessageStore.now() - beginTimeMills);

            switch (tranType) {
                case MessageSysFlag.TRANSACTION_PREPARED_TYPE:
                case MessageSysFlag.TRANSACTION_ROLLBACK_TYPE:
                    break;
                case MessageSysFlag.TRANSACTION_NOT_TYPE:
                case MessageSysFlag.TRANSACTION_COMMIT_TYPE:
                    // The next update ConsumeQueue information
                    CommitLog.this.topicQueueTable.put(key, ++queueOffset);
                    break;
                default:
                    break;
            }
            return result;
        }
到这里,消息就已经写到了内存的缓冲区中了。这篇文章也就到这里了。
四、 其他问题
关于上面提到的transientStorePool,之前讲的都是不开启的情况,那开启以后会怎么样呢?以及消息现在还是在内存的缓冲区中,怎么真正刷到磁盘呢?这个下篇文章再说。