
我们用大学的四年去怀念高中的三年,但是我们会用大学以后的余生去怀念大学的四年。
1、JDBC 概述
- JDBC(Java Database Connectivity),Java数据库连接。
- sun公司为Java设计了一套操作数据库的API(位于java.sql和javax.sql包下),然后每个数据库厂商提供实现JDBC接口的驱动。
- 这样我们有了对应数据库的驱动,就能通过Java来操作数据库啦。

2、开发环境搭建
(1)创建一个普通的Maven项目


(2) 导入mysql驱动
maven仓库地址:https://mvnrepository.com/artifact/mysql/mysql-connector-java/5.1.46
<!-- https://mvnrepository.com/artifact/mysql/mysql-connector-java -->
<dependency>
    <groupId>mysql</groupId>
    <artifactId>mysql-connector-java</artifactId>
    <version>5.1.46</version>
</dependency>

(3)查看mysql驱动是否导入成功
(4)测试
public class MyTest {
    public static void main(String[] args) {
        try {
            // 加载数据库驱动
            Class.forName("com.mysql.jdbc.Driver");
            System.out.println("mysql数据库驱动加载成功!");
        } catch (ClassNotFoundException e) {
            System.out.println("mysql数据库驱动加载失败!");
            e.printStackTrace();
        }
    }
}

3、使用JDBC访问数据库
JDBC访问数据库步骤:
- 注册驱动(Driver)
- 获取连接(Connection)
- 获取数据库操作对象(Statement)
- 执行SQL语句
- 处理查询结果集
- 释放资源
3.1、注册驱动&获取连接
注册数据库驱动


数据库驱动类 com.mysql.jdbc.Driver,实现了java.sql.Driver接口;查看源码后发现也是通过DriverManager.registerDriver()来注册驱动的,这样我们可以通过反射的方式来加载这个数据库驱动类Class.forName(xxx.Driver);
获取数据库的连接

url,统一资源定位符(网络中某个资源的绝对地址)。
URL由哪几个部分组成:协议,ip,port,资源名。
比如我们访问百度的主页:
http://39.156.66.18:80/index.html

http://          通信协议
39.156.66.18     服务器ip地址
80               端口,80是Web服务的默认端口
index.html       是服务器上某个资源名
mysql5.7和8.0驱动中url:
//mysql5.7, userSSL=false:关闭安全连接  useUnicode=true&characterEncoding=utf-8:字符集编码
url=jdbc:mysql://127.0.0.1:3306/mydatabase?useSSL=false&useUnicode=true&characterEncoding=utf-8

//mysql8.0,需要增加时区的配置:serverTimezone=GMT%2B8
url=jdbc:mysql://127.0.0.1:3306/mydatabase?useSSL=false&useUnicode=true&characterEncoding=utf-8&serverTimezone=GMT%2B8
示例代码:
import java.sql.Connection;
import java.sql.Driver;
import java.sql.DriverManager;
import java.sql.SQLException;

/**
 * @ClassName: JDBCTest01
 * @Description: 注册驱动&获取连接
 * @Author: baidou
 * @Date: 2022/1/30 08:09
 * Version: 1.0
 */
public class JDBCTest01 {
    public static void main(String[] args) {
        try {
            //1、注册驱动
            Driver driver = new com.mysql.jdbc.Driver(); // 多态:父类引用指向子类对象
            DriverManager.registerDriver(driver);
            //2、获取连接
            String url = "jdbc:mysql://localhost:3306/mysqlstudy?useSSL=false&useUnicode=true&characterEncoding=utf-8";
            String user = "root";
            String password = "123456";
            Connection connection = DriverManager.getConnection(url, user, password);
            System.out.println("数据库连接对象=" + connection); //com.mysql.jdbc.JDBC4Connection@3d646c37
        } catch (SQLException e) {
            // 打印异常信息
            e.printStackTrace();
        }
    }
}
3.2、执行SQL&释放资源
获取执行SQL的对象

SQL:
# 创建数据库
create database if not exists jdbctest character set utf8;
# 使用数据库
use jdbctest ;
# 创建数据表
CREATE TABLE IF NOT EXISTS `student` (
		`id` INT ( 4 ) NOT NULL AUTO_INCREMENT COMMENT '学号',
		`name` VARCHAR ( 30 ) NOT NULL DEFAULT '匿名' COMMENT '学号',
		`pwd` VARCHAR ( 20 ) NOT NULL DEFAULT '123456' COMMENT '密码',
		`address` VARCHAR ( 100 ) DEFAULT NULL COMMENT '家庭地址',
		`email` VARCHAR ( 50 ) DEFAULT NULL COMMENT '邮箱',
		PRIMARY KEY ( `id` ) -- 把id设置主键

) ENGINE = INNODB DEFAULT CHARSET = utf8;-- 设置引擎和字符编码
执行SQL

示例:
import java.sql.*;

// 添加一条数据
public class JDBCTest01 {
    public static void main(String[] args) {
        Connection connection = null;
        Statement statement = null;
        try {
            //1、注册驱动
            Driver driver = new com.mysql.jdbc.Driver(); // 多态:父类引用指向子类对象
            DriverManager.registerDriver(driver);

            //2、获取连接
            String url = "jdbc:mysql://localhost:3306/jdbctest?useSSL=false&useUnicode=true&characterEncoding=utf-8";
            String user = "root";
            String password = "123456";
            connection = DriverManager.getConnection(url, user, password);
            System.out.println("数据库连接对象 = " + connection); //com.mysql.jdbc.JDBC4Connection@3d646c37

            //3、获取数据库操作对象
            statement = connection.createStatement();

            //4、执行sql
            String sql = "insert into student(name,pwd,address,email) values('pear','pear','新疆','233333@qq.com')";
            //专门执行DML语句(insert、update、delete),返回值是影响数据库中的记录条数
            int count = statement.executeUpdate(sql);
            System.out.println(count > 0 ? "添加成功!!!" : "添加失败!!!");
        } catch (SQLException e) {
            // 打印异常信息
            e.printStackTrace();
        } finally {
            //5、释放资源 (从小到大依次关闭)
            try {
                if (statement != null) {
                    statement.close();
                }
                if (connection != null) {
                    connection.close();
                }
            } catch (SQLException e) {
                e.printStackTrace();
            }
        }
    }
}

如果你的控制台出现乱码,尝试这个方法点我?。
ok已经将这条数据成功插入到数据表中啦!
3.3、JDBC删除&更新操作
删除操作
// 删除一条数据
public class JDBCTest02 {
    public static void main(String[] args) {
        Connection connection = null;
        Statement statement = null;
        try {
            //1、注册驱动
            DriverManager.registerDriver(new com.mysql.jdbc.Driver());
            //2、获取连接
            String url = "jdbc:mysql://localhost:3306/jdbctest?useSSL=false&useUnicode=true&characterEncoding=utf-8";
            String user = "root";
            String pwd = "123456";
            connection = DriverManager.getConnection(url, user, pwd);
            System.out.println("Connection = " + connection);
            //3、获取数据库操作对象
            statement = connection.createStatement();
            //4、执行SQL
            String sql = "delete from student where id = 10 ";
            int count = statement.executeUpdate(sql);
            //打印输出结果
            System.out.println(count > 0 ? "delete success" : "delete falied");
        } catch (SQLException e) {
            e.printStackTrace();
        } finally {
            //5、释放资源
            try {
                if (statement != null) {
                    statement.close();
                }
                if (connection != null) {
                    connection.close();
                }
            } catch (SQLException e) {
                e.printStackTrace();
            }
        }
    }
}

更新操作
// 更新表中的数据
public class JDBCTest02 {
    public static void main(String[] args) {
        Connection connection = null;
        Statement statement = null;
        try {
            //1、注册驱动
            DriverManager.registerDriver(new com.mysql.jdbc.Driver());
            //2、获取连接
            String url = "jdbc:mysql://localhost:3306/jdbctest?useSSL=false&useUnicode=true&characterEncoding=utf8";
            String user = "root";
            String pwd = "123456";
            connection = DriverManager.getConnection(url, user, pwd);
            System.out.println("Connection = " + connection);
            //3、获取数据库操作对象
            statement = connection.createStatement();
            //4、执行SQL
            String sql = "update student set name='玉兔',address='月球' where name='joker'";
            int count = statement.executeUpdate(sql);
            //打印输出结果
            System.out.println(count > 0 ? "update success" : "update falied");
        } catch (SQLException e) {
            e.printStackTrace();
        } finally {
            //5、释放资源
            try {
                if (statement != null) {
                    statement.close();
                }
                if (connection != null) {
                    connection.close();
                }
            } catch (SQLException e) {
                e.printStackTrace();
            }
        }

    }
}

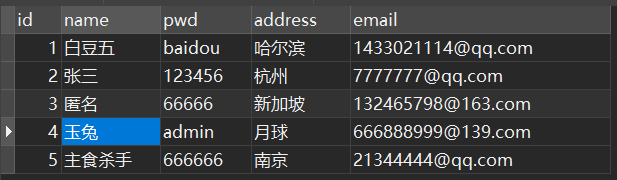
成功修改表中的数据!
3.4、通过反射注册数据库驱动
public class MyTest {
    public static void main(String[] args) {
        try {
            // 注册驱动
            Class.forName("com.mysql.jdbc.Driver");
        } catch (ClassNotFoundException e) {
            e.printStackTrace();
        }
    }
}
3.5、读取配置文件中的内容
在项目的资源目录resources中创建一个db.properties文件。
将我们的数据库配置信息写在db.properties中,目的是方便维护。
driver=com.mysql.jdbc.Driver
url=jdbc:mysql://localhost:3306/jdbctest?useSSL=false&useUniCode=true&characterEncoding=utf-8
user=root
password=123456
通过测试类来读取db.properties中的内容。
public class JDBCTest03 {
    public static void main(String[] args) {
        try {
            // 创建配置文件对象
            Properties properties = new Properties();

            // 通过类加载器获取配置文件db.properties的输入流
            InputStream is = ClassLoader.getSystemResourceAsStream("db.properties");

            // 将这个资源加载到配置文件对象中
            properties.load(is);

            // 关闭输入流
            is.close();

            // 通过key获取配置文件对应的value
            String driver = properties.getProperty("driver");
            String url = properties.getProperty("url");
            String user = properties.getProperty("user");
            String password = properties.getProperty("password");

            // 输出获取的内容
            System.out.println("driver = " + driver);
            System.out.println("url = " + url);
            System.out.println("user = " + user);
            System.out.println("password = " + password);

        } catch (IOException e) {
            e.printStackTrace();
        }
    }
}

4、实现用户登录功能
需求分析:
- 接收用户输入的用户名和密码;
- 验证用户名和密码;
- 返回给用户提示信息;
SQL语句:
use jdbctest;
create table user
(
   id                   int not null auto_increment,
   name                 varchar(255) not null,
   password             varchar(255) not null,
   vocation             varchar(255),
   primary key (id)
)engine= INNODB default charset= utf8;

insert into user(`name`,`password`,`vocation`) values('白豆五','123456','大三'),('wangwu','wangwu','画家'),('zhangsan','7777','程序员');
db.properties:
driver=com.mysql.jdbc.Driver
url=jdbc:mysql://localhost:3306/jdbctest?useSSL=false&useUniCode=true&characterEncoding=utf-8
user=root
password=123456
示例代码:
import java.io.IOException;
import java.io.InputStream;
import java.sql.*;
import java.util.HashMap;
import java.util.Map;
import java.util.Properties;
import java.util.Scanner;

/**
 * @ClassName: JDBCTest04
 * @Description: 模拟用户登录功能实现
 * @Author: baidou
 * @Date: 2022/1/31 08:40
 * Version: 1.0
 */
public class JDBCTest04 {
    public static void main(String[] args) {

        // 初始化界面
        Map<String, String> userLoginInfo = initUI();
        // 验证用户名和密码
        boolean loginSuccess = login(userLoginInfo);
        // 打印提示信息
        System.out.println(loginSuccess ? "success" : "fail");

    }

    /**
     * 用户登录
     *
     * @param userLoginInfo 用户登录信息
     * @return false表示失败, true表示成功
     */
    private static boolean login(Map<String, String> userLoginInfo) {
        Connection conn = null;
        Statement stmt = null;
        ResultSet rs = null;
        // 定义一个红绿灯标识用户登录和失败
        boolean loginSuccess = false;

        try {
            // 创建配置类对象
            Properties p = new Properties();
            // 通过类加载器获取类路径下的db.properties这个资源
            InputStream is = ClassLoader.getSystemResourceAsStream("db.properties");
            //加载资源
            p.load(is);
            // 关闭流
            is.close();
            // 通过属性获取内容
            String driver = p.getProperty("driver");
            String user = p.getProperty("user");
            String url = p.getProperty("url");
            String password = p.getProperty("password");
            //System.out.println(driver);
            //System.out.println(user);
            //System.out.println(url);
            //System.out.println(password);

            // 1、注册驱动
            Class.forName(driver);
            // 2、获取连接
            conn = DriverManager.getConnection(url, user, password);
            //System.out.println("数据库连接对象 = " + conn);
            // 3、获取数据库操作对象
            stmt = conn.createStatement();
            // 执行sql
            String sql = "select * from user where name ='" + userLoginInfo.get("name") + "' and password = '" + userLoginInfo.get("password") + "'";
            rs = stmt.executeQuery(sql);
            // 处理结果集
            while (rs.next()) {
                // 登陆成功
                loginSuccess = true;
            }
        } catch (ClassNotFoundException e) {
            e.printStackTrace();
        } catch (SQLException throwables) {
            throwables.printStackTrace();
        } catch (IOException e) {
            e.printStackTrace();
        } finally {
            // 释放资源
            close(rs, stmt, conn);
        }
        return loginSuccess;
    }

    /**
     * 初始化界面
     *
     * @return 用户名和密码等信息
     */
    private static Map<String, String> initUI() {
        Scanner sc = new Scanner(System.in);
        System.out.println("用户名:");
        String name = sc.nextLine();
        System.out.println("密码:");
        String password = sc.nextLine();
        Map<String, String> userLoginInfo = new HashMap<String, String>();
        userLoginInfo.put("name", name);
        userLoginInfo.put("password", password);

        return userLoginInfo;
    }

    /**
     * 释放资源
     *
     * @param rs   结果集对象
     * @param stmt 数据库操作对象
     * @param conn 数据库连接对象
     */
    public static void close(ResultSet rs, Statement stmt, Connection conn) {
        try {
            if (rs != null) {
                rs.close();
            }
            if (stmt != null) {
                stmt.close();
            }
            if (conn != null) {
                conn.close();
            }

        } catch (SQLException throwables) {
            throwables.printStackTrace();
        }
    }
}

5、SQL注入问题
通过把SQL命令插入到Web表单提交或输入域名或页面请求的查询字符串,最终达到欺骗服务器执行恶意的SQL命令。
这次我们在上一个登录案例对密码做一些小手段,后面拼接一些字符串,竟然能登录成功。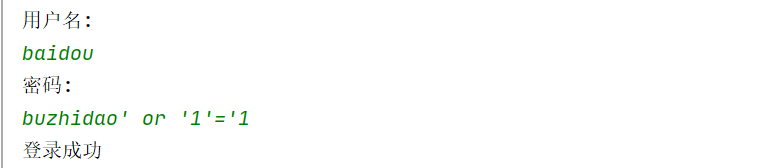
分析:只要用户提供的信息不参与SQL语句的编译过程,问题就解决了。
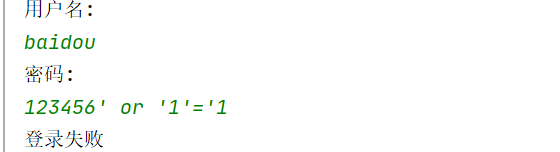
解决方案:
- 可以利用正则表达式来防止用户输入一些非法字符,例如(‘=’,‘or’等)
- 将Statment换成PreparedStatement(预编译的数据库操作对象);
PreparedStatement的原理:首先将SQL语句传入PreparedStatement中,然后把传入到SQL语句中的参数用?(占位符)来代替,然后该SQL语句会进行预编译,之后将获取的参数通过PreparedStatement中的set()方法传入编译后的SQL语句中,这样SQL语句就会先被编译再进行传值,这样就解决SQL注入问题。
示例代码:
import java.io.IOException;
import java.io.InputStream;
import java.sql.*;
import java.util.HashMap;
import java.util.Map;
import java.util.Properties;
import java.util.Scanner;

/**
 * @ClassName: JDBCTest04
 * @Description: 模拟用户登录功能实现
 * @Author: baidou
 * @Date: 2022/1/31 08:40
 * Version: 1.0
 */
public class JDBCTest04 {
    public static void main(String[] args) {

        // 初始化界面
        Map<String, String> userLoginInfo = initUI();
        // 验证用户名和密码
        boolean loginSuccess = login(userLoginInfo);
        // 打印提示信息
        System.out.println(loginSuccess ? "登录成功" : "登录失败");

    }

    /**
     * 用户登录
     *
     * @param userLoginInfo 用户登录信息
     * @return false表示失败, true表示成功
     */
    private static boolean login(Map<String, String> userLoginInfo) {
        Connection conn = null;
        PreparedStatement ps = null;
        ResultSet rs = null;
        // 定义一个红绿灯标识用户登录和失败
        boolean loginSuccess = false;

        try {
            // 创建配置类对象
            Properties p = new Properties();
            // 通过类加载器获取类路径下的db.properties这个资源
            InputStream is = ClassLoader.getSystemResourceAsStream("db.properties");
            //加载资源
            p.load(is);
            // 关闭流
            is.close();
            // 通过属性获取内容
            String driver = p.getProperty("driver");
            String user = p.getProperty("user");
            String url = p.getProperty("url");
            String password = p.getProperty("password");
            //System.out.println(driver);
            //System.out.println(user);
            //System.out.println(url);
            //System.out.println(password);

            // 1、注册驱动
            Class.forName(driver);
            // 2、获取连接
            conn = DriverManager.getConnection(url, user, password);
            //System.out.println("数据库连接对象 = " + conn);
            // 3、获取预编译的数据库操作对象
            String sql = "select * from user where name =? and password=?";
            ps = conn.prepareStatement(sql);
            // 给占位符传值
            ps.setString(1, userLoginInfo.get("name"));
            ps.setString(2, userLoginInfo.get("password"));
            // 4、执行sql
            rs = ps.executeQuery();
            // 5、处理结果集
            while (rs.next()) {
                // 登陆成功
                loginSuccess = true;
            }
        } catch (ClassNotFoundException e) {
            e.printStackTrace();
        } catch (SQLException throwables) {
            throwables.printStackTrace();
        } catch (IOException e) {
            e.printStackTrace();
        } finally {
            // 6、释放资源
            close(rs, ps, conn);
        }
        return loginSuccess;
    }

    /**
     * 初始化界面
     *
     * @return 用户名和密码等信息
     */
    private static Map<String, String> initUI() {
        Scanner sc = new Scanner(System.in);
        System.out.println("用户名:");
        String name = sc.nextLine();
        System.out.println("密码:");
        String password = sc.nextLine();
        Map<String, String> userLoginInfo = new HashMap<String, String>();
        userLoginInfo.put("name", name);
        userLoginInfo.put("password", password);

        return userLoginInfo;
    }

    /**
     * 释放资源
     *
     * @param rs   结果集对象
     * @param stmt 数据库操作对象
     * @param conn 数据库连接对象
     */
    public static void close(ResultSet rs, Statement stmt, Connection conn) {
        try {
            if (rs != null) {
                rs.close();
            }
            if (stmt != null) {
                stmt.close();
            }
            if (conn != null) {
                conn.close();
            }

        } catch (SQLException throwables) {
            throwables.printStackTrace();
        }
    }
}
6、使用PreparedStatement完成增删改查
示例代码:
import org.junit.Test;

import java.sql.*;

/**
 * @ClassName: JDBCTest05
 * @Description: 使用PreparedStatement完成增删改查功能
 * @Author: baidou
 * @Date: 2022/2/2 09:06
 * Version: 1.0
 */
public class JDBCTest05 {

    Connection conn;
    PreparedStatement pstmt;

    /**
     * 获取数据库连接对象
     *
     * @return connection
     * @throws SQLException, ClassNotFoundException
     */
    public static Connection getConnection() throws SQLException, ClassNotFoundException {
        Class.forName("com.mysql.jdbc.Driver");
        Connection connection = DriverManager.getConnection("jdbc:mysql://localhost:3306/jdbctest?useSSL=false&useUniCode=true&characterEncoding=utf-8", "root", "123456");
        return connection;
    }

    /**
     * 获取数据库的预处理对象
     *
     * @param connection 数据库连接对象
     * @param sql        我们传入的sql语句
     * @param obj        占位符的参数
     * @return
     * @throws SQLException
     */
    public static PreparedStatement getPreparedStatement(Connection connection, String sql, Object[] obj) throws SQLException {
        PreparedStatement pstmt = connection.prepareStatement(sql);
        if (obj != null) {
            for (int i = 0; i < obj.length; i++) {
                pstmt.setObject(i + 1, obj[i]);
            }
        }
        return pstmt;
    }

    /**
     * 释放资源
     *
     * @param rs
     * @param ps
     * @param conn
     * @throws SQLException
     */
    public static void close(ResultSet rs, PreparedStatement ps, Connection conn) throws SQLException {
        if (rs != null) {
            rs.close();
        }
        if (ps != null) {
            ps.close();
        }
        if (conn != null) {
            conn.close();
        }

    }

    @Test
    public void add() throws SQLException, ClassNotFoundException {
        conn = JDBCTest05.getConnection();
        String sql = "insert into user(name,password,vocation) values(?,?,?)";
        Object[] obj = {"大灰狼", "2333", "战士"};
        pstmt = JDBCTest05.getPreparedStatement(conn, sql, obj);
        int count = pstmt.executeUpdate();
        System.out.println(count > 0 ? "添加成功" : "添加失败");
        JDBCTest05.close(null, pstmt, conn);
    }

    @Test
    public void delete() throws SQLException, ClassNotFoundException {
        conn = JDBCTest05.getConnection();
        String sql = "delete from user where id=?";
        pstmt = JDBCTest05.getPreparedStatement(conn, sql, new Object[]{4});
        int count = pstmt.executeUpdate();
        System.out.println(count > 0 ? "删除成功" : "删除失败");
        JDBCTest05.close(null, pstmt, conn);
    }

    @Test
    public void update() throws SQLException, ClassNotFoundException {
        conn = JDBCTest05.getConnection();
        String sql = "update user set name=?,password=? where name=?";
        Object[] obj = {"铠甲勇士", "0000", "zhangsan"};
        pstmt = JDBCTest05.getPreparedStatement(conn, sql, obj);
        int count = pstmt.executeUpdate();
        System.out.println(count > 0 ? "修改成功" : "修改失败");
        JDBCTest05.close(null, pstmt, conn);
    }

    @Test
    public void list() throws SQLException, ClassNotFoundException {
        conn = JDBCTest05.getConnection();
        String sql = "select * from user";
        pstmt = JDBCTest05.getPreparedStatement(conn, sql, null);
        ResultSet rs = pstmt.executeQuery();
        while (rs.next()) {
            System.out.println("id:" + rs.getObject(1) + "\t用户名:" + rs.getObject(2) + "\t密码:" + rs.getObject(3) + "\t职业:" + rs.getObject(4));
        }
        JDBCTest05.close(rs, pstmt, conn);
    }
}
7、事务
8、数据库连接池
DataSource,实现javax.sql.DataSource接口。C3P0,是一个开源的JDBC连接池,它实现了数据源和JNDI绑定,支持JDBC3规范和JDBC2的标准扩展。C3P0是异步操作的,缓慢的JDBC操作通过帮助进程完成。扩展这些操作可以有效的提升性能。目前使用它的开源项目有hibernate,spring等。C3P0有自动回收空闲连接功能。
-DBCP(DataBase Connection Pool),是java数据库连接池的一种,由Apache开发,通过数据库连接池,可以让程序自动管理数据库连接的释放和断开。Proxool,是sourceforge下的一个开源项目,这个项目提供一个健壮、易用的连接池,最为关键的是这个连接池提供监控的功能,方便易用,便于发现连接泄漏的情况。Druid,是阿里的一个开源项目,整个项目由数据库连接池、插件框架和SQL解析器组成。该项目主要是为了扩展JDBC的一些限制,可以让程序员实现一些特殊的需求,比如向密钥服务请求凭证、统计SQL信息、SQL性能收集、SQL注入检查、SQL翻译等,程序员可以通过定制来实现自己需要的功能。HikariCP, 是一个高性能的 JDBC 连接池组件。