用modelsim仿真时调用xilinx vivado IP
以modelsim se-64 10.5 和vivado 2017.4为例说明这个配置过程。
1、首先生成可以被modelsim 调用的库
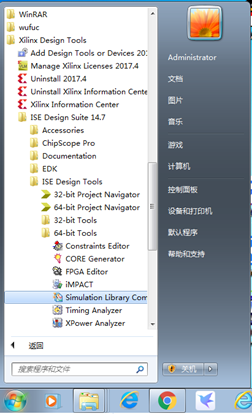
Windows à所有程序àxilinx design toolsàISE Design Toolsà64-bit ToolsàSimulation Library Com…
本人modelsim是64位的,所以选择64位。然后用这个程序生成所需要的库。
2、在modelsim里配置这个库
找到modelsim的安装目录,找到modelsim.ini文件,然后添加刚才安装的库的路径
在这个文件里面找到[Library]块,然后在后面用如下的语句添加如下的几行:
XILINXCORELIB_VER = D:\Xilinx\14.7\ISE_DS\ISE\verilog\mti_se\10.5\nt64\xilinxcorelib_ver
UNISIMS_VER = D:\Xilinx\14.7\ISE_DS\ISE\verilog\mti_se\10.5\nt64\unisims_ver
UNIMACRO_VER = D:\Xilinx\14.7\ISE_DS\ISE\verilog\mti_se\10.5\nt64\unimacro_ver
SIMPRIMS_VER =D:\Xilinx\14.7\ISE_DS\ISE\verilog\mti_se\10.5\nt64\simprims_ver
SECUREIP = D:\Xilinx\14.7\ISE_DS\ISE\verilog\mti_se\10.5\nt64\secureip
以上是例子,自己要依据上一步编译库的具体地址来添加。
添加了之后下次运行modelsim的时候就可以看到这些库。
3、在系统的环境变量里添加名为XILINX的环境变量

加这个环境变量主要是为了方便后面找到glbl.v这个文件
因为后面在仿真的时候,需要用到vlog $env(XILINX)/verilog/src/glbl.v这个语句来编译glbl.v
4、使用vivado的IP catalog来生成想要调用的IP,这里以乘法器为例,说明处理过程。
例如如果以mul作为文件名生成一个IP,那么会生成如下的文件:
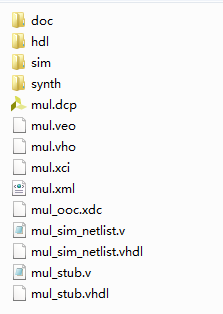
这里有两个文件需要注意,第一个是mul.veo这个文件说明了如何调用IP,另一个文件是mul_sim_netlist.v在后面要在modelsim里仿真的时候这个文件是需要的。
5、仿真
创建一个要仿真的目录,例如tb,然后把上面说的mul_sim_netlist.v这个文件拷贝过去,然后就是添加自己的仿真testbench,然后就是常规的modelsim仿真了,需要注意的是对调用库和glbl.v的处理,下面给一个do的例程。
vlib work
vmap work work
vlog $env(XILINX)/verilog/src/glbl.v
vlog -reportprogress 300 -work work mul_sim_netlist.v
vlog -reportprogress 300 -work work mymul_tb.v
vsim -L work -L SECUREIP -L UNIMACRO_VER -L UNISIMS_VER -L XILINXCORELIB_VER -novopt mymul_tb glbl
dd wave sim:/*
run 100000
特别需要注意的时候,一定要有vlog $env(XILINX)/verilog/src/glbl.v,也要在vsim语句后面的glbl 不可缺少。
下面也附上网上的另外一个方法:
http://www.kommunikationstechnik.org/en/book/export/html/114
How to simulate Xilinx IP cores in Modelsim
This short tutorial explains, how to make the Xilinx IP cores work within Modelsim simulations
The following tasks have to be performed with Administrator privileges
- start Xilinx "Project Navigator" (ISE)
- in the "Edit - Preferences" dialog under "ISE General"->"Integrated Tools"->"Model Tech Simulator", set the path to the "modelsim.exe"
- create a new project in the Xilinx Project Navigator for the desired FPGA
- select your FPGA in the "Sources" tab belonging to the "Implementation" drop-down element
- choose "Compile HDL Simulation Libraries" in the "Design Utilities" in the "Processes" tab with the right mouse button and check for the proper ModelSim path
- double-click on "Compile HDL Simulation Libraries" to start compiling the libraries
- add the following files to the modelsim.ini within the Modelsim directory at the end of the [Library] block (depending on your Xilinx installation, the directories must be modified):
XILINXCORELIB_VER = C:\programme\xilinx\10.1\ISE\verilog\mti_se\XilinxCoreLib_ver
UNISIMS_VER = C:\programme\xilinx\10.1\ISE\verilog\mti_se\unisims_ver
UNIMACRO_VER = C:\programme\xilinx\10.1\ISE\verilog\mti_se\unimacro_ver
SIMPRIMS_VER = C:\programme\xilinx\10.1\ISE\verilog\mti_se\simprims_ver
SECUREIP = C:\programme\xilinx\10.1\ISE\verilog\mti_se\secureip
In the following, Administrator privileges are not necessary anymore:
- to link the libraries within modelsim, call "vsim" within your do script with the parameter "-L XilinxCoreLib_ver" (and "-L unisims_ver", if applicable), e.g. "vsim -novopt my_verilog_testbench -L XilinxCoreLib_ver"
- sometimes, the following command must be included in your do file: vlog $env(XILINX)/verilog/src/glbl.v
- In case the environment variable "XILINX" does not exist, it must be created manually (e.g. "XILINX=C:\Xilinx\13.1\ISE_DS\ISE" )
- sometimes, "work.glbl" must be passed to vsim as additional argument