Tips:以下代码在go1.12.6 windows/amd64版本下测试分析,版本不同在分析源码的时候略有不同。目录
问题产生
最近群里有人提了下面一个问题,源码差不多是这样:
func f1()  {
	s := []int{1,2,3,4,5}
	l := len(s)
	copy(s,s[1:])
	s = s[:l-1]
	fmt.Println(s)
}
可以改成下面这样吗?
func f1()  {
	s := []int{1,2,3,4,5}
	l := len(s)
	s = s[1:l]
	fmt.Println(s)
}
首先,这两种确实都能实现想要的结果,但是源码这样写肯定有它的原因和特定的上下文。现在我们来分析分析,先打印地址看看:
func f1()  {
	s := []int{1,2,3,4,5}
	fmt.Printf("%p %v\n",s,cap(s))
	l := len(s)

	// 第一种
	//copy(s,s[1:])
	//s = s[:l-1]

	// 第二种
    s = s[1:l]

	fmt.Printf("%p %v\n",s,cap(s))
	fmt.Println(s)
}
第一种:
0xc04200a210 5
0xc04200a210 5
[2 3 4 5]
第二种:
0xc042080030 5
0xc042080038 4
[2 3 4 5]由上打印结果可以看出,第二种s指向的底层地址不一样,而且还是偏移0xc042080038-0xc042080030=8,正好是64位系统的int的内存大小,也就是说s指向的底层数组移动了一位,现在的底层数组是[1,2,3,4,5],s是[2,3,4,5],len=4,cap=4。
源码这样写的好处是,s指向的底层数组[2,3,4,5,5],s是[2,3,4,5],len=4,cap=5。所以源码的方式cap更大,在下次append一个元素时候,直接添加到后面,而第二种就要重新分配底层数组了。
截取
既然说到slice的截取,看一下饶大在深入解密slice中讲解。
先了解一下截取操作,例如:
 data := [...]int{0, 1, 2, 3, 4, 5, 6, 7, 8, 9}
 slice := data[2:4:6] // data[low, high, max]
对 data 使用3个索引值,截取出新的 slice。这里 data 可以是数组或者 slice。low 是最低索引值,这里是闭区间,也就是说第一个元素是 data 位于 low 索引处的元素;而 high 和 max 则是开区间,表示最后一个元素只能是索引 high-1 处的元素,而最大容量则只能是索引 max-1 处的元素。high 和 max 必须在底层数组 的容量(cap)范围内,如果超出范围则panic。
- 不指定max,新slice的cap最大值是:底层数组长度-low。
- 指定max,新slice的cap最大值是:max-low。
饶大举了雨痕大佬《Go学习笔记》第四版的一个例子:
package main

import "fmt"

func main() {
    slice := []int{0, 1, 2, 3, 4, 5, 6, 7, 8, 9}
    s1 := slice[2:5]
    s2 := s1[2:6:7]

    s2 = append(s2, 100)
    s2 = append(s2, 200)

    s1[2] = 20

    fmt.Println(s1)
    fmt.Println(s2)
    fmt.Println(slice)
}
[2 3 20]
[4 5 6 7 100 200]
[0 1 2 3 20 5 6 7 100 9]现在,走一遍代码,初始状态如下:
slice := []int{0, 1, 2, 3, 4, 5, 6, 7, 8, 9}
s1 := slice[2:5]
s2 := s1[2:6:7]
s1 从 slice 索引2(闭区间)到索引5(开区间,元素真正取到索引4),长度为3,容量默认到数组结尾,为8。s2 从 s1 的索引2(闭区间)到索引6(开区间,元素真正取到索引5),容量到索引7(开区间,真正到索引6),为5。
接着,向 s2 尾部追加一个元素 100:
s2 = append(s2, 100)s2 容量刚好够,直接追加。不过,这会修改原始数组对应位置的元素。这一改动,数组和 s1 都可以看得到:
再次向 s2 追加元素200:
s2 = append(s2, 200)这时,s2 的容量不够用,该扩容了。于是,s2 另起炉灶,将原来的元素复制新的位置,扩大自己的容量。并且为了应对未来可能的 append 带来的再一次扩容,s2 会在此次扩容的时候多留一些 buffer,将新的容量将扩大为原始容量的2倍,也就是10了。
最后,修改 s1 索引为2位置的元素:
s1[2] = 20这次只会影响原始数组相应位置的元素。它影响不到 s2 了,人家已经远走高飞了。
再提一点,打印 s1 的时候,只会打印出 s1 长度以内的元素。所以,只会打印出3个元素,虽然它的底层数组不止3个元素。
上面4张图来自饶大在深入解密slice
传值还是传指针
先看一个例子:
func main() {
	s := []int{1, 1, 1}
	f(s)
	fmt.Println(s)
}

func f(s []int) {
	s[0] = 100
	s[1] = 100
	s[2] = 100
}
[100 100 100]从结果来看,传递[]int,然后在函数内部修改s有影响到外部的s。但是总是会这样吗?再看:
func main() {
	s := []int{1, 1, 1}
	f(s)
	fmt.Println(s)
}

func f(s []int)  {
	s = append(s,1)
	fmt.Println(s)
}
[1 1 1 1]
[1 1 1]可以发现函数内s和外s并不一样。由前面内容来看,函数内的s因为cap不够重新分配一块内存,然后添加1,所以重新分配的内存并不影响外部s,所以导致不一样。
总结,函数传[]int并不能确保外部slice也会改变,那由上面办法让外部slice肯定会改变呢?如下:
func main() {
	s := []int{1, 1, 1}
	//f1(&s)
	s = f2(s)
	fmt.Println(s)
}

func f1(s *[]int)  {   //传指针
	*s = append(*s,1)
}

func f2(s []int)  []int {  //返回值
	s = append(s,1)
	return s
}
append
append到底会做什么?
package main

import "fmt"

func main() {
	s := []int{1, 1, 1}
	s = append(s,1)
	fmt.Println(s)
}
通过汇编角度来看append会做什么:
"".main STEXT size=283 args=0x0 locals=0x58
        0x0000 00000 (test.go:5)        TEXT    "".main(SB), ABIInternal, $88-0
        0x0000 00000 (test.go:5)        MOVQ    TLS, CX
        0x0009 00009 (test.go:5)        MOVQ    (CX)(TLS*2), CX
        0x0010 00016 (test.go:5)        CMPQ    SP, 16(CX)
        0x0014 00020 (test.go:5)        JLS     273
        0x001a 00026 (test.go:5)        SUBQ    $88, SP
        0x001e 00030 (test.go:5)        MOVQ    BP, 80(SP)
        0x0023 00035 (test.go:5)        LEAQ    80(SP), BP
        0x0028 00040 (test.go:5)        FUNCDATA        $0, gclocals·69c1753bd5f81501d95132d08af04464(SB)
        0x0028 00040 (test.go:5)        FUNCDATA        $1, gclocals·568470801006e5c0dc3947ea998fe279(SB)
        0x0028 00040 (test.go:5)        FUNCDATA        $3, gclocals·bfec7e55b3f043d1941c093912808913(SB)
        0x0028 00040 (test.go:5)        FUNCDATA        $4, "".main.stkobj(SB)
        0x0028 00040 (test.go:6)        PCDATA  $2, $1
        0x0028 00040 (test.go:6)        PCDATA  $0, $0
        0x0028 00040 (test.go:6)        LEAQ    type.[3]int(SB), AX  //类型是[3]int 放入AX
        0x002f 00047 (test.go:6)        PCDATA  $2, $0
        0x002f 00047 (test.go:6)        MOVQ    AX, (SP)      //runtime.newobject参数
        0x0033 00051 (test.go:6)        CALL    runtime.newobject(SB)
        0x0038 00056 (test.go:6)        PCDATA  $2, $1
        0x0038 00056 (test.go:6)        MOVQ    8(SP), AX
        0x003d 00061 (test.go:6)        MOVQ    "".statictmp_0(SB), CX
        0x0044 00068 (test.go:6)        MOVQ    CX, (AX)
        0x0047 00071 (test.go:6)        MOVUPS  "".statictmp_0+8(SB), X0
        0x004e 00078 (test.go:6)        MOVUPS  X0, 8(AX)
        0x0052 00082 (test.go:7)        PCDATA  $2, $2
        0x0052 00082 (test.go:7)        LEAQ    type.int(SB), CX
        0x0059 00089 (test.go:7)        PCDATA  $2, $1
        0x0059 00089 (test.go:7)        MOVQ    CX, (SP) //growslice第一个参数 et *_type,从27行看出是int类型参数地址
        0x005d 00093 (test.go:7)        PCDATA  $2, $0
        0x005d 00093 (test.go:7)        MOVQ    AX, 8(SP)  //growslice第二个参数是old slice,slice是一个由底层数组指针、len和cap组成的结构体。 8(SP)表示底层数组指针。
        0x0062 00098 (test.go:7)        MOVQ    $3, 16(SP) //len = 3
        0x006b 00107 (test.go:7)        MOVQ    $3, 24(SP) //cap = 3
        0x0074 00116 (test.go:7)        MOVQ    $4, 32(SP) //growslice第三个参数是 cap int,等于4
        0x007d 00125 (test.go:7)        CALL    runtime.growslice(SB)
        0x0082 00130 (test.go:7)        PCDATA  $2, $1
        0x0082 00130 (test.go:7)        MOVQ    40(SP), AX  //growslice返回值slice。分别是底层数组指针、len和cap。 AX是底层数组指针
        0x0087 00135 (test.go:7)        MOVQ    48(SP), CX  //CX 是len = 3(返回的len是old.len通过下面growslice函数返回可知)
        0x008c 00140 (test.go:7)        MOVQ    56(SP), DX  //DX 是cap = 6
        0x0091 00145 (test.go:7)        MOVQ    $1, 24(AX)  //AX偏移24个字节,正好是新的slice[3]得地址,所以slice[3] = 1
        0x0099 00153 (test.go:8)        PCDATA  $2, $0
        0x0099 00153 (test.go:8)        MOVQ    AX, (SP)   //convTslice函数将slice的底层struct转成eface,因为fmt.Println参数是interface{}。convTslice参数是[]byte, 第一个8字节是 底层数组指针,第二个8字节是len,第三个8字节是cap
        0x009d 00157 (test.go:7)        LEAQ    1(CX), AX
        0x00a1 00161 (test.go:8)        MOVQ    AX, 8(SP)  //AX= CX+1=4
        0x00a6 00166 (test.go:8)        MOVQ    DX, 16(SP) //第三个8字节是 DX = 6
        0x00ab 00171 (test.go:8)        CALL    runtime.convTslice(SB)
        0x00b0 00176 (test.go:8)        PCDATA  $2, $1
        0x00b0 00176 (test.go:8)        MOVQ    24(SP), AX //convTslice返回值
        0x00b5 00181 (test.go:8)        PCDATA  $0, $1
        0x00b5 00181 (test.go:8)        XORPS   X0, X0
        0x00b8 00184 (test.go:8)        MOVUPS  X0, ""..autotmp_12+64(SP)
        0x00bd 00189 (test.go:8)        PCDATA  $2, $2
        0x00bd 00189 (test.go:8)        LEAQ    type.[]int(SB), CX
        0x00c4 00196 (test.go:8)        PCDATA  $2, $1
        0x00c4 00196 (test.go:8)        MOVQ    CX, ""..autotmp_12+64(SP) //临时栈变量
        0x00c9 00201 (test.go:8)        PCDATA  $2, $0
        0x00c9 00201 (test.go:8)        MOVQ    AX, ""..autotmp_12+72(SP)
        0x00ce 00206 (test.go:8)        XCHGL   AX, AX
        0x00cf 00207 ($GOROOT\src\fmt\print.go:275)     PCDATA  $2, $1
        0x00cf 00207 ($GOROOT\src\fmt\print.go:275)     MOVQ    os.Stdout(SB), AX
        0x00d6 00214 ($GOROOT\src\fmt\print.go:275)     PCDATA  $2, $2
        0x00d6 00214 ($GOROOT\src\fmt\print.go:275)     LEAQ    go.itab.*os.File,io.Writer(SB), CX
        0x00dd 00221 ($GOROOT\src\fmt\print.go:275)     PCDATA  $2, $1
        0x00dd 00221 ($GOROOT\src\fmt\print.go:275)     MOVQ    CX, (SP)
        0x00e1 00225 ($GOROOT\src\fmt\print.go:275)     PCDATA  $2, $0
        0x00e1 00225 ($GOROOT\src\fmt\print.go:275)     MOVQ    AX, 8(SP)
        0x00e6 00230 ($GOROOT\src\fmt\print.go:275)     PCDATA  $2, $1
        0x00e6 00230 ($GOROOT\src\fmt\print.go:275)     PCDATA  $0, $0
        0x00e6 00230 ($GOROOT\src\fmt\print.go:275)     LEAQ    ""..autotmp_12+64(SP), AX
        0x00eb 00235 ($GOROOT\src\fmt\print.go:275)     PCDATA  $2, $0
        0x00eb 00235 ($GOROOT\src\fmt\print.go:275)     MOVQ    AX, 16(SP)
        0x00f0 00240 ($GOROOT\src\fmt\print.go:275)     MOVQ    $1, 24(SP)
        0x00f9 00249 ($GOROOT\src\fmt\print.go:275)     MOVQ    $1, 32(SP)
        0x0102 00258 ($GOROOT\src\fmt\print.go:275)     CALL    fmt.Fprintln(SB)
        0x0107 00263 (<unknown line number>)    MOVQ    80(SP), BP
        0x010c 00268 (<unknown line number>)    ADDQ    $88, SP
        0x0110 00272 (<unknown line number>)    RET
        0x0111 00273 (<unknown line number>)    NOP
        0x0111 00273 (test.go:5)        PCDATA  $0, $-1
        0x0111 00273 (test.go:5)        PCDATA  $2, $-1
        0x0111 00273 (test.go:5)        CALL    runtime.morestack_noctxt(SB)
        0x0116 00278 (test.go:5)        JMP     0
说明:
- newobject(SB) 函数创建对象,在Go/runtime/malloc.go
- convTslice旧版本是convT2Eslice函数,在Go/runtime/iface.go
- slice底层数据结构:
type slice struct {
	array unsafe.Pointer
	len   int
	cap   int
}
从汇编来看:
0x007d 00125 (test.go:7) CALL runtime.growslice(SB)源码第7行CALL(调用)函数runtime.growslice,该函数源码在Go/runtime/slice.go,如下(删减版+注解):
//et *_type:slice元素类型
//old slice:旧的slice
//cat int:新slice需要的最小cap
func growslice(et *_type, old slice, cap int) slice {
	//...

	newcap := old.cap
	doublecap := newcap + newcap
	if cap > doublecap {
		newcap = cap
	} else {
		if old.len < 1024 { //当原 slice 容量小于 1024 的时候,新 slice 容量变成原来的 2 倍
			newcap = doublecap
		} else {  //原 slice 容量超过 1024,新 slice 容量变成原来的1.25倍。
			for 0 < newcap && newcap < cap {
				newcap += newcap / 4
			}

			if newcap <= 0 {
				newcap = cap
			}
		}
	}

    //字节对齐相关,主要是roundupsize函数
	var overflow bool
	var lenmem, newlenmem, capmem uintptr
	switch {
	case et.size == 1:
		lenmem = uintptr(old.len)
		newlenmem = uintptr(cap)
		capmem = roundupsize(uintptr(newcap))
		overflow = uintptr(newcap) > maxAlloc
		newcap = int(capmem)
	case et.size == sys.PtrSize:
		lenmem = uintptr(old.len) * sys.PtrSize
		newlenmem = uintptr(cap) * sys.PtrSize
		capmem = roundupsize(uintptr(newcap) * sys.PtrSize)
		overflow = uintptr(newcap) > maxAlloc/sys.PtrSize
		newcap = int(capmem / sys.PtrSize)
	case isPowerOfTwo(et.size):
		var shift uintptr
		if sys.PtrSize == 8 {
			// Mask shift for better code generation.
			shift = uintptr(sys.Ctz64(uint64(et.size))) & 63
		} else {
			shift = uintptr(sys.Ctz32(uint32(et.size))) & 31
		}
		lenmem = uintptr(old.len) << shift
		newlenmem = uintptr(cap) << shift
		capmem = roundupsize(uintptr(newcap) << shift)
		overflow = uintptr(newcap) > (maxAlloc >> shift)
		newcap = int(capmem >> shift)
	default:
		lenmem = uintptr(old.len) * et.size
		newlenmem = uintptr(cap) * et.size
		capmem, overflow = math.MulUintptr(et.size, uintptr(newcap))
		capmem = roundupsize(capmem)
		newcap = int(capmem / et.size)
	}

    //...

	if overflow || capmem > maxAlloc {
		panic(errorString("growslice: cap out of range"))
	}

	var p unsafe.Pointer
	if et.kind&kindNoPointers != 0 {
		p = mallocgc(capmem, nil, false)  //不包含指针的对象分配内存
		memclrNoHeapPointers(add(p, newlenmem), capmem-newlenmem) //先把P指针从p+0移到p+newlenmem,然后把p+newlenmem后面的内存清零
	} else {
		p = mallocgc(capmem, et, true)  //包含指针的对象分配内存
		if writeBarrier.enabled {
			bulkBarrierPreWriteSrcOnly(uintptr(p), uintptr(old.array), lenmem)
		}
	}
	memmove(p, old.array, lenmem)  //将old.array复制lenmem字节到P

	return slice{p, old.len, newcap}
}
上面提到roundupsize函数进行内存对齐,根据go内存分配知识,go小内存(67种规格大小的内存)和大内存(大于32kb)。class_to_size通过 spanClass获取 span划分的 object大小。而 size_to_class8 表示通过 size(即newcap*ptrSize) 获取它的 spanClass,详细参考详解大彬的Go内存分配。
总之,从growslice函数看出append扩容规则:扩容策略并不是简单的扩为原切片容量的 2 倍或 1.25 倍,还有内存对齐的操作。扩容后的容量 >= 原容量的 2 倍或 1.25 倍。
再看一个例子:
func main() {
	s := []int{1,2}
	s = append(s,4,5,6)
	fmt.Printf("len=%d, cap=%d",len(s),cap(s))
}
len=5, cap=6要是以前的认知肯定认为cap=8,但是这里确实cap=6?我们再看看growslice源码:中 s 原来只有 2 个元素,len 和 cap 都为 2,append 了三个元素后,长度变为 3,容量最小要变成 5,即调用 growslice 函数时,传入的第三个参数应该为 5。即 cap=5。而一方面,doublecap 是原 slice容量的 2 倍,等于 4。满足第一个 if 条件,所以 newcap 变成了 5。接着调用了 roundupsize 函数,传入 40。(代码中ptrSize是指一个指针的大小,在64位机上是8)。所以(size+smallSizeDiv-1)/smallSizeDiv = 5;获取 size_to_class8 数组中索引为 5 的元素为 4;获取 class_to_size 中索引为 4 的元素为 48。最终,newcap = int(capmem / ptrSize) newcap == 6。
扩展--堆内存分配
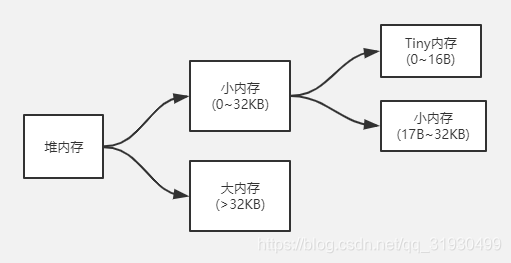
上面竟然说到Go语言堆内存分配,关注一下mallocgc分配堆内存的函数,Go语言堆内存大小分为两种:
mallocgc源码(删减版+注解):
func mallocgc(size uintptr, typ *_type, needzero bool) unsafe.Pointer {
	//...

	// Set mp.mallocing to keep from being preempted by GC.
	mp := acquirem()
	if mp.mallocing != 0 {
		throw("malloc deadlock")
	}
	if mp.gsignal == getg() {
		throw("malloc during signal")
	}
	mp.mallocing = 1

	shouldhelpgc := false
	dataSize := size
	c := gomcache()   //当前运行goroutine的P上的mcache
	var x unsafe.Pointer
	noscan := typ == nil || typ.kind&kindNoPointers != 0 // noscan == true:不包含指针对象无需GC扫描
	if size <= maxSmallSize {
		if noscan && size < maxTinySize { //0~16B
			// Tiny allocator.
			//
			// Tiny allocator combines several tiny allocation requests
			// into a single memory block. The resulting memory block
			// is freed when all subobjects are unreachable. The subobjects
			// must be noscan (don't have pointers), this ensures that
			// the amount of potentially wasted memory is bounded.
			//
			// Size of the memory block used for combining (maxTinySize) is tunable.
			// Current setting is 16 bytes, which relates to 2x worst case memory
			// wastage (when all but one subobjects are unreachable).
			// 8 bytes would result in no wastage at all, but provides less
			// opportunities for combining.
			// 32 bytes provides more opportunities for combining,
			// but can lead to 4x worst case wastage.
			// The best case winning is 8x regardless of block size.
			//
			// Objects obtained from tiny allocator must not be freed explicitly.
			// So when an object will be freed explicitly, we ensure that
			// its size >= maxTinySize.
			//
			// SetFinalizer has a special case for objects potentially coming
			// from tiny allocator, it such case it allows to set finalizers
			// for an inner byte of a memory block.
			//
			// The main targets of tiny allocator are small strings and
			// standalone escaping variables. On a json benchmark
			// the allocator reduces number of allocations by ~12% and
			// reduces heap size by ~20%.
			off := c.tinyoffset
			// Align tiny pointer for required (conservative) alignment.
			if size&7 == 0 {
				off = round(off, 8)
			} else if size&3 == 0 {
				off = round(off, 4)
			} else if size&1 == 0 {
				off = round(off, 2)
			}
			if off+size <= maxTinySize && c.tiny != 0 {
				// The object fits into existing tiny block.
                                //如果tiny block还能放下size大小内存
				x = unsafe.Pointer(c.tiny + off)
				c.tinyoffset = off + size
				c.local_tinyallocs++
				mp.mallocing = 0
				releasem(mp)
				return x
			}
			// Allocate a new maxTinySize block.
                        /*创建一个新的tiny block内存
                        通过源码知道tinySpanClass == 5 且 noscan = true 所以通过
                        makeSpanClass函数知道,span class是2即对应class_to_size[2]=16
                        正好是tiny小对象的最大内存。*/
			span := c.alloc[tinySpanClass]
			v := nextFreeFast(span) //从本地mcache上获取
			if v == 0 {
				v, _, shouldhelpgc = c.nextFree(tinySpanClass) //从公共mcentral上获取
			}
			x = unsafe.Pointer(v)
			(*[2]uint64)(x)[0] = 0  //初始化0-7字节内存
			(*[2]uint64)(x)[1] = 0  //初始化8-15字节内存
			// See if we need to replace the existing tiny block with the new one
			// based on amount of remaining free space.
			if size < c.tinyoffset || c.tiny == 0 {
				c.tiny = uintptr(x)
				c.tinyoffset = size
			}
			size = maxTinySize
		} else { //17B~32KB
			var sizeclass uint8
			if size <= smallSizeMax-8 {
				sizeclass = size_to_class8[(size+smallSizeDiv-1)/smallSizeDiv]
			} else {
				sizeclass = size_to_class128[(size-smallSizeMax+largeSizeDiv-1)/largeSizeDiv]
			}
			size = uintptr(class_to_size[sizeclass])
			spc := makeSpanClass(sizeclass, noscan)
			span := c.alloc[spc]
			v := nextFreeFast(span)
			if v == 0 {
				v, span, shouldhelpgc = c.nextFree(spc)
			}
			x = unsafe.Pointer(v)
			if needzero && span.needzero != 0 {
				memclrNoHeapPointers(unsafe.Pointer(v), size)
			}
		}
	} else { // >32KB
		var s *mspan
		shouldhelpgc = true
		systemstack(func() {       //系统调用,在系统thread上执行大内存分配函数largeAlloc
			s = largeAlloc(size, needzero, noscan)
		})
		s.freeindex = 1
		s.allocCount = 1
		x = unsafe.Pointer(s.base())
		size = s.elemsize
	}

        //含指针对象,设置GC bitmap
	var scanSize uintptr
	if !noscan {
		// If allocating a defer+arg block, now that we've picked a malloc size
		// large enough to hold everything, cut the "asked for" size down to
		// just the defer header, so that the GC bitmap will record the arg block
		// as containing nothing at all (as if it were unused space at the end of
		// a malloc block caused by size rounding).
		// The defer arg areas are scanned as part of scanstack.
		if typ == deferType {
			dataSize = unsafe.Sizeof(_defer{})
		}
		heapBitsSetType(uintptr(x), size, dataSize, typ)
		if dataSize > typ.size {
			// Array allocation. If there are any
			// pointers, GC has to scan to the last
			// element.
			if typ.ptrdata != 0 {
				scanSize = dataSize - typ.size + typ.ptrdata
			}
		} else {
			scanSize = typ.ptrdata
		}
		c.local_scan += scanSize
	}

	// Ensure that the stores above that initialize x to
	// type-safe memory and set the heap bits occur before
	// the caller can make x observable to the garbage
	// collector. Otherwise, on weakly ordered machines,
	// the garbage collector could follow a pointer to x,
	// but see uninitialized memory or stale heap bits.
	publicationBarrier()

	// Allocate black during GC.
	// All slots hold nil so no scanning is needed.
	// This may be racing with GC so do it atomically if there can be
	// a race marking the bit.
	if gcphase != _GCoff {
		gcmarknewobject(uintptr(x), size, scanSize)
	}

	if raceenabled {
		racemalloc(x, size)
	}

	if msanenabled {
		msanmalloc(x, size)
	}

	mp.mallocing = 0
	releasem(mp)

	//...

	return x
}
有几个小知识点:
- 系统调用:即OS Thread call,OS thread调用函数。参数一般使用函数定义的字面量,这样函数的参数和返回值可以直接使用上下文的参数。比如上面函数systemstack(func(){ s = largeAlloc(size, needzero, noscan)})
- 对于不含指针的对象,GC的时候不需要再scan,直接GC对象;对于包含指针的对象,GC的时候需要scan,看看哪些地方都引用该对象,然后对其都要GC。
参考地址: