原帖地址:http://blog.csdn.net/roderick2015/article/details/52846240,转载请注明。
我们先回顾下在Web应用中构建SpringMVC框架的大体流程:
1.使用Maven等工具引入依赖(依赖的jar包还不少)。
2.在web.xml中配置DispatcherServlet。
3.创建spring-mvc.xml文件,在这里写上我们对SpringMVC的定制化配置(或者使用注解类的方式)。
4.编写Controller类,使用注解的方式指定与URL对应的处理方法(当然你可能还得准备JSP之类的页面)。
5.发布到Web容器(本帖使用的是Tomcat)并启动。
整个流程并不复杂,但每个步骤所涉及的东西比较多,一不小心配错可就糟糕了。但这参与感十足的配置方式除了它的灵活性外,也能让我们更加清楚框架在为我们服务之前,到底做了哪些事情,接下来我们就到源码中去看看SpringMVC的核心入口类DispatcherServlet在Web容器启动后做了哪些准备。
从DispatcherServlet的名字可以知道它是个Servlet,我们看下它在web.xml中的具体配置,代码如下所示。
    <servlet>
        //servlet的名字
        <servlet-name>dispatcher</servlet-name>
        //指定具体的类
        <servlet-class>org.springframework.web.servlet.DispatcherServlet</servlet-class>
        //以类似HashMap中key和value的方式给servlet配置一些参数信息
        <init-param>
            //指定context配置文件的路径
            <param-name>contextConfigLocation</param-name>
            <param-value>classpath:/spring-mvc.xml</param-value>
        </init-param>
        <init-param>
            //不要在意这个参数,帖子后面会提到的
            <param-name>publishContext</param-name>
            <param-value>true</param-value>
        </init-param>
        //大于或等于1表示web容器在启动的时候就会调用,值越大优先级越高
        //0或-1表示在第一次被使用的时候才会调用
        <load-on-startup>1</load-on-startup>
    </servlet>

    //url路径映射
    <servlet-mapping>
        <servlet-name>dispatcher</servlet-name>
        <url-pattern>/</url-pattern>
    </servlet-mapping>
接着看它的继承体系,如下图所示。
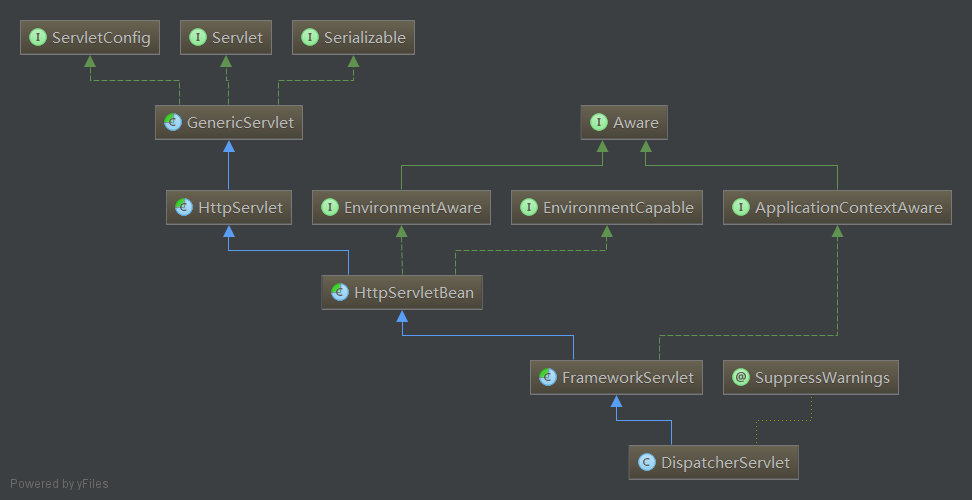
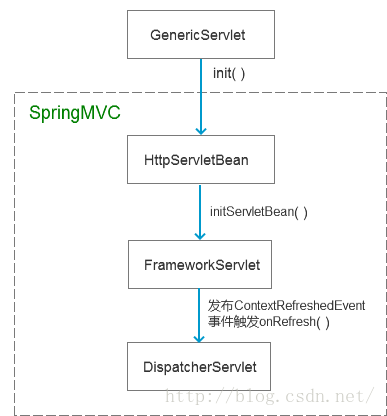
图中可以很清晰地看到DispatcherServlet的继承主线是比较单一的:DispatcherServlet —> FrameworkServlet —> HttpServletBean,我们主要分析这三个类,后面的HttpServlet到Servlet接口属于Java的Servlet原生代码,其中GenericServlet也参与了初始化,整个初始化流程如下图所示。
声明:本帖所示的代码一律省略源码中的log日志输出,以精简阅读。
在 Tomcat启动时会加载应用的Web.xml文件,这时就会扫描到DispatchServlet,然后调用init方法进行初始化(就是Servlet接口的init方法嘛),该方法的具体实现在DispatchServlet的父类GenericServlet中,也是DispatchServlet初始化的入口。
GenericServlet
GenericServlet初始化的时候就干了两件事:
1.接收Tomcat传过来的ServletConfig。
2.调用空方法init,供子类覆写实现后续的初始化。
public void init(ServletConfig config) throws ServletException {
this.config = config;
this.init();
}
public void init() throws ServletException {
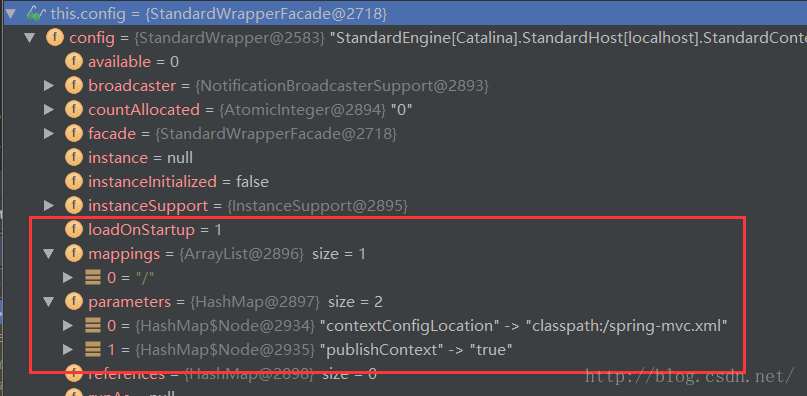
}这里看下config里面到底装了什么东西,如下图所示。

StandardWrapper和ApplicationContextFacade都是Tomcat中的对象,本帖不作详细说明,只需要知道ApplicationContextFacade里放的是整个Web应用的上下文信息,StandardWrapper则是针对DispatchServlet的,它两的作用域不同。如下图所示,可以看到我们在Web.xml文件中配置的相关数据。
HttpServletBean
接着HttpServletBean作为子类覆写了GenericServlet的init方法,代码如下所示。
    @Override
    public final void init() throws ServletException {
        try {
            PropertyValues pvs = new ServletConfigPropertyValues(getServletConfig(), this.requiredProperties);
            BeanWrapper bw = PropertyAccessorFactory.forBeanPropertyAccess(this);
            ResourceLoader resourceLoader = new ServletContextResourceLoader(getServletContext());
            bw.registerCustomEditor(Resource.class, new ResourceEditor(resourceLoader, getEnvironment()));
            initBeanWrapper(bw);
            bw.setPropertyValues(pvs, true);
        }
        catch (BeansException ex) {
            throw ex;
        }

        //进一步初始化,与GenericServlet的套路一样,供子类(FrameworkServlet)覆写
        initServletBean();
}总的来说,这里只干了三件事:
1.把DispatchServlet封装成BeanWrapper。
2.给BeanWrapper设置属性。
3.调用空方法initServletBean,让子类接着干。
好,我们再逐行看下init方法中的代码。
PropertyValues pvs = new ServletConfigPropertyValues(getServletConfig(), this.requiredProperties);ServletConfigPropertyValues的作用是从GenericServlet的config中取出我们在Web.xml中配置的信息, 生成对应的PropertyValue对象,由于我们可以配置多条参数信息,所以最后放入List< PropertyValue >集合中管理,这个集合由MutablePropertyValues类维护。ServletConfigPropertyValues的实现方式是开闭原则的体现,它作为HttpServletBean的内部类继承MutablePropertyValues,再通过扩展的方式写入自身的处理逻辑,最后看下继承关系就很明显了,如下图所示。

BeanWrapper bw = PropertyAccessorFactory.forBeanPropertyAccess(this);这句代码就是把this(DispatchServlet)封装成BeanWrapperImpl对象,然后由它的父类接口BeanWrapper接收引用,使用了简单工厂模式。
ResourceLoader resourceLoader = new ServletContextResourceLoader(getServletContext());
bw.registerCustomEditor(Resource.class, new ResourceEditor(resourceLoader, getEnvironment()));
给BeanWrapper注册自定义的PropertyEditor,其中ResourceEditor用来把加载的文件或者URL等资源转成统一的Resource对象,为什么需要传入ResourceLoader参数呢,因为它是负责加载资源的啊,而ResourceEditor是定义如何转换的,就好比ResourceLoader负责买菜洗好切好,ResourceEditor提供菜谱,那谁负责炒菜呢?答案是TypeConverter,这个接口我会在后面提到。那ResourceLoader还在哪里用到过呢?我们看看Spring中的下面这句代码,你一定不会陌生。
ApplicationContext ctx = new ClassPathXmlApplicationContext("conf/appContext.xml"); 为什么ApplicationContext作为容器但也可以加载路径资源呢?因为他的两大父类接口,第一个是BeanFactory,第二个就是ResourceLoader了,这样是不是就好理解了呢。这里还使用到了getEnvironment方法,那Environment里又有什么?
别着急,其实这些大部分都是SpringFramework的知识,我会在文章末尾展开说明。
FrameworkServlet
FrameworkServlet手握接力棒,继续初始化之旅。
    @Override
    protected final void initServletBean() throws ServletException {
        try {
            this.webApplicationContext = initWebApplicationContext();
            initFrameworkServlet();
        }
        catch (ServletException ex) {
            throw ex;
        }
        catch (RuntimeException ex) {
            throw ex;
        }
    }
这个方法实际干活的只有两行代码,其余的都是log输出和异常处理,而initFrameworkServlet是空方法,目前并没有被使用,所以我们只剩一句代码需要分析了,initWebApplicationContext方法的作用就是创建并初始化WebApplicationContext容器,具体代码实现如下所示。
    protected WebApplicationContext initWebApplicationContext() {
        //获取根容器
        WebApplicationContext rootContext =
            WebApplicationContextUtils.getWebApplicationContext(getServletContext());
        WebApplicationContext wac = null;

        //如果是调用ServletContext对象的addServlet方法添加的Servlet,
        //然后在构造函数中传入webApplicationContext,则采用下面的方式配置。
        if (this.webApplicationContext != null) {
            wac = this.webApplicationContext;
            if (wac instanceof ConfigurableWebApplicationContext) {
                ConfigurableWebApplicationContext cwac = (ConfigurableWebApplicationContext) wac;
                if (!cwac.isActive()) {
                    if (cwac.getParent() == null) {
                        cwac.setParent(rootContext);
                    }
                    configureAndRefreshWebApplicationContext(cwac);
                }
            }
        }

        //与获取根容器的原理类似,只是寻找的key由Web.xml中Servlet <init-param>标签的
        //contextAttribute参数指定。
        if (wac == null) {
            wac = findWebApplicationContext();
        }

        //最后还没找到,就自己创建一个,正常配置的话就是采用这个方法。
        if (wac == null) {
            wac = createWebApplicationContext(rootContext);
        }

        if (!this.refreshEventReceived) {
            onRefresh(wac);
        }

        //本帖的Web.xml中是配置了该参数的,设置为true时,会把刚创建的WebApplicationContext
        //对象作为Attribute属性放入ServletContext中,key值是
        //FrameworkServlet.SERVLET_CONTEXT_PREFIX + 当前Servlet的名称,默认值是false。
        if (this.publishContext) {
            String attrName = getServletContextAttributeName();
            getServletContext().setAttribute(attrName, wac);
        }

        return wac;
    }
这里说明一下是如何获取根容器的,还记得我们在web.xml中给Spring配置的那个监听器吗,如下所示。
    <listener>
        <listener-class>org.springframework.web.context.ContextLoaderListener</listener-class>
    </listener>
它会在Tomcat启动的时候触发监听创建WebApplicationContext容器(为什么是WebApplicationContext?因为我们是Web应用啊)然后解析我们的配置文件(比如spring.xml)装配容器,最后以org.springframework.web.context.WebApplicationContext.ROOT作为key放入ServletContext中,这里的ServletContext其实是GenericServlet中config的ApplicationContextFacade对象,如果没有配置Spring则没有父容器,SpringMVC会负责加载所有的bean来提供IOC功能,但是配了Spring就会出现双容器的情况,这时候bean该由谁加载,就得注意区分了,一般情况下SpringMVC容器管理Controller组件,其它的交给Spring容器管理。
接下来我们看下createWebApplicationContext方法,是怎么创建Web容器的,代码如下所示。
    protected WebApplicationContext createWebApplicationContext(ApplicationContext parent) {
        //这里决定了要创建的容器类型,默认是XmlWebApplicationContext,
        //可以在<init-param>中配置contextClass参数指定类型。
        Class<?> contextClass = getContextClass();
        //这个类型必须属于ConfigurableWebApplicationContext,否则抛出异常。
        if (!ConfigurableWebApplicationContext.class.isAssignableFrom(contextClass)) {
            throw new ApplicationContextException(
                    "Fatal initialization error in servlet with name '" + getServletName() +
                    "': custom WebApplicationContext class [" + contextClass.getName() +
                    "] is not of type ConfigurableWebApplicationContext");
        }

        //创建对象,然后给context配置各种属性,
        //这也是为啥我们需要ConfigurableWebApplicationContext的类型
        ConfigurableWebApplicationContext wac =
                (ConfigurableWebApplicationContext) BeanUtils.instantiateClass(contextClass);

        //放入HttpServletBean里创建的环境对象
        wac.setEnvironment(getEnvironment());
        //设置父容器
        wac.setParent(parent);
        //将我们指定的context配置文件的路径放进去,如果没有指定默认传入
        //WEB-INFO/[Servlet的名字]-Servlet.xml
        wac.setConfigLocation(getContextConfigLocation());
        //进一步配置其它属性
        configureAndRefreshWebApplicationContext(wac);

        return wac;
    }
再看configureAndRefreshWebApplicationContext方法,代码如下所示。
    protected void configureAndRefreshWebApplicationContext(ConfigurableWebApplicationContext wac) {
        if (ObjectUtils.identityToString(wac).equals(wac.getId())) {
            if (this.contextId != null) {
                wac.setId(this.contextId);
            }
            else {
            //就是把它的id由org.springframework.web.context.support.XmlWebApplicationContext@c335c0c
            //改成了基于Servlet名字的org.springframework.web.context.WebApplicationContext:/dispatcher,
            //官方文档说是替换成一个更有意义的ID
                wac.setId(ConfigurableWebApplicationContext.APPLICATION_CONTEXT_ID_PREFIX +
                        ObjectUtils.getDisplayString(getServletContext().getContextPath()) + "/" + getServletName());
            }
        }

        //配置ServletContext,放进去的是ApplicationContextFacade对象
        wac.setServletContext(getServletContext());
        //配置ServletConfig,StandardWrapperFacade对象
        wac.setServletConfig(getServletConfig());
        //配置命名空间,默认是[Servlet的名字]-servlet
        wac.setNamespace(getNamespace());
        //添加监听器,监听ContextRefreshedEvent事件,该事件会在WebApplicationContext初始化完毕或者主动调用
        //refresh()方法时触发,比如Spring容器加载完context配置文件后就会触发,所以会触发多次,触发后调用
        //onApplicationEvent方法,这个后面再讲。
        wac.addApplicationListener(new SourceFilteringListener(wac, new ContextRefreshListener()));

        //补全之前创建的StandardServletEnvironment对象
        ConfigurableEnvironment env = wac.getEnvironment();
        if (env instanceof ConfigurableWebEnvironment) {
            ((ConfigurableWebEnvironment) env).initPropertySources(getServletContext(), getServletConfig());
        }

        //空方法,也是供子类扩展的,目前还没有使用
        postProcessWebApplicationContext(wac);
        //主要是为了在调用refresh方法之前做一些准备工作
        applyInitializers(wac);
        //主动调用refresh方法,触发上面刚添加的监听器
        wac.refresh();
}看完代码后,需要弄清两个问题:
1.ConfigurableWebEnvironment的initPropertySources方法对StandardServletEnvironment对象做了啥?
2.wac.refresh()是怎么触发监听事件的?
先看第一个问题,这里其实是填补了之前在HttpServletBean中留下的坑(详见文章末尾问题3),这里调用了StandardServletEnvironment的第二个方法填补了占位符的位置,把servletContext和servletConfig加进去了,而且是赶在refresh方法之前加进去的,便于后面调用,结果如下图所示。
这样我们就可以在Environment里取到这两个对象了,这个在开发中是非常有用的,比如我们可以把数据作为attribute放入servletContext中实现共享。

再看第二个问题,其实它调用的是父类AbstractApplicationContext中的refresh()方法,此时SpringMVC容器就会开始加载spring-mvc.xml文件,这个过程与Spring容器的配置类似,装配bean、注册listener等等,不过这属于容器的初始化了,过程更为复杂。配置完毕后发布ContextRefreshedEvent事件,触发调用onApplicationEvent方法,代码如下所示。
    public void onApplicationEvent(ContextRefreshedEvent event) {
        //设为true,其他地方则根据该标志位不再调用refresh方法,保证下面的onRefresh方法只会被调用一次
        this.refreshEventReceived = true;
        //这个ApplicationContext是事件的发起者,我们刚刚创建出来的WebApplicationContext
        onRefresh(event.getApplicationContext());
    }
    //给子类覆写扩展的,这个正是DispatcherServlet类初始化的入口
    protected void onRefresh(ApplicationContext context) {

    }
DispatcherServlet
我们的主角DispatcherServlet类终于要出场了,它的onRefresh方法代码如下所示。
    @Override
    protected void onRefresh(ApplicationContext context) {
        //将初始化策略和onRefresh方法分开,让子类灵活扩展
        initStrategies(context);
    }

    //将整个处理流程分成九个部分,处理非常灵活,我们可以在配置文件中对这些组件进行定制,
    //这也正是SpringMVC最为核心的部分
    protected void initStrategies(ApplicationContext context) {
        //处理文件上传请求
        initMultipartResolver(context);
        //国际化处理
        initLocaleResolver(context);
        //解析主题配置
        initThemeResolver(context);
        //把request映射到具体的处理器上(负责找handler)
        initHandlerMappings(context);
        //调用处理器来处理(负责让handler干活)
        initHandlerAdapters(context);
        //解析过程出了问题就交给我
        initHandlerExceptionResolvers(context);
        //从request中获取viewName
        initRequestToViewNameTranslator(context);
        //将我们返回的视图名字符串(如hello.jsp)解析为具体的view对象
        initViewResolvers(context);
        //管理FlashMap,主要用于redirect
        initFlashMapManager(context);
    }
代码注释部分已经简单介绍了各组件的功能,而它们初始化的套路是很类似的,因此我们这里看下比较熟悉的ViewResolver组件是如何初始化的就行了。
    private void initViewResolvers(ApplicationContext context) {
        this.viewResolvers = null;

        if (this.detectAllViewResolvers) {
            //到容器(包括父容器)中查找ViewResolver.class类型的bean,这也是为啥我们在配置文件里
            //只需要指定类而不用命名,详情见后面的讲解。
            Map<String, ViewResolver> matchingBeans =
                    BeanFactoryUtils.beansOfTypeIncludingAncestors(context, ViewResolver.class, true, false);
            if (!matchingBeans.isEmpty()) {
                //因为可以匹配到多个,所以放入list中管理
                this.viewResolvers = new ArrayList<ViewResolver>(matchingBeans.values());
                //排序,决定优先使用哪个来解析视图
                OrderComparator.sort(this.viewResolvers);
            }
        }
        else {
            try {
                //只以viewResolver名字去查找
                ViewResolver vr = context.getBean(VIEW_RESOLVER_BEAN_NAME, ViewResolver.class);
                this.viewResolvers = Collections.singletonList(vr);
            }
            catch (NoSuchBeanDefinitionException ex) {
                // Ignore, we'll add a default ViewResolver later.
            }
        }

        //如果没有配置或者找到viewResolver,就采用默认的组件,其他组件初始化也是这思路。
        if (this.viewResolvers == null) {
            this.viewResolvers = getDefaultStrategies(context, ViewResolver.class);
        }
    }
比如我们对viewResolver最常用的配置如下所示。
    //InternalResourceViewResolver就是用来解析JSP的,其实默认采用的也是这个组件
    <bean class="org.springframework.web.servlet.view.InternalResourceViewResolver">
        //配置统一的前缀路径
        <property name="prefix" value="/WEB-INF/views/" />
        //配置统一的后缀名
        <property name="suffix" value=".jsp" />
    </bean>
再看下从容器中找到的viewResolver长啥样,如下图所示。

默认的组件信息保存在一个叫做DispatcherServlet.properties的文件里面,DispatcherServlet类在一开始就把内容加载到了defaultStrategies属性里(使用了静态代码块),该文件的路径如下图所示。

总结
最后回顾一下,Web容器启动后(发起调用),GenericServlet接收上下文对象,HttpServletBean给属性赋值,FrameworkServlet负责创建并初始化WebApplicationContext容器,最后DispatcherServlet初始化九大组件,一切准备就绪就等Request进来了,在下篇帖子《SpringMVC源码之DispatchServlet请求处理》中我们将了解是如何处理http请求的。
Spring Framework知识扩展
根据文中的内容,这里列出三个问题,内容较多请按需查看。
1.什么是BeanWrapper?
2.BeanWrapper是怎么设置属性的?
3.getEnvironment方法干了什么?
第一个问题
从定义上看BeanWrapper是用来操作JavaBean属性的工具,比如有一个Person类,代码如下所示。
    public class Person {
        private String name = "张三";

        public void setName(String name) {
            this.name = name;
        }

        public String getName() {
            return this.name;
        }
    }
把这个类封装成BeanWrapper后,可以通过反射的方式调用setter方法直接修改name的值,当然这个例子中的属性只是基本类型所以处理起来简单,但是当属性是数据集合、嵌套对象(比如Person包含属性对象B,通过Person对象来修改B对象的属性值)等情况的时候就变得复杂了,所以Spring就把这些属性统一封装成了PropertyValue对象,从外部屏蔽属性的差异,就能统一处理了。把对象封装成BeanWrapper也是一样的道理,比如Spring提供的IOC容器,它就是把我们配置的class生成对象后,使用BeanWrapper包裹生成统一的Bean(封装可变性),所以有时我们也称它为bean容器。
第二个问题
我们先看下BeanWrapper的实现类BeanWrapperImpl的继承体系,理清类之间的关系就很好理解了,如下图所示。

我们只需要看他的三个父接口:PropertyAccessor,PropertyEditorRegistry和TypeConverter。
PropertyAccessor赋予了BeanWrapperImpl访问和操作对象属性的功能,PropertyEditorRegistry赋予了BeanWrapperImpl注册PropertyEditor的功能,PropertyEditor这么来理解,比如从XML配置文件中读取的属性都是String类型,但放到代码中处理的时候,可能是int类型、布尔类型或者数组类型等,这时候就需要类型转换了,而PropertyEditor定义了类型转换的标准。Spring在PropertyEditorRegistrySupport类中会默认注册处理各种类型转换的PropertyEditor实现类,下图所示是该方法的部分截图。

要是默认的Editor不能满足需要,也可以实现自己的PropertyEditor,只要继承PropertyEditorSupport类然后覆写setAsText和getAsText方法,像这里给BeanWrapper注册的ResourceEditor就是由SpringMVC自己定义的,继承关系如下图所示。

最后由TypeConverter使用PropertyEditor执行类型转换操作。
第三个问题
getEnvironment方法代码如下所示。
    @Override
    public ConfigurableEnvironment getEnvironment() {
        //如果为空则创建一个,我们这里是首次调用,所以会创建该对象。
        if (this.environment == null) {
            this.environment = this.createEnvironment();
        }
        return this.environment;
    }

    protected ConfigurableEnvironment createEnvironment() {
        return new StandardServletEnvironment();
    }
这里创建了StandardServletEnvironment对象,这个类很简单,代码如下所示。
public class StandardServletEnvironment extends StandardEnvironment
    implements ConfigurableWebEnvironment {

    public static final String SERVLET_CONTEXT_PROPERTY_SOURCE_NAME = "servletContextInitParams";
    public static final String SERVLET_CONFIG_PROPERTY_SOURCE_NAME = "servletConfigInitParams";
    public static final String JNDI_PROPERTY_SOURCE_NAME = "jndiProperties";

    @Override
    protected void customizePropertySources(MutablePropertySources propertySources) {
        propertySources.addLast(new StubPropertySource(SERVLET_CONFIG_PROPERTY_SOURCE_NAME));
        propertySources.addLast(new StubPropertySource(SERVLET_CONTEXT_PROPERTY_SOURCE_NAME));
        if (JndiLocatorDelegate.isDefaultJndiEnvironmentAvailable()) {
            propertySources.addLast(new JndiPropertySource(JNDI_PROPERTY_SOURCE_NAME));
        }
        super.customizePropertySources(propertySources);
    }

    @Override
    //该方法目前还没有被调用
    public void initPropertySources(ServletContext servletContext, ServletConfig servletConfig) {
        WebApplicationContextUtils.initServletPropertySources(getPropertySources(), servletContext, servletConfig);
    }

}
在它的父类AbstractEnvironment构造函数中调用了customizePropertySources方法,并创建了MutablePropertySources对象(实际是一个CopyOnWriteArrayList)用于存放PropertySource列表。但我们发现customizePropertySources的第一二行代码,只是放入了两个StubPropertySource对象,而这两个对象实际是作为占位符使用的,也就是说这两个位置上的属性还没准备好,我先给他占个位置,那什么时候会加进来呢,我们后面会讲到。接着添加了JndiPropertySource对象,是用来存Jndi信息的,最后调用父类的customizePropertySources方法,添加了MapPropertySource和SystemEnvironmentPropertySource对象分别用来存放虚拟机和电脑的环境变量信息,最终结构如下图所示。

bw.setPropertyValues(pvs, true);最后把配置好的PropertyValues设置到BeanWrapper的对应属性上,这里相当于给DispatchServlet父类FrameworkServlet中的如下两个属性赋值,代码如下所示。
    public abstract class FrameworkServlet extends HttpServletBean
        implements ApplicationContextAware {

    /** Explicit context config location */
    private String contextConfigLocation;
    /** Should we publish the context as a ServletContext attribute? */
    private boolean publishContext = true;
    //其余代码省略。。。

    }