一、环境搭建
1、Python环境搭建
使用版本:
Mac系统
Python 3.10.8
Selenium4.5.0
python的安装:
从https://www.python.org/下载安装.
终端输入python3,如下图所示:

2、安装Selenium及驱动:
selenium类库安装
pip3 install selenium
驱动类库安装(告别手动下载驱动包)
pip install webdriver-manager
安装完成,如下图所示:
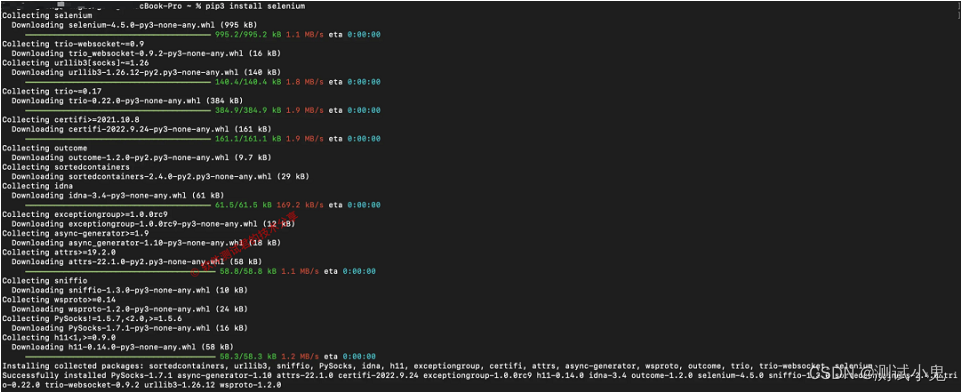
这里有一个警告,是pip3命令需要进行升级(pip是一个用于安装及维护Python包的命令)

1、第一个脚本
环境基本搞定了,使用pycharm创建好工程后,运行如下代码:
# -*- coding: utf-8 -*-
"""
@Time :2022/10/18 10:21 PM
@File :demo.py
@IDE :PyCharm
@Motto:ABC(Always Be Coding)
"""
from selenium import webdriver
from webdriver_manager.chrome import ChromeDriverManager

driver = webdriver.Chrome(ChromeDriverManager().install())
driver.get("https://www.baidu.com/")
driver.quit()
2、可能遇到的问题
就像我一样,把代码复制到编译器里运行报错,如下图所示:

3、解决办法
终端输入如下:pip install packaging
注意: 这些pip命令也要在Pycharm中输入,如下图所示:
成功解决问题,这里要吐槽下自己,度娘后发现,居然是缺少类库引起,真的是笨的可以,哭笑不得,哈哈哈!
4、运行效果

三、元素定位
这部分内容可以说是重中之重了,也是大部分写web自动化的同学,必会入门技能之一了。
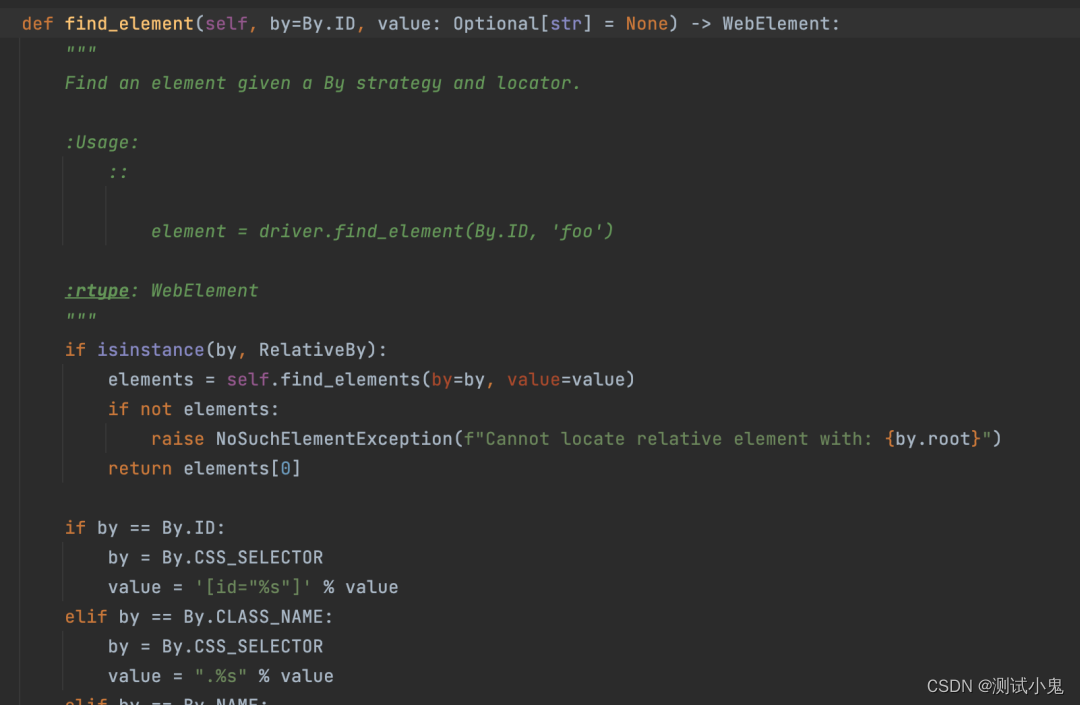
1、常见八种定位元素方法
我们还是直接来看源代码吧,示例如下:
# Licensed to the Software Freedom Conservancy (SFC) under one
# or more contributor license agreements.  See the NOTICE file
# distributed with this work for additional information
# regarding copyright ownership.  The SFC licenses this file
# to you under the Apache License, Version 2.0 (the
# "License"); you may not use this file except in compliance
# with the License.  You may obtain a copy of the License at
#
#   http://www.apache.org/licenses/LICENSE-2.0
#
# Unless required by applicable law or agreed to in writing,
# software distributed under the License is distributed on an
# "AS IS" BASIS, WITHOUT WARRANTIES OR CONDITIONS OF ANY
# KIND, either express or implied.  See the License for the
# specific language governing permissions and limitations
# under the License.

"""
The By implementation.
"""


class By:
    """
    Set of supported locator strategies.
    """

    ID = "id"
    XPATH = "xpath"
    LINK_TEXT = "link text"
    PARTIAL_LINK_TEXT = "partial link text"
    NAME = "name"
    TAG_NAME = "tag name"
    CLASS_NAME = "class name"
    CSS_SELECTOR = "css selector"
2、根据id定位元素
driver.find_element(By.ID,"kw")
3、根据xpath定位元素
driver.find_element(By.XPATH, '//*[@id="kw"]')
4、根据css定位器定位元素
driver.find_element(By.CSS_SELECTOR, '#kw')
5、根据name属性值定位元素
driver.find_element(By.NAME, 'wd')
6、根据class_name类名定位元素
driver.find_element(By.CLASS_NAME, 's_ipt')
7、根据链接文本定位元素
driver.find_element(By.LINK_TEXT, 'hao123')
8、根据部分链接文本定位元素
driver.find_element(By.PARTIAL_LINK_TEXT, 'hao')
9、根据标签名定位元素
driver.find_element(By.TAG_NAME, 'input')
四、find_element与find_elements区别
find_elemnet:定位到是一个对象,定位不到则报错。
find_elemnets:定位到是一个含元素的列表,定位不到是一个空列表。
五、值得关注的问题
1、举个栗子
# 这句运行直接报错
driver.find_element_by_id('kw').send_keys('python')
# 这句就正常
driver.find_element(By.ID,"kw").send_keys(u"111 3333")
2、为什么报错
来吧,还是直接看源代码学习,如下所示:
不难看出,最新版本只能通过find这种写法去写,已经不支持老版本写法。
最后在我的QQ技术交流群里整理了我这10几年软件测试生涯整理的一些技术资料,包括:电子书,简历模块,各种工作模板,面试宝典,自学项目等。如果在学习或工作中遇到问题,群里也会有大神帮忙解答,群号 798478386 ( 备注 csdn555 )
全套软件测试自动化测试教学视频
300G教程资料下载【视频教程+PPT+项目源码】
全套软件测试自动化测试大厂面经
