springboot整合rabbitmq
依赖
<!-- mq -->
<dependency>
	<groupId>org.springframework.boot</groupId>
	<artifactId>spring-boot-starter-amqp</artifactId>
</dependency>
根据springboot自动配置原理,查看rabbitmq的自动配置类


可以看到rabbitmq的配置信息来自RabbitProperties
创建rabbitmq.properties配置文件以spring.rabbitmq为前缀
rabbitmq.properties
spring.rabbitmq.host=192.168.3.114
spring.rabbitmq.port=5672
spring.rabbitmq.username=root
spring.rabbitmq.password=root
#连接到代理时用的虚拟主机
spring.rabbitmq.virtualHost=/dev
#连接到server的地址列表(以逗号分隔),先addresses后host
#spring.rabbitmq.addresses
#请求心跳超时时间,0为不指定,如果不指定时间单位默认为秒
#spring.rabbitmq.requested-heartbeat=0
#是否启用【发布确认】,默认false
#spring.rabbitmq.publisher-confirms=false
#是否启用【发布返回】,默认false
#spring.rabbitmq.publisher-returns=false
#连接超时时间,单位毫秒,0表示永不超时
#spring.rabbitmq.connection-timeout=0

#=========================SSL=====================
#是否支持ssl,默认false
#spring.rabbitmq.ssl.enabled=false
#持有SSL certificate的key store的路径
#spring.rabbitmq.ssl.key-store=
#访问key store的密码
#spring.rabbitmq.ssl.key-store-password
#持有SSL certificates的Trust store
#spring.rabbitmq.ssl.trust-store=
#访问trust store的密码
#spring.rabbitmq.ssl.trust-store-password=
#JKS:Trust store 类型.
#spring.rabbitmq.ssl.trust-store-type=
#ssl使用的算法,默认由rabiitClient配置
#spring.rabbitmq.ssl.algorithm=
#是否启用服务端证书验证
#spring.rabbitmq.ssl.validate-server-certificate=true
#是否启用主机验证
#spring.rabbitmq.ssl.verify-hostname=true

#===========cache===============
#缓存中保持的channel数量
#spring.rabbitmq.cache.channel.size=
#当缓存数量被设置时,从缓存中获取一个channel的超时时间,单位毫秒;如果为0,则总是创建一个新channel
#spring.rabbitmq.cache.channel.checkout-timeout=
#缓存的channel数,只有是CONNECTION模式时生效
#spring.rabbitmq.cache.connection.size=
#连接工厂缓存模式:channel 和 connection
#spring.rabbitmq.cache.connection.mode=channel

#===================listener=========================
# 容器类型.simple或direct
#direct: 在这个容器中,监听器被直接在RabbitMQ消费者线程上调用。
#simple: RabbitMQ用户将消息发送给调用线程的容器  默认simple
#spring.rabbitmq.listener.type=simple
#是否启动时自动启动容器
#spring.rabbitmq.listener.simple.auto-startup=true
	#auto:消费者根据程序执行正常或者抛出异常来决定是提交ack或者nack
	#manual: 手动ack,用户必须手动提交ack或者nack
	#none: 没有ack机制
#表示消息确认方式,其有三种配置方式,分别是none、manual和auto;默认auto
#spring.rabbitmq.listener.simple.acknowledge-mode=
#最小的消费者数量
#spring.rabbitmq.listener.simple.concurrency=5
#最大的消费者数量
#spring.rabbitmq.listener.simple.max-concurrency=10
#一个消费者最多可处理的nack消息数量,如果有事务的话,必须大于等于transaction数量.
#spring.rabbitmq.listener.simple.prefetch=
#当ack模式为auto时,一个事务(ack间)处理的消息数量,最好是小于等于prefetch的数量.若大于prefetch, 则prefetch将增加到这个值
#spring.rabbitmq.listener.simple.transaction-size=
#决定被拒绝的消息是否重新入队;默认是true(与参数acknowledge-mode有关系)
#spring.rabbitmq.listener.simple.default-requeue-rejected=
#若容器声明的队列在代理上不可用,是否失败; 或者运行时一个多多个队列被删除,是否停止容器
#spring.rabbitmq.listener.simple.missing-queues-fatal=true
#发布空闲容器的时间间隔,单位毫秒
#spring.rabbitmq.listener.simple.idle-event-interval=
#监听重试是否可用
#spring.rabbitmq.listener.simple.retry.enabled=false
#最大重试次数
#spring.rabbitmq.listener.simple.retry.max-attempts=3
#最大重试时间间隔
#spring.rabbitmq.listener.simple.retry.max-interval=10000ms
#第一次和第二次尝试传递消息的时间间隔
#spring.rabbitmq.listener.simple.retry.initial-interval=1000ms
#应用于上一重试间隔的乘数
#spring.rabbitmq.listener.simple.retry.multiplier=1
# 重试时有状态or无状态
#spring.rabbitmq.listener.simple.retry.stateless=true

#==============template=========================
#为true时,如果exchange根据routingKey将消息路由到queue时找不到匹配的queue,触发return回调,为false时,exchange直接丢弃消息。
#spring.rabbitmq.template.mandatory=false
# receive() 操作的超时时间
#spring.rabbitmq.template.receive-timeout=
#sendAndReceive() 操作的超时时间
#spring.rabbitmq.template.reply-timeout=
#发送重试是否可用
#spring.rabbitmq.template.retry.enabled=true
#最大重试次数
#spring.rabbitmq.template.retry.max-attempts=3
#第一次和第二次尝试发布或传递消息之间的间隔
#spring.rabbitmq.template.retry.initial-interva=1000ms
#应用于上一重试间隔的乘数
#spring.rabbitmq.template.retry.multiplier=1
#最大重试时间间隔
#spring.rabbitmq.template.retry.max-interval=10000
创建RabbitMqConfig配置类加载rabbitmq.properties,并创建交换机、队列、绑定等
package com.conformity.rabbitmq;

import org.springframework.amqp.core.Binding;
import org.springframework.amqp.core.Binding.DestinationType;
import org.springframework.amqp.core.DirectExchange;
import org.springframework.amqp.core.Exchange;
import org.springframework.amqp.core.FanoutExchange;
import org.springframework.amqp.core.Queue;
import org.springframework.amqp.core.TopicExchange;
import org.springframework.amqp.support.converter.Jackson2JsonMessageConverter;
import org.springframework.amqp.support.converter.MessageConverter;
import org.springframework.context.annotation.Bean;
import org.springframework.context.annotation.Configuration;
import org.springframework.context.annotation.PropertySource;


@Configuration
@PropertySource(value = {"classpath:rabbitmq.properties"},encoding = "utf-8")
public class RabbitMqConfig {

	/** 将rabbitmq服务器队列存的消息转成json格式
	 * @return
	 */
	@Bean
	public MessageConverter setMessageConverter() {
		return new Jackson2JsonMessageConverter();
	}

	/**
	 * 创建队列交换机
	 */
	//点对点模式
	@Bean
	public Exchange directExchange() {
		//第一个参数:交换机名称  第二个参数  是否持久化  第三个参数是否自动删除
		return new DirectExchange("direct.exchange", true, false);
	}

	//发布订阅
	@Bean
	public Exchange fanoutExchange() {
		return new FanoutExchange("fanout.exchange", true, false);
	}

	//主题
	@Bean
	public Exchange topExchange() {
		return new TopicExchange("topic.exchange", true, false);
	}

	/**
	 * 创建队列
	 */
	@Bean
	public Queue directQueue() {
		return new Queue("direct.queue", true);
	}

	@Bean
	public Queue fanoutQueue() {
		return new Queue("fanout.queue", true);
	}
	@Bean
	public Queue topicQueue() {
		return new Queue("topic.queue", true);
	}

	/**
	 * 绑定
	 */
	 //点对点模式
	@Bean
	public Binding bindingDir() {
		 return new Binding("direct.queue", DestinationType.QUEUE, "direct.exchange","direct.test",null);
	}
	//广播模式 广播类型的交换机绑定三个队列
	@Bean
	public Binding bindingFan1() {
		return new Binding("fanout.queue", DestinationType.QUEUE, "fanout.exchange","",null);
	}
	@Bean
	public Binding bindingFan2() {
		return new Binding("direct.queue", DestinationType.QUEUE, "fanout.exchange","",null);
	}
	@Bean
	public Binding bindingFan3() {
		return new Binding("topic.queue", DestinationType.QUEUE, "fanout.exchange","",null);
	}
	//主题模式的交换机绑定两个队列
	@Bean
	public Binding bindingTOP1() {
		return new Binding("topic.queue", DestinationType.QUEUE, "topic.exchange","top.#",null);
	}
	@Bean
	public Binding bindingTOP2() {
		return new Binding("direct.queue", DestinationType.QUEUE, "topic.exchange","dir.#",null);
	}
}
补充:关于Queue构造参数
测试
controller
package com.conformity.general.controller;

import javax.annotation.Resource;

import org.springframework.amqp.rabbit.core.RabbitTemplate;
import org.springframework.web.bind.annotation.RequestMapping;
import org.springframework.web.bind.annotation.RequestMethod;
import org.springframework.web.bind.annotation.RestController;

import com.conformity.general.entity.test.MybatisTestUser;
import com.github.xiaoymin.knife4j.annotations.ApiOperationSupport;

import io.swagger.annotations.Api;
import io.swagger.annotations.ApiImplicitParam;
import io.swagger.annotations.ApiImplicitParams;
import io.swagger.annotations.ApiOperation;
import springfox.documentation.annotations.ApiIgnore;

@RestController
@RequestMapping(value = "/rabbit",method = RequestMethod.POST)
@Api(tags = {"rabbitmq的测试类"})
public class RabbitmqController {

	@Resource
	private RabbitTemplate rabbitTemplate;

	@RequestMapping("/sendMessage1")
	@ApiOperation("rabbitMq测试---点对点发送消息")
	@ApiOperationSupport(author = "lsx",order = 1)
	@ApiImplicitParams({
        @ApiImplicitParam(name = "age", value = "年龄", required = true, paramType = "query"),
        @ApiImplicitParam(name = "name", value = "姓名", required = true, paramType = "query"),
        @ApiImplicitParam(name = "email", value = "邮箱", required = true, paramType = "query"),
	})
	public String sendMessage1(@ApiIgnore MybatisTestUser user) {
		try {
			rabbitTemplate.convertAndSend("direct.exchange", "direct.test", user);
		} catch (Exception e) {
			e.printStackTrace();
			return "发送失败";
		}
		return "发送成功";

	}
	@RequestMapping("/sendMessage2")
	@ApiOperation("rabbitMq测试---广播发送消息")
	@ApiOperationSupport(author = "lsx",order = 2)
	@ApiImplicitParams({
		@ApiImplicitParam(name = "age", value = "年龄", required = true, paramType = "query"),
		@ApiImplicitParam(name = "name", value = "姓名", required = true, paramType = "query"),
		@ApiImplicitParam(name = "email", value = "邮箱", required = true, paramType = "query"),
	})
	public String sendMessage2(@ApiIgnore MybatisTestUser user) {
		try {
			rabbitTemplate.convertAndSend("fanout.exchange", "aaa", user);
		} catch (Exception e) {
			e.printStackTrace();
			return "发送失败";
		}
		return "发送成功";

	}
	@RequestMapping("/sendMessage3")
	@ApiOperation("rabbitMq测试---主题发送消息")
	@ApiOperationSupport(author = "lsx",order = 3)
	@ApiImplicitParams({
		@ApiImplicitParam(name = "age", value = "年龄", required = true, paramType = "query"),
		@ApiImplicitParam(name = "name", value = "姓名", required = true, paramType = "query"),
		@ApiImplicitParam(name = "email", value = "邮箱", required = true, paramType = "query"),
		@ApiImplicitParam(name = "type", value = "主题top/dir", required = true, paramType = "query"),
	})
	public String sendMessage3(@ApiIgnore MybatisTestUser user,@ApiIgnore String type) {
		try {
			rabbitTemplate.convertAndSend("topic.exchange", type+".aaa", user);
		} catch (Exception e) {
			e.printStackTrace();
			return "发送失败";
		}
		return "发送成功";

	}
}
service
package com.conformity.general.service;

import org.springframework.amqp.rabbit.annotation.RabbitListener;
import org.springframework.stereotype.Service;

@Service
public class RabbitMqService {

	@RabbitListener(queues = {"direct.queue"})
	public void getMessage1(Object object) {
		System.out.println("direct.queue========"+object);
	}
	@RabbitListener(queues = {"fanout.queue"})
	public void getMessage2(Object object) {
		System.out.println("fanout.queue========"+object);
	}
	@RabbitListener(queues = {"topic.queue"})
	public void getMessage3(Object object) {
		System.out.println("topic.queue========"+object);
	}
}
rabbitmq管理界面

看到交换机和队列都没有RabbitMqConfig配置的信息
启动springboot,成功启动后,再次观察rabbitmq管理界面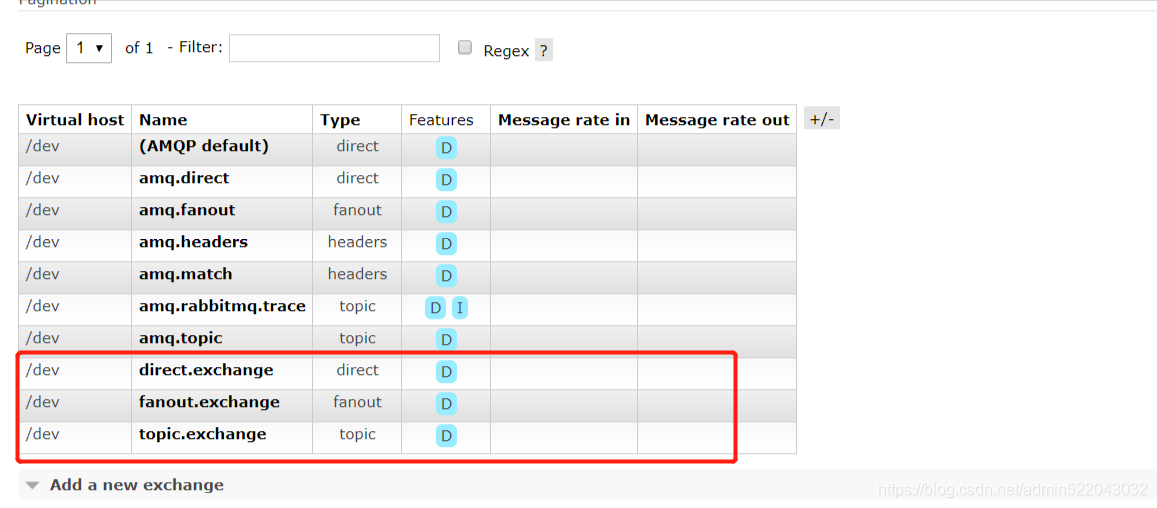

交换机和队列中都出现了我们配置的信息
通过访问controller进行测试
后台控制台,输出对应信息 到此整合完成
rabbitmq消息可靠性代码测试
代码变动
service
@RabbitListener(queues = {"direct.queue"})
	public void getMessage1(Message message) {
		Object parse = JSONObject.parse(new String(message.getBody()));
		JSONObject user = (JSONObject)parse;
		System.out.println("direct.queue========"+user);
	}
	@RabbitListener(queues = {"fanout.queue"})
	public void getMessage2(Message message) {
		Object parse = JSONObject.parse(new String(message.getBody()));
		JSONObject user = (JSONObject)parse;
		System.out.println("fanout.queue========"+user);
	}
	@RabbitListener(queues = {"topic.queue"})
	public void getMessage3(Message message) {
		Object parse = JSONObject.parse(new String(message.getBody()));
		JSONObject user = (JSONObject)parse;
		System.out.println("topic.queue========"+user);
	}
controller
@RestController
@RequestMapping(value = "/rabbit",method = RequestMethod.POST)
@Api(tags = {"rabbitmq的测试类"})
public class RabbitmqController {

	@Resource
	private RabbitTemplate rabbitTemplate;

	@RequestMapping("/sendMessage1")
	@ApiOperation("rabbitMq测试---点对点发送消息")
	@ApiOperationSupport(author = "lsx",order = 1)
	@ApiImplicitParams({
		@ApiImplicitParam(name = "age", value = "年龄", required = true, paramType = "query"),
		@ApiImplicitParam(name = "name", value = "姓名", required = true, paramType = "query"),
		@ApiImplicitParam(name = "email", value = "邮箱", required = true, paramType = "query"),
	})
	public String sendMessage1(@ApiIgnore MybatisTestUser user) {
		try {
			rabbitTemplate.convertAndSend("direct.exchange", "direct.test",JSONObject.toJSON(user));
		} catch (Exception e) {
			e.printStackTrace();
			return "发送失败";
		}
		return "发送成功";

	}
	@RequestMapping("/sendMessage2")
	@ApiOperation("rabbitMq测试---广播发送消息")
	@ApiOperationSupport(author = "lsx",order = 2)
	@ApiImplicitParams({
		@ApiImplicitParam(name = "age", value = "年龄", required = true, paramType = "query"),
		@ApiImplicitParam(name = "name", value = "姓名", required = true, paramType = "query"),
		@ApiImplicitParam(name = "email", value = "邮箱", required = true, paramType = "query"),
	})
	public String sendMessage2(@ApiIgnore MybatisTestUser user) {
		try {
			rabbitTemplate.convertAndSend("fanout.exchange", "aaa", JSONObject.toJSON(user));
		} catch (Exception e) {
			e.printStackTrace();
			return "发送失败";
		}
		return "发送成功";

	}

	@RequestMapping("/sendMessage3")
	@ApiOperation("rabbitMq测试---主题发送消息")
	@ApiOperationSupport(author = "lsx",order = 3)
	@ApiImplicitParams({
		@ApiImplicitParam(name = "age", value = "年龄", required = true, paramType = "query"),
		@ApiImplicitParam(name = "name", value = "姓名", required = true, paramType = "query"),
		@ApiImplicitParam(name = "email", value = "邮箱", required = true, paramType = "query"),
		@ApiImplicitParam(name = "type", value = "主题top/dir", required = true, paramType = "query"),
	})
	public String sendMessage3(@ApiIgnore MybatisTestUser user,@ApiIgnore String type) {
		try {
			rabbitTemplate.convertAndSend("topic.exchange", type+".aaa", JSONObject.toJSON(user));
		} catch (Exception e) {
			e.printStackTrace();
			return "发送失败";
		}
		return "发送成功";

	}

	@RequestMapping("/sendMessage4")
	@ApiOperation("rabbitMq测试---消息可靠性投递")
	@ApiOperationSupport(author = "lsx",order = 4)
	@ApiImplicitParams({
		@ApiImplicitParam(name = "age", value = "年龄", required = true, paramType = "query"),
		@ApiImplicitParam(name = "name", value = "姓名", required = true, paramType = "query"),
		@ApiImplicitParam(name = "email", value = "邮箱", required = true, paramType = "query"),
	})
	public void sendMessage4(@ApiIgnore MybatisTestUser user) {
		CorrelationData correlationData = new CorrelationData();
		byte[] body = JSONObject.toJSONBytes(user, SerializerFeature.QuoteFieldNames);
		Message message = new Message(body , new MessageProperties());
		correlationData.setReturned(new ReturnedMessage(message, 0, "", "test-confirm", "direct.test"));
		//写错交换机的名称
		rabbitTemplate.convertAndSend("test-confirm","direct.test",JSONObject.toJSON(user),correlationData);
		//写错路由键的名称
//		rabbitTemplate.convertAndSend("direct.exchange", "5555",JSONObject.toJSON(user));
	}
RabbitMqConfig
@Bean
   public RabbitTemplate rabbitTemplate(ConnectionFactory connectionFactory) {
       RabbitTemplate rabbitTemplate = new RabbitTemplate(connectionFactory);
       rabbitTemplate.setConfirmCallback((correlationData,ack,cause)->{
		if (ack) {
			System.out.println("消息发送成功:"+correlationData.getId());
		}else {
			Message message = correlationData.getReturned().getMessage();
			Object parse = JSONObject.parse(new String(message.getBody()));
			System.out.println("失败消息:"+parse);
			System.err.println("发送失败原因:"+cause);
			System.out.println("插入数据库或者重发");
		}
	});

	rabbitTemplate.setReturnsCallback((returnedMessage)->{
		byte[] body = returnedMessage.getMessage().getBody();
		System.err.println("未进入队列消息:"+new String(body));
		System.err.println("应答码:"+returnedMessage.getReplyCode());
		System.err.println("原因:"+returnedMessage.getReplyText());
		System.err.println("路由建:"+returnedMessage.getRoutingKey());
		System.err.println("交换机:"+returnedMessage.getExchange());
		//重新发送该消息
		rabbitTemplate.convertAndSend("direct.exchange", "direct.test",returnedMessage.getMessage());
	});
	rabbitTemplate.setMandatory(true);
	rabbitTemplate.setMessageConverter(setMessageConverter());
       return rabbitTemplate;
   }
rabbitmq.properties
#是否启用【发布确认】,默认false
spring.rabbitmq.publisher-confirms=true
#是否启用【发布返回】,默认false
spring.rabbitmq.publisher-returns=true
其他不变
可靠性消息投递
基于confirm模式和returns模式
当消息未到达交换机时发生消息丢失
在该方法中故意写错交换机的名称,因此消息无法到达交换机,在消息发送后会进入RabbitMqConfig配置的ConfirmCallback中
当消息进入交换机但未能进入队列中,发生消息丢失
这次故意写错路由键,因此消息无法进入队列,在消息发送后会进入RabbitMqConfig配置的ReturnsCallback中
但是当服务器宕机不可用的情况下,还是有可能发生数据丢失。可以搭建rabbitmq集群,或者借助其他缓存工具先缓存,消息发送成功后再删除等等。
消息消费确认
代码改动
rabbitmq.properties
#表示消息确认方式,其有三种配置方式,分别是none、manual和auto;默认auto
	#auto:消费者根据程序执行正常或者抛出异常来决定是提交ack或者nack
	#manual: 手动ack,用户必须手动提交ack或者nack
	#none: 没有ack机制
spring.rabbitmq.listener.simple.acknowledge-mode=manual
#一个消费者最多可处理的nack消息数量,如果有事务的话,必须大于等于transaction数量.
spring.rabbitmq.listener.simple.prefetch=10
其他配置不变
service
@RabbitListener(queues = {"direct.queue"})
	public void getMessage1(Message message,Channel channel) {
		try {
			//业务处理正常
			Object parse = JSONObject.parse(new String(message.getBody()));
			JSONObject user = (JSONObject)parse;
			int a = 5/0;
			channel.basicAck(message.getMessageProperties().getDeliveryTag(), false);
			System.out.println("业务处理完成");
			System.out.println("direct.queue========"+user);
		} catch (Exception e) {
			//业务处理不正常
			try {
				channel.basicNack(message.getMessageProperties().getDeliveryTag(), false,true);
				System.out.println("业务处理失败");
			} catch (IOException e1) {
				e1.printStackTrace();
			}
		}

	}
controller
@RequestMapping("/sendMessage5")
	@ApiOperation("rabbitMq测试---消费确认")
	@ApiOperationSupport(author = "lsx",order = 5)
	@ApiImplicitParams({
		@ApiImplicitParam(name = "age", value = "年龄", required = true, paramType = "query"),
		@ApiImplicitParam(name = "name", value = "姓名", required = true, paramType = "query"),
		@ApiImplicitParam(name = "email", value = "邮箱", required = true, paramType = "query"),
	})
	public String sendMessage5(@ApiIgnore MybatisTestUser user,@ApiIgnore String type) {
		try {
			rabbitTemplate.convertAndSend("direct.exchange","direct.test", JSONObject.toJSON(user));
		} catch (Exception e) {
			e.printStackTrace();
			return "发送失败";
		}
		return "发送成功";

	}
将确认代码注释掉之后,后台虽然接收了消息,但是在rabbitmq管理界面中消息依然存在

将消费确认代码开启后,重启服务,还是能接收到消息,此时返回给rabbitmq返回ack
rabbitmq管理界面的消息没有了

如果返回的是Nack的话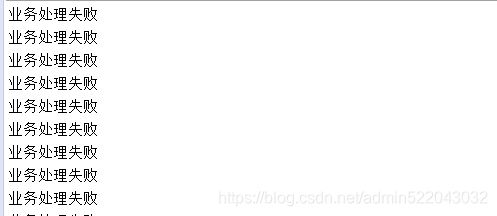

后台一直接收到该消息,并且管理界面是ready状态,因此会一直监听到该消息这和channel.basicNack方法的第三个参数有关
对于channel.basicNack方法的第三个参数,表示消息nack后是否返回队列,如果设置为true,表示返回队列,此时消息处于队列头部,消费者会一直处理该消息,影响后续消息的消费,设置为false时表示不返回队列,此时如果设置有DLX(死信队列),那么消息会进入DLX中,后续再对该消息进行相应的处理,如果没有设置DLX,此时消息就会被丢弃。
到此消息确认测试完毕。
优先级队列测试
创建优先级队列
//优先级队列
	@Bean
	public Queue proQueue() {
		/**
		 * 第一个参数队列名称
		 * 第二个参数 是否持久化
		 * 第三个参数 是否创建排他队列
		 * 第四个参数 是否自动删除
		 * 第五个参数 队列参数配置
		 */
		Map<String, Object> arguments = new HashMap<>();
		arguments.put("x-max-priority", 10);
		return new Queue("priorityQueue", true, false, false, arguments);
	}
@Bean
	public Binding proBinding() {
		return new Binding("priorityQueue", DestinationType.QUEUE, "direct.exchange", "direct.priority", null);
	}

controller:

@RequestMapping("/sendMessage6")
	@ApiOperation("rabbitMq测试---测试优先级队列")
	@ApiOperationSupport(author = "lsx",order = 6)
	@ApiImplicitParams({
	})
	public String sendMessage6() {
		try {
			for(int i= 1;i<=10;i++) {
				int a = new Random().nextInt(9);
				JSONObject jsonObject = new JSONObject();
				jsonObject.put("priority", a);
				//通过MessagePostProcessor 配置优先级
				rabbitTemplate.convertAndSend("direct.exchange","direct.priority", jsonObject, (message)->{
					message.getMessageProperties().setPriority(a);
					return message;
				});
			}
		} catch (Exception e) {
			e.printStackTrace();
			return "发送失败";
		}
		return "发送成功";

	}

service:

//@RabbitListener(queues = {"priorityQueue"})
	public void getMessage4(Message message,Channel channel) {
		try {
			JSONObject parse = JSONObject.parseObject(new String(message.getBody(),"utf-8"));
			System.out.println("priorityQueue========开始消费");
			Set<String> keySet = parse.keySet();
			for (String key : keySet) {
				System.out.println(key+"="+parse.get(key));
			}
			System.out.println("priorityQueue========消费结束");
			channel.basicAck(message.getMessageProperties().getDeliveryTag(), false);
		} catch (Exception e) {
			e.printStackTrace();
			try {
				channel.basicAck(message.getMessageProperties().getDeliveryTag(), false);
			} catch (IOException e1) {
				// TODO Auto-generated catch block
				e1.printStackTrace();
			}
		}

	}
先后发送优先级从1到10 总共10条消息,同时开启监听,看日志消息的消费顺序
开启消费查看消费记录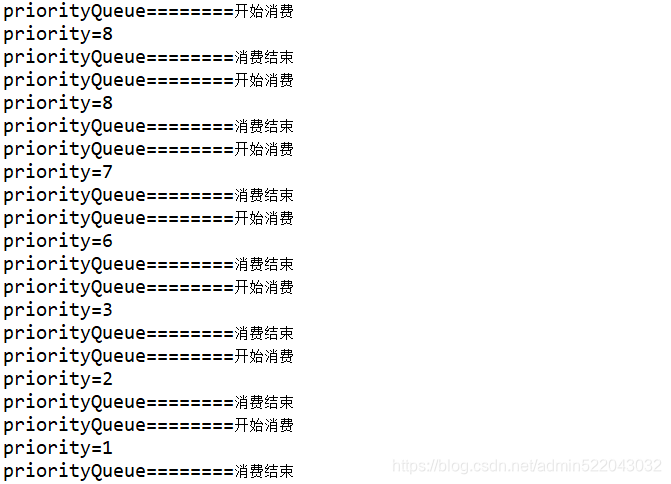
消费顺序按照优先级从大到小