在这篇文章中了解如何为 Spring Boot Swagger 示例实现 Spring Boot Basic Security。
在本教程中,我们将为 Spring Boot Swagger 示例实现 Spring Boot Basic Security。所以在使用 Swagger 访问端点时,Swagger 还允许我们配置 Spring Security 用户名和密码。
让我们开始
我们将修改我们在上一个教程中实现的 Spring Boot + Swagger 3 (OpenAPI 3) Hello World Example 项目。
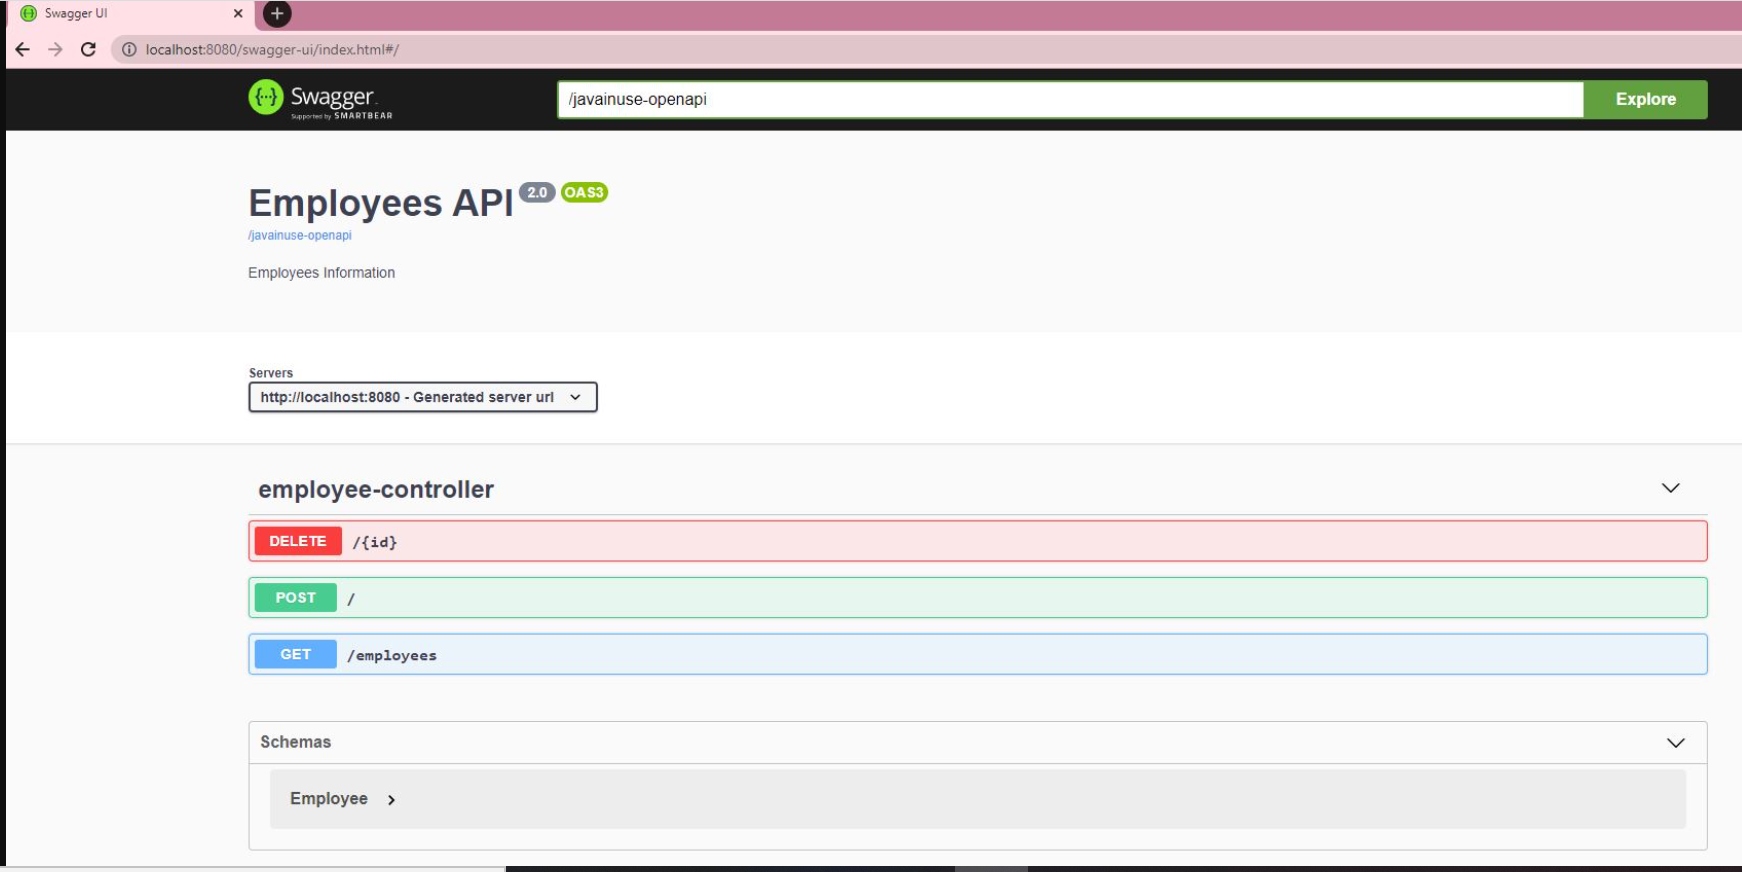
下载项目并在eclipse中导入maven项目。启动项目。如果我们访问http://localhost:8080/swagger-ui/index.html#/我们会看到以下内容:
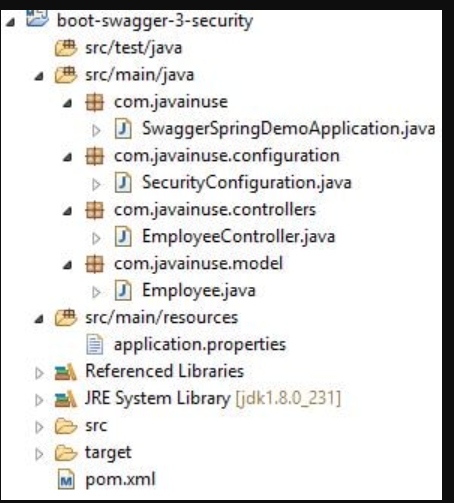
我们将要开发的最终maven项目如下:
修改 pom.xml 添加 spring 安全依赖:
<?xml version="1.0" encoding="UTF-8"?>
<project xmlns="http://maven.apache.org/POM/4.0.0" xmlns:xsi="http://www.w3.org/2001/XMLSchema-instance"
	xsi:schemaLocation="http://maven.apache.org/POM/4.0.0 https://maven.apache.org/xsd/maven-4.0.0.xsd">
	<modelVersion>4.0.0</modelVersion>
	<parent>
		<groupId>org.springframework.boot</groupId>
		<artifactId>spring-boot-starter-parent</artifactId>
		<version>2.3.0.RELEASE</version>
		<relativePath /> <!-- lookup parent from repository -->
	</parent>
	<groupId>com.javainuse</groupId>
	<artifactId>boot-swagger-3-fin</artifactId>
	<version>0.0.1-SNAPSHOT</version>
	<name>boot-swagger-3</name>

	<properties>
		<java.version>1.8</java.version>
	</properties>

	<dependencies>
		<!-- Swagger UI -->
		<dependency>
			<groupId>org.springdoc</groupId>
			<artifactId>springdoc-openapi-ui</artifactId>
			<version>1.2.32</version>
		</dependency>

		<dependency>
			<groupId>org.springframework.boot</groupId>
			<artifactId>spring-boot-starter-web</artifactId>
		</dependency>
		<dependency>
			<groupId>org.springframework.boot</groupId>
			<artifactId>spring-boot-starter-security</artifactId>
		</dependency>
	</dependencies>

	<build>
		<plugins>
			<plugin>
				<groupId>org.springframework.boot</groupId>
				<artifactId>spring-boot-maven-plugin</artifactId>
			</plugin>
		</plugins>
	</build>

</project>
接下来,我们将添加 Spring Security 配置。
- 我们使用 @EnableWebSecurity 注释 SecurityConfiguration 类,以将该类应用于全局 WebSecurity。
- 此外,我们扩展 WebSecurityConfigurerAdapter 以定义规则以指定要保护或通过的 URI。这为我们提供了一种配置方法。
- 扩展 WebSecurityConfiguration 允许通过覆盖方法自定义 Spring Security。
package com.javainuse.configuration;
import org.springframework.context.annotation.Bean;
import org.springframework.security.config.annotation.authentication.builders.AuthenticationManagerBuilder;
import org.springframework.security.config.annotation.web.builders.HttpSecurity;
import org.springframework.security.config.annotation.web.configuration.EnableWebSecurity;
import org.springframework.security.config.annotation.web.configuration.WebSecurityConfigurerAdapter;
import org.springframework.security.crypto.bcrypt.BCryptPasswordEncoder;
import org.springframework.security.crypto.password.PasswordEncoder;
@EnableWebSecurity
public class SecurityConfiguration extends WebSecurityConfigurerAdapter {
@Override
protected void configure(HttpSecurity http) throws Exception {
http.authorizeRequests()
.antMatchers("/swagger-ui/**", "/javainuse-openapi/**").permitAll()
.anyRequest().authenticated()
.and()
.httpBasic();
}
@Override
protected void configure(AuthenticationManagerBuilder auth) throws Exception {
auth.inMemoryAuthentication()
.withUser("javainuse")
.password(passwordEncoder().encode("javainuse"))
.authorities("ADMIN");
}
@Bean
public PasswordEncoder passwordEncoder() {
return new BCryptPasswordEncoder();
}
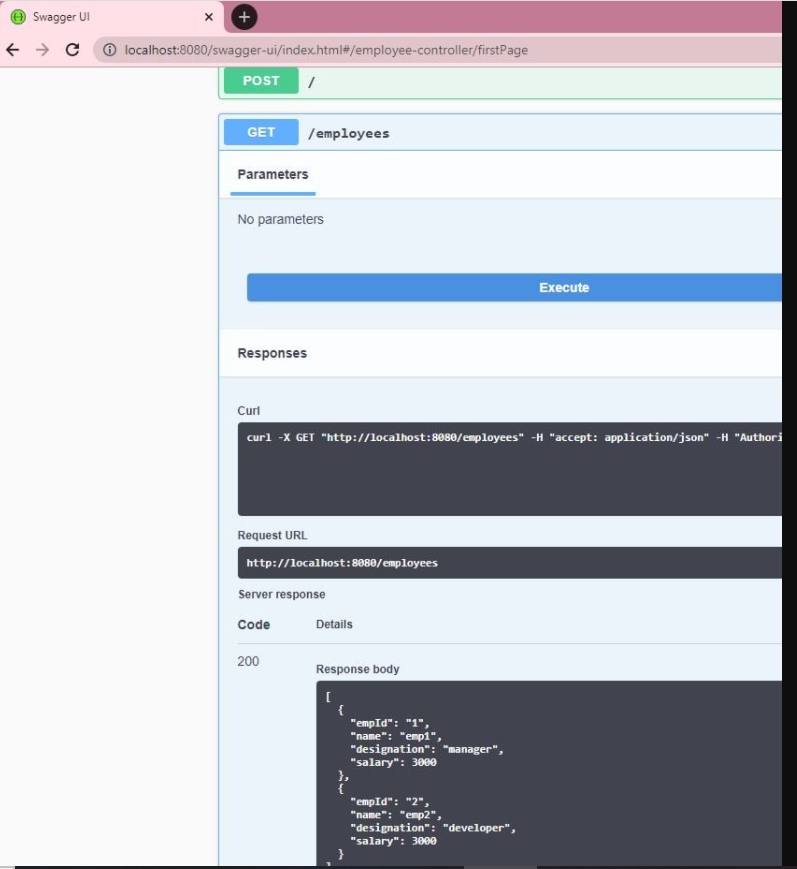
}如果我们不尝试测试它要求用户名和密码的 REST 端点,则使用 Swagger UI 启动项目。如果我们输入这些,Swagger 就能够成功地与端点交互。
现在让我们为 Spring Security 配置 Swagger。在 SwaggerSpringDemoApplication 类中,指定 SecurityScheme。OpenAPI 使用术语安全方案来表示身份验证和授权方案。OpenAPI 3.0 允许您描述使用以下安全方案保护的 API:
- HTTP 身份验证方案(它们使用 Authorization 标头):
- 基本的
- 承载
- 由 RFC 7235 和 HTTP Authentication Scheme Registry 定义的其他 HTTP 方案
- 标头、查询字符串或 cookie 中的 API 密钥:
- Cookie 身份验证
- 认证 2
- OpenID 连接发现
package com.javainuse;

import org.springframework.boot.SpringApplication;
import org.springframework.boot.autoconfigure.SpringBootApplication;

import io.swagger.v3.oas.annotations.OpenAPIDefinition;
import io.swagger.v3.oas.annotations.enums.SecuritySchemeIn;
import io.swagger.v3.oas.annotations.enums.SecuritySchemeType;
import io.swagger.v3.oas.annotations.info.Info;
import io.swagger.v3.oas.annotations.security.SecurityScheme;

@SpringBootApplication
@OpenAPIDefinition(info = @Info(title = "Employees API", version = "2.0", description = "Employees Information"))
@SecurityScheme(name = "javainuseapi", scheme = "basic", type = SecuritySchemeType.HTTP, in = SecuritySchemeIn.HEADER)
public class SwaggerSpringDemoApplication {

	public static void main(String[] args) {
		SpringApplication.run(SwaggerSpringDemoApplication.class, args);
	}

}
最后,在控制器类中,使用 SecurityRequirement 定义单个操作(在方法级别应用时)或类的所有操作(在类级别应用时)的安全要求。
package com.javainuse.controllers;
import java.util.ArrayList;
import java.util.List;
import org.springframework.web.bind.annotation.DeleteMapping;
import org.springframework.web.bind.annotation.PathVariable;
import org.springframework.web.bind.annotation.PostMapping;
import org.springframework.web.bind.annotation.RequestBody;
import org.springframework.web.bind.annotation.RequestMapping;
import org.springframework.web.bind.annotation.RequestMethod;
import org.springframework.web.bind.annotation.RestController;
import com.javainuse.model.Employee;
import io.swagger.v3.oas.annotations.security.SecurityRequirement;
@RestController
@SecurityRequirement(name = "javainuseapi")
public class EmployeeController {
private List<Employee> employees = createList();
@RequestMapping(value = "/employees", method = RequestMethod.GET, produces = "application/json")
public List<Employee> firstPage() {
return employees;
}
@DeleteMapping(path = { "/{id}" })
public Employee delete(@PathVariable("id") int id) {
Employee deletedEmp = null;
for (Employee emp : employees) {
if (emp.getEmpId().equals(id)) {
employees.remove(emp);
deletedEmp = emp;
break;
}
}
return deletedEmp;
}
@PostMapping
public Employee create(@RequestBody Employee user) {
employees.add(user);
System.out.println(employees);
return user;
}
private static List<Employee> createList() {
List<Employee> tempEmployees = new ArrayList<>();
Employee emp1 = new Employee();
emp1.setName("emp1");
emp1.setDesignation("manager");
emp1.setEmpId("1");
emp1.setSalary(3000);
Employee emp2 = new Employee();
emp2.setName("emp2");
emp2.setDesignation("developer");
emp2.setEmpId("2");
emp2.setSalary(3000);
tempEmployees.add(emp1);
tempEmployees.add(emp2);
return tempEmployees;
}
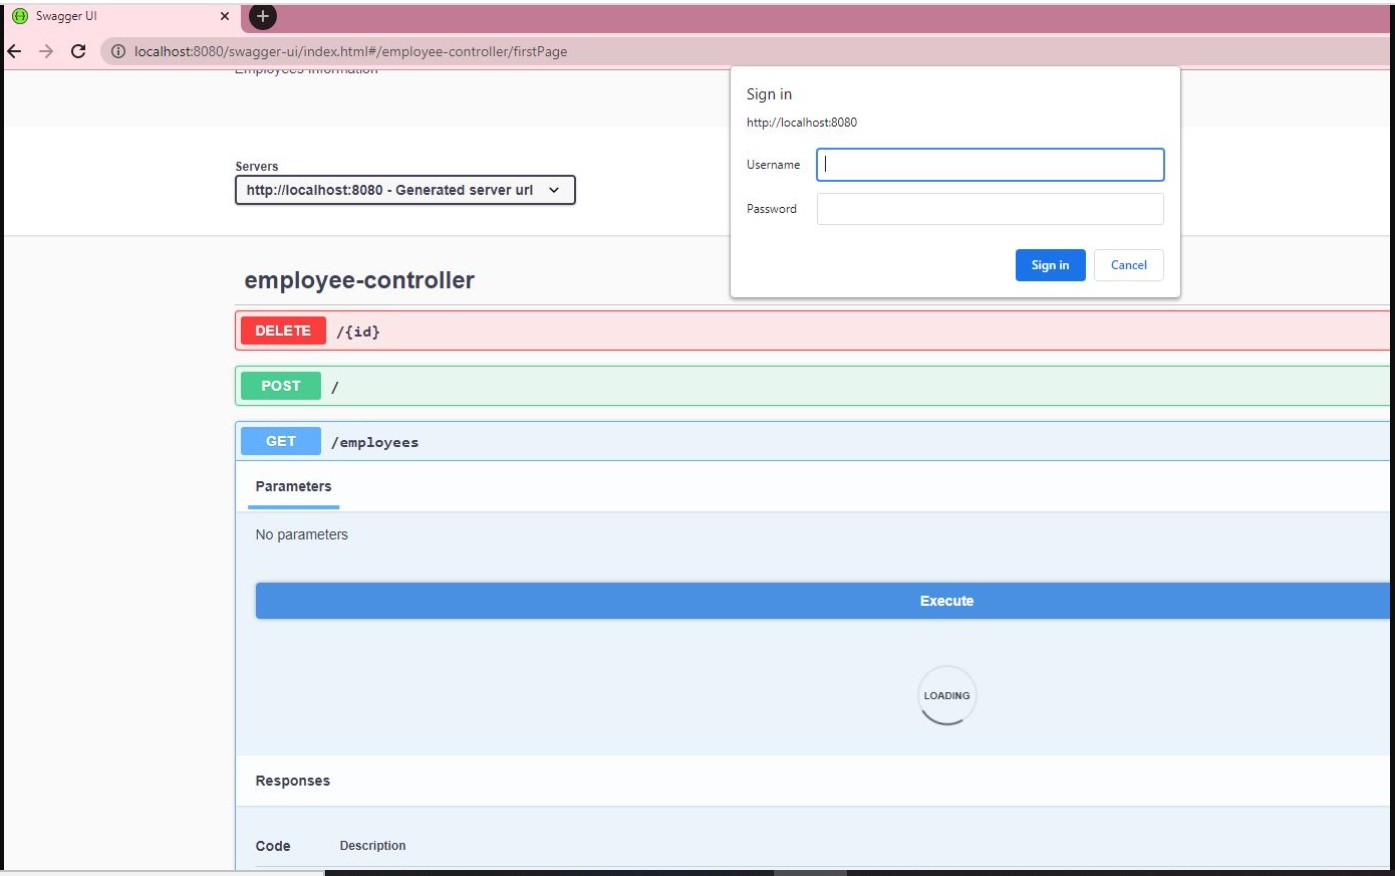
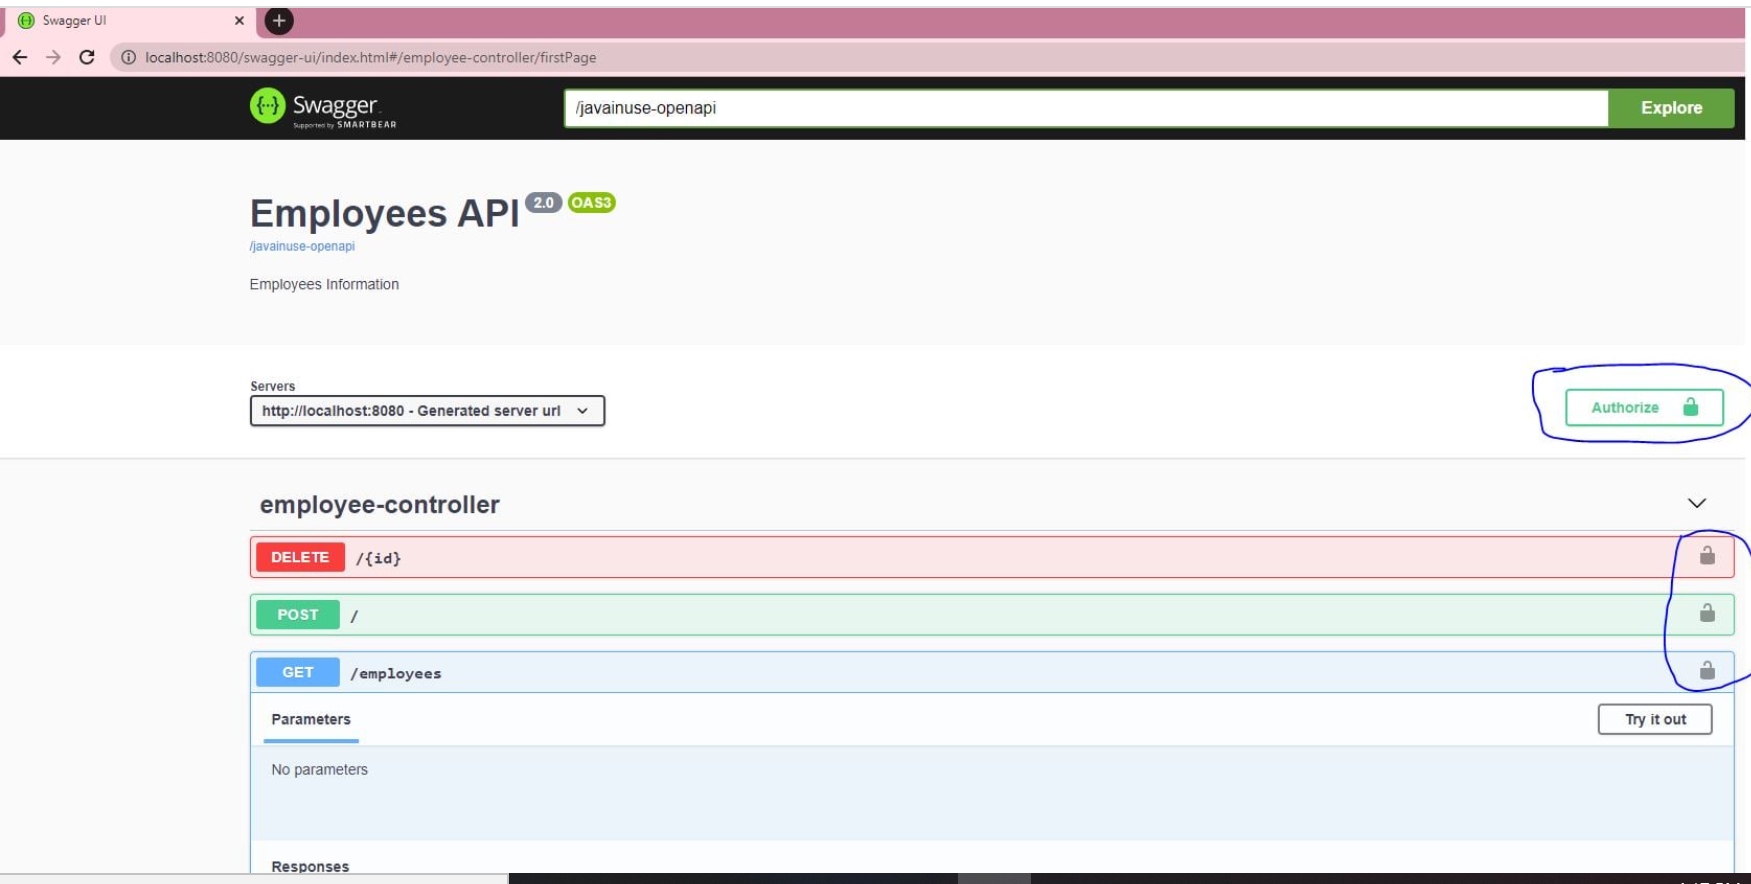
}启动项目。我们现在可以看到锁定符号。
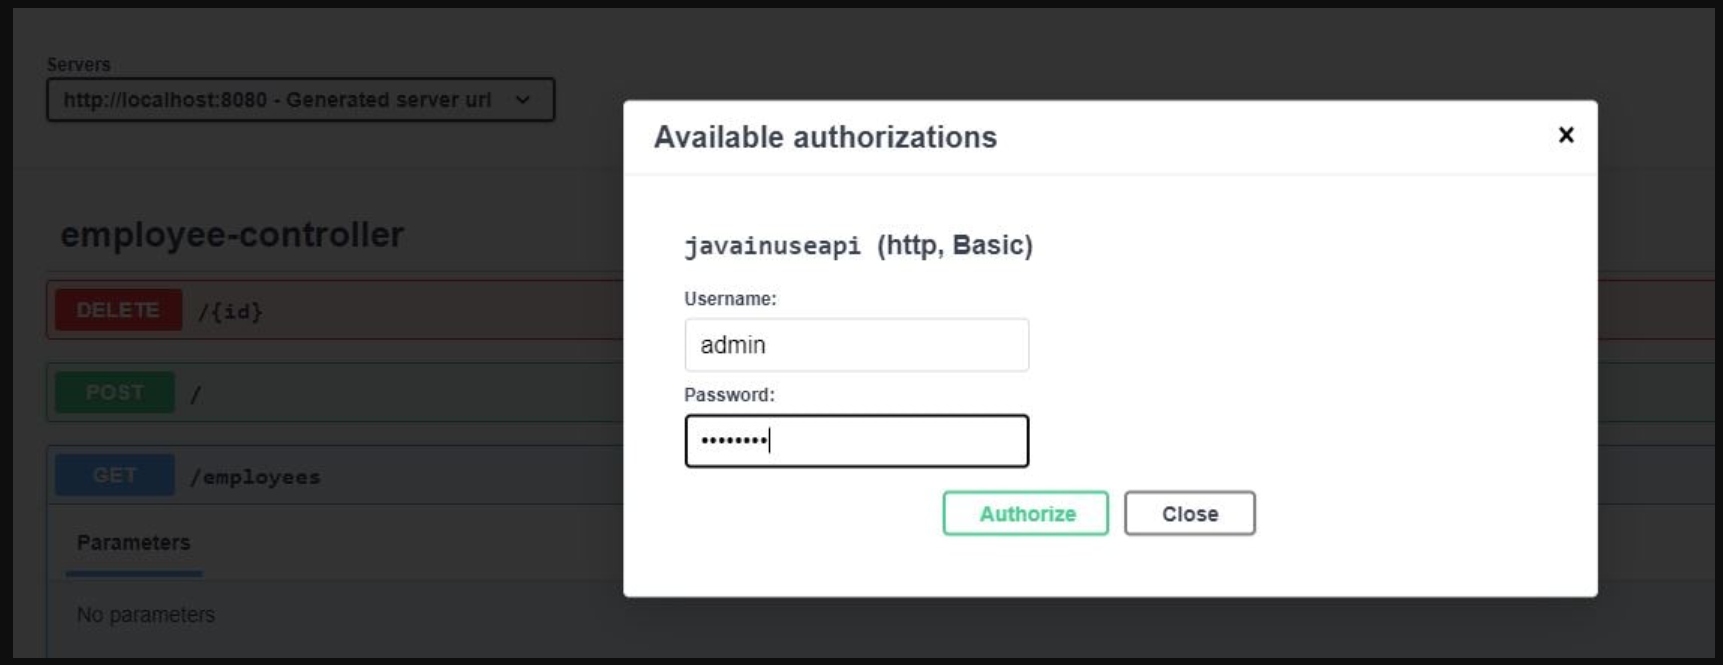
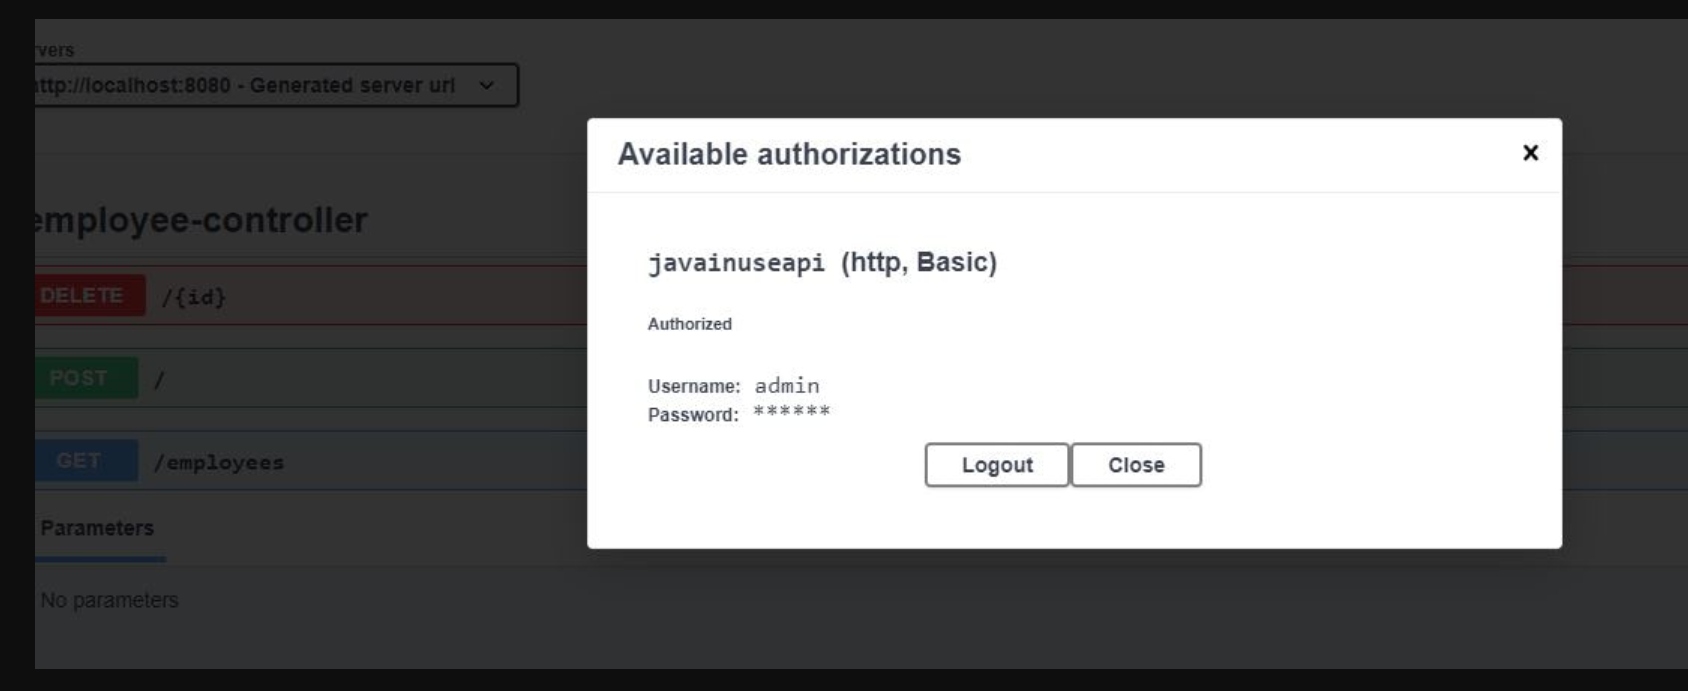
如果我们单击它,它会要求提供凭据。进入后,我们可以使用 Swagger 成功访问 REST enfpoint。
说明:本文限于篇幅,故而只展示部分的JVM内容,完整的JVM学习文档小编已经
帮你整理好了,需要的朋友点赞+关注私信我777免费领取Java知识与技巧、课件
,源码,安装包等等等还有大厂面试学习资料哦!