在生产环境中,ceph集群要求最少配置3个MON,一般情况下很少出现3个MON同时挂掉的情况,但是也不排除出现这种情况的可能,如果集群中的所有MON都损坏了,是不是集群数据就丢失了呢?能不能恢复集群?当然是可以的,ceph中国的一位开发者写了一个工具,来对损坏的MON的数据进行重构,这个工具已经集成到了新版的ceph中,官网上也提供了一个重构的脚本,但是这个脚本似乎有点问题,网上也有一些相关的帖子,但是不够清晰和全面,现在我就一步步的恢复一次,使所有功能都恢复正常。
一.环境准备
1.集群信息
测试环境:3台服务器,3个mon,6个osd,集群状态ok。

这是我的配置文件:

2.模拟mon挂掉(在每台mon上都需要执行)
2.1停止所有mon服务
systemctl stop ceph-mon.target2.2删除所有mon配置文件(我在这里采用备份的方式)
mv /var/lib/ceph/mon/ceph-node1/ /var/lib/ceph/mon/ceph-node1.back
mv /var/lib/ceph/mon/ceph-node2/ /var/lib/ceph/mon/ceph-node2.back
mv /var/lib/ceph/mon/ceph-node3/ /var/lib/ceph/mon/ceph-node3.back
现在集群已经不可用了

二.收集mon信息
1.创建一个mon临时目录(在node3上执行命令)
mkdir /tmp/mon-store2.停止所有服务器的osd,rgw服务
systemctl stop ceph-osd.target
systemctl stop ceph-radosgw.target
3.通过osd收集当前服务器上的mon信息到/tmp/mon-store中
3.1收集node3的mon信息(在node3上执行命令)
for osd in /var/lib/ceph/osd/ceph-*; do ceph-objectstore-tool --data-path $osd --op update-mon-db --mon-store-path /tmp/mon-store --no-mon-config; done 3.2同步信息到node2(在node3上执行命令)
rsync -avz /tmp/mon-store/ root@node2:/tmp/mon-store/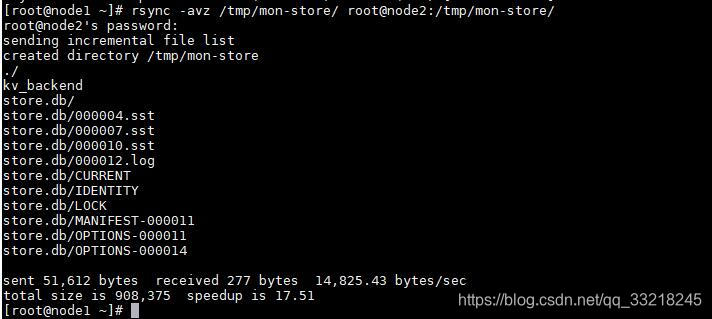
3.3收集node2的mon信息(在node2上执行命令)
for osd in /var/lib/ceph/osd/ceph-*; do ceph-objectstore-tool --data-path $osd --op update-mon-db --mon-store-path /tmp/mon-store --no-mon-config; done
3.4同步信息到node1(在node2上执行命令)
rsync -avz /tmp/mon-store/ root@node1:/tmp/mon-store/3.5收集node1的mon信息 (在node1上执行命令)
for osd in /var/lib/ceph/osd/ceph-*; do ceph-objectstore-tool --data-path $osd --op update-mon-db --mon-store-path /tmp/mon-store --no-mon-config; done 
3.6 查看同步后的文件

三.重构store.db
1.此时3台服务器信息已经收集完,node1上的信息最完整,所以我在node1上开始重构store.db
ceph-monstore-tool /tmp/mon-store/ rebuild -- --keyring /etc/ceph/ceph.client.admin.keyring2.将重构都store.db等文件复制到mon文件夹下,并创建相关文件
mkdir /var/lib/ceph/mon/ceph-node1
cp -ra /tmp/mon-store/* /var/lib/ceph/mon/ceph-node1/
touch /var/lib/ceph/mon/ceph-node1/done
touch /var/lib/ceph/mon/ceph-node1/systemd
sudo ceph-authtool --create-keyring /var/lib/ceph/mon/ceph-node1/keyring --gen-key -n mon. --cap mon 'allow *'
四.创建monmap
1.创建mommap(将node3加入monmap,先恢复一个mon,其它mon待集群正常后再加入进来)
monmaptool --create --fsid d2068e51-3775-47ad-8721-129080a6bfe7 --add node1 192.168.10.17:6789 monmap2.导入monmop
ceph-mon -i node1 --inject-monmap monmap3.修改mon目录权限
chown ceph:ceph -R /var/lib/ceph/mon/
chmod 755 -R /var/lib/ceph/mon/
4.修改ceph.conf,去掉其它的mon节点信息,然后分发到其它节点去

同步配置文件
ceph-deploy --overwrite-conf admin node1 node2 node35.启动mon osd,rgw服务
systemctl start ceph-mon.target
systemctl start ceph-osd.target
systemctl start ceph-radosgw.target
6.ceph -s 查看集群信息
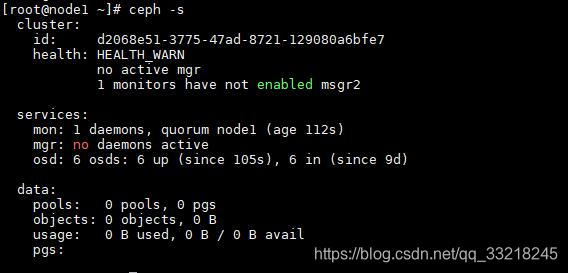
7.可以看到现在还有些不正常,先执行这个命令
ceph mon enable-msgr2
8.添加mgr
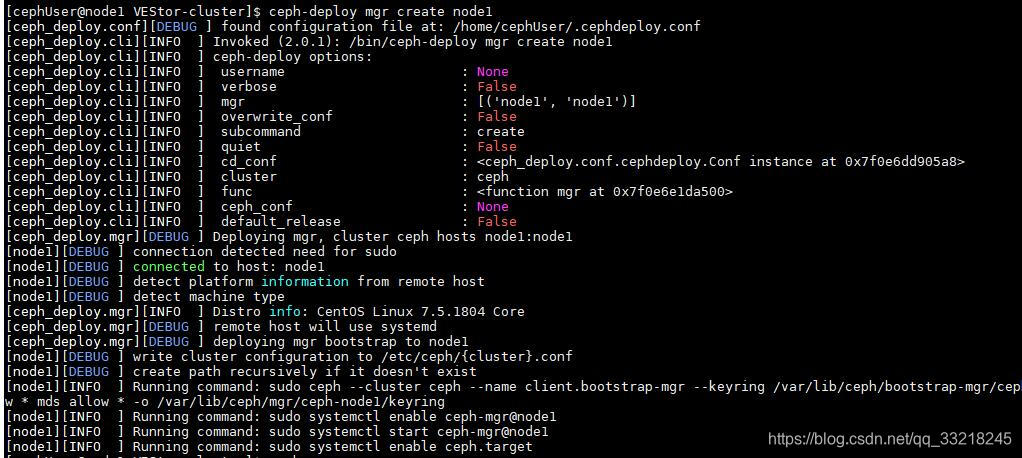
ceph-deploy mgr create node1现在添加会报这个错,验证失败,那是因为没有添加密钥
AuthRegistry(0x7f901c0673c8) no keyring found at /etc/ceph/ceph.client.bootstrap-mgr.keyring,/etc/ceph/ceph.keyring,/etc/ceph/keyring,/etc/ceph/keyring.bin,, disabling cephx
handle_auth_bad_method server allowed_methods [2] but i only support [2]

五.创建密钥
1.查看密钥
ceph auth list
并没有mgr密钥
2.添加mgr密钥
ceph auth get-or-create client.bootstrap-mgr mon 'allow profile bootstrap-mgr'3.添加node1为mgr
1.导出密钥
ceph auth get-or-create client.bootstrap-mgr | tee /var/lib/ceph/bootstrap-mgr/ceph.keyring注意:如果是用ceph-deploy部署的集群,还需要将ceph-deploy根目录下的相关密钥更新
2.创建mgr成功
3.重启mgr服务查看集群信息,恢复集群成功
systemctl restart ceph-mgr@node1
其它的mon可以单独添加进来,并且保证集群mon为奇数,其它的密钥可以通过同样的方式添加进来,还有下面这些密钥需要添加。
