ES文档操作
添加文档
自动创建id方式
索引已经创建好之后就可以继续创建文档,并添加数据。 这里的文档可以类比为关系型数据库中的表数据,添加的数据格式为JSON格式。
选择post请求方式,并发出如下请求
http://localhost:9200/golang/_doc
在Body里面选择raw,添加的数据选择JSON格式,内容如下:
{
    "name": "Psych",
    "url": "https://blog.csdn.net/qq_39280718?type=blog",
    "author": "PPPsych"
}
运行结果如下:

返回的结果里面包含了_id字段也就是该文档的唯一标识。这个id也是可以自定义的。
自定义id方式
在某些场景下我们可能需要去自主产生维护id信息, 这样的情况下主要创建文档的URL要有变化,就是在url后面要加上id信息。例如http://127.0.0.1:9200/golang/_doc/001
同样使用POST请求,在Body里面选择raw,添加的数据选择JSON格式(操作同上)

这个时候响应体里面的id就是自定义的001了。
其实创建文档的地址也可以是
http://127.0.0.1:9200/golang/_create/002.也就是_create和_doc都是可行的

查询文档
主键查询
从前面的操作来看,其实可以很好的猜想根据主键查询的url地址一个和主键添加文档的URL地址一样,只是请求的方法得使用GET请求。例如查询001的文档,URL地址:http://127.0.0.1:9200/golang/_doc/001

如果我们给出的id是不存在的,例如:http://127.0.0.1:9200/golang/_doc/999
返回内容就会变为:

全查询
全查询就是查询所有的文档信息:
请求的url地址:http://127.0.0.1:9200/golang/_search
运行结果为:
{
    "took": 38,
    "timed_out": false,
    "_shards": {
        "total": 1,
        "successful": 1,
        "skipped": 0,
        "failed": 0
    },
    "hits": {
        "total": {
            "value": 5,
            "relation": "eq"
        },
        "max_score": 1.0,
        "hits": [
            {
                "_index": "golang",
                "_type": "_doc",
                "_id": "WmazaIMBJ_0P-pFT6wOp",
                "_score": 1.0,
                "_source": {
                    "name": "Psych",
                    "url": "https://blog.csdn.net/qq_39280718?type=blog",
                    "author": "PPPsych"
                }
            },
            {
                "_index": "golang",
                "_type": "_doc",
                "_id": "001",
                "_score": 1.0,
                "_source": {
                    "name": "Psych",
                    "url": "https://blog.csdn.net/qq_39280718?type=blog",
                    "author": "PPPsych"
                }
            },
            {
                "_index": "golang",
                "_type": "_doc",
                "_id": "002",
                "_score": 1.0,
                "_source": {
                    "name": "Psych",
                    "url": "https://blog.csdn.net/qq_39280718?type=blog",
                    "author": "PPPsych"
                }
            },
            {
                "_index": "golang",
                "_type": "_doc",
                "_id": "003",
                "_score": 1.0,
                "_source": {
                    "name": "Psych",
                    "url": "https://blog.csdn.net/qq_39280718?type=blog",
                    "author": "PPPsych"
                }
            },
            {
                "_index": "golang",
                "_type": "_doc",
                "_id": "005",
                "_score": 1.0,
                "_source": {
                    "name": "Morax",
                    "url": "https://blog.csdn.net/qq_39280718?type=blog",
                    "author": "钟离"
                }
            }
        ]
    }
}
响应内容里面会包含了是否超时time_out 、切片信息shards、
hits这个里面就是我们查询出来的内容数据。
修改文档
当文档数据被创建之后如果想对文档进行修改,这样的操作在ES中是被允许的。但是在ES中修改是分为两种情况的,
- 一种是完全覆盖式的修改,也叫全量修改。
- 另外一种是局部性的修改。
全量修改
全量修改的情况下,无论发送多少次请求,数据都是会被完全覆盖的。
所以可以采用PUT进行操作. 地址跟主键查询和自定义主键修改是类似的。
URL:http://127.0.0.1:9002/golang/_doc/001
其中:
_doc表示文档数据。
001就是文档主键。
http请求的body体就是我们准备修改后的内容。比如下面我们准备修改一下
name:{ "name": "ROOT", "url": "https://blog.csdn.net/qq_39280718?type=blog", "author": "PPPsych" }发送请求获取响应:
{
    "_index": "golang",
    "_type": "_doc",
    "_id": "001",
    "_version": 2,
    "result": "updated",
    "_shards": {
        "total": 2,
        "successful": 1,
        "failed": 0
    },
    "_seq_no": 5,
    "_primary_term": 1
}
执行结果中主要内容:
result修改结果为updated,即修改成功。_version:版本,修改了一次加了1,变为了2.
查询文档是否修改成功:

发现
name发生变化,即修改成功
局部修改
由于我们是局部修改,所以我们每次修改的结果不会是相同的。此时不能采用PUT,要使用POST。
URL地址和全量更新也不相同:
http://127.0.0.1:9002/golang/_update/002http请求的body也有固定的格式,例如同上修改name,body体如下:{ "doc":{ "name": "root" } }发送请求获取响应如下:
{
    "_index": "golang",
    "_type": "_doc",
    "_id": "002",
    "_version": 2,
    "result": "updated",
    "_shards": {
        "total": 2,
        "successful": 1,
        "failed": 0
    },
    "_seq_no": 6,
    "_primary_term": 1
}
这个时候响应结果
result为update。如果我们修改的内容与库中内容完全一致,如下响应的
result为noop: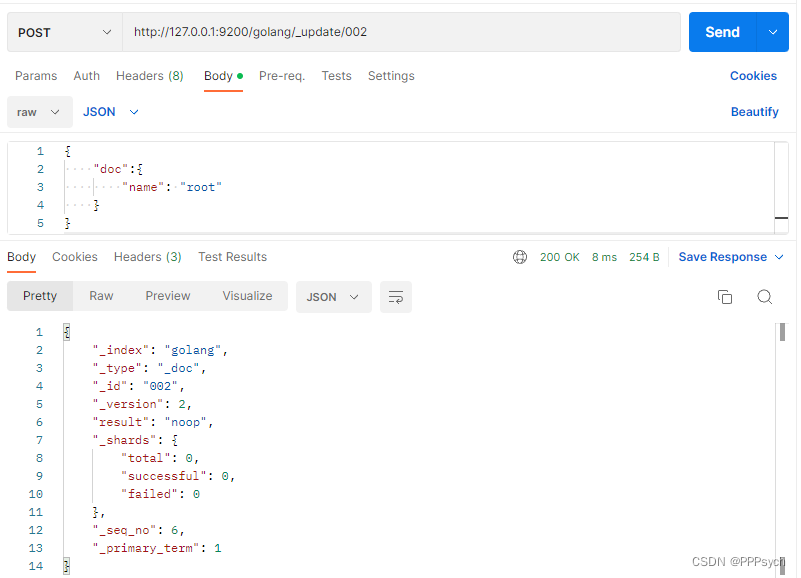
查询文档是否修改成功
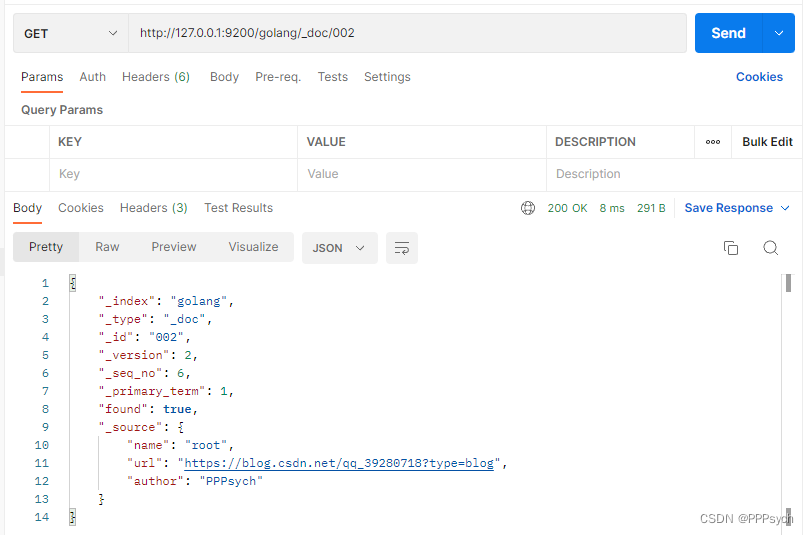
发现
name发生变化,即修改成功
删除文档
文档创建之后删除也是我们对数据管理的一些常规操作。与前面的操作类似,删除操作是,http请求的方式需要使用delete操作.资源地址是一样的。
具体过程:
先全查询当前有哪些文档
{
    "took": 1,
    "timed_out": false,
    "_shards": {
        "total": 1,
        "successful": 1,
        "skipped": 0,
        "failed": 0
    },
    "hits": {
        "total": {
            "value": 5,
            "relation": "eq"
        },
        "max_score": 1.0,
        "hits": [
            {
                "_index": "golang",
                "_type": "_doc",
                "_id": "WmazaIMBJ_0P-pFT6wOp",
                "_score": 1.0,
                "_source": {
                    "name": "Psych",
                    "url": "https://blog.csdn.net/qq_39280718?type=blog",
                    "author": "PPPsych"
                }
            },
            {
                "_index": "golang",
                "_type": "_doc",
                "_id": "003",
                "_score": 1.0,
                "_source": {
                    "name": "Psych",
                    "url": "https://blog.csdn.net/qq_39280718?type=blog",
                    "author": "PPPsych"
                }
            },
            {
                "_index": "golang",
                "_type": "_doc",
                "_id": "005",
                "_score": 1.0,
                "_source": {
                    "name": "Morax",
                    "url": "https://blog.csdn.net/qq_39280718?type=blog",
                    "author": "钟离"
                }
            },
            {
                "_index": "golang",
                "_type": "_doc",
                "_id": "001",
                "_score": 1.0,
                "_source": {
                    "name": "ROOT",
                    "url": "https://blog.csdn.net/qq_39280718?type=blog",
                    "author": "PPPsych"
                }
            },
            {
                "_index": "golang",
                "_type": "_doc",
                "_id": "002",
                "_score": 1.0,
                "_source": {
                    "name": "root",
                    "url": "https://blog.csdn.net/qq_39280718?type=blog",
                    "author": "PPPsych"
                }
            }
        ]
    }
}
删除
id为WmazaIMBJ_0P-pFT6wOp的文档url地址为:
http://127.0.0.1:9200/golang/_doc/WmazaIMBJ_0P-pFT6wOp发送
DELETE请求
响应内容的result可以看出为
deleted,也就是被删除成功了。如果我们再点击一次继续删除。响应结果如下:
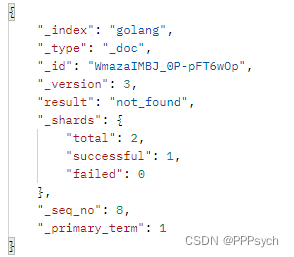
此时
result的值为not_found也就是没有找到该文档。即表示删除成功再次全查询查看当前已有文档:
{
    "took": 90,
    "timed_out": false,
    "_shards": {
        "total": 1,
        "successful": 1,
        "skipped": 0,
        "failed": 0
    },
    "hits": {
        "total": {
            "value": 4,
            "relation": "eq"
        },
        "max_score": 1.0,
        "hits": [
            {
                "_index": "golang",
                "_type": "_doc",
                "_id": "003",
                "_score": 1.0,
                "_source": {
                    "name": "Psych",
                    "url": "https://blog.csdn.net/qq_39280718?type=blog",
                    "author": "PPPsych"
                }
            },
            {
                "_index": "golang",
                "_type": "_doc",
                "_id": "005",
                "_score": 1.0,
                "_source": {
                    "name": "Morax",
                    "url": "https://blog.csdn.net/qq_39280718?type=blog",
                    "author": "钟离"
                }
            },
            {
                "_index": "golang",
                "_type": "_doc",
                "_id": "001",
                "_score": 1.0,
                "_source": {
                    "name": "ROOT",
                    "url": "https://blog.csdn.net/qq_39280718?type=blog",
                    "author": "PPPsych"
                }
            },
            {
                "_index": "golang",
                "_type": "_doc",
                "_id": "002",
                "_score": 1.0,
                "_source": {
                    "name": "root",
                    "url": "https://blog.csdn.net/qq_39280718?type=blog",
                    "author": "PPPsych"
                }
            }
        ]
    }
}
发现
id为WmazaIMBJ_0P-pFT6wOp的文档已被删除。