样例:
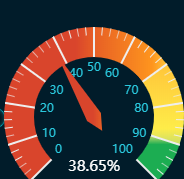
在项目中大概需要这样一个仪表盘,就去看了官网,也在博客上看了大神们的代码
上代码:
<!DOCTYPE html>
<html>

<head>
	<meta charset="UTF-8">
	<title>单仪表盘案例</title>
	<!-- 引入 ECharts 文件 -->
	<script src="js/echarts4.0.js" type="text/javascript" charset="utf-8"></script>

<body>
	<!-- 为 ECharts 准备一个具备大小(宽高)的 容器 -->
	<div id="chart1" style="width: 80%;height: 400px;top: 50px;left: 10%;border: 3px solid #000;"></div>
</body>

</html>
<script type="text/javascript">
	// 基于准备好的容器(这里的容器是id为chart1的div),初始化echarts实例
	var chart1 = echarts.init(document.getElementById("chart1"));

	var colorTemplate1 = [
		[0.2, "rgba(255,0,0,0.8)"],
		[0.8, "rgba(0,255,255,0.8)"],
		[1, "rgba(0,255,0,0.8)"]
	];


	var data1 = [{
		name: "安全度",
		value: 85,
	}];


	// 指定图表的配置项和数据
	var option = {
		backgroundColor: "#000",
		tooltip: { // 本系列特定的 tooltip 设定。
			show: true,
			formatter: "{b}:{c}%",
			backgroundColor: "rgba(50,50,50,0.7)", // 提示框浮层的背景颜色。注意:series.tooltip 仅在 tooltip.trigger 为 'item' 时有效。
			borderColor: "#333", // 提示框浮层的边框颜色。...
			borderWidth: 0, // 提示框浮层的边框宽。...
			padding: 5, // 提示框浮层内边距,单位px,默认各方向内边距为5,接受数组分别设定上右下左边距。...
			textStyle: { // 提示框浮层的文本样式。...
				// color ,fontStyle ,fontWeight ,fontFamily ,fontSize ,lineHeight ,.......
			},
		},

		series: [{
			name: "单仪表盘示例", // 系列名称,用于tooltip的显示,legend 的图例筛选,在 setOption 更新数据和配置项时用于指定对应的系列。
			type: "gauge", // 系列类型
			radius: "80%", // 参数:number, string。 仪表盘半径,默认 75% ,可以是相对于容器高宽中较小的一项的一半的百分比,也可以是绝对的数值。
			center: ["50%", "55%"], // 仪表盘位置(圆心坐标)
			startAngle: 225, // 仪表盘起始角度,默认 225。圆心 正右手侧为0度,正上方为90度,正左手侧为180度。
			endAngle: -45, // 仪表盘结束角度,默认 -45
			clockwise: true, // 仪表盘刻度是否是顺时针增长,默认 true。
			min: 0, // 最小的数据值,默认 0 。映射到 minAngle。
			max: 100, // 最大的数据值,默认 100 。映射到 maxAngle。
			splitNumber: 10, // 仪表盘刻度的分割段数,默认 10。

			axisLine: { // 仪表盘轴线(轮廓线)相关配置。
				show: true, // 是否显示仪表盘轴线(轮廓线),默认 true。
				lineStyle: { // 仪表盘轴线样式。
					color: colorTemplate1, //仪表盘的轴线可以被分成不同颜色的多段。每段的  结束位置(范围是[0,1]) 和  颜色  可以通过一个数组来表示。默认取值:[[0.2, '#91c7ae'], [0.8, '#63869e'], [1, '#c23531']]
					opacity: 1, //图形透明度。支持从 0 到 1 的数字,为 0 时不绘制该图形。
					width: 30, //轴线宽度,默认 30。
					shadowBlur: 20, //(发光效果)图形阴影的模糊大小。该属性配合 shadowColor,shadowOffsetX, shadowOffsetY 一起设置图形的阴影效果。
					shadowColor: "#fff", //阴影颜色。支持的格式同color。
				}
			},

			splitLine: { // 分隔线样式。
				show: true, // 是否显示分隔线,默认 true。
				length: 30, // 分隔线线长。支持相对半径的百分比,默认 30。
				lineStyle: { // 分隔线样式。
					color: "#eee", //线的颜色,默认 #eee。
					opacity: 1, //图形透明度。支持从 0 到 1 的数字,为 0 时不绘制该图形。
					width: 2, //线度,默认 2。
					type: "solid", //线的类型,默认 solid。 此外还有 dashed,dotted
					shadowBlur: 10, //(发光效果)图形阴影的模糊大小。该属性配合 shadowColor,shadowOffsetX, shadowOffsetY 一起设置图形的阴影效果。
					shadowColor: "#fff", //阴影颜色。支持的格式同color。
				}
			},

			axisTick: { // 刻度(线)样式。
				show: true, // 是否显示刻度(线),默认 true。
				splitNumber: 5, // 分隔线之间分割的刻度数,默认 5。
				length: 8, // 刻度线长。支持相对半径的百分比,默认 8。
				lineStyle: { // 刻度线样式。
					color: "#eee", //线的颜色,默认 #eee。
					opacity: 1, //图形透明度。支持从 0 到 1 的数字,为 0 时不绘制该图形。
					width: 1, //线度,默认 1。
					type: "solid", //线的类型,默认 solid。 此外还有 dashed,dotted
					shadowBlur: 10, //(发光效果)图形阴影的模糊大小。该属性配合 shadowColor,shadowOffsetX, shadowOffsetY 一起设置图形的阴影效果。
					shadowColor: "#fff", //阴影颜色。支持的格式同color。
				},
			},

			axisLabel: { // 刻度标签。
				show: true, // 是否显示标签,默认 true。
				distance: 5, // 标签与刻度线的距离,默认 5。
				color: "#fff", // 文字的颜色,默认 #fff。
				fontSize: 12, // 文字的字体大小,默认 5。
				formatter: "{value}", // 刻度标签的内容格式器,支持字符串模板和回调函数两种形式。 示例:// 使用字符串模板,模板变量为刻度默认标签 {value},如:formatter: '{value} kg'; // 使用函数模板,函数参数分别为刻度数值,如formatter: function (value) {return value + 'km/h';}
			},

			pointer: { // 仪表盘指针。
				show: true, // 是否显示指针,默认 true。
				length: "70%", // 指针长度,可以是绝对数值,也可以是相对于半径的百分比,默认 80%。
				width: 5, // 指针宽度,默认 8。
			},

			itemStyle: { // 仪表盘指针样式。
				color: "auto", // 指针颜色,默认(auto)取数值所在的区间的颜色
				opacity: 1, // 图形透明度。支持从 0 到 1 的数字,为 0 时不绘制该图形。
				borderWidth: 0, // 描边线宽,默认 0。为 0 时无描边。
				borderType: "solid", // 柱条的描边类型,默认为实线,支持 'solid', 'dashed', 'dotted'。
				borderColor: "#000", // 图形的描边颜色,默认 "#000"。支持的颜色格式同 color,不支持回调函数。
				shadowBlur: 10, // (发光效果)图形阴影的模糊大小。该属性配合 shadowColor,shadowOffsetX, shadowOffsetY 一起设置图形的阴影效果。
				shadowColor: "#fff", // 阴影颜色。支持的格式同color。
			},

			emphasis: { // 高亮的 仪表盘指针样式
				itemStyle: {
					//高亮 和正常  两者具有同样的配置项,只是在不同状态下配置项的值不同。
				}
			},

			title: { // 仪表盘标题。
				show: true, // 是否显示标题,默认 true。
				offsetCenter: [0, "20%"], //相对于仪表盘中心的偏移位置,数组第一项是水平方向的偏移,第二项是垂直方向的偏移。可以是绝对的数值,也可以是相对于仪表盘半径的百分比。
				color: "#fff", // 文字的颜色,默认 #333。
				fontSize: 20, // 文字的字体大小,默认 15。
			},

			detail: { // 仪表盘详情,用于显示数据。
				show: true, // 是否显示详情,默认 true。
				offsetCenter: [0, "50%"], // 相对于仪表盘中心的偏移位置,数组第一项是水平方向的偏移,第二项是垂直方向的偏移。可以是绝对的数值,也可以是相对于仪表盘半径的百分比。
				color: "auto", // 文字的颜色,默认 auto。
				fontSize: 30, // 文字的字体大小,默认 15。
				formatter: "{value}%", // 格式化函数或者字符串
			},

			data: data1
		}]

	};

	// 使用刚指定的配置项和数据显示图表
	chart1.setOption(option)
</script>
版权声明:本文为heyNewbie原创文章,遵循CC 4.0 BY-SA版权协议,转载请附上原文出处链接和本声明。