阅读本文所需知识点:
- 进程隔离的概念,需要了解为什么需要IPC
- 什么是用户态和内核态,需要了解IPC实现的机制以及为什么IPC需要内存拷贝
- JNI的作用,JNI可以理解为Java对象与native的通信的协议,它既可以操作Java对象,又可以操作native的对象,理解这点很重要
- Java的对象的本质,这点也很重要,因为JNI操作Java对象的时候要理解它在Java虚拟机中的理论模型(与其说是模型,其实展示出来就是一副图像)
对于第一、二点不清楚的可以阅读《OS: Three easy pieces》,是我看来最好的操作系统原理入门书籍,它厚重的原因是对于概念的解释很详细,专注于虚拟化,并发,文件系统三个方面,而不是大而全
对于第三、四点不清楚的可以看一下《深入理解Java虚拟机》这本书
Binder的使用
这里以gityuan的代码作为示例
public class ClientDemo {
public static void main(String[] args) throws RemoteException {
System.out.println(“Client start”);
IBinder binder = ServiceManager.getService(“MyService”); //获取名为"MyService"的服务
IMyService myService = new MyServiceProxy(binder); //创建MyServiceProxy对象
myService.sayHello(“binder”); //通过MyServiceProxy对象调用接口的方法
System.out.println(“Client end”);
}
}
public class ServerDemo {
public static void main(String[] args) {
System.out.println(“MyService Start”);
Looper.prepareMainLooper(); //开启循环执行
android.os.Process.setThreadPriority(android.os.Process.THREAD_PRIORITY_FOREGROUND); //设置为前台优先级
ServiceManager.addService(“MyService”, new MyService());//注册服务
Looper.loop();
}
}
获取ServiceManager
在ServerDemo中可以看到在获取服务之前,先要想ServiceManager添加服务ServiceManager.addService(),既然有添加,那必定有一个地方去存储它,存储的地方就是ServiceManager,那么要怎么获取到ServiceManager呢?先从ServiceManager.addService()开始,在开始之前先来看一下获取ServiceManager的UML图
类图
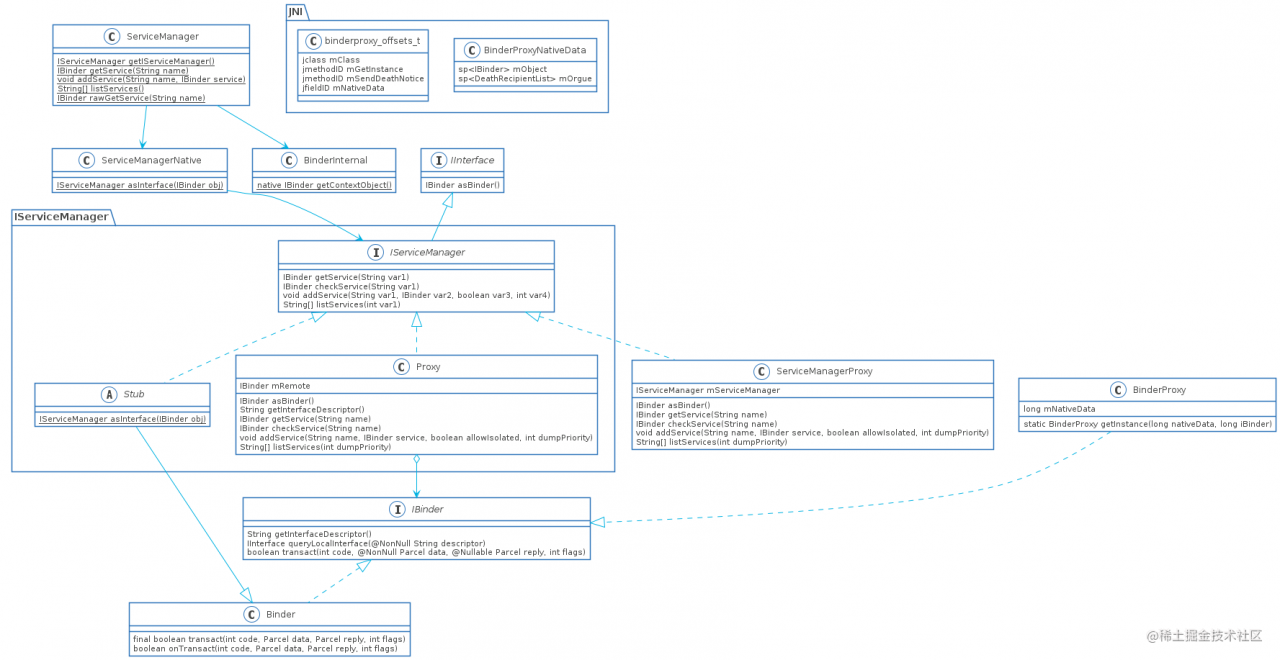
有几个特殊的类要解释一下
- BinderProxy,native binder的存储类,里面存储的是native binder的指针,并且不是由Java类初始化,是在JNI代码中加载和创建
- IServiceManager.Stub,这个是个抽象类,没有实现类,在平常使用Binder的时候一般都是继承它作为Binder实体类,但是IServiceManager是工作在native中的服务,所以Stub类不会被继承,这种方式也常见于获取C++ Binder服务的时候
ServiceManager.addService()
最终调用到addService(String name, IBinder service, boolean allowIsolated, int dumpPriority),它里面的代码就一行
getIServiceManager().addService(name, service, allowIsolated, dumpPriority)
看到正主getIServiceManager()了
ServiceManager.getIServiceManager()
private static IServiceManager getIServiceManager() {
if (sServiceManager != null) {
return sServiceManager;
}
// Find the service manager
sServiceManager = ServiceManagerNative
.asInterface(Binder.allowBlocking(BinderInternal.getContextObject()));
return sServiceManager;
}
这里使用的是单例模式,没有加线程保护,因为这个接口并不给应用使用,以及应用也不能直接操作addService()``getService()等接口,所以getIServiceManager()可以是认为运行在主线程中,没错,我们与ServiceManager的通信也是采用Binder,只是ServiceManager的Binder是有点特殊,我们先看ServiceManagerNative.asInterface()这个方法
ServiceManagerNative.asInterface()
public static IServiceManager asInterface(IBinder obj) {
if (obj == null) {
return null;
}
// ServiceManager is never local
return new ServiceManagerProxy(obj);
}
直接创建了一个ServiceManagerProxy对象
ServiceManagerProxy初始化
public ServiceManagerProxy(IBinder remote) {
mRemote = remote;
mServiceManager = IServiceManager.Stub.asInterface(remote);
}
mRemote = remote;这个是老的方式,gityuan的Binder系列7-framework层分析,就是使用这种方式mServiceManager = IServiceManager.Stub.asInterface(remote);是通过AIDL方式进行通信,显得更加简洁一点
这里说明一点AIDL并不等于Binder通信,它只是让Binder通信变得更加简单,就如同Retrofit和okhttp的关系,AIDL生成的java代码在out目录下,所以想要分析的话得要先编译过Android源码才行,具体的路径是out/soong/.intermediates/frameworks/base/framework-minus-apex/android_common/javac/shard30/classes/android/os/IServiceManager.class使用AndroidStudio,IDEA或者反编译工具可以打开查看,如果想直接看的话我把它拷贝了一份IServiceManager.java
IServiceManager.Stub.asInterface()
public static IServiceManager asInterface(IBinder obj) {
if (obj == null) {
return null;
} else {
IInterface iin = obj.queryLocalInterface(“android.os.IServiceManager”);
return (IServiceManager)(iin != null && iin instanceof IServiceManager ? (IServiceManager)iin : new IServiceManager.Stub.Proxy(obj));
}
}
逻辑很简单
- 如果是相同进程,直接返回Binder对象,由于ServiceManager是单独处于一个进程,这里不会是相同进程,至于本地Service是怎么连接到的,我们稍后再讨论
- 如果不是相同进程,则创建
IServiceManager.Stub.Proxy
IServiceManager.Stub.Proxy初始化
Proxy(IBinder remote) {
this.mRemote = remote;
}
这个和ServiceManagerProxy老的初始化方式是不是一模一样,再来看看IServiceManager.Stub.Proxy.addService()
public void addService(String name, IBinder service, boolean allowIsolated, int dumpPriority) throws RemoteException {
Parcel _data = Parcel.obtain();
Parcel _reply = Parcel.obtain();
try {
_data.writeInterfaceToken(“android.os.IServiceManager”);
_data.writeString(name);
_data.writeStrongBinder(service);
_data.writeInt(allowIsolated ? 1 : 0);
_data.writeInt(dumpPriority);
boolean _status = this.mRemote.transact(3, _data, _reply, 0);
if (!_status && IServiceManager.Stub.getDefaultImpl() != null) {
IServiceManager.Stub.getDefaultImpl().addService(name, service, allowIsolated, dumpPriority);
return;
}
_reply.readException();
} finally {
_reply.recycle();
_data.recycle();
}
}
和老方式也基本一样,所以新方式只是自动生成了这部分代码,减少了代码量,让IPC看起来就是一个方法调用,但最终都是调用IBinder.transact()方法进行IPC,接下来回到ServiceManager.getIServiceManager()方法中,上面的只能算作是一些代码技巧而已,接下来就是Binder的核心,获取ServiceManager的IBinder对象。
BinderInternal.getContextObject()
这是一个native方法,对应到android_util_Binder.cpp的android_os_BinderInternal_getContextObject()
android_os_BinderInternal_getContextObject()
这里做了两件事情:
- 通过调用
ProcessState.getContextObject(NULL)获取sp,注意这里传递的参数NULL,即要获取的是IServiceManager的Binder,这一步留作native Binder解析流程中详细阐述 - 调用
javaObjectForIBinder()将IBinder转为java对象,即BinderProxy对象,转换的过程就是将IBinder的指针(long类型)存储在BinderProxy的mNativeData中
javaObjectForIBinder()
检查是不是Binder类型,这一步是判断是不是传入的是
JavaBBinder类型创建BinderProxyNativeData类型的指针,并初始化对应的字段
将其IBinder的智能指针引用放到BinderProxyNativeData.mObject当中
通过
CallStaticObjectMethod()调用BinderProxy.getInstance()并传递对应的参数,这里又引出了一个问题,**我们都知道调用一个类的静态方法是会触发类的加载,可以看到这里直接传的是gBinderProxyOffsets.mClass,说明BinderProxy.class对象已经加载完成了,那么这个gBinderProxyOffsets又是怎么初始化的呢?**答案是在虚拟机启动的时候就加载完成了,具体的调用栈大致如下
//AndroidRuntime.cpp,这部分是将函数指针进行绑定,使用宏的目的是为了方便DEBUG,可以定义不同的结构体,进行不同的初始化操作
#define REG_JNI(name) { name }
struct RegJNIRec {
int (mProc)(JNIEnv);
};
extern int register_android_os_Binder(JNIEnv* env);//申明函数,使用静态链接链入
static const RegJNIRec gRegJNI[] = {
…
REG_JNI(register_android_os_Binder),//宏展开就是结构体的初始化操作{register_android_os_Binder}
…
};
//AndroidRuntime.cpp,这部分在进程启动时调用
AndroidRuntime::start(const char* className, const Vector& options, bool zygote)
int AndroidRuntime::startReg(JNIEnv* env)
static int register_jni_procs(const RegJNIRec array[], size_t count, JNIEnv* env)
//android_util_Binder.cpp
int register_android_os_Binder(JNIEnv* env)
s
《一线大厂Java面试题解析+后端开发学习笔记+最新架构讲解视频+实战项目源码讲义》
【docs.qq.com/doc/DSmxTbFJ1cmN1R2dB】 完整内容开源分享
tatic int int_register_android_os_BinderInternal(JNIEnv* env)
- 下面的代码没有看懂,但是关系不是很大
如此一来返回的就是BinderProxy的对象实例,它也是实现了IBinder的接口
BinderProxy.getInstance()
方法签名如下private static BinderProxy getInstance(long nativeData, long iBinder),是一个私有的静态方法,返回的是BinderProxy的对象实例,再来对比一下CallStaticObjectMethod(gBinderProxyOffsets.mClass, gBinderProxyOffsets.mGetInstance, (jlong) nativeData, (jlong) val.get()),应该会觉得很相似。前面两个参数gBinderProxyOffsets.mClass和gBinderProxyOffsets.mGetInstance代表的分别是BinderProxy.class对象以及getInstance的方法名字,具体的可以看static int int_register_android_os_BinderProxy(JNIEnv* env)函数是怎么初始化gBinderProxyOffsets的字段的;后面两个参数就是getInstance的两个参数,将指针转成jlong类型传入到BinderProxy.getInstance()当中。接下来看一下getInstance中的逻辑
- 看看有没有缓存的BinderProxy对象,有则直接返回,这里可以缓存BinderProxy的原因是BinderProxy<==>Binder是一一对应的,所以对于一个Binder服务来说,只需要要一个BinderProxy即可,所以可以是全局的
- 如果没有,则创建一个BinderProxy实例,并存入到缓存中
- 之后的BinderProxy的初始化只做了一件事,将传递过来的
BinderProxyNativeData的指针对应的jlong,存入到mNativeData中,实现了BinderProxy和native binder的关联
以上就是获取IServiceManager整个过程,需要记住一点就是IServiceManager的所有接口,最终都是调用BinderProxy.transact()方法中
ServiceManager.addService()
回到最开始添加服务的位置,方法签名如下
public static void addService(String name, IBinder service, boolean allowIsolated,int dumpPriority){
try {
getIServiceManager().addService(name, service, allowIsolated, dumpPriority);
} catch (RemoteException e) {
Log.e(TAG, “error in addService”, e);
}
}
在获取到IserviceManager之后的addService()则会调用到AIDL生成的方法当中
IServiceManager.Proxy.addService()
这个方法的代码在上面有贴出,逻辑如下
- 获取Parcel对象,分为两种,传递数据的data和获取回复的reply
- 写入两个String对象,分别是token和服务名称
- 写入Binder对象,这里我们在下面进行讨论
- 调用
IBinder.transact()方法,之前获取IServiceManager的时候就说过返回的是BinderProxy的对象实例,所以看BinderProxy.transact()方法
BinderProxy.transact()
- 判断是不是异步的Binder,这里有个变量
mWarnOnBlocking,还记得之前在调用BinderInternal.getContextObject()之后还做了一个操作Binder.allowBlocking(BinderInternal.getContextObject()),这里会将mWarnOnBloking置为false,所以这块逻辑一般都是走不到 - 是否添加Trace,主要是性能跟踪
- 接下来的一堆操作不是很理解是要干嘛的,最后是调用到
transactNative(),这是个native方法,方法签名如下transactNative(int code, Parcel data, Parcel reply, int flags),对应android_util_Binder.cpp的android_os_BinderProxy_transact()
android_os_BinderProxy_transact()
- 判断dataObj是否为NULL,所以即使不传任何数据,也要在调用
transact()之前调用Parcel.obtain()获取Parcel对象 - 将java端的Parcel对象转为native的Parcel,包括data和reply,转换的方式其实和BinderProxy很类似,之后我们再来讨论
- 之后调用
getBPNativeData()将BinderProxy.mNativeData转为指向BinderProxyNativeData的指针,从而获取到sp - 之后调用native 的Binder的
transact()方法进行,这部分留到native 的解析的时候再说
in()`获取Parcel对象 - 将java端的Parcel对象转为native的Parcel,包括data和reply,转换的方式其实和BinderProxy很类似,之后我们再来讨论
- 之后调用
getBPNativeData()将BinderProxy.mNativeData转为指向BinderProxyNativeData的指针,从而获取到sp - 之后调用native 的Binder的
transact()方法进行,这部分留到native 的解析的时候再说