理解了**锁屏流程**,再来看一看解锁流程。
1、上滑解锁流程:
由于锁屏界面是灭屏时构建并显示的,所以亮屏后就能直接看到锁屏界面啦。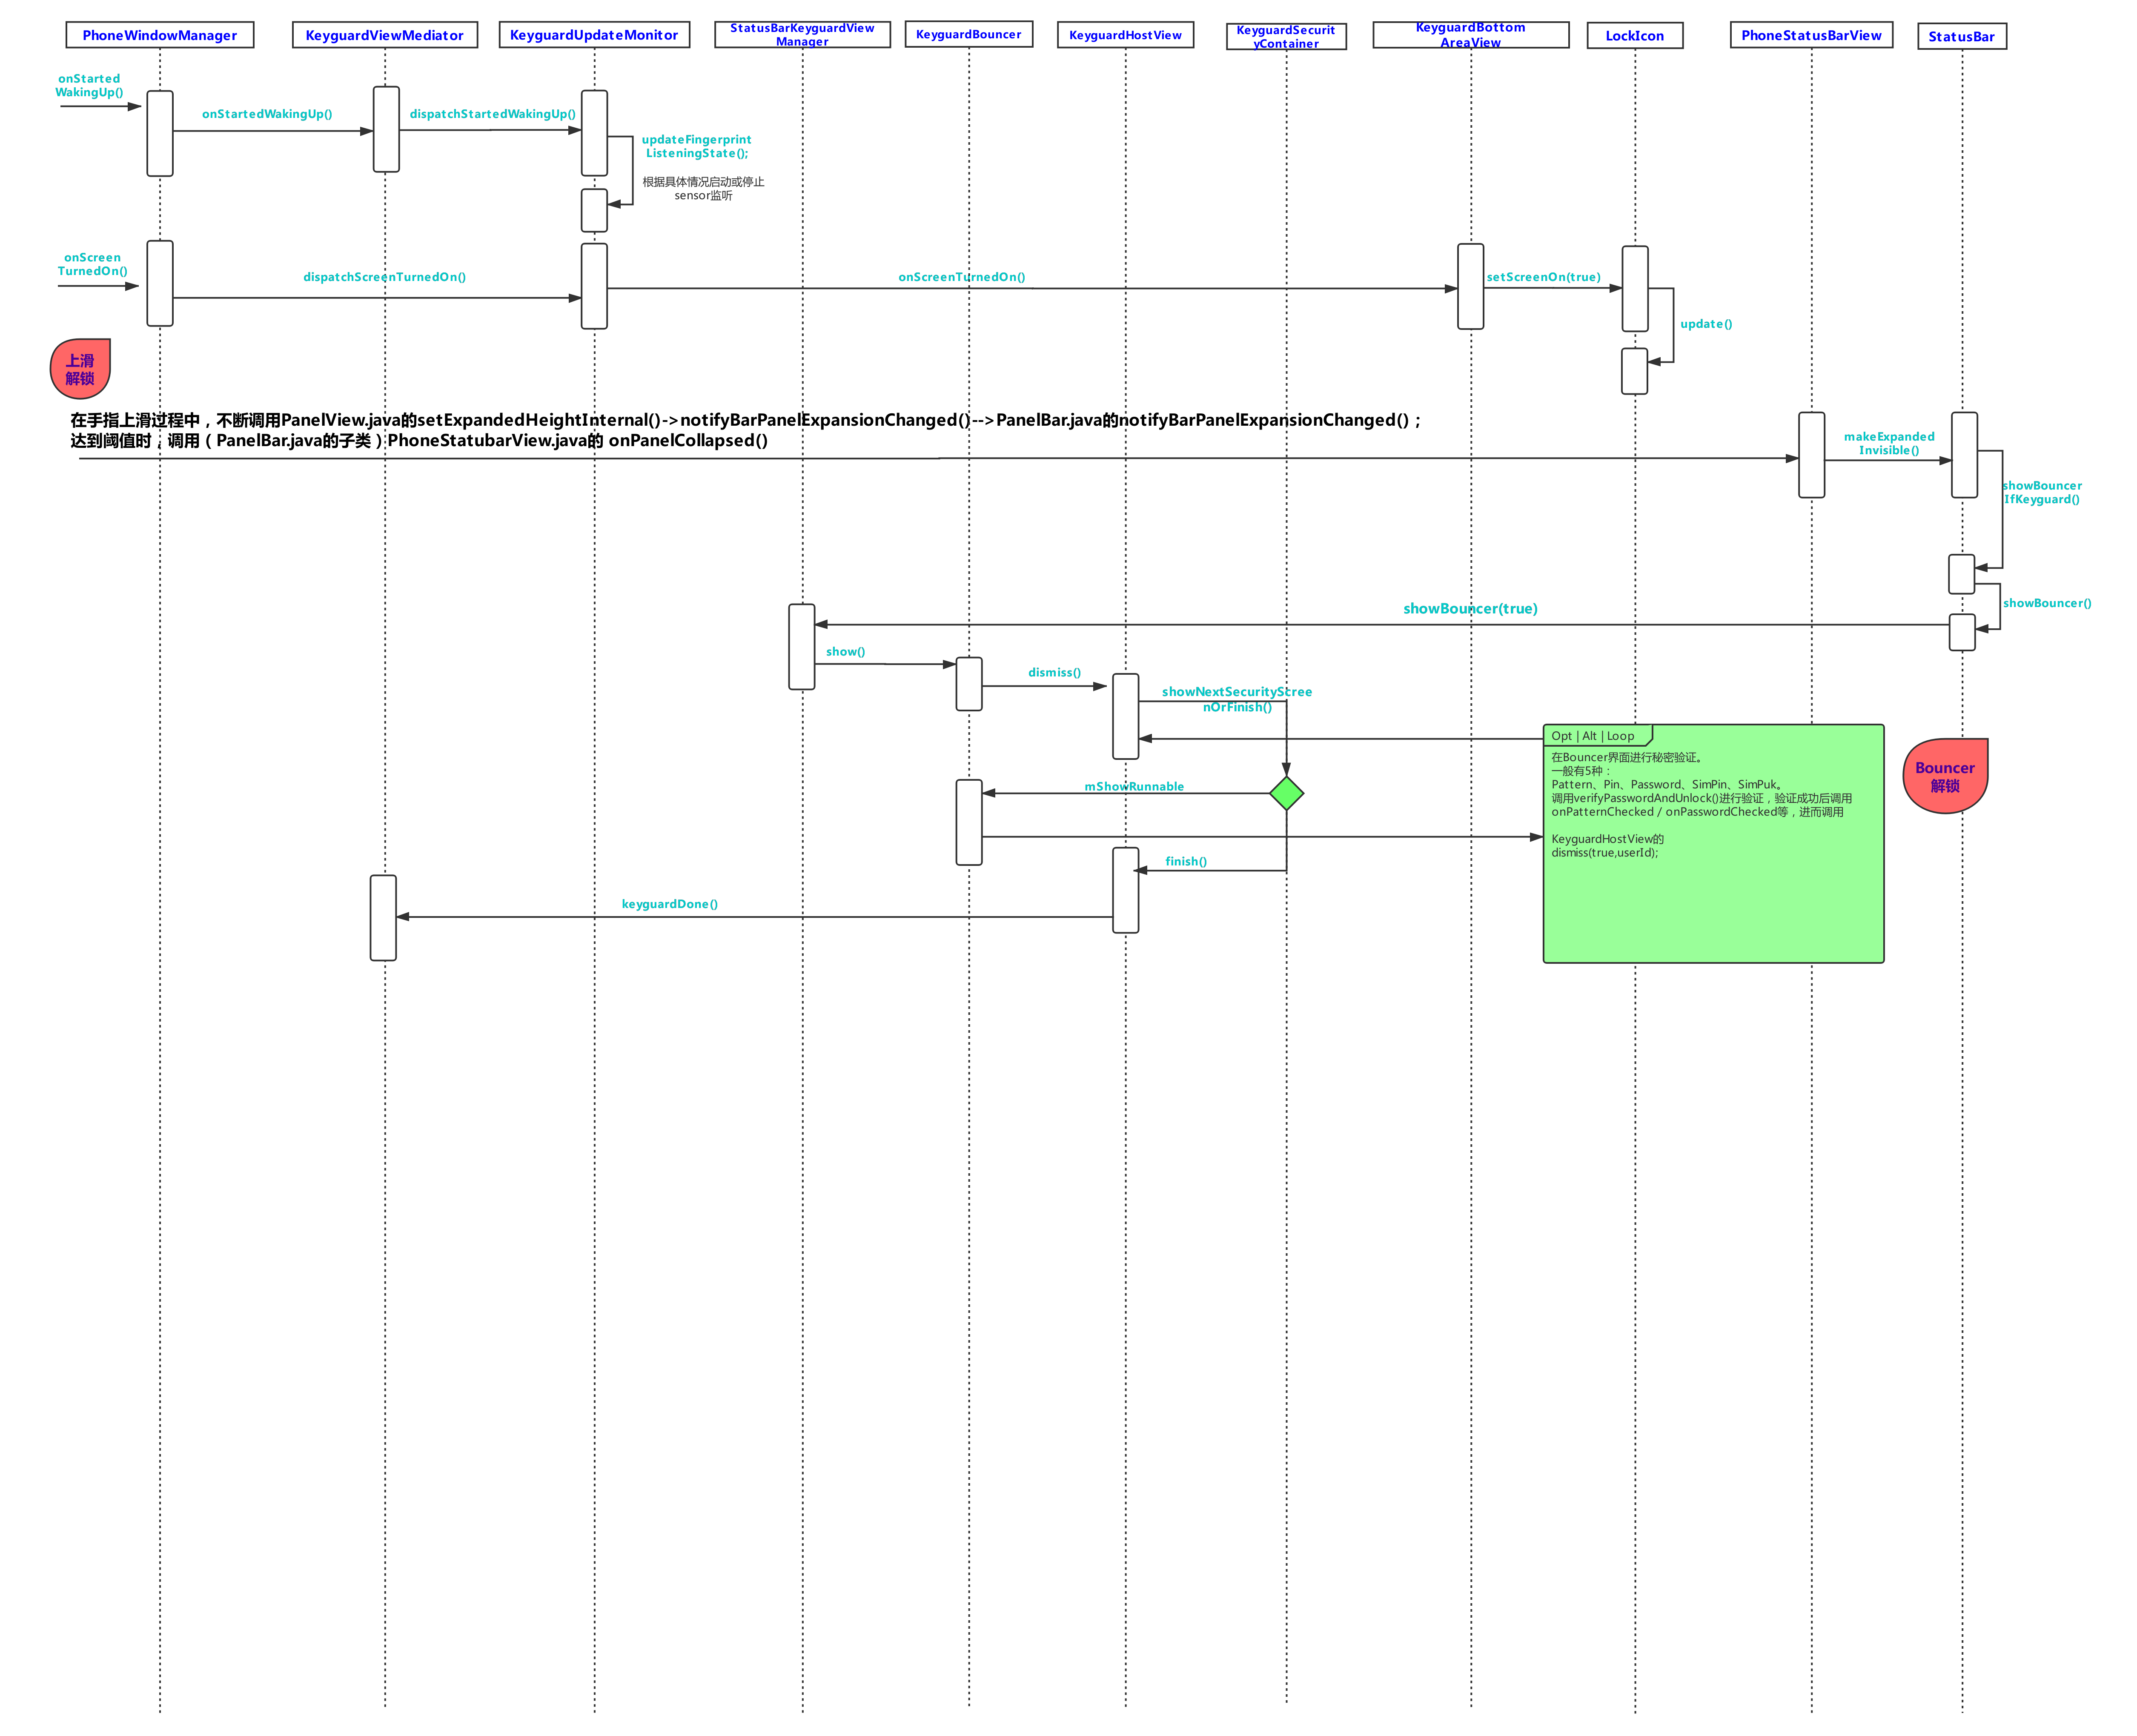
按照流程图跟下去,一般是能看懂的。
这里着重分析一下KeyguardSecurityContainer 的 showNextSecurityScreenOrFinish 方法:
   /**
     * Shows the next security screen if there is one.
     * @param authenticated true if the user entered the correct authentication
     * @param targetUserId a user that needs to be the foreground user at the finish (if called)
     *     completion.
     * @return true if keyguard is done
     */
    boolean showNextSecurityScreenOrFinish(boolean authenticated, int targetUserId) {
        if (DEBUG) Log.d(TAG, "showNextSecurityScreenOrFinish(" + authenticated + ")");
        boolean finish = false;
        boolean strongAuth = false;
        if (mUpdateMonitor.getUserCanSkipBouncer(targetUserId)) {//比如fingerprint解锁就在这里验证为true所以跳过了Bouncer。
            finish = true;
        } else if (SecurityMode.None == mCurrentSecuritySelection) {
        //当前为非安全锁屏界面时,进入。
            SecurityMode securityMode = mSecurityModel.getSecurityMode(targetUserId);
            if (SecurityMode.None == securityMode) {
            //如果用户没有设置密码,进入。
                finish = true; // no security required
            } else {
                showSecurityScreen(securityMode); // switch to the alternate security view,即去显示安全锁屏界面(Bouncer界面)
            }
        } else if (authenticated) {//安全锁屏界面验证密码成功后,会再次调用showNextSecurityScreenOrFinish ,就会来到这里。
            switch (mCurrentSecuritySelection) {
                case Pattern:
                case Password:
                case PIN:
                    strongAuth = true;
                    finish = true;
                    break;

                case SimPin:
                case SimPuk:
                    // Shortcut for SIM PIN/PUK to go to directly to user's security screen or home
                    SecurityMode securityMode = mSecurityModel.getSecurityMode(targetUserId);
                    if (securityMode != SecurityMode.None
                            || !mLockPatternUtils.isLockScreenDisabled(
                            KeyguardUpdateMonitor.getCurrentUser())) {
                        showSecurityScreen(securityMode);
                    } else {
                        finish = true;
                    }
                    break;

                default:
                    Log.v(TAG, "Bad security screen " + mCurrentSecuritySelection + ", fail safe");
                    showPrimarySecurityScreen(false);
                    break;
            }
        }
        if (finish) {
            mSecurityCallback.finish(strongAuth, targetUserId);//mSecurityCallback其实就是KeyguardHostView
        }
        return finish;
    }
所有的解锁方式,最终都会调用KeyguardViewMediator的keyguardDone()方法。其实重点就在如下代码:
    /**
     * Handle message sent by {@link #hideLocked()}
     * @see #HIDE
     */
    private void handleHide() {
        Trace.beginSection("KeyguardViewMediator#handleHide");
        synchronized (KeyguardViewMediator.this) {
            if (DEBUG) Log.d(TAG, "handleHide");

            if (mustNotUnlockCurrentUser()) {
                // In split system user mode, we never unlock system user. The end user has to
                // switch to another user.
                // TODO: We should stop it early by disabling the swipe up flow. Right now swipe up
                // still completes and makes the screen blank.
                if (DEBUG) Log.d(TAG, "Split system user, quit unlocking.");
                return;
            }
            mHiding = true;

            if (mShowing && !mOccluded) {
                mKeyguardGoingAwayRunnable.run();
                //这里面就会完成activity stack的更新,执行完apptransition又会调到handleStartKeyguardExitAnimation
                //(通过PhoneWindowManager内部注册的AppTransitionListener调用startKeyguardExitAnimation())
            } else {
                handleStartKeyguardExitAnimation(
                        SystemClock.uptimeMillis() + mHideAnimation.getStartOffset(),
                        mHideAnimation.getDuration());
            }
        }
        Trace.endSection();
    }
再来一张指纹解锁流程:
指纹解锁分两部分:
1、锁屏的时候,启动指纹sensor监听。
2、指纹sensor监听到及验证指纹正确后的回调。(如果未亮屏,会先wakeup系统)
(流程图里面备注的比较清楚,就不具体阐述了)
版权声明:本文为liyuchong2537631原创文章,遵循CC 4.0 BY-SA版权协议,转载请附上原文出处链接和本声明。