1. 了解Rabbitmq工作原理
消息发送到队列的过程->
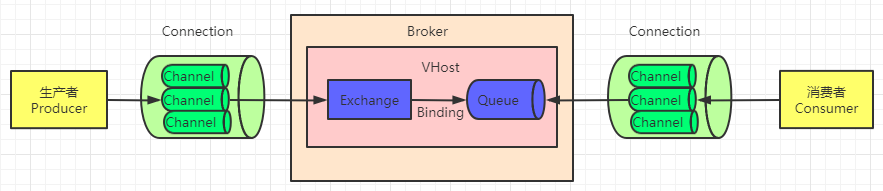
生产者通过Connection建立的channel与rabbitmq的核心Broker进行联系.
生产者生产的消息先由Channel发送到交换机Exchange(如果没指定发到哪个交换机,会有默认的交换机帮忙处理),然后交换机再去和已和他绑定的众多队列中去找指定的队列,找到后消息就存入队列中了.
在消息存入队列之前,路由失败会导致消息丢失,或者消息在未被持久化之前,机器宕机,消息也会丢失,那么只有在消息到达队列之后,并且持久化,再应答ack回给监听器,消息才真正的被保证成功发送.
消费者从队列中消费消息的过程->
消费者通过Connection建立的channel与rabbitmq的核心Broker进行联系.
消费者与Broker建立联系后,会监听交换机绑定的队列,队列中有未被消费者消费的消息,消费者就可以拿来消费.
2. 环境准备
2.1 Dependency: Springboot 2.6.4
        <dependency>
            <groupId>org.springframework.boot</groupId>
            <artifactId>spring-boot-starter-amqp</artifactId>
        </dependency>
        <dependency>
            <groupId>org.springframework.boot</groupId>
            <artifactId>spring-boot-starter-web</artifactId>
        </dependency>
2.2 application.yaml
spring:
  rabbitmq:
    host:
    username:
    password:
    port: 5672
    #消费者监听器
    listener:
      simple:
        #设置消费端手动 ack
        acknowledge-mode: manual
        #消费者 消息预取值 basicQOS
        prefetch: 1
2.3 Consumer
@Component
public class Consumer {

    @Autowired
    RabbitTemplate rabbitTemplate;

    //默认交换机,队列名为hello
    @RabbitListener(queuesToDeclare = @Queue(name = "hello", exclusive = "false", durable = "true", autoDelete = "false"))
    public void String2_1(String mes, Channel channel, Message message) throws Exception {
        System.out.println("Consumer处理hello对列里的消息:  " + mes);
        channel.basicAck(message.getMessageProperties().getDeliveryTag(), false);
    }

    //直连交换机springbootdirect,路由key为thisisroute,队列为临时队列
    @RabbitListener(bindings = {
            @QueueBinding(value = @Queue(),
                    exchange = @Exchange(value = "springbootdirect", type = "direct"),
                    key = {"thisisroute"}
            )
    })
    public void direct(String mes,Channel channel, Message message) throws IOException {
        System.out.println("Consumer处理与direct交换机绑定的队列的消息:  " + mes);
        channel.basicAck(message.getMessageProperties().getDeliveryTag(), false);
    }

}
2.4 TestController
@RestController
public class TestController {
    @Autowired
    RabbitTemplate rabbitTemplate;

       @RequestMapping("/test1")
    public void test1(@RequestParam(defaultValue = "",required = false) String exchange,@RequestParam(defaultValue = "",required = false) String routingKey){
        String msg="这个是test1发的消息,"+new Date();
        //data代表唯一id,创建CorrelationData与消息之间的联系,之后可在confirmCallBack回调函数里通过获取CorrelationData里的id与消息之间的联系来获取消息
        CorrelationData correlationData=new CorrelationData(UUID.randomUUID().toString());
        rabbitTemplate.convertAndSend(exchange,routingKey,msg,correlationData);
    }
}
3. 如何确保消息被发送到交换机
如果消息发送指定了途径的交换机,但交换机不存在,消息最终就肯定不能正确的存入队列
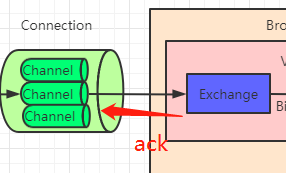
要想保证这一过程能受到我们的监控,我们可以让交换机来告诉我们他有没有收到消息,ack作为标识
消息发送给交换机,交换机收到后应答ack为true,如果ack失败则证明消息丢失.
代码实现则是通过回调函数 rabbitTemplate.setConfirmCallback()来处理逻辑,当消息发送后,ConfirmCallback会监听交换机的ack结果,如果ack失败,证明消息发送失败,之后在回调函数里面中进一步操作来获取我们发送失败的消息,对其进行记录或重发等操作,来保证我们消息发送的可靠性.
(tips : publisher-confirm-type:correlated这个过程是异步的,并不会阻塞)
SpringBoot实现
3.1 application.yaml开启发布确认设置
默认是不会开启 交换机确认消息回调函数的
spring:
  rabbitmq:
    ##开启发布确认  (三种模式)
    #        SIMPLE, 同步确认,单次,批量确认 通过invoke调用
    #            rabbitTemplate.invoke(operations -> {
    #            rabbitTemplate.convertAndSend("", "hello3", msg, new CorrelationData(id));
    #            return rabbitTemplate.waitForConfirms(5000);
    #        });
    #        CORRELATED,异步确认,消息附带CorrelationData
    #        NONE;不开启
    publisher-confirm-type: correlated
3.2 RabbitmqConfig.java编写回调函数逻辑代码
设置rabbitTemplate的ConfirmCallback函数
@Configuration
public class RabbitmqConfig {

    @Bean
    public RabbitTemplate rabbitTemplate(ConnectionFactory connectionFactory) {
        RabbitTemplate rabbitTemplate = new RabbitTemplate();
        rabbitTemplate.setConnectionFactory(connectionFactory);
        rabbitTemplate.setConfirmCallback(new RabbitTemplate.ConfirmCallback() {
            @Override
            public void confirm(CorrelationData correlationData, boolean ack, String cause) {
                if(ack)
                    System.out.println("触发confirm回调函数,交换机接受到了");
                else{
                    System.out.println("触发confirm回调函数,交换机收不到信息,原因:"+cause);
                    System.out.println("消息对应的的CorrelationData id:"+correlationData.getId());
                }
            }
        });
        return rabbitTemplate;
    }
}
3.3 测试
3.3.1 交换机存在,消息发送成功
当消息发给默认交换机(已存在的交换机)里的hello队列时
测试链接:http://localhost:8080/test1?routingKey=hello
控制台输出分析:
1.消息已被Consumer处理,因为流程正确,消息正确进入队列了
2.ConfirmCallback函数被调用,并且ack为true,因为默认的交换机exchange存在,交换机接收消息后ack为true,被回调函数监听到然后输出打印
**Consumer**处理hello对列里的消息:  这个是test1发的消息,Sat Mar 26 15:17:59 CST 2022
confirm回调函数,交换机接受到了
3.3.2 交换机不存在,消息发送失败
当消息发给指定交换机(不存在的交换机)里的hello队列时
测试链接:http://localhost:8080/test1?exchange=abc&routingKey=hello
控制台输出分析:
1.指定的exchange交换机不存在,消息没有被任何一个交换机接受,ack失败,消息发送失败
2.ConfirmCallback函数被调用,并且ack为true,因为默认的交换机exchange存在,交换机接收消息后ack为true,被回调函数监听到然后输出打印了与该消息绑定的唯一id,CorrelationData
confirm回调函数,交换机收不到,原因:channel error; protocol method: #method<channel.close>(reply-code=404, reply-text=NOT_FOUND - no exchange 'abc' in vhost '/', class-id=60, method-id=40)
消息对应的CorrelationData id:4afe2344-ed7a-48cd-99a8-038737b8f55f
3.4消息发送失败后,如何处理
在TestController中发送消息时,我们在发消息时,给消息绑定了一个CorrelationData,里面的id作为消息的唯一标识符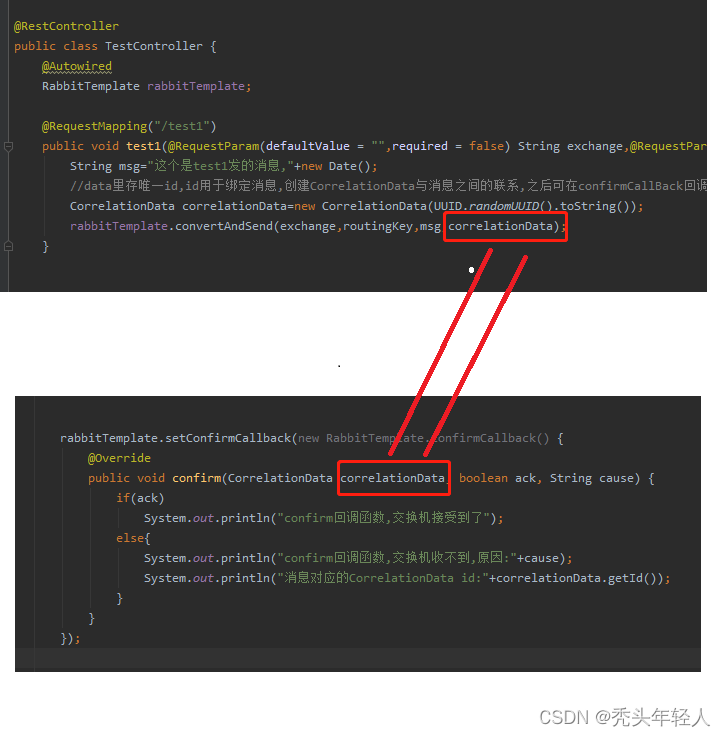
在ConfirmCallback监听中,当消息发送失败,ack失败时,我们又能拿到消息的CorrelationData,所以通过CorrelationData与消息之间的关系,我们在回调函数中通过CorrelationData来获取发送失败的消息,进而对其进行下一步操作(记录或重发等)
发送消息时,如何建立CorrelationData与消息之间的联系
我们可以在发消息之前,将CorrelationData作为key,消息作为value,持久化起来(例如用redis数据库),当消息成功发送到交换机,ack为true时,我们再把他从持久化层中删除,这样的话,当消息发送失败时,我们就可以通过CorrelationData,从持久层中拿到发送失败的消息了
4. 如何确保消息被发送到队列
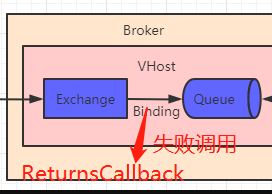
如果消息正确到达exchange交换机,但交换机通过routingKey匹配不到队列,那么消息也会发送失败
此时设置消息发送失败打回,消息就会被打回并被一个回调函数ReturnsCallback监听,当路由不到队列时触发回调,回调中能直接获取到当前消息ReturnedMessage,进而对发送失败的消息进行操作
4.1 application.yaml开启消息失败返回
默认是不会开启 比如路由不到队列时触发回调
spring:
  rabbitmq:
    publisher-returns: true
4.2 RabbitmqConfig.java添加回调函数逻辑代码
开启消息失败返回,设置rabbitTemplate的ReturnsCallback回调函数(最新版为ReturnsCallback,旧版的ReturnCallback不带s的已过期)
//        mandatory:交换器无法根据自身类型和路由键找到一个符合条件的队列时的处理方式
//        true:RabbitMQ会调用Basic.Return命令将消息返回给生产者
//        false:RabbitMQ会把消息直接丢弃
        rabbitTemplate.setMandatory(true);
        rabbitTemplate.setReturnsCallback(new RabbitTemplate.ReturnsCallback() {
            @Override
            public void returnedMessage(ReturnedMessage returnedMessage) {
                System.out.println("return函数收到未路由到队列的回调消息:" + new String(returnedMessage.getMessage().getBody()));
            }
        });
4.3 测试
4.3.1 指定交换机存在,且rutingkey存在,消息发送成功
当消息发给指定交换机(已存在的交换机)里的匹配rutingKey的队列时
测试链接:http://localhost:8080/test1?exchange=springbootdirect&routingKey=thisisroute
控制台输出分析:
1.消息已被Consumer处理,因为流程正确,消息正确进入临时队列了,且被监听的消费者消费
2.ConfirmCallback函数被调用,并且ack为true,因为指定的交换机springbootdirect存在,交换机接收消息后ack为true,被回调函数监听到然后输出打印
confirm回调函数,交换机接受到了id:CorrelationData [id=d7b1f4ab-749c-46f8-996d-39e2495bdbfe]
Consumer处理与direct交换机绑定的队列的消息:  这个是test1发的消息,Sat Mar 26 16:06:24 CST 2022
4.3.2 指定交换机存在,但rutingkey不存在,消息发送失败
当消息发给指定交换机(已存在的交换机)里的匹配rutingKey的队列时
测试链接:http://localhost:8080/test1?exchange=springbootdirect&routingKey=thisisroute1
控制台输出分析:
1.消息已被exchange接收,但交换机通过rutingKey匹配不到对应的队列,因此触发回调函数returnedMessage,并获取到未发送成功的消息.
2.ConfirmCallback函数被调用,顺序在returnedMessage之后.
ack为true,因为指定的交换机springbootdirect存在,交换机接收消息后ack为true,被回调函数监听到然后输出打印
return函数收到未路由到队列的回调消息:这个是test1发的消息,Sat Mar 26 16:10:39 CST 2022
confirm回调函数,交换机接受到了id:CorrelationData [id=a2681850-6bcd-4202-9564-a66b49f3336d]
4.3.4 消息发送失败后,如何处理
回调函数**returnedMessage(ReturnedMessage returnedMessage)**里能直接获取到未发送成功的消息
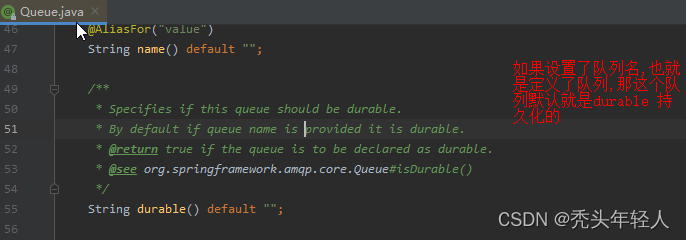
5. 队列持久化
队列持久化durable默认是开启的,但他只保留队列的壳,如果消息没设置持久化,那么宕机后队列里面的消息将丢失,但队列的结构得以保存
@RabbitListener(queuesToDeclare = @Queue(name = "hello", exclusive = "false", durable = "true", autoDelete = "false"))
6. 消息持久化
发消息时,我们可以定义消息是否需要被持久化,如果消息不持久化,rabbitmq宕机后消息将消失
rabbitTemplate.convertAndSend()该方法已帮我们封装好了一些设置,默认情况下,通过该方法发送的消息都将被持久化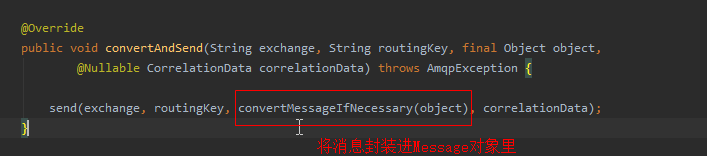
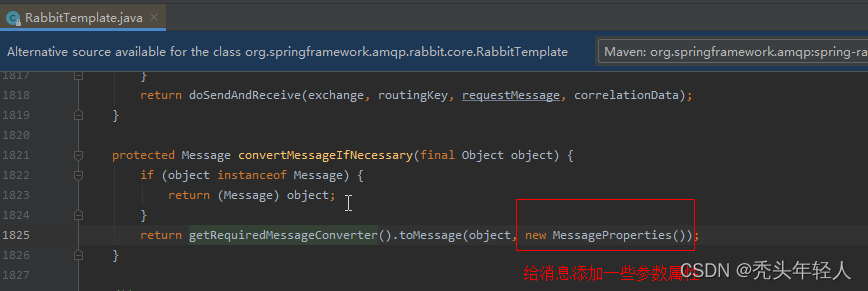


如果不想让消息持久化,可以自己把消息封装进Message,把MessageProperties 里的属性DeliveryMode设置为NON_PERSISTENT
            String id = UUID.randomUUID().toString();
            CorrelationData correlationData = new CorrelationData();
            String msg ="helloword111";
            MessageProperties messageProperties = new MessageProperties();
            messageProperties.setDeliveryMode(MessageDeliveryMode.NON_PERSISTENT);//消息不持久化
            messageProperties.setCorrelationId(id);
            Message message = new Message(msg.getBytes(), messageProperties);
            rabbitTemplate.convertAndSend("springbootdirect", "thisisroute", message,correlationData);