二:EditText简介
EditText是一个非常重要的组件,可以说它是用户和Android应用进行数据传输窗户,有了它就等于有了一扇和Android应用传输的门,通过它用户可以把数据传给Android应用,然后得到我们想要的数据。
EditText是TextView的子类,所以TextView的方法和特性同样存在于EditText中,具体的TextView的介绍可以参考上一节Android系列教程之六:TextView小组件的使用–附带超链接和跑马灯效果
三:长度和空白提示文字,提示文字颜色,是否可编辑等
EditText有一些属性可以设置EditText的特性,比如最大长度,空白提示文字等。
有时候我们有一些特属的需要,要求只能在EditText中输入特定个数的字符,比如身份证号、手机号吗等。这时候就可以通过android:maxLength属性来设置最大输入字符个数,比如android:maxLength=“4”就表示最多能输入4个字符,再多了就输入不进去了。
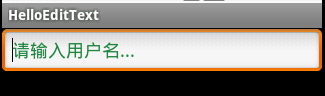
空白提示文字。有时候我们需要说明你定义的这个EditText是做什么用的,比如让输入“用户名”,或者输入“电话号码”等,但是你又不想在EditText前面加一个TextView来说明这是输入“用户名”的,因为这会使用一个TextView,那么怎么办呢?EditText为我们提供了android:hint来设置当EditText内容为空时显示的文本,这个文本只在EditText为空时显示,你输入字符的时候就消失了,不影响你的EditText的文本。。修改main.xml如下:
Xml代码 
- <?xml version\="1.0" encoding\="utf-8"?>
<LinearLayout xmlns:android=“http://schemas.android.com/apk/res/android”
android:orientation=“vertical”
android:layout_width=“fill_parent”
android:layout_height=“fill_parent”
>
<EditText
android:id="@+id/edit_text"
android:layout_width=“fill_parent”
android:layout_height=“wrap_content”
android:maxLength=“40”
android:hint=“请输入用户名…”/>
</LinearLayout>
运行应用就会看到如下的效果:

看看吧,简洁明了还不用新增一个TextView说明,也不影响用户操作。
- 上面列出了空白时的提示文字,有的人说了,我不想要这个灰色的提示文字,和我的应用整体风格不协调,那也行啊,我们可以换颜色,怎么换呢,就是通过android:textColorHint属性设置你想要的颜色。修改main.xml如下:
Xml代码 
- <?xml version\="1.0" encoding\="utf-8"?>
<LinearLayout xmlns:android=“http://schemas.android.com/apk/res/android”
android:orientation=“vertical”
android:layout_width=“fill_parent”
android:layout_height=“fill_parent”
>
<EditText
android:id="@+id/edit_text"
android:l
《Android学习笔记总结+最新移动架构视频+大厂安卓面试真题+项目实战源码讲义》
【docs.qq.com/doc/DSkNLaERkbnFoS0ZF】 完整内容开源分享
ayout_width=“fill_parent”
android:layout_height=“wrap_content”
android:maxLength=“40”
android:hint=“请输入用户名…”
android:textColorHint="#238745"/>
</LinearLayout>
运行程序效果如下:
看到了吧,颜色已经变了。。
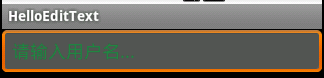
- 还有一个比较实用的功能,就是设置EditText的不可编辑。设置android:enabled="false"可以实现不可编辑,可以获得焦点。这时候我们看到EditText和一个TextView差不多:
- 实现类似html中Textarea的文本域。在Android中没有专门的文本域组件,但是可以通过设置EditText的高来实现同样的文本域功能。修改main.xml如下:
Xml代码 
- <?xml version\="1.0" encoding\="utf-8"?>
<LinearLayout xmlns:android=“http://schemas.android.com/apk/res/android”
android:orientation=“vertical”
android:layout_width=“fill_parent”
android:layout_height=“fill_parent”
>
<EditText
android:id="@+id/edit_text"
android:layout_width=“fill_parent”
android:layout_height=“200dip”/>
</LinearLayout>
运行程序效果如下:

四:输入特殊格式的字符
在我们开发程序的时候不免会输入一些特属个数的字符,比如密码(输入框的字符要加密显示),电话号码(比如数字和-),数字等,这些都算是一些特属格式的字符,强大的EditText同样为我们提供了输入这些特属格式字符的设置。
- 密码文本框。密码输入也是Android应用常用的功能,通过配置EditText的android:password="true"就可以实现这一密码输入功能,修改main.xml如下:
Xml代码 
- <?xml version\="1.0" encoding\="utf-8"?>
<LinearLayout xmlns:android=“http://schemas.android.com/apk/res/android”
android:orientation=“vertical”
android:layout_width=“fill_parent”
android:layout_height=“fill_parent”
>
<EditText
android:id="@+id/edit_text"
android:layout_width=“fill_parent”
android:layout_height=“wrap_content”
android:password=“true”/>
</LinearLayout>
运行效果如下:
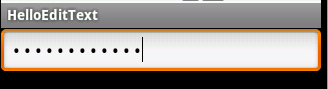
可以看到我们输入的字符已经被“.”这样的掩码所代替。
- 手机中发短信打电话是必不可少的,所以用于专门输入电话号码的文本框也是大有用途,有了他我们对是否是电话号码的校验就容易的多了(因为字符是正确的,只要校验格式 ).通过设置android:phoneNumber="true"就可以把EditText变成只接受电话号码输入的文本框,连软键盘都已经变成拨号专用软键盘了,所以不用再担心输入其他字符了。修改main.xml如下:
Xml代码 
- <?xml version\="1.0" encoding\="utf-8"?>
<LinearLayout xmlns:android=“http://schemas.android.com/apk/res/android”
android:orientation=“vertical”
android:layout_width=“fill_parent”
android:layout_height=“fill_parent”
>
<EditText
android:id="@+id/edit_text"
android:layout_width=“fill_parent”
android:layout_height=“wrap_content”
android:phoneNumber=“true”/>
</LinearLayout>
运行程序效果如下:
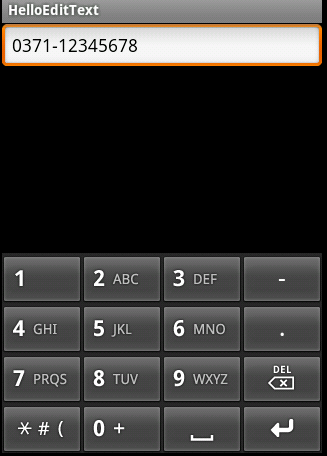
注意看软键盘,已经变成拨号专用的啦.
- 有时候我们只想输入数字,不想输入字母,EditText为我们提供了android:numeric来控制输入的数字类型,一共有三种分别为integer(正整数)、signed(带符号整数)和decimal(浮点数)。这里以signed类型的为例,修改main.xml如下:
Xml代码 
- <?xml version\="1.0" encoding\="utf-8"?>
<LinearLayout xmlns:android=“http://schemas.android.com/apk/res/android”
android:orientation=“vertical”
android:layout_width=“fill_parent”
android:layout_height=“fill_parent”
>
<EditText
android:id="@+id/edit_text"
android:layout_width=“fill_parent”
android:layout_height=“wrap_content”
android:numeric=“signed”/>
</LinearLayout>
运行效果如下:
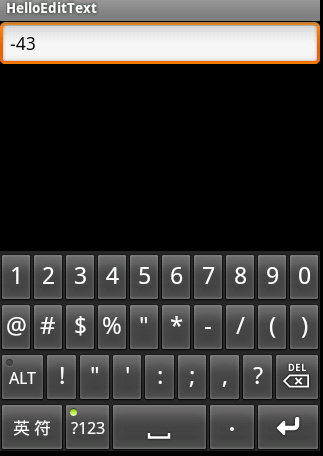
注意这里的软键盘变成“数字键盘”的变化.
五:为文本指定特定的软键盘类型
前面我们通过指定为电话号码特定格式,然后键盘类型变成了拨号专用的键盘,这个是自动变的,其实我们也可以通过android:inputType来设置文本的类型,让输入法选择合适的软键盘的。。android:inputType有很多类型,这里使用date类型来演示,修改main.xml如下:
Xml代码 
- <?xml version\="1.0" encoding\="utf-8"?>
<LinearLayout xmlns:android=“http://schemas.android.com/apk/res/android”
android:orientation=“vertical”
android:layout_width=“fill_parent”
android:layout_height=“fill_parent”
>
<EditText
android:id="@+id/edit_text"
android:layout_width=“fill_parent”
android:layout_height=“wrap_content”
android:inputType=“date”/>
</LinearLayout>
运行效果如下:
六:Enter键图标的设置
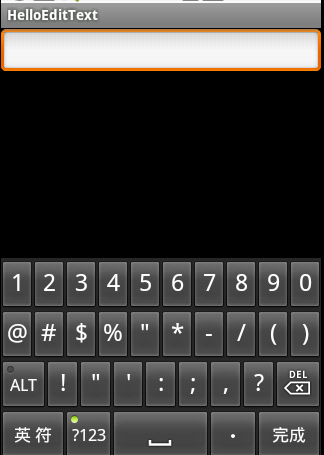
软键盘的Enter键默认显示的是“完成”文本,我们知道按Enter建表示前置工作已经准备完毕了,要去什么什么啦。比如,在一个搜索中,我们输入要搜索的文本,然后按Enter表示要去搜索了,但是默认的Enter键显示的是“完成”文本,看着不太合适,不符合搜索的语义,如果能显示“搜索”两个字或者显示一个表示搜索的图标多好。事实证明我们的想法是合理的,Android也为我们提供的这样的功能。通过设置android:imeOptions来改变默认的“完成”文本。这里举几个常用的常量值:
actionUnspecified 未指定,对应常量EditorInfo.IME_ACTION_UNSPECIFIED.效果:

actionNone 没有动作,对应常量EditorInfo.IME_ACTION_NONE 效果:

actionGo 去往,对应常量EditorInfo.IME_ACTION_GO 效果:

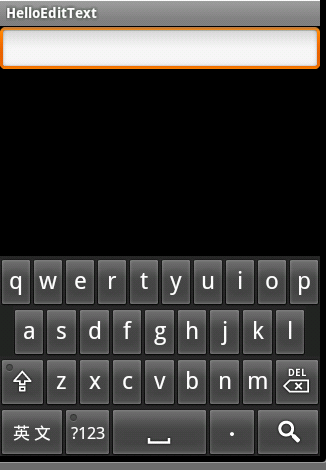
actionSearch 搜索,对应常量EditorInfo.IME_ACTION_SEARCH 效果:

actionSend 发送,对应常量EditorInfo.IME_ACTION_SEND 效果:

actionNext 下一个,对应常量EditorInfo.IME_ACTION_NEXT 效果:

actionDone 完成,对应常量EditorInfo.IME_ACTION_DONE 效果:

下面已搜索为例,演示一个实例,修改main.xml如下:
Xml代码 
- <?xml version\="1.0" encoding\="utf-8"?>
<LinearLayout xmlns:android=“http://schemas.android.com/apk/res/android”
android:orientation=“vertical”
android:layout_width=“fill_parent”
android:layout_height=“fill_parent”
>
<EditText
android:id="@+id/edit_text"
android:layout_width=“fill_parent”
android:layout_height=“wrap_content”
android:imeOptions=“actionSearch”/>
</LinearLayout>
修改HelloEditText如下:
Java代码 
package com.flysnow;
import android.app.Activity;
import android.os.Bundle;
import android.view.KeyEvent;
import android.widget.EditText;
import android.widget.TextView;
import android.widget.Toast;
import android.widget.TextView.OnEditorActionListener;
public class HelloEditText extends Activity {
/** Called when the activity is first created. */
@Override
public void onCreate(Bundle savedInstanceState) {
super.onCreate(savedInstanceState);
setContentView(R.layout.main);
EditText editText=(EditText)findViewById(R.id.edit_text);
editText.setOnEditorActionListener(new OnEditorActionListener() {
@Override
public boolean onEditorAction(TextView v, int actionId, KeyEvent event) {
Toast.makeText(HelloEditText.this, String.valueOf(actionId), Toast.LENGTH_SHORT).show();
return false;
}
});
}
}
运行程序,点击回车(也就是搜索图标软键盘按钮)会显示该actionId.我们上面的每一个设置都会对应一个常量,这里的actionId就是那个常量值。
七:EditText的取值、全选、部分选择、获取选中文本
下面通过一个例子来演示EditText的取值、全选、部分选择和获取选中文本.main.xml修改如下:
Xml代码
- <?xml version\="1.0" encoding\="utf-8"?>
<LinearLayout xmlns:android=“http://schemas.android.com/apk/res/android”
android:orientation=“vertical”
android:layout_width=“fill_parent”
android:layout_height=“fill_parent”
>
<EditText
android:id="@+id/edit_text"
android:layout_width=“fill_parent”
android:layout_height=“wrap_content”
android:imeOptions=“actionSearch”/>
<Button
android:id="@+id/btn_get_value"
android:text=“取值”
android:layout_width=“wrap_content”
android:layout_height=“wrap_content”/>
<Button
android:id="@+id/btn_all"
android:text=“全选”
android:layout_width=“wrap_content”
android:layout_height=“wrap_content”/>
<Button
android:id="@+id/btn_select"
android:text=“从第2个字符开始选择”
android:layout_width=“wrap_content”
android:layout_height=“wrap_content”/>
<Button
android:id="@+id/btn_get_select"
android:text=“获取选中文本”
android:layout_width=“wrap_content”
android:layout_height=“wrap_content”/>
</LinearLayout>
HelloEditText修改如下:
Java代码
package com.flysnow;
import android.app.Activity;
import android.os.Bundle;
import android.text.Editable;
“wrap_content”/>
<Button
android:id="@+id/btn_get_select"
android:text=“获取选中文本”
android:layout_width=“wrap_content”
android:layout_height=“wrap_content”/>
</LinearLayout>
HelloEditText修改如下:
Java代码 [外链图片转存中…(img-6soCgAcn-1640142118282)]
package com.flysnow;
import android.app.Activity;
import android.os.Bundle;
import android.text.Editable;