1,在CentOS7安装epel源,(原服务器上要有php环境以及php的进程管理器php-fpm)
yum -y install epel-release
2,安装phpMyAdmin软件
yum -y install phpmyadmin
3,为了使Nginx Web服务器正确地查找和提供phpMyAdmin文件,我们只需要创建一个从安装文件到我们的Nginx文档根目录的符号链接:
ln -s /usr/share/phpMyAdmin /usr/share/nginx/html
4,配置nginx,如下图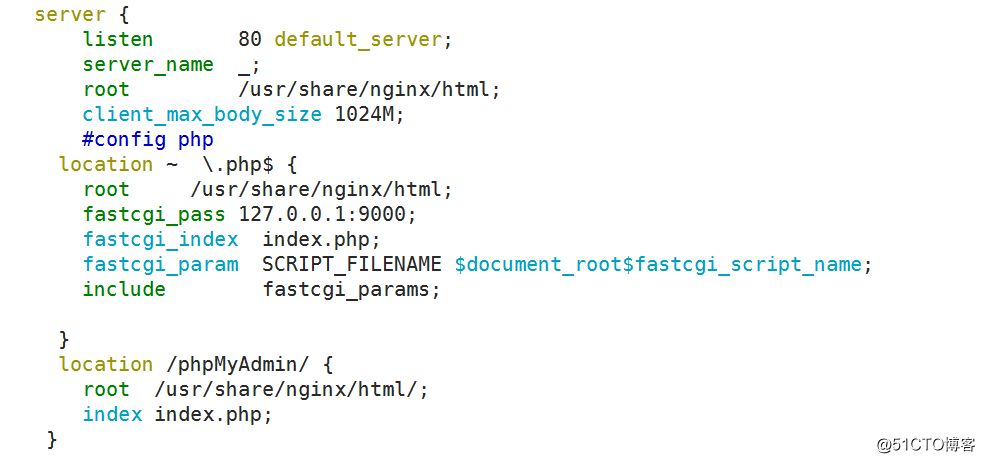
5,重新启动我们的PHP处理器,以确保它可以加载我们安装的额外的PHP模块:
systemctl restart php-fpm
6,这样,我们的phpMyAdmin安装现在可以运行。 要访问该界面中,转至服务器的域名或公网IP地址,后跟/phpMyAdmin ,在网页浏览器
http://server_domain_or_IP/phpMyAdmin

7,我们可以授权我们的mysql数据库服务器对外远程访问
登录mysql数据库
msyql -uyourusername -pyoupassword
mysql > grant all privileges on . to yourMysqlUser@'%' identified by 'your password';
mysql > flush privileges;
mysql > exit;
8,测试并验证
9,若是有多个需要连接的数据库,可以修改phpMyAdmin的配置文件,修改根目录/etc/phpMyAdmin中的config.inc.php配置
$i = 0;
/*
- 服务器A
/
$i++;
/ Authentication type */
$cfg['Servers'][$i]['auth_type'] = 'config';
$cfg['Servers'][$i]['host'] = '127.0.0.1';
$cfg['Servers'][$i]['port'] = '3307';
$cfg['Servers'][$i]['connect_type'] = 'tcp';
$cfg['Servers'][$i]['compress'] = false;
$cfg['Servers'][$i]['extension'] = 'mysqli';
$cfg['Servers'][$i]['user'] = 'root';
$cfg['Servers'][$i]['password'] = '123456';
$cfg['Servers'][$i]['bs_garbage_threshold'] = 50;
$cfg['Servers'][$i]['bs_repository_threshold'] = '32M';
$cfg['Servers'][$i]['bs_temp_blob_timeout'] = 600;
$cfg['Servers'][$i]['bs_temp_log_threshold'] = '32M';
/*
- 服务器B
*/
$i++;
$cfg['Servers'][$i]['auth_type'] = 'config';
$cfg['Servers'][$i]['host'] = '127.0.0.1';
$cfg['Servers'][$i]['port'] = '3308';
$cfg['Servers'][$i]['connect_type'] = 'tcp';
$cfg['Servers'][$i]['compress'] = false;
$cfg['Servers'][$i]['extension'] = 'mysqli';
$cfg['Servers'][$i]['user'] = 'root';
$cfg['Servers'][$i]['password'] = ‘123456';
$cfg['Servers'][$i]['bs_garbage_threshold'] = 50;
$cfg['Servers'][$i]['bs_repository_threshold'] = '32M';
$cfg['Servers'][$i]['bs_temp_blob_timeout'] = 600;
$cfg['Servers'][$i]['bs_temp_log_threshold'] = '32M';
/*
- 服务器C
*/
$i++;
$cfg['Servers'][$i]['auth_type'] = 'config';
$cfg['Servers'][$i]['host'] = '127.0.0.1';
$cfg['Servers'][$i]['port'] = '3306';
$cfg['Servers'][$i]['connect_type'] = 'tcp';
$cfg['Servers'][$i]['compress'] = false;
$cfg['Servers'][$i]['extension'] = 'mysqli';
$cfg['Servers'][$i]['user'] = 'root';
$cfg['Servers'][$i]['password'] = '123456';
$cfg['Servers'][$i]['bs_garbage_threshold'] = 50;
$cfg['Servers'][$i]['bs_repository_threshold'] = '32M';
$cfg['Servers'][$i]['bs_temp_blob_timeout'] = 600;
$cfg['Servers'][$i]['bs_temp_log_threshold'] = '32M';
保存,打开phpmyadmin,在首页就可以看到服务器列表了
10,可参考内容如下
https://www.howtoing.com/how-to-install-and-secure-phpmyadmin-with-nginx-on-a-centos-7-server
转载于:https://blog.51cto.com/13718210/2335177