文章来源:https://mp.weixin.qq.com/s/DZe8CdteyNlMQGJ4nAi-oA
原文作者: forezp
在Matrix-Web项目中使用Mybatis-Plus作为操作数据库的ORM框架。在市面上常用的ORM框架有hibernetes、mybatis、JPA等,那么为什么选择Mybatis-Plus呢?主要基于以下方面考虑:
- 兼容Mybatis,可以轻松写出很复杂的sql和业务逻辑。^_^
- 简单、容易上手,单表操作不需要写mybatis的xml,代码自动生成,可以实现快速开发。
- 基于Mybatis,和Mybatis完全兼容,和Mybatis相比,此框架无性能损耗(号称成为 MyBatis 最好的搭档)
- Mybatis-Plus符合国人开发习惯
- MyBatis-Plus(简称 MP)是一个 MyBatis 的增强工具,在 MyBatis 的基础上只做增强不做改变,为简化开发、提高效率而生。符合本项目的宗旨。
Mybatis特性
- 无侵入:只做增强不做改变,引入它不会对现有工程产生影响,如丝般顺滑
- 损耗小:启动即会自动注入基本 CURD,性能基本无损耗,直接面向对象操作
- 强大的 CRUD 操作:内置通用 Mapper、通用 Service,仅仅通过少量配置即可实现单表大部分 CRUD 操作,更有强大的条件构造器,满足各类使用需求
- 支持 Lambda 形式调用:通过 Lambda 表达式,方便的编写各类查询条件,无需再担心字段写错
- 支持主键自动生成:支持多达 4 种主键策略(内含分布式唯一 ID 生成器 - Sequence),可自由配置,完美解决主键问题
- 支持 ActiveRecord 模式:支持 ActiveRecord 形式调用,实体类只需继承 Model 类即可进行强大的 CRUD 操作
- 支持自定义全局通用操作:支持全局通用方法注入( Write once, use anywhere )
- 内置代码生成器:采用代码或者 Maven 插件可快速生成 Mapper 、 Model 、 Service 、 Controller 层代码,支持模板引擎,更有超多自定义配置等您来使用
- 内置分页插件:基于 MyBatis 物理分页,开发者无需关心具体操作,配置好插件之后,写分页等同于普通 List 查询
- 分页插件支持多种数据库:支持 MySQL、MariaDB、Oracle、DB2、H2、HSQL、SQLite、Postgre、SQLServer2005、SQLServer 等多种数据库
- 内置性能分析插件:可输出 Sql 语句以及其执行时间,建议开发测试时启用该功能,能快速揪出慢查询
- 内置全局拦截插件:提供全表 delete 、 update 操作智能分析阻断,也可自定义拦截规则,预防误操作
Mybatis的结构如下:
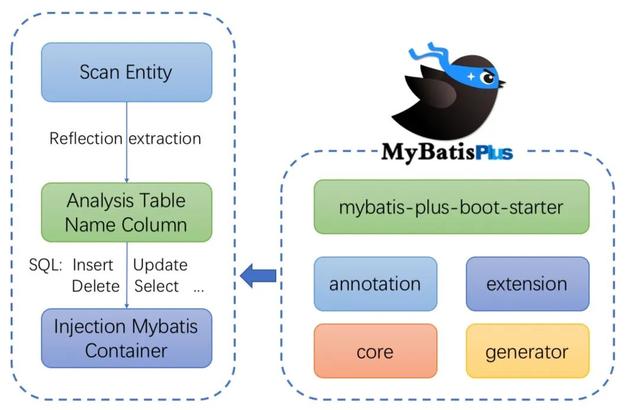
以上部分来源于官网。
Mybatis-Plus代码生成
Myatis-Pluss是在 MyBatis 的基础上只做增强不做改变,为简化开发、提高效率而生。符合本项目快速开发后端管理系统的宗旨。Mybatis-Plus提供了生成代码的插件,能够读取数据库里面的表,生成对应的实体类、Mapper类、写SQL的xml、Service类等,其中Mapper类和Service类具有操作单表CRUD能力,不需要额外写Sql语句。对于复杂的多表操作,还是需要写SQL语句。
sql语句准备
在数据库areis中,准备以下的sys_user表的数据,如下:
DROP TABLE IF EXISTS `sys_user`;CREATE TABLE `sys_user` ( `id` bigint(20) NOT NULL AUTO_INCREMENT COMMENT '用户编号', `user_id` varchar(50) NOT NULL COMMENT '用户名', `password` varchar(80) NOT NULL COMMENT '密码,需加密存储', `realname` varchar(20) DEFAULT NULL COMMENT '真实姓名', `type` tinyint(3) DEFAULT '0' COMMENT '类型,1管理员 2.员工 3.普通用户', `mobile` varchar(30) DEFAULT NULL COMMENT '手机号', `email` varchar(50) DEFAULT NULL COMMENT '邮箱', `remarks` varchar(255) DEFAULT NULL COMMENT '备注', `status` tinyint(1) DEFAULT '1' COMMENT '0停用1启用2锁定', `avatar` varchar(255) DEFAULT NULL COMMENT '用户头像', `create_time` datetime DEFAULT NULL COMMENT '注册时间', `create_by` varchar(50) DEFAULT NULL COMMENT '创建人id', `update_time` datetime DEFAULT NULL COMMENT '更新时间', `update_by` varchar(50) DEFAULT NULL COMMENT '更新人', `sex` int(2) DEFAULT '1', PRIMARY KEY (`id`), KEY `USERNAME_IDX` (`user_id`), KEY `REALNAME_IDX` (`realname`), KEY `idx_mobile` (`mobile`)) ENGINE=InnoDB AUTO_INCREMENT=2 DEFAULT CHARSET=utf8 ROW_FORMAT=DYNAMIC COMMENT='用户';添加生成代码的依赖
Matrix-Web项目的代码生成模块为matrix-gen-code。在工程的pom文件加上代码生成的相关依赖,包括连接数据库依赖mysql-connector-java、代码生成模块mybatis-plus-generator、模板引擎依赖,代码如下:
org.springframework.boot spring-boot-starter-jdbc mysql mysql-connector-java runtimeorg.springframework.boot spring-boot-starter-freemarker com.baomidou mybatis-plus-generator 3.1.2org.apache.velocity velocity-engine-core 2.1生成代码逻辑
Mybatis-Plus生成代码的逻辑比较简单,直接贴出源码,不再讲解。
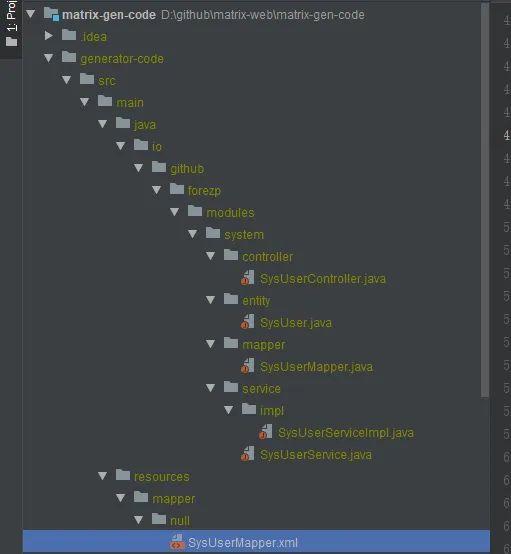
public class MysqlGenerator { public static String[] tableNames={"sys_user"}; public static String packageName="io.github.forezp.modules.system"; /** * RUN THIS */ public static void main(String[] args) { // 代码生成器 AutoGenerator mpg = new AutoGenerator(); // 全局配置 GlobalConfig gc = new GlobalConfig(); String projectPath = System.getProperty("user.dir"); gc.setOutputDir(projectPath + "/generator-code/src/main/java"); gc.setAuthor("forezp"); gc.setOpen(false); gc.setDateType(DateType.ONLY_DATE); gc.setFileOverride(true); gc.setBaseColumnList(true); gc.setBaseResultMap(true); gc.setServiceName("%sService"); mpg.setGlobalConfig(gc); // 数据源配置 DataSourceConfig dsc = new DataSourceConfig(); dsc.setUrl("jdbc:mysql://127.0.0.1:3306/aries?useUnicode=true&characterEncoding=utf8&tinyInt1isBit=false&useSSL=false&serverTimezone=GMT"); // dsc.setSchemaName("public"); dsc.setDriverName("com.mysql.jdbc.Driver"); dsc.setUsername("root"); dsc.setPassword("123456"); mpg.setDataSource(dsc); // 包配置s PackageConfig pc = new PackageConfig();// pc.setModuleName(scanner("模块名")); pc.setParent(packageName); pc.setController("controller"); pc.setEntity("entity"); mpg.setPackageInfo(pc); // 自定义配置 InjectionConfig cfg = new InjectionConfig() { @Override public void initMap() { // to do nothing } }; List focList = new ArrayList<>(); focList.add(new FileOutConfig("/templates/mapper.xml.ftl") { @Override public String outputFile(TableInfo tableInfo) { // 自定义输入文件名称 return projectPath + "/generator-code/src/main/resources/mapper/" + pc.getModuleName() + "/" + tableInfo.getEntityName() + "Mapper" + StringPool.DOT_XML; } }); cfg.setFileOutConfigList(focList); mpg.setCfg(cfg); mpg.setTemplate(new TemplateConfig().setXml(null)); // 策略配置 StrategyConfig strategy = new StrategyConfig(); strategy.setNaming(NamingStrategy.underline_to_camel); strategy.setColumnNaming(NamingStrategy.underline_to_camel); strategy.setSuperEntityClass("io.github.forezp.common.base.BaseEntity"); strategy.setEntityLombokModel(true); strategy.setCapitalMode(true); strategy.setEntitySerialVersionUID(true); strategy.setNaming(NamingStrategy.underline_to_camel); strategy.setInclude(tableNames);//修改替换成你需要的表名,多个表名传数组 // strategy.setSuperControllerClass("io.github.forezp.modules.common.BaseController"); strategy.setSuperEntityColumns("id", "create_by", "create_time", "update_by", "update_time"); strategy.setControllerMappingHyphenStyle(true); strategy.setTablePrefix(pc.getModuleName() + "_"); mpg.setStrategy(strategy); // 选择 freemarker 引擎需要指定如下加,注意 pom 依赖必须有! mpg.setTemplateEngine(new FreemarkerTemplateEngine()); mpg.execute(); }}运行上面代码的Main方法,生成了实体类SysUser、SysUserMapper、SysUserService、SysUserServiceImpl、SysUserMapper.xml、SysUserController,代码就不再这里展示。
Spring Boot集成Mybatis-Plus
在Matrix-Web的后端代码模块matrix-web-backend,matrix-web-backend为Spring Boot工程,现在来讲解如何在Spring Boot中引入Mybatis-Plus。需要说明的是Matrix-Web后端采用Sharding-Jdbc、Druid、Mybatis-Plus三个组件作为操作数据库的框架,本篇文章之讲述如何Spring Boot集成Mybatis-Plus,后面的文章会讲述Sharding-Jdbc和Druid。
在工程的pom文件引入Mybatis-Plus的起步依赖,版本为3.1.2,代码如下:
com.baomidou mybatis-plus-boot-starter ${mybatisplus.spring.boot.version}在工程的配置文件appliaction.yml做mybatis-plus的相关配置,其中datasource为数据源,mapper-locations配置的是在存放mapper.xml的位置,typeAliasesPackage配置实体类的包地址,还有其他配置,具体看代码注释。全部配置如下:
mybatis-plus: datasource: dataSource mapper-locations: classpath:/mapper/*Mapper.xml #实体扫描,多个package用逗号或者分号分隔 typeAliasesPackage: io.github.forezp.modules.system.entity typeEnumsPackage: io.github.forezp.modules.system.entity.enums global-config: db-config: id-type: id_worker capital-mode: true #主键类型 0:"数据库ID自增", 1:"用户输入ID",2:"全局唯一ID (数字类型唯一ID)", 3:"全局唯一ID UUID"; id-type: 2 #字段策略 0:"忽略判断",1:"非 NULL 判断"),2:"非空判断" field-strategy: 2 #驼峰下划线转换 db-column-underline: true #刷新mapper 调试神器 refresh-mapper: true #数据库大写下划线转换 #capital-mode: true #序列接口实现类配置 #key-generator: com.baomidou.springboot.xxx #逻辑删除配置 logic-delete-value: 0 logic-not-delete-value: 1 #自定义填充策略接口实现# meta-object-handler: com.baomidou.springboot.xxx #自定义SQL注入器 #sql-injector: com.baomidou.springboot.xxx configuration: map-underscore-to-camel-case: true cache-enabled: false log-impl: org.apache.ibatis.logging.stdout.StdOutImpl在springBoot工程的启动文件SpringBootServletInitializer配置Mybtis的MapperScan的包名,配置了就会自动扫描Mapper,并注入到spring ioc容器里面。代码如下:
@SpringBootApplication@MapperScan({"io.github.forezp.modules.system.mapper" ,"io.github.forezp.modules.task.mapper","io.github.forezp.modules.activiti.mapper","io.github.forezp.modules.personnel.mapper"})public class AriesApplication extends SpringBootServletInitializer { public static void main(String[] args) { SpringApplication.run(AriesApplication.class, args); }}将上一小节自动生成的代码,SysUser、SysUserMapper、SysUserService、SysUserServiceImpl、SysUserMapper.xml、SysUserController,放在相关的包下面,启动SpringBoot工程。这样Spring Boot整合mybatis-plus就整合好了。
总结
这篇文章主要讲述了如何使用Mybatis-Plus生成代码,然后讲解如何在Spring Boot中整合使用Mybatis-Plus。下篇文章将讲述如何使用Mybatis-Plus的自动填充功能和分页功能。
对了,在这里说一下,我目前是在职Java开发,如果你现在正在学习Java,了解Java,渴望成为一名合格的Java开发工程师,在入门学习Java的过程当中缺乏基础入门的视频教程,可以关注并私信我:01。获取。我这里有最新的Java基础全套视频教程。