车辆计数系统
主要内容:
1、目标检测:背景差分法
2、目标跟踪:DeepSort跟踪算法
3、计数器:多线程定时计数
1车流量计数系统设计
为了能够实时准确地对交通路口地车流量进行统计,在本论文中,首先,我们采用背景差分法对进入交通路口摄像头中的车辆进行检测,由于环境光等干扰因素的影响,会导致不同目标重叠在一起,这将大大降低本系统的检测效果,因此,我们需要对每帧图像进行形态学预处理,消除干扰;其次,使用Deepsort跟踪算法对检测出来的车辆进行跟踪,为了避免目标被遮挡后ID跳变引起的计数不准确的问题,我们采用卡尔曼滤波算法通过当前时刻车辆的运动方向、运动速度等数据预测出车辆下一帧或下几帧可能出现的区域,然后通过提取目标特征并与消失前的特征进行余弦距离度量,将满足阈值的目标恢复其消失前的ID。最后,我们通过计算单位时间内增加的ID数来统计交通路口地车流量。因此,车流量计数系统设计主要分为车辆检测模块、车辆跟踪计数模块
1.1车辆检测模块
对于车辆检测模块,主要由背景建模、差分计算、形态学处理以及框出目标组成。具体流程如下:
第一步:使用KNN背景建模对前20帧图像进行背景建模。通过调用Python-opencv中的createBackgroundSubtractorKNN函数构建背景模型,便于后面的前景提取,具体程序如下:
def build_subtractor(self, history):
bs = cv2.createBackgroundSubtractorKNN(detectShadows=False) # 背景减除器,设置阴影检测
bs.setHistory(history)
return bs
def train(self, frame): # 背景建模
if self.count == self.history:
return True
else:
fg_mask = self.bs.apply(frame) # 获取 foreground mask
self.count += 1
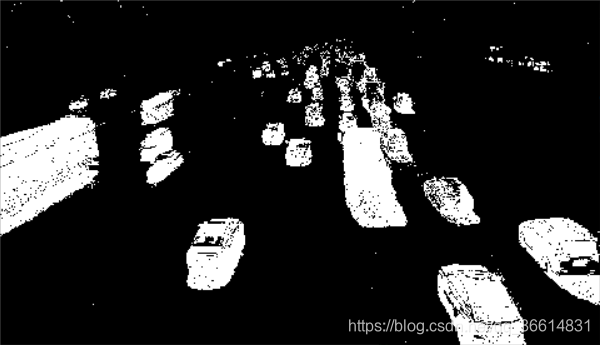
return False第二步,通过当前帧与背景模型做减法,提取当前帧中的运动目标,如图1.1;
第三步,对第二步中提取的运动目标进行形态学处理,并提取出运动目标位置,同时,使用标记框标记运动目标,实验效果如图1.2所示。
    def detect(self, frame):  #   检测
        fg_mask = self.bs.apply(frame)   # 获取 foreground mask

        # 对原始帧进行膨胀去噪
        th = cv2.threshold(fg_mask.copy(), 244, 255, cv2.THRESH_BINARY)[1]
        th = cv2.erode(th, cv2.getStructuringElement(cv2.MORPH_ELLIPSE, (1, 1)), iterations=2)
        dilated = cv2.dilate(th, cv2.getStructuringElement(cv2.MORPH_ELLIPSE, (2, 2)), iterations=2)
        # 获取所有检测框
        image, contours, hier = cv2.findContours(fg_mask, cv2.RETR_EXTERNAL, cv2.CHAIN_APPROX_SIMPLE)

        boxes = []
        cv2.imshow("fg_mask", fg_mask)
        cv2.imshow("dilated", dilated)
        for c in contours:
            # 获取矩形框边界坐标
            x, y, w, h = cv2.boundingRect(c)
            if y < self.detection_area[1] or x < self.detection_area[0] or y > self.detection_area[3]:continue  # 排除计数区域之外的目标干扰
            # 计算矩形框的面积
            area = cv2.contourArea(c)
            if 500 < area:
                boxes.append([x, y, w, h])

        return boxes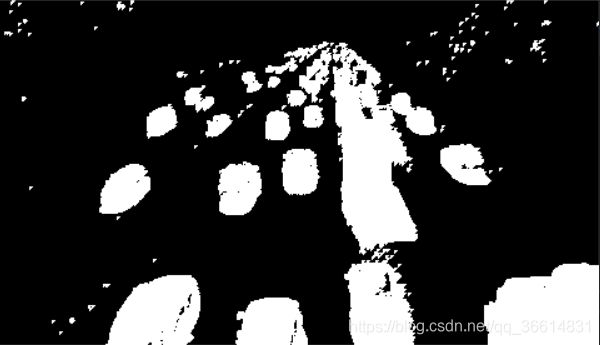
1.2车辆跟踪计数模块
1.2.1轨迹处理与状态估计
(1)状态估计: 使用一个8维空间去刻画轨迹在某时刻的状态,分别表示bounding box中心的位置、纵横比、高度、以及在图像坐标中对应的速度信息。然后使用一个卡尔曼滤波器预测更新轨迹,该卡尔曼滤波器采用匀速模型和线性观测模型。其观测变量为
(2)轨迹处理:这个主要说轨迹什么时候终止、什么时候产生新的轨迹。首先对于每条轨迹都有一个阈值a用于记录轨迹从上一次成功匹配到当前时刻的时间。当该值大于提前设定的阈值 则认为改轨迹终止,直观上说就是长时间匹配不上的轨迹认为已经结束。然后在匹配时,对于没有匹配成功的检测都认为可能产生新的轨迹。但由于这些检测结果可能是一些错误警告,所以对这种情形新生成的轨迹标注状态'tentative' ,然后观查在接下来的连续若干帧(论文中是3帧)中是否连续匹配成功,是的话则认为是新轨迹产生,标注为'confirmed',否则则认为是假性轨迹,状态标注为'deleted'
class KalmanFilter(object):
def __init__(self):
ndim, dt = 4, 1.
# Create Kalman filter model matrices.
self._motion_mat = np.eye(2 * ndim, 2 * ndim)
for i in range(ndim):
self._motion_mat[i, ndim + i] = dt
self._update_mat = np.eye(ndim, 2 * ndim)
self._std_weight_position = 1. / 20
self._std_weight_velocity = 1. / 160
1.2.2运动信息关联
1)使用平方马氏距离来度量预测track的Kalman状态(BBOX的几何位置)和新到来detection之间的距离;
2)使用cosine距离来度量各个track的appearance feature(128维)和detection feature之间的距离,来跟准确地预测ID;
3)引入两个二值函数来限制assignment矩阵,分别比较平方马氏距离以及cosine距离和阈值的大小来进行判断,将两个函数结合起来对矩阵进行限制;
4)使用combined距离来作为cost matrix进行度量各个track和detection之间的距离,这里文中只使用cosine距离进行度量(即将lambda设置为0),使用马氏距离排除不可能的情况,既基于由卡尔曼滤波器推断的可能的物体位置忽略不可行的分配。
1.2.3级联匹配
本文还提出了一种级联匹配的策略来提高匹配精度,主要由于当一个目标被遮挡很长时间,Kalman滤波的不确定性就会大大增加,并会导致连续预测的概率弥散,假设本来协方差矩阵是一个正态分布,那么连续的预测不更新就会导致这个正态分布的方差越来越大,那么离均值欧氏距离远的点可能和之前分布中离得较近的点获得同样的马氏距离值。
在最后阶段,使用之前SORT算法中的IOU关联去匹配n=1的unconfirmed和unmatched的轨迹。这可以缓解因为表观突变或者部分遮挡导致的较大变化。效果图如图3所示。
def _cosine_distance(a, b, data_is_normalized=False):
if not data_is_normalized:
a = np.asarray(a) / np.linalg.norm(a, axis=1, keepdims=True)
b = np.asarray(b) / np.linalg.norm(b, axis=1, keepdims=True)
return 1. - np.dot(a, b.T)

2.程序运行结果及分析
程序参数设置
(1)设置感兴趣区域(RIO)的范围
# 计数区域,当目标离开该区域后将不再被跟踪 [x,y,w,h]
detection_area=[60,int(frame.shape[0]/3),frame.shape[1],frame.shape[0]-70]
(2)设置检测目标的大小
# 获取矩形框边界坐标
x, y, w, h = cv2.boundingRect(c)
if y < self.detection_area[1] or x < self.detection_area[0] or y > self.detection_area[3]:continue # 排除计数区域之外的目标干扰
# 计算矩形框的面积
area = cv2.contourArea(c)
if 500 < area:
boxes.append([x, y, w, h])
如果具矩形框的面积超过了我们设置的500,那么就会将这个矩形框中的数据[x, y, w, h],记录下来,并会赋予其一个 Track ID,即为一个车辆信息。
(3)设置检验时间间隔
Intervals = 5 # 设置时间间隔,单位:秒
task("车辆计数", tracker, Intervals)
2.2程序运行效果
为了观察本次设计的效果,本人在网上找了一段测试视频,因为视频时间过短,所以设置了循环播放测试视频,并且每5秒记录通过感兴趣区域的车辆。效果还是很不错的,再图片2-1中的计数情况还是很不错的。
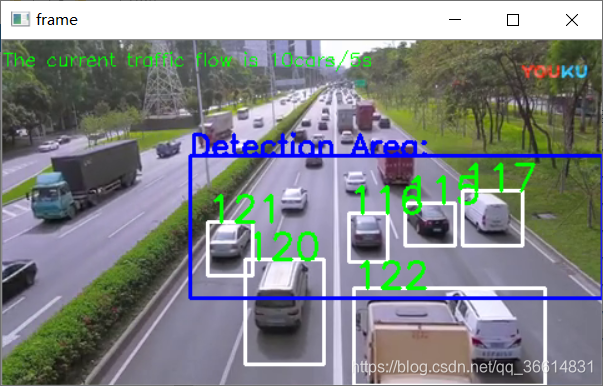
图5-1 程序测试图
main文件(main.py)
import numpy as np

import cv2

#  deepsort为跟踪模块
from deep_sort import preprocessing  # 加载deepsort的处理模块
from deep_sort import nn_matching  # 加载deepsort的匹配模块
from deep_sort.detection import Detection  # 加载deepsort的检测数据处理模块
from deep_sort.tracker import Tracker   # 加载deepsort的跟踪模块
from tools import generate_detections as gdet  # 加载deepsort的gdet模块

from detection import BackgroundSubtractor  # 加载背景差分法模块
import threading  # 加载多线程模块

counting = 0
pre_id = 1
# 设计多线程循环定时器任务
def task(name, tracker, t):
    global timer
    global counting
    global pre_id
    print("启动%s" %name)

    counting = tracker._next_id - pre_id  # 车辆数量为跟踪标记ID的最大值

    pre_id = tracker._next_id

    timer = threading.Timer(t, task, args=("车辆计数",tracker,t))

    timer.start()

    #counting = int(num_cars/t)  # 时间为t,车辆数量为num_cars,int(num_cars/t)为单位时间内流通的汽车数量


def main():
    cap = cv2.VideoCapture(0)  #  选择视频输入模式为读取视频
    # Definition of the parameters
    max_cosine_distance = 0.3  # 最大余弦距离
    nn_budget = None
    nms_max_overlap = 1.0  # 设置非极大抑制的最大重叠度

   # 加载deep_sort模型
    model_filename = 'model_data/mars-small128.pb'
    encoder = gdet.create_box_encoder(model_filename,batch_size=1)  # 创建deepsort编码器

    metric = nn_matching.NearestNeighborDistanceMetric("cosine", max_cosine_distance, nn_budget)  # 创建deepsort距离度量
    tracker = Tracker(metric)  #  创建跟踪器

    # 加载视频文件 or 打开摄像头
    video = '1587029839833.mp4'
    camera = cv2.VideoCapture(video)

    #camera = cv2.VideoCapture(0)  # 更改这段注释,将视频输入改为由0号摄像头输入

    # 创建背景差分的检测器
    res, frame = camera.read()
    detection_area = [120, int(frame.shape[0]/3),frame.shape[1], frame.shape[0]-70]  # 计数区域,当目标离开该区域后将不再被跟踪
    detector = BackgroundSubtractor(detection_area,history=500)

    Intervals = 5 # 设置时间间隔,单位:秒
    task("车辆计数", tracker, Intervals)
    global counting
    while(1):

        # 读取视频序列
        res, frame = camera.read()
        if not res:
            camera = cv2.VideoCapture(video)
            res, frame = camera.read()
            #break
        if not detector.train(frame):continue


        boxs = detector.detect(frame) # 检测当前帧中的运动目标
        features = encoder(frame,boxs)  #  提取特征

        detections = [Detection(bbox, 1.0, feature) for bbox, feature in zip(boxs, features)] # 处理检测数据

        # Run non-maxima suppression.
        boxes = np.array([d.tlwh for d in detections])  # 得到标记框,格式为[x,y,w,h]
        scores = np.array([d.confidence for d in detections])   # 得到当前检测框中的目标与上一帧中丢失目标的置信度

        # 恢复跟踪丢失目标的ID
        indices = preprocessing.non_max_suppression(boxes, nms_max_overlap, scores)
        detections = [detections[i] for i in indices]

        # Call the tracker
        tracker.predict()  # 跟踪器开始预测目标可能出现的位置范围
        tracker.update(detections)  # 更新当前检测框中的目标ID

        # 在视频中标记出每一个成功跟踪的目标(车辆)
        for track in tracker.tracks:
            if not track.is_confirmed() or track.time_since_update > 1:  # 排除干扰
                continue
            bbox = track.to_tlbr() # 得到标记框坐标,格式为[x,y,w,h]
            cv2.rectangle(frame, (int(bbox[0]), int(bbox[1])), (int(bbox[2]), int(bbox[3])),(255,255,255), 2)  # 绘制方框
            cv2.putText(frame, str(track.track_id),(int(bbox[0]), int(bbox[1])),0, 5e-3 * 200, (0,255,0),2)  #标上ID

        cv2.putText(frame, "The current traffic flow is {}cars/{}s".format(counting, Intervals),(0, 20),0, 0.5, (0,255,0),1) # 显示车流量
        #cv2.rectangle(frame, tuple(detection_area[:2]), tuple(detection_area[2:]), (255, 0, 0), 2)
        #cv2.putText(frame, "Detection Area:",(detection_area[0],detection_area[1]),0, 0.8, (255,0,0),2)
        cv2.imshow('frame',frame)  #  显示图像

        k = cv2.waitKey(3)&0xff  #  等待时间/ms

        if k == 27:  #  退出键值
            break

    cap.release()
    cv2.destoryAllWindows()

if __name__ == '__main__':
    main()
detector文件(detector.py)
import cv2

class BackgroundSubtractor():
    def __init__(self, detection_area, history):
        super(BackgroundSubtractor, self).__init__()
        self.detection_area = detection_area  #  检测区域
        self.history = history  # 设置训练帧数
        self.bs = self.build_subtractor(history=history)  # 建立背景差分器
        self.count= 0

    def build_subtractor(self, history):
        bs = cv2.createBackgroundSubtractorKNN(detectShadows=False)  # 背景减除器,设置阴影检测
        bs.setHistory(history)
        return bs

    def train(self, frame):  #  背景建模
        if self.count == self.history:
            return True
        else:
            fg_mask = self.bs.apply(frame)   # 获取 foreground mask
            self.count += 1
            return False


    def detect(self, frame):  #   检测
        fg_mask = self.bs.apply(frame)   # 获取 foreground mask

        # 对原始帧进行膨胀去噪
        th = cv2.threshold(fg_mask.copy(), 244, 255, cv2.THRESH_BINARY)[1]
        th = cv2.erode(th, cv2.getStructuringElement(cv2.MORPH_ELLIPSE, (1, 1)), iterations=2)
        dilated = cv2.dilate(th, cv2.getStructuringElement(cv2.MORPH_ELLIPSE, (2, 2)), iterations=2)
        # 获取所有检测框
        image, contours, hier = cv2.findContours(fg_mask, cv2.RETR_EXTERNAL, cv2.CHAIN_APPROX_SIMPLE)

        boxes = []
        cv2.imshow("fg_mask", fg_mask)
        cv2.imshow("dilated", dilated)
        for c in contours:
            # 获取矩形框边界坐标
            x, y, w, h = cv2.boundingRect(c)
            if y < self.detection_area[1] or x < self.detection_area[0] or y > self.detection_area[3]:continue  # 排除计数区域之外的目标干扰
            # 计算矩形框的面积
            area = cv2.contourArea(c)
            if 500 < area:
                boxes.append([x, y, w, h])

        return boxes


#  测试
if __name__ == '__main__':
    video = '1587029839833.mp4'
    camera = cv2.VideoCapture(video)
    res, frame = camera.read()
    detector = BackgroundSubtractor(detection_area = [100, int(frame.shape[0]/3),frame.shape[1], frame.shape[0]-50],history=500)

    while True:
            res, frame = camera.read()
            if not res:
                camera = cv2.VideoCapture(video)
                res, frame = camera.read()
                #break
            if not detector.train(frame):continue
            boxes = detector.detect(frame)

            #cv2.rectangle(frame, (100, int(frame.shape[0]/3)), (frame.shape[1], frame.shape[0]-70), (0, 255, 0), 2)
            for box in boxes:
                x,y,w,h = box
                cv2.rectangle(frame, (x, y), (x + w, y + h), (0, 255, 0), 2)

            cv2.imshow("detection", frame)
            if cv2.waitKey(30) & 0xff == 27:
                break

    camera.release()
    cv2.destroyAllWindows()